
TL;DR: Want to level up your Git skills? Check out the top 10 essential commands, including git init and git clone, to streamline your development workflow and boost productivity.
Git is open-source software and distributed version control system. It helps developers easily handle different versions of a source code. With it, you can know who did what, when, and why. Nowadays, Git has become a must-have tool for any developer, and knowing Git commands is essential for developers to use Git to its full potential. There are hundreds of Git commands, but only a few significant commands are used regularly.
In this article, you will learn the most helpful Git commands that will take you to the next level in development:
#1 git init
The git init command lets us create a new Git repository. This is the first command to start a new project in a GitHub repository. Go to the directory that contains your project files and run the git init command. A hidden .git subdirectory will be added to it.
Usage
$ git init |
You can also provide a repository name with the git init command.
$ git init <your repository name> |

#2 git clone
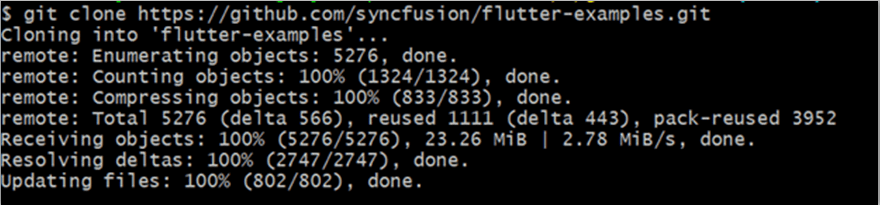
git clone creates a local working copy of the source code from a remote repository. When you clone a repository, the code will be automatically downloaded to your machine.
This command will add the original location as a remote location so you can pull changes from it and push changes to it if you have permission.
Usage
$ git clone <git-repo-url> |
#3 git branch
git branch lets us add a new branch to an existing branch, view all existing branches, and delete a branch.
Usage
Create a new branch locally:
$ git branch <branch-name> |
List all the local and remote branches:
$ git branch -a |
View all branches and see which branch you’re currently working on:
$ git branch or $ git branch --list |
Delete a branch:
$ git branch -d <branch-name> |
Rename a branch:
git branch -m <branch-name> <new-branch-name> |
![]()

#4 git checkout
The git checkout command allows us to switch to an existing branch or create and switch to a new branch. To achieve this, the branch you want to switch to should be present in your local system and the changes in your current branch should be committed or stashed before you make the switch. You can also use this command to check out the files.
Usage
Switch to an existing branch:
git checkout <branch-name> |
Create and switch to a new branch:
git checkout -b <new-branch-name> |
![]()
#5 git add
The git adds command adds your changes in a file to the staging area where you can compare your local version and the version on the remote repository.
Before you commit your new or modified file, it should be added to the staging area by using the git add command.
Usage
Add specific files:
$ git add <file-name-1> <file-name-2> |
Add all new, modified, and deleted files:
$ git add -A |
Add modified and deleted files:
$ git add -u |

#6 git commit
git commit saves the changes in your local repository. Every time you commit your code changes, you have to include a brief description of the changes made. This commit message helps others understand the changes that have been done.
Usage
Commit any files added with the git add command and files that have been changed since then:
$ git commit -a |
Note: After running the above command, the default editor will open to provide a commit message.
Commit files with a message:
$ git commit -m “<commit-message>” |
You can replace the two previous commands with the following single command:
$ git commit -am “<commit-message>” |
Modify the last commit with the latest changes as a new commit:
$ git commit --amend -m “<commit-message>" |

#7 git push
The git push command pushes the committed file changes from the local repository to the remote repository so others can use them. It will also create a named branch in the remote repository if it does not exist.
Usage
$ git push or $ git push <remote> <branch-name> |
If your branch is a newly created one, then you need to push the branch using the following command:
git push --set-upstream <remote> <branch-name>or git push -u origin <branch-name> |
 #8 git pull
git pull fetches the last uploaded changes from the remote server into the local repository so that you can have the latest updates from your teammates.
Usage
$ git pull or $ git pull <remote> or $ git pull <remote> <branch-name> |
 #9 git merge
The git merge command merges your branch with the parent branch. The parent branch can either be a development or master branch depending on your workflow.
It will automatically create a new commit if there are no conflicts. Before running the git merge command, you should be on the specific branch you want to merge with your parent branch.
Usage
Switch to the branch that you want to merge everything in:
$ git checkout <branch> |
Note: Before merging, you should update your local development/master branch. This is because your teammates might have merged into the parent branch while you were working on your branch.
Command to fetch the latest updates:
$ git pull or git fetch |
If there are no conflicts while pulling the updates, you can merge your branch into the parent branch.
Merge your branch:
$ git merge <branch-name> |
 #10 git status
git status provides an overview of the current status of your repository.
Usage
$ git status |
It returns the following information about your branch:
- Your current branch name.
- Whether your current branch is up to date or not.
- Number of commits that your branch is behind its remote branch.
- Changes that are staged and to be committed.
- Changes that are not staged for commit.
- Un-tracked files.
 Conclusion
Thanks for reading! In this blog, we have learned some of the most important Git commands to enhance your productivity. Try these Git commands in your day-to-day coding life and let us know if you have any concerns in the comments section below!
Syncfusion has 1,800 components and frameworks for WinForms, WPF, WinUI, ASP.NET (MVC, Core), UWP, .NET MAUI, Xamarin, Flutter, JavaScript, Angular, Blazor, Vue, and React. Use them to boost your application development speed.
For existing customers, the new version of our frameworks is available for download from the License and Downloads page. If you are not yet a Syncfusion customer, you can try our 30-day free trial to check out our available features. Also, you can try our samples from this GitHub location.
You can also contact us through our support forums, support portal, or feedback portal. We are always happy to assist you!
 No spam, just valuable updates.