
Why security in ASP.NET Core matters more than ever
Security in ASP.NET has come a long way, from basic authentication in classic ASP.NET to the robust, flexible systems available in ASP.NET Core today. With the .NET 10 release, the core principles remain solid, though it’s always worth checking for updates.
That’s why locking down your app is non-negotiable. It’s the only way to shield your users, your data, and your reputation from threats that can escalate fast.
The two questions that decide your app’s security
Every secure ASP.NET Core app must answer exactly two questions correctly, every time:
- Who is the user? (Authentication)
- What are they allowed to do? (Authorization)
If you confuse these concepts or blur the distinctions, security holes appear quickly. We’ll walk through both using a realistic scenario, a Blog API with different user roles and permissions:
- Anyone can read posts.
- Logged‑in users can comment.
- Admins can create or delete posts.
Simple rules. Powerful lessons. Ready to secure your ASP.NET Core app? Let’s dive in and put these principles to work.
The basics: Authentication and authorization
Authentication verifies who a user is, like logging in with credentials. Authorization determines what the user can do. ASP.NET Core supports both via middleware and schemes configured in Program.cs.
The authentication middleware (UseAuthentication()) runs early in the pipeline to establish the user’s identity as a ClaimsPrincipal, which authorization then uses to make decisions.
Building a solid foundation early makes everything smoother. With that groundwork in mind, let’s explore how ASP.NET Core processes requests and the different authentication and authorization types you’ll encounter.
Step-by-step flow of involving requests in ASP.NET Core
The following are the steps for authentication and authorization to obtain a protected resource.
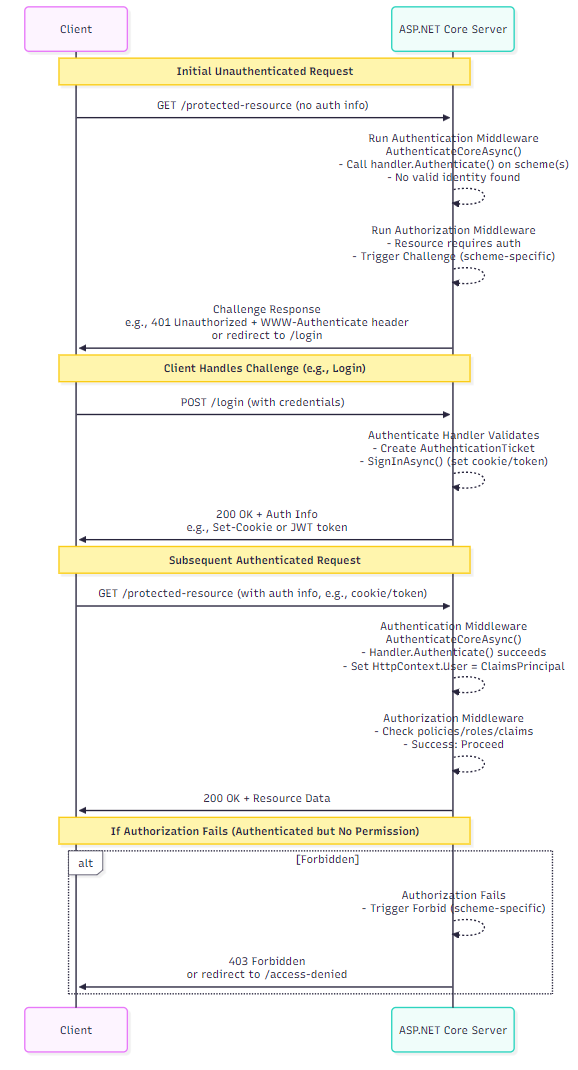
- First request (Unauthenticated access attempt):
- The client sends a request to a protected endpoint (e.g., GET /protected-resource).
- The request contains no valid authentication information (e.g., no cookies, tokens, or headers).
- The server’s authentication middleware
(AuthenticateCoreAsync())runs:- Calls the handler’s
AuthenticateAsync()method for the scheme(s). - No valid identity is found, so no
ClaimsPrincipalis created.
- Calls the handler’s
- The authorization middleware then checks and fails.
- Since the resource requires authentication, authorization fails.
- Handler then issues a challenge, depending on the scheme:
- For APIs/SPAs: Often a 401 unauthorized response with WWW-Authenticate header (e.g., “Bearer” for JWT).
- For web apps: Redirect (302) to a login page (e.g., /login).
- At this point, no
ClaimsPrincipalexists yet, because the user has not been authenticated.
- Second request (login/authentication):
- The client responds to the earlier challenge by attempting to authenticate:
- Prompts the user for credentials (username/password, etc.).
- Sends a new request, e.g., POST /login or POST /token with those credentials.
- The server’s authentication middleware runs again:
- Handler’s
AuthenticateAsync()validates credentials (e.g., by checking against a database or an external provider). - If the credentials are valid, the server creates a
AuthenticationTicketcontaining the user’s claims. - The handler then calls the
SignInAsync()method to persist the identity (e.g., sets a cookie or issues a JWT token). - ASP.NET Core sets
HttpContext.Userto the newly createdClaimsPrincipal.
- Handler’s
- The server returns a success status (200 OK) and an authentication artifact (a cookie/token) for the client to use in future requests.
- Now, the
ClaimsPrincipalis established on the server for this session.
- The client responds to the earlier challenge by attempting to authenticate:
- Subsequent requests (With auth):
- The client now includes authentication information (e.g., an authorization header with a token or a cookie).
- The authentication middleware authenticates successfully.
- A valid
ClaimsPrincipalis populated immediately.
- Authorization checks pass, then the resource is served.
- No additional login requests needed until the session expires.
- The client now includes authentication information (e.g., an authorization header with a token or a cookie).
The following sequence diagram illustrates the client and server-side flows:
Types of authentication and when to use them
ASP.NET Core supports a variety of authentication policy schemes via middleware. Here’s a grouped overview:
- ASP.NET Core identity: It provides a complete, integrated system for managing users, roles, and claims with seamless persistence via Entity Framework Core. It supports modern authentication capabilities, including passkeys for passwordless login, two-factor authentication, and external logins. Use it when you need a full-featured identity system for web apps.
- Azure authentication: It allows you to federate identities with Microsoft Entra ID (formerly Azure AD) using OpenID Connect (OIDC). This approach provides a single sign-on (SSO) and delivers enterprise-grade security for cloud and hybrid apps. It’s the ideal choice when your app needs to support organizational accounts or integrate with Microsoft 365.
- Cookie authentication: It provides a stateful session authentication mechanism for web apps. The server issues an encrypted authentication cookie that stores the user’s identity, and the browser automatically sends it with each request. This allows the server to rebuild the user’s identity across the session. This method works well for traditional MVC apps where session continuity is important.
- OIDC web authentication: OpenID Connect (OIDC) is used when your web app needs to authenticate users through external identity providers such as Google and Microsoft. The OIDC middleware handles the full flow for you, including redirects, token exchange, and user profile retrieval. It’s the standard for modern federated authentication in web apps.
- JWT Bearer authentication: It is designed for stateless APIs. The client sends a JSON Web Token in the authorization header, and the server validates it without maintaining session state. This method is lightweight and ideal for microservices and SPA backends.
- Certificate authentication: Use client certificates to establish identity via mutual TLS authentication. The server validates the client’s certificate, ensuring strong identity verification. This approach is common in high-security environments like banking or government systems.
- Windows authentication: It is used for intranet apps in which users are a part of an Active Directory domain. It relies on protocols such as Kerberos or NTLM to automatically authenticate users. This method is perfect for internal enterprise apps.
- WS-federation authentication: It enables integration with ADFS or Microsoft Entra ID for federated identity. Although it predates modern protocols like OIDC, it remains widely used in legacy enterprise systems. It supports single sign-on (SSO) across multiple apps.
- Social authentication: It uses OAuth for providers like Google, Facebook, or GitHub. This allows users to log in with their existing social accounts, improving convenience and reducing password fatigue.
Authentication considerations
Let’s explore the key considerations below:
- Policy schemes: They allow us to combine multiple authentication methods within the same app. For example, we might use Google OAuth to handle sign‑in challenges while using cookie authentication to maintain the session afterward. This approach gives us the flexibility to blend external identity providers with local session management, resulting in a smooth, consistent experience across hybrid authentication flows.
- Mapping, customizing, and transforming claims: Standardize user identity information by adjusting or transforming claims within middleware or authorization handlers. This includes mapping external provider claims, such as email or role, into the format your app expects, or adding custom claims required for business logic. These transformations ensure consistent identity data and make it easier to evaluate authorization policies across different identity sources.
- Community OSS options: Use open‑source frameworks to handle advanced identity, multi‑tenancy, and authentication needs without building everything yourself. For multi‑tenancy, we can rely on tools like Orchard Core, ABP Framework, or Finbuckle.MultiTenant. For identity and authentication, popular open‑source providers include Duende IdentityServer, OpenIddict, the FIDO2 .NET Library, and WebAuthn. These solutions help us implement standards such as OAuth2, OpenID Connect, and passwordless authentication efficiently and consistently.
- Multi-Factor authentication (MFA): We can enhance account security by verifying a user’s identity with multiple factors (2FA). Common options include authenticator apps (such as Microsoft Authenticator), passkeys/FIDO2 for passwordless login, or SMS-based codes for an additional verification step. MFA greatly reduces the likelihood of account compromise and is an essential layer in modern authentication strategies.
Types of authorization (Where most apps quietly fail)
Authorization in ASP.NET Core builds on the ClaimsPrincipal established during authentication. Each authorization decision relies on the claims contained within that principal, allowing for flexible, fine‑grained access control.
The following are the primary authorization approaches that leverage the ClaimsPrincipal model.
- Role-based authorization (RBAC): Checks whether the authenticated user belongs to a specific role before granting access. Roles represent pre-defined sets of permissions, such as Admin, Manager, or User, making this approach simple and effective when your app has a clear role hierarchy.
- Claims-based authorization: This method evaluates specific claims attached to a user’s identity to decide what they can access. Claims are simple key-value attributes representing user details (e.g., “CanComment = true” in our Blog API, enabling commenting privileges). This approach provides more precise and flexible control than basic roles, allowing permissions to be tailored to specific attributes and scenarios.
- Policy-based authorization: This approach allows us to define custom authorization policies that combine specific requirements and handlers to enforce complex business rules. For example, in a Blog API, we might enforce a policy requiring a “
CanComment = true” claim plus a minimum age check via a custom handler for commenting eligibility. It offers high flexibility, making it ideal for advanced scenarios such as external validations, multi‑step checks, or conditional access logic. - Resource-based authorization: This method performs authorization checks directly against a specific resource, usually within controllers or services. For example, in a Blog API, you can use IAuthorizationService to confirm that the authenticated user owns a post before allowing it to be deleted. This approach is especially effective when permissions depend on resource attributes, such as ownership, rather than general roles or claims.
- View-based authorization: This approach applies authorization rules directly in the UI layer, allowing Razor or Blazor views to show or hide components based on the user’s permissions. For example, in a Blog API’s Blazor frontend, you could use the
AuthorizeViewcomponent to display a “Delete Post” button only to admins. This improves usability by tailoring the interface to each user and preventing sensitive actions from appearing to unauthorized users.
Authorization considerations
The following considerations strengthen our overall authorization model and prepare the foundation for more advanced scenarios:
- Authorization policy providers: Dynamic policy loading. Use this when a large range of policies is needed.
- Limit identity by scheme: Use scheme-specific identities when multiple authentication schemes are configured. This provides secure isolation for each scheme and improves code readability and maintainability by clearly indicating which scheme applies to each resource.
- Customize the behavior of AuthorizationMiddleware: Override the default behavior of ASP.NET Core’s AuthorizationMiddleware to handle authorization failures in a custom way. Instead of simply returning a 403 or redirecting to a login page, we can return custom responses (e.g., JSON error messages for APIs), log additional details, or trigger specific workflows. This flexibility is useful for tailoring the user experience and meeting app-specific requirements.
- Dependency injection in requirement handlers: ASP.NET Core lets us inject services directly into custom authorization requirement handlers. This allows us to access app services, such as databases, logging, and external APIs, while evaluating authorization logic. Using dependency injection creates modular, testable, and maintainable handlers without hardcoding dependencies.
Deep dive: JWT Bearer authentication with policy-based authorization in ASP.NET Core Web API
Let’s build a Blog API with anonymous reads, authenticated comments, and admin posts. The API uses JWT for stateless authentication and policy-based authorization for flexible rules (e.g., age checks or custom logic). This approach scales well for modern APIs.
If you’re new to creating a minimal API with ASP.NET Core, review the basics in the guide.
Setup (Program.cs)
Install the following packages:
- Microsoft.AspNetCore.Authentication.JwtBearer.
- Microsoft.AspNetCore.Identity.EntityFrameworkCore.
- Microsoft.EntityFrameworkCore.SqlServer.
using Microsoft.AspNetCore.Authentication.JwtBearer;
using Microsoft.AspNetCore.Authorization;
using Microsoft.AspNetCore.Identity;
using Microsoft.AspNetCore.Identity.EntityFrameworkCore;
using Microsoft.EntityFrameworkCore;
using Microsoft.IdentityModel.Tokens;
using System.IdentityModel.Tokens.Jwt;
using System.Security.Claims;
using System.Text;
using System.Text.Json.Serialization;

var builder = WebApplication.CreateBuilder(args);

builder.Services.Configure<Microsoft.AspNetCore.Http.Json.JsonOptions>(options =>
    options.SerializerOptions.PropertyNameCaseInsensitive = true
);

builder.Services.AddDbContext<ApplicationDbContext>(options =>
    options.UseSqlServer(builder.Configuration.GetConnectionString("DefaultConnection"))
);

builder.Services.AddIdentity<IdentityUser, IdentityRole>()
    .AddEntityFrameworkStores<ApplicationDbContext>()
    .AddDefaultTokenProviders();

// JWT Authentication
var jwtSettings = builder.Configuration.GetSection("JwtSettings");
builder.Services.AddAuthentication(JwtBearerDefaults.AuthenticationScheme)
    .AddJwtBearer(options =>
    {
        options.TokenValidationParameters = new TokenValidationParameters
        {
            ValidateIssuer = true,
            ValidIssuer = jwtSettings["Issuer"],
            ValidateAudience = true,
            ValidAudience = jwtSettings["Audience"],
            ValidateLifetime = true,
            ClockSkew = TimeSpan.Zero, // stricter expiration
            IssuerSigningKey = new SymmetricSecurityKey(Encoding.UTF8.GetBytes(jwtSettings["Key"]))
        };
    });

// Policy-Based Authorization
builder.Services.AddAuthorization(options =>
{
    options.AddPolicy("AdminPolicy",
        policy => policy.RequireRole("Admin")
    );
    options.AddPolicy("CommentPolicy", policy =>
    {
        policy.RequireClaim("CanComment", "true");
        policy.Requirements.Add(new MinimumAgeRequirement(18));  // Custom requirement
    });
});
builder.Services.AddSingleton<IAuthorizationHandler, MinimumAgeHandler>();

var app = builder.Build();

if (app.Environment.IsDevelopment())
{
    app.MapOpenApi();
}

app.UseAuthentication();
app.UseAuthorization();
app.UseHttpsRedirection();
//Add Endpoints here
app.Run();
Custom requirement/handler
In a scenario where only users above the age of 18 are eligible to comment on the blog, you can implement a custom authorization requirement and handler to enforce this rule:
public class MinimumAgeRequirement : IAuthorizationRequirement
{
    public int MinimumAge { get; }
    public MinimumAgeRequirement(int minimumAge) => MinimumAge = minimumAge;
}

public class MinimumAgeHandler : AuthorizationHandler<MinimumAgeRequirement>
{
    protected override Task HandleRequirementAsync(AuthorizationHandlerContext context, MinimumAgeRequirement requirement)
    {
        var dateOfBirthClaim = context.User.FindFirst(c => c.Type == "DateOfBirth");
        if (dateOfBirthClaim == null) return Task.CompletedTask;

        var dateOfBirth = Convert.ToDateTime(dateOfBirthClaim.Value);
        var age = DateTime.Today.Year - dateOfBirth.Year;
        if (age >= requirement.MinimumAge) context.Succeed(requirement);

        return Task.CompletedTask;
    }
}
Now, create a test user and login Endpoint (Generate JWT) as shown below.
app.MapPost("/create-test-user", async (UserManager<IdentityUser> userManager) =>
{
var user = new IdentityUser
{
UserName = "[email protected]",
Email = "[email protected]",
EmailConfirmed = true
};
var result = await userManager.CreateAsync(user, "YourStrongPassword123!");
if (result.Succeeded)
{
await userManager.AddToRoleAsync(user, "Admin");
await userManager.AddClaimAsync(user, new Claim("CanComment", "true"));
await userManager.AddClaimAsync(user, new Claim("DateOfBirth", "2000-01-01"));
return Results.Ok("Test user created");
}
return Results.BadRequest(result.Errors);
});
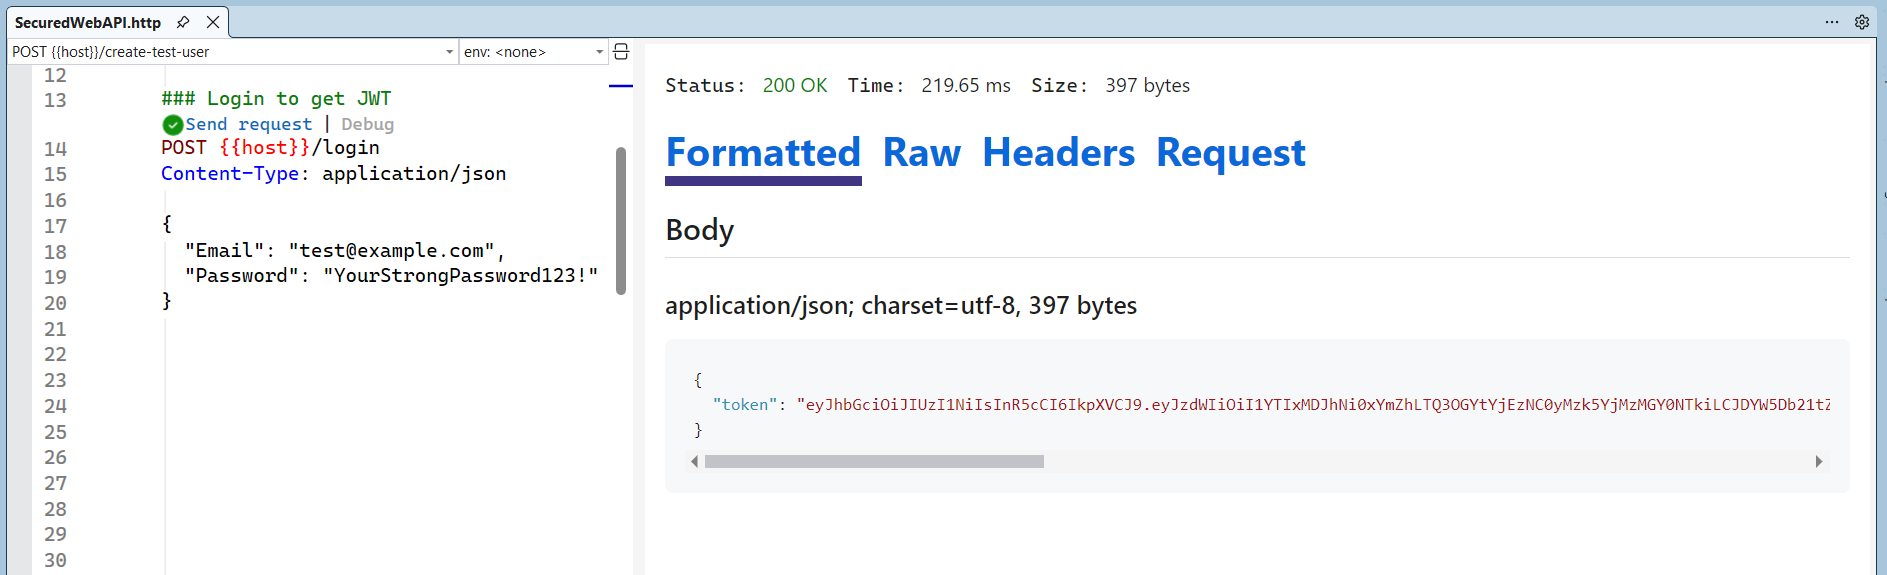
// Endpoint for login with JWT generation
app.MapPost("/login", async (LoginModel model, SignInManager<IdentityUser> signInManager, UserManager<IdentityUser> userManager) =>
{
var user = await userManager.FindByEmailAsync(model.Email);
var signInResult = await signInManager.CheckPasswordSignInAsync(user, model.Password, false);
if (user == null || !signInResult.Succeeded)
return Results.Unauthorized();
var claims = new List<Claim> { new Claim("sub", user.Id.ToString()), new Claim("CanComment", "true") };
claims.AddRange((await userManager.GetRolesAsync(user)).Select(r => new Claim(ClaimTypes.Role, r)));
var dobClaims = await userManager.GetClaimsAsync(user);
claims.AddRange(dobClaims);
var token = new JwtSecurityToken(
issuer: jwtSettings["Issuer"],
audience: jwtSettings["Audience"],
claims: claims,
expires: DateTime.UtcNow.AddMinutes(30),
signingCredentials: new SigningCredentials(new SymmetricSecurityKey(Encoding.UTF8.GetBytes(jwtSettings["Key"])), SecurityAlgorithms.HmacSha256)
);
return Results.Ok(new { Token = new JwtSecurityTokenHandler().WriteToken(token) });
});Refer to the following image.
Protected endpoints
Refer to the following code example to configure protected endpoints.
app.MapGet("/posts", () => "Public posts");  // Anonymous

app.MapPost("/comments", () => "Add comment")
    .RequireAuthorization("CommentPolicy");  // Policy-Based

app.MapPost("/posts", () => "Create post")
    .RequireAuthorization("AdminPolicy");  // RBAC via Policy
Setting the appsettings.json file
The following appsettings.json configuration centralizes two critical concerns for the application: JWT authentication settings and database connectivity.
{
"JwtSettings": {
"Key": "A-Very-Long-Secret-Key-Here-AtLeast-32-Bytes-For-Security",
"Issuer": "Syncfusion",
"Audience": "Syncfusion"
},
"ConnectionStrings": {
"DefaultConnection": "Data Source=YourServerName;Initial Catalog=BlogDb;Integrated Security=True;Encrypt=False"
}
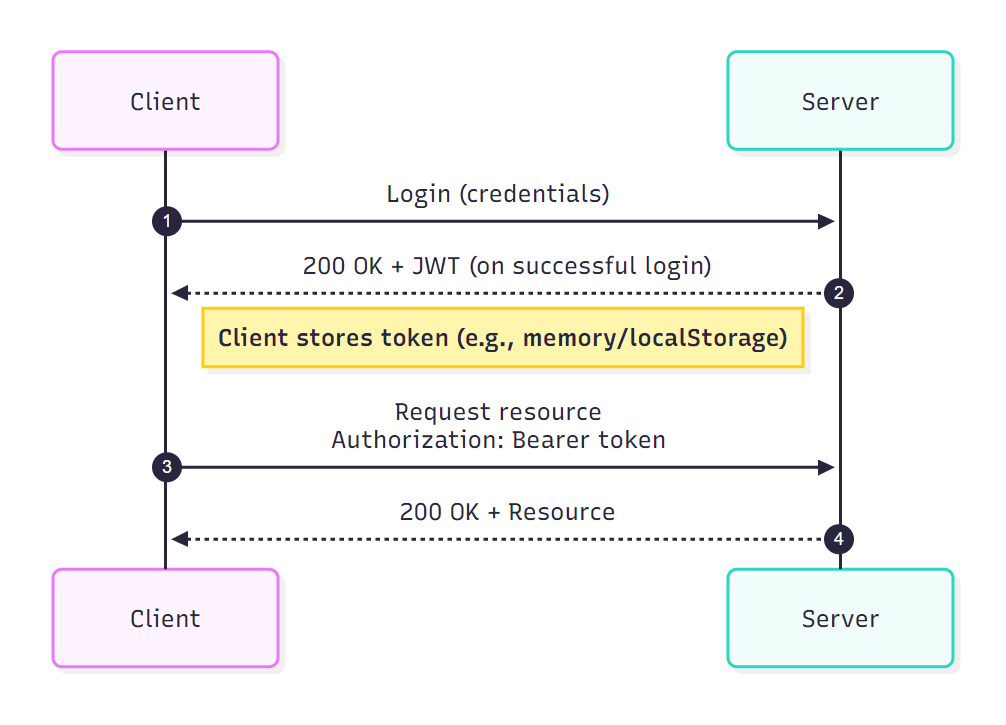
}Now, the client logs in, receives a JWT with claims, and sends it in the Bearer header. ASP.NET Core validates the token, builds the user principal, and evaluates authorization policies for each request.
When to use which authentication and authorization approach?
The table below outlines which authentication and authorization methods are most appropriate for different application scenarios.
| Category | Type/Consideration | Scenarios | When to Use/Combine |
| Authentication | ASP.NET Core Identity | User management with DB | With JWT/Cookie for full stack |
| Authentication | Azure/OIDC/Social | External providers | Federated logins; combine with Identity |
| Authentication | Cookie | Stateful web apps | With policies for sessions |
| Authentication | JWT Bearer | Stateless APIs | With policy-based for scalability |
| Authentication | Certificate/Windows/WS-Fed | Secure/enterprise | Intranets; limited combos |
| Authentication Consideration | Policy Schemes/MFA | Multi-scheme/Multi-factor | Enhance security; OSS for tenants |
| Authorization | Role/Claims-Based | Simple/dynamic access | Base; combine with policy |
| Authorization | Policy/Resource-Based | Complex/ownership | Advanced; with DI/handlers |
| Authorization | View-Based | UI control | Razor; pair with action auth |
| Authorization Consideration | Providers/Scheme Limits | Dynamic/custom | Enterprise; middleware tweaks |
Security best practices you should never skip
The following are recommended best practices for building a secure ASP.NET Core application.
- Enforce HTTPS: Prevents token/credential theft by mitigating man-in-the-middle (MITM) attacks.
- Use least privilege: Limits damage if a token is compromised. Use specific roles or claims instead of “Admin” for everything. Create granular policies (e.g.,
CanCreatePost,CanDeleteOwnComment). Never protect sensitive operations with [Authorize] only. - Validate tokens strictly: Prevents forged, expired, or replayed tokens. Use short-lived tokens with a refresh mechanism. Avoid placing sensitive data in claims.
- Implement MFA: Passwords alone are not sufficient for secure authentication.
- Store secrets securely (Key Vault): No hardcoded keys in source code. In production, use a secure store such as Azure Key Vault, AWS Secrets Manager, etc.
- Enable audit logging: Helps detect breaches and fulfill compliance requirements.
- Keep packages and SDK up to date: This will patch known vulnerabilities faster.
- Secure cross-origin in Blazor/API hybrids: Never store JWT in localStorage (XSS risk). Prefer an HttpOnly cookie with the BFF pattern. If you must use Bearer tokens, use short-lived with the refresh tokens. Always specify allowed origins, and never
AllowAnyOrigin(). - Optimize performance by caching roles or claims: For large apps, cache user roles or claims using
IMemoryCacheor similar to reduce database load. - Extend identity models when needed: When using identity, extend IdentityUser or IdentityRole to add custom properties (e.g., add public string Department { get; set; } to the user).
- Test authentication thoroughly: Use tools like Postman to test registration or login with roles. Inspect database tables to confirm proper storage and relationships.
Costly ASP.NET Core security mistakes
Avoid these, and you’re already ahead of most apps:
- Trusting JWTs without validation.
- Using roles for complex business rules.
- Storing too many claims in tokens.
- Skipping authorization on background APIs.
- Treating frontend auth as backend security.
Frequently Asked Questions
Always validate the issuer, audience, expiration, and signature. Use short-lived tokens with refresh tokens, and avoid placing sensitive data in claims. The built-in JWT middleware in ASP.NET Core manages this when properly configured.What are the best practices for validating JWT tokens in ASP.NET Core?
Do not store JWTs in How can I secure cross-origin requests in hybrid Blazor/API setups?
localStorage because of XSS risks. Use HttpOnly cookies with a Backend-for-Frontend (BFF) pattern, restrict allowed origins, and use short-lived tokens. For applications requiring higher security, implement Blazor JS interop for inactivity detection and automatic token revocation.
Never embed details in the JWT. Fetch on-demand via a protected API endpoint using the JWT as a bearer token. Always enforce HTTPS and server-side authorization policies. Cache briefly on the client if needed, but refresh regularly.How can I securely send additional user details (e.g., department) after login?
It is not safe. WASM code and data are always downloaded to the browser, where they can be inspected or altered. Keep sensitive data and logic on the server, and fetch only essential data via authenticated HTTPS API calls.Is it safe to include sensitive data in a client-side WebAssembly app?
Use model binding with data annotations such asHow should input validation be implemented to avoid injection vulnerabilities in ASP.NET Core?
[Required] and [StringLength]. Avoid raw SQL; use Entity Framework Core with parameterized queries. Encode outputs and maintain updated dependencies.
Conclusion: Build secure ASP.NET Core apps with confidence
Thanks for reading! Securing ASP.NET Core apps today goes far beyond basic login forms or simple role checks. It offers a comprehensive, layered approach, ranging from robust authentication schemes and federated identity to granular policy‑based authorization, custom requirement handlers, and runtime best practices like strict token validation and MFA enforcement. By leveraging features such as ASP.NET Core Identity, JWT Bearer with policy schemes, claims transformation, resource‑based checks, and tools like OpenIddict or Duende, you can build apps that remain resilient against modern threats while staying flexible and scalable.
Ready to take this further? Whether you’re securing a public‑facing Blazor app, a high‑traffic Web API, or an enterprise microservices environment, start by establishing identity early, layering defenses carefully, and validating relentlessly. Apply these practices incrementally, test with real‑world attack scenarios, and your apps will not only be secure, but they’ll also set the standard for trust in a zero‑trust world.
Let us know in the comments section which authentication and authorization features you would like explained in the next blog post.
Once your ASP.NET Core app is secure, building a polished UI shouldn’t slow you down. Syncfusion ASP.NET Core components help you create secure, role‑aware dashboards and admin screens quickly, so you can focus on logic, not UI boilerplate.
👉 Try them free to accelerate your next secure app.
You can also reach us via our support forum, support portal, or feedback portal. We’d love to hear from you!


 No spam, just valuable updates.