

Having an important file on a machine and limiting its sharing scope within an organization is no longer adequate for many corporate offices. As organizations expand around the world, people nowadays prefer to share and access such documents globally from anywhere. Amazon S3 (Simple Storage Service) provides a preferable public cloud storage resource for storing any data files in the cloud, like videos, images, documents, and more.
In this blog, I’ll walk you through how to synchronize the files and folders present in an Amazon S3 bucket with our Essential JS 2 File Manager component. The Essential JS 2 File Manager is a UI component built by Syncfusion that allows you to view and interact with a hierarchical collection of files and folders. Using this component, you can easily manage the file system and perform most common file and folder operations like read, write, delete, create, rename, upload, edit, select, and sort. It is also available on all major web platforms, including Angular, React, Vue, JavaScript, ASP.NET MVC, ASP.NET Core, and Blazor.
Moreover, you can easily cross-verify whether the files and folders displayed in the File Manager component are identical to those present in the Amazon S3 storage bucket. Let’s start with what Amazon S3 is first and then I’ll proceed with the steps to synchronize it with the Essential JS 2 File Manager.
What is Amazon S3?
Amazon S3 (Simple Storage Service) is a simple web storage services interface that you can use to store and retrieve any amount of data at any time from anywhere on the web. It provides highly scalable, reliable, fast, and inexpensive data storage infrastructure.
Creation of an Amazon S3 Bucket
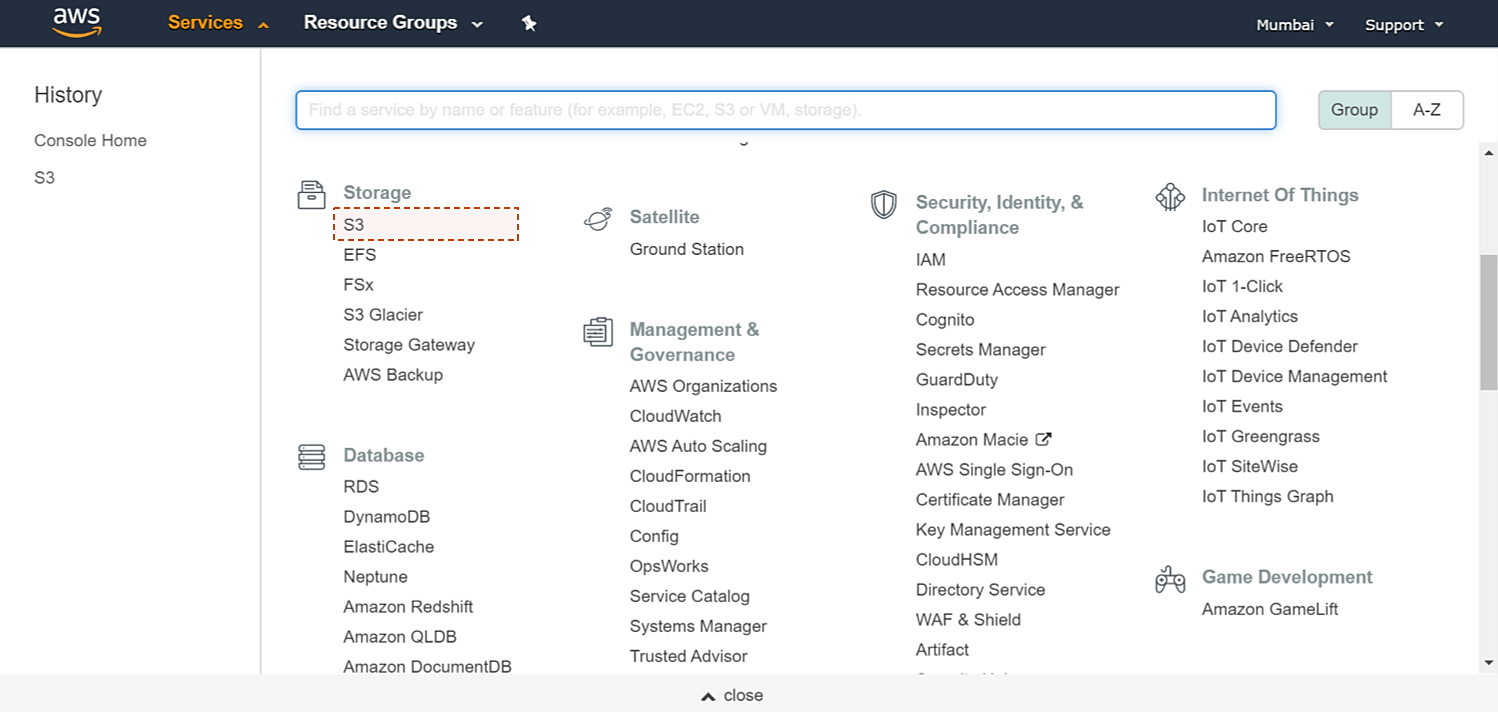
Step 1: To create a new S3 bucket, sign in to the AWS (Amazon Web Services) management console and open the Amazon S3 console. Now, select the S3 service from the storage options.
Step 2: Click Create bucket to start creating an AWS S3 bucket.
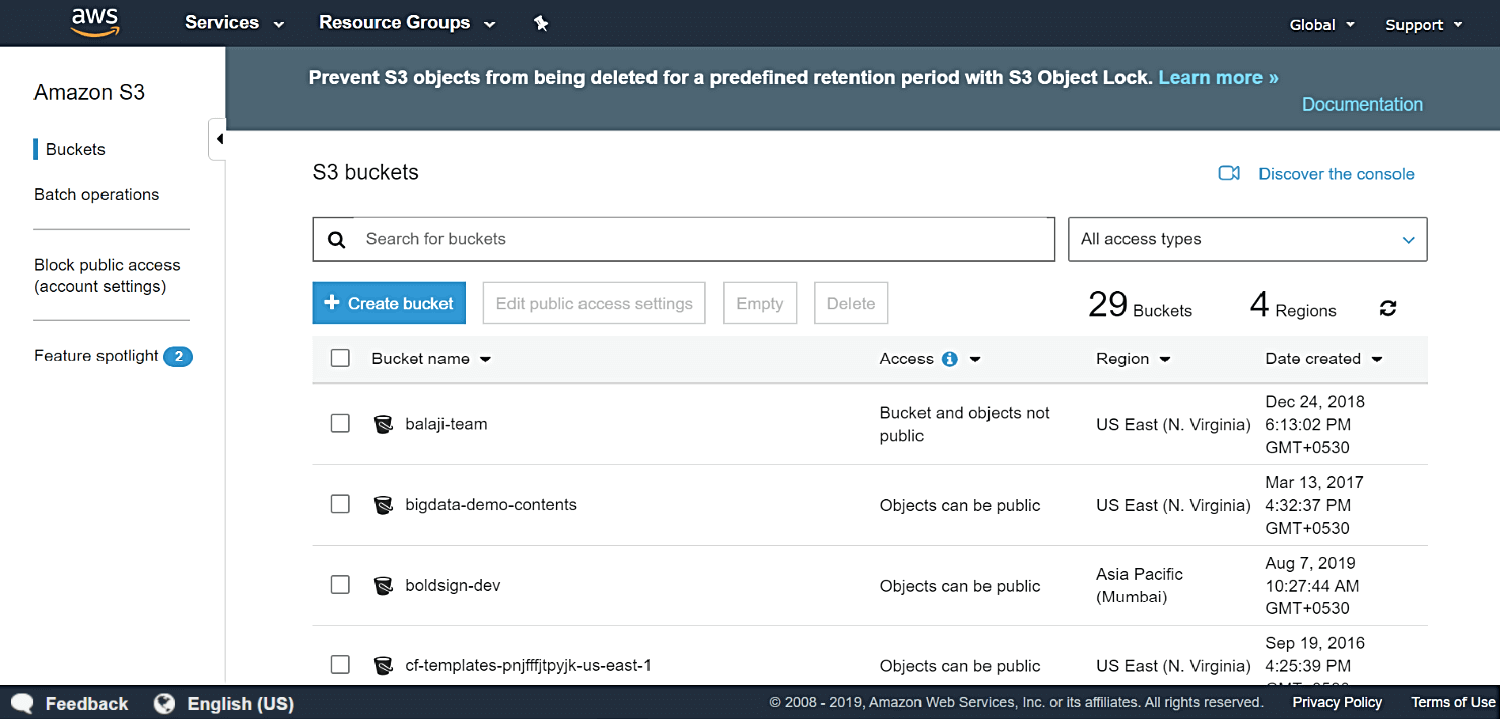
Step 3: Provide a unique bucket name and select the region where the bucket should exist. After providing these details, click the Create button. You have now successfully created an S3 bucket using Amazon Web Services.
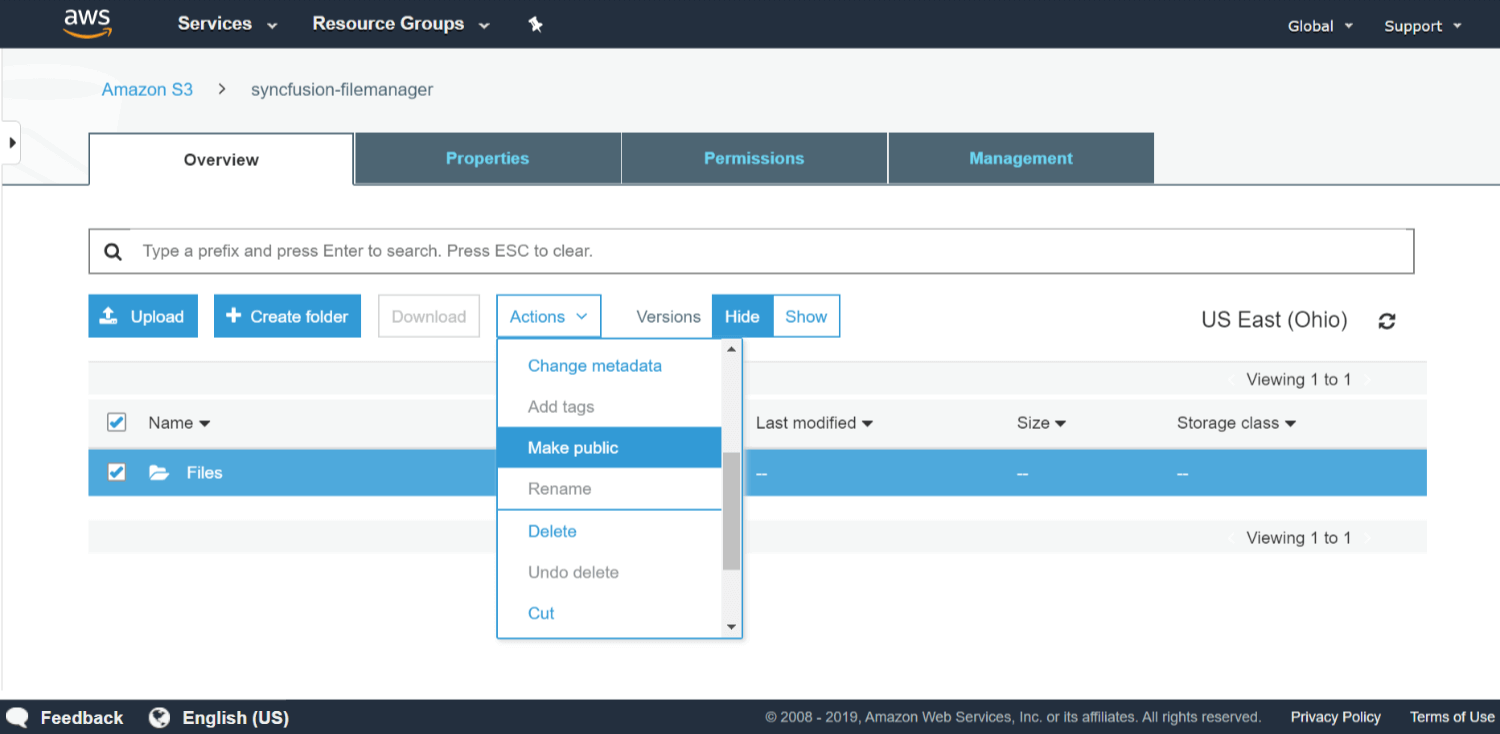
Step 4: Now, upload files to the bucket. To upload a file, first select your bucket and then click the Upload button.

Step 5: Set your bucket as public by right-clicking on the created bucket and then choosing the Make public option.
Now your new bucket is ready to use, so let’s see how to transfer the data from Amazon S3 storage to the Essential JS 2 File Manager component. In the next step we will create an intermediate ASP.NET Core project which acts as a service provider that will connect with the File Manager component.
Creating an Amazon S3 File Provider Project
The ASP.NET Core Amazon S3 file provider project acts as a gateway to synchronize the content between the File Manager component and Amazon S3 bucket storage. The files will flow as follows:
Amazon S3 Storage > Amazon File Provider > Essential JS 2 File Manager component
GitHub Example
You can download the Amazon S3 file provider source project from the following GitHub location:
https://github.com/SyncfusionExamples/ej2-amazon-s3-aspcore-file-provider.
An important step in this Amazon S3 file provider ASP.NETCore project is to ensure that you have registered your Amazon S3 client account details like awsAccessKeyId, awsSecretAccessKey, bucketRegion, and bucketName using the RegisterAmazonS3 method to perform the file operations.
void RegisterAmazonS3(string bucketName, string awsAccessKeyId, string awsSecretAccessKey, string bucketRegion);
Run the application
- Open a command prompt, clone this ready-to-use project from GitHub, and then navigate to the path where it has been placed in your system by running the following commands in order.
git clone https://github.com/ej2-amazon-s3-aspcore-file-provider

cd ej2-amazon-s3-aspcore-file-provider
- Now, restore the NuGet packages by running the following command from the root folder.
dotnet restore
- Build the application using the following command.
dotnet build
- After a successful compilation, run the following command to run this file provider application.
dotnet run
Now, the project will be hosted. To ensure that Amazon-s3-service works, type the following URL in your browser.
http://localhost:<port-number>/api/test
Note: Make sure to map the proper in the above URL.
Configuring File Provider Service in Essential JS 2 File Manager
Now the service project is ready to use, so next I’ll create a basic JavaScript File Manager example by referring to the getting started documentation. You can also get a runnable and pre-configured example from this GitHub repository.
To perform the basic file actions such as read, delete, copy, move, rename, and search, and to retrieve the details of files from the Amazon S3 service, start mapping the following service URLs to the ajaxSettings property of File Manager.
Note: The hostUrl will be the locally hosted port number of the S3 file provider project that was created in the previous step.
var hostUrl = http://localhost:<Port Number>/;
  ajaxSettings: {
        url: hostUrl + 'api/AmazonS3Provider/AmazonS3FileOperations'
  }
Perform download operation
To enable and perform download operations on the files, initialize the downloadUrl property within the ajaxSettings of the File Manager component.
  var hostUrl = http://localhost:<Port Number>/;
  ajaxSettings: {
        url: hostUrl + ‘api/AmazonS3Provider/AmazonS3FileOperations’,
        downloadUrl: hostUrl + ‘api/AmazonS3Provider/AmazonS3Download’
  }
Perform upload operation
To perform the upload operation in the File Manager, initialize the uploadUrl property within the ajaxSettings of the File Manager component as shown in the following sample.
  var hostUrl = http://localhost:<Port Number>/;
  ajaxSettings: {
        url: hostUrl + 'api/AmazonS3Provider/AmazonS3FileOperations',
        uploadUrl: hostUrl + 'api/AmazonS3Provider/AmazonS3Upload'
  }
Image preview settings
To enable the image preview settings in the File Manager component, initialize the getImageUrl property within the ajaxSettings property as shown in the following code.
  var hostUrl = http://localhost:<Port Number>/;
  ajaxSettings: {
        url: hostUrl + 'api/AmazonS3Provider/AmazonS3FileOperations',
         getImageUrl: hostUrl + 'api/AmazonS3Provider/AmazonS3GetImage'
  }
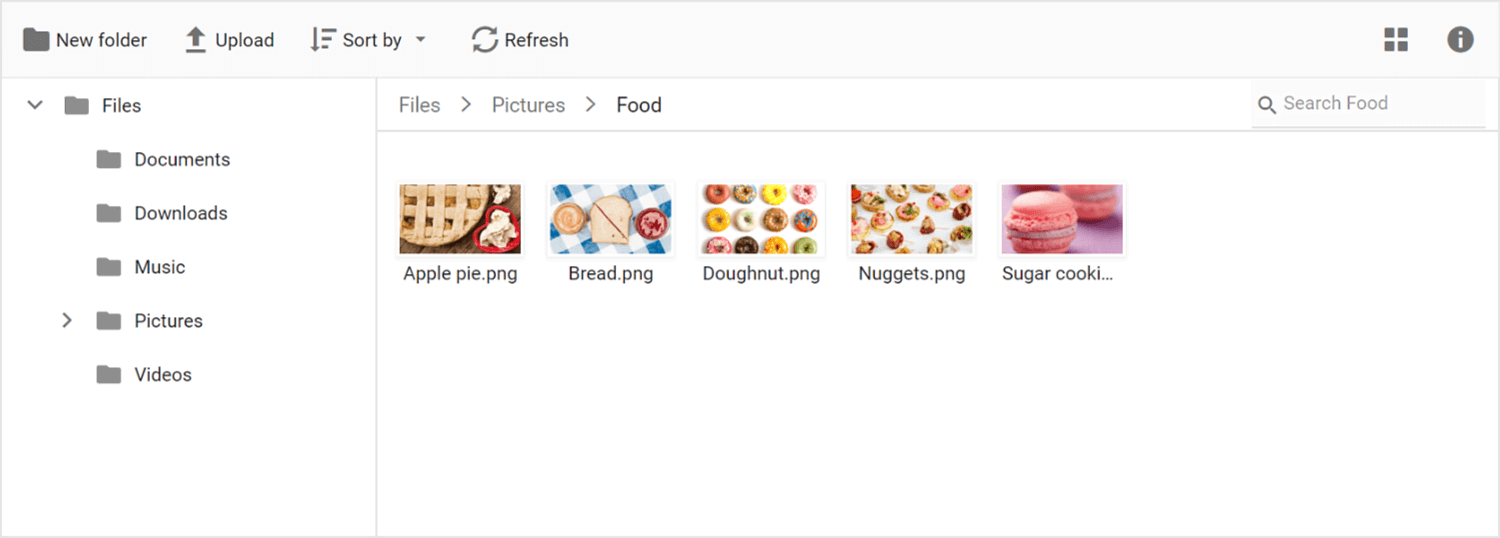
Now, the Essential JS 2 File Manager will be rendered with the same files and folders as in the Amazon S3 bucket object as shown in the following screenshot.

Conclusion
To summarize, the ability to synchronize and share files and folders between an Amazon S3 bucket and the Syncfusion File Manager component allows you to have global access to local files and folders. If we make any changes to the files and folders present in the Amazon S3 cloud bucket, those changes will be reflected immediately in the File Manager component and vice versa. In just a few steps, you can create and deploy an application that uses the Essential JS 2 File Manager and connects to Amazon S3 bucket storage in a simpler way.
Try this out with our 2019 Volume 3 release and share your feedback as comments on this blog. If you need support for specific features in this component or have any questions, contact us through our support forum, Direct Trac, or feedback portal. We are waiting to hear what you think about this feature!


 No spam, just valuable updates.