
TL;DR: Learn how to export spreadsheet data from React applications to Excel, CSV, and PDF formats using an enterprise-ready Spreadsheet component from Syncfusion. This guide covers exporting via ribbon UI and programmatic save methods, customizing output with beforeSave and saveComplete events, and optimizing performance using server-side processing or Docker-based deployment for large datasets.
Exporting spreadsheet data is a must-have feature in modern React apps, dashboards, reports, admin tools, and internal data workflows all need it. Users expect to download data for sharing, analysis, and archiving.
This guide shows how to export Excel, CSV, and PDF in React using the Syncfusion® React Spreadsheet in two common ways:
- Ribbon UI (end-user driven).
- Custom export with the
save()method (developer controlled).
You’ll also learn how to customize exports with beforeSave and saveComplete for better performance and more control.
Why use Syncfusion React Spreadsheet for exporting files?
The Syncfusion React Spreadsheet component is designed for enterprise-grade scenarios and includes export support that works well for both end users and developers:
- Multiple export formats: Export to XLSX, XLS, CSV, and PDF.
- Flexible UX: Users can export via the Ribbon, or you can trigger export from your own UI using save method.
- Preserves workbook features: Keeps styles, formulas, and formatting in exports.
- Server-side processing: Offloads file generation to the backend for better performance.
- Customizable export lifecycle: Use events like beforeSave and saveComplete to fine-tune behavior.
If you need simple downloads or heavily formatted exports, this approach scales without forcing you to build export logic from scratch. From viewing Excel files to editing data, running calculations, and exporting workbooks, Syncfusion React Spreadsheet helps you build complete spreadsheet experiences inside your applications.
Supported file formats
You can export spreadsheet data to:
- Microsoft Excel (.xlsx)
- Microsoft Excel 97-2003 (.xls)
- Comma-Separated Values (.csv)
- PDF (.pdf)
How exporting works behind the scenes (server-side)
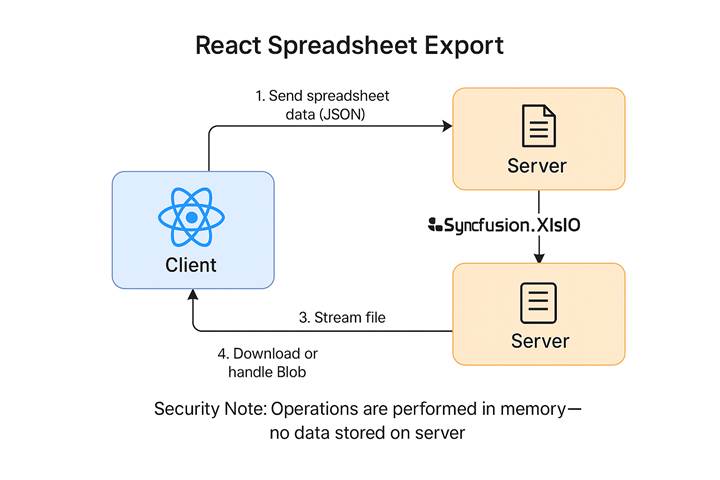
Syncfusion Spreadsheet export uses server-side processing via the Syncfusion.EJ2.Spreadsheet server library (ASP.NET Core / MVC). The high-level flow looks like this:
- The React client sends spreadsheet content to the server as JSON.
- The server uses Syncfusion.XlsIO to convert JSON into the target format (XLSX/XLS/CSV/PDF).
- The server streams the generated file back to the client.
- The client downloads the file (or you can handle it programmatically, e.g., as a Blob).
Note: The export runs in memory during the request lifecycle; no data is stored on the server.
Prerequisites
Before implementing export functionality;
- Node.js and npm installed on your machine.
- A React development environment set up using tools like VS Code or any preferred IDE.
- A React project created (e.g., using create-react-app, Vite, or Next.js).
- Syncfusion Spreadsheet component added to your React app.
- Syncfusion.XlsIO or equivalent library configured on the backend for file generation.
- Backend environment ready (Node.js, .NET, or any server stack) to handle spreadsheet generation and stream the file back to the client.
With the prerequisites ready, we can now integrate the Spreadsheet component and wire it up to the app logic. We’ll now set up the React front end and configure the backend services that will generate and export the spreadsheet files.
Step 1: Set up your React app
Integrate the Syncfusion Spreadsheet component into your React project using the Getting Started guide (install packages, add styles, render the Spreadsheet).
Step 2: Configure backend services for export (required)
Exports rely on a backend service. You have two common options:
Option A: Self-host with .NET (ASP.NET Core)
Best when you want full control over infrastructure and logic.
- Follow the guide: Host Open and Save Services for JavaScript Spreadsheet with ASP.NET Core.
- Use the GitHub sample: Essential Studio Spreadsheet Web Services
Option B: Deploy the Spreadsheet Server using Docker
Best when you want consistent deployments and easy scaling.
- Read: Deploy Syncfusion Spreadsheet Docker Image.
- Docker Hub: syncfusion/spreadsheet-server (ASP.NET Core 8.0)
Once your backend is running, configure the Spreadsheet component to point at your endpoints:
Exporting approach
Export via Ribbon UI
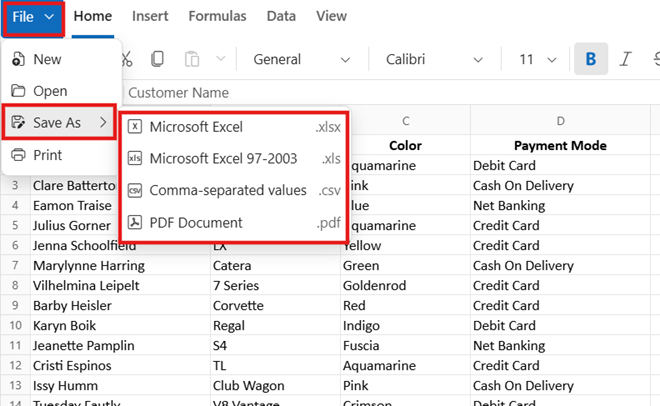
If you want a familiar, user-driven workflow, the built-in Ribbon is the simplest option:
- Go to File → Save As.
- Choose a format: XLSX, XLS, CSV, or PDF.
- Download the file.
This is ideal when users should control export format without any custom UI work.
Programmatic export with the save Method
When you need more control (custom buttons, workflow-based export, default naming, extra server params), use the Spreadsheet save API.
How the Save workflow operates:
- Pick an export format (XLSX, XLS, CSV, PDF) from the dropdown.
- The save action calls the save API.
- Spreadsheet JSON is posted to the backend for processing.
- Use beforeSave and saveComplete to modify routing, performance, or output.
Code example (React)
import { SpreadsheetComponent } from '@syncfusion/ej2-react-spreadsheet';
import { DropDownListComponent } from '@syncfusion/ej2-react-dropdowns';
import { ButtonComponent } from '@syncfusion/ej2-react-buttons';
…
function Default() {
    let spreadsheet;
    // Initial save type
    let saveType = 'Xlsx';

    // Dropdown data
    const saveAsOptions = [
        { saveAs: 'XLSX', saveType: 'Xlsx' },
        { saveAs: 'XLS', saveType: 'Xls' },
        { saveAs: 'CSV', saveType: 'Csv' },
        { saveAs: 'PDF', saveType: 'Pdf' }
    ];
    const fields = { text: 'saveAs', value: 'saveType' };

    // Update save type on selection
    const onSaveTypeChange = (args) => {
        saveType = args.itemData[fields.value];
    };

    // Trigger export programmatically
    const onSaveClick = () => {
        spreadsheet.save({
            url: 'https://document.syncfusion.com/web-services/spreadsheet-editor/api/spreadsheet/save',
            fileName: 'Sample',
            saveType: saveType,
            // Optional (PDF): customize PDF layout if saveType === 'Pdf'
            // pdfLayoutSettings: { orientation: 'Landscape', fitSheetOnOnePage: true }
        });
    };

    // Fires before save; great place to customize behavior
    const onBeforeSave = (args) => {
        // Disable full form submission to improve performance on large workbooks
        args.isFullPost = false;

        // Example: send custom data to the server
        // args.customParams = { tenantId: 'contoso', exportSource: 'marketing' };

        // Example: request Blob data back (for custom handling in saveComplete)
        // args.needBlobData = true;
    };

    // Fires after save completes if isFullPost is false
    const onSaveComplete = (args) => {
        // Example: show a toast or handle Blob
        // if (args.blobData) { uploadToServer(args.blobData); }
        console.log('File saved successfully', args);
    };
    …
    return (
        <div className='control-pane'>
            <DropDownListComponent
                dataSource={saveAsOptions}
                fields={fields}
                width="100px"
                change={onSaveTypeChange}
                index={0}
            />
            <ButtonComponent cssClass="save-btn" onClick={onSaveClick}>Save</ButtonComponent>
            <div className='control-section spreadsheet-control'>
                <SpreadsheetComponent
                    openUrl='https://document.syncfusion.com/web-services/spreadsheet-editor/api/spreadsheet/open'
                    saveUrl='https://document.syncfusion.com/web-services/spreadsheet-editor/api/spreadsheet/save'
                    ref={(ssObj) => { spreadsheet = ssObj; }}
                    created={onCreated}
                    beforeSave={onBeforeSave}
                    saveComplete={onSaveComplete}
                >
                    <SheetsDirective>
                        <SheetDirective name="Car Sales Report">
                            …
                            …
                        </SheetDirective>
                    </SheetsDirective>
                </SpreadsheetComponent>
            </div>
        </div>
    );
}
Key Highlights:
- Dynamic format selection: The dropdown updates the saveType based on user input.
- Performance optimization: The beforeSave event disables full form submission (isFullPost = false)
- for better performance exports. This switches the request to a lightweight fetch call, making the export faster and more reliable, especially with large workbooks.
- Custom server endpoint: The export is sent to Syncfusion’s hosted service, but you can replace the url with your own backend if self-hosted.
- PDF customization: You can optionally pass pdfLayoutSettings to control orientation and layout.
You can see this feature in action with the Live demo, and for more technical details, check out the API guide for save method.
Note: The Spreadsheet component supports multiple save workflows. Beyond downloading directly, you can save the file as a Blob, or send exported files to a server.
Export events you can customize (most useful hooks)
Syncfusion gives you powerful hooks to customize the export process through two key events: beforeSave and saveComplete. These events let you fine-tune how exports behave, add custom logic, or even intercept the process entirely.
beforeSave event
Runs right before export starts. Use it to:
- Override file name/format or change the target saveUrl.
- Pass custom parameters to your backend (
customParams). - Cancel export (
args.cancel = true). - Improve performance by switching to fetch-based export (
args.isFullPost = false). - Request Blob data for custom handling (
args.needBlobData = true). - Customize PDF Layout (layout/orientation via
pdfLayoutSettings).
saveComplete event
Runs after export completes (especially when isFullPost = false). Use it to:
- Show a toast or success message.
- Access Blob data (if requested) for uploads or alternate storage flows.
- Trigger logging/analytics hooks in your app.
Enterprise considerations (performance, scalability, maintainability)
- Performance: For larger workbooks, set
args.isFullPost = falseinbeforeSaveto avoid heavier form-style submissions. - Scalability: Host the export service in your own infrastructure (or Docker) so you can scale independently from the React frontend.
- Maintainability: Keep export logic centralized on the server. The client stays thin: it sends workbook JSON and receives a file stream back.
- Security: Exports run in memory during the request lifecycle; design your endpoints with auth, rate limits, and auditing if you handle sensitive data.
Frequently Asked Questions
Yes. You can use lifecycle events such as beforeSave to modify parameters, change file names, customize formats, or cancel exports. You can also use saveComplete to trigger notifications, analytics, or follow-up actions after successful export.Can I customize the export process?
You can export using custom UI buttons, save the file as a Blob, send exported files to a server, or generate Base64 output for advanced workflows. These methods allow full control over export behavior depending on your application’s requirements.What export options are available besides downloading from the Ribbon UI?
Yes. Exported Excel files retain formatting such as fonts, colors, borders, alignment, merged cells, and conditional formatting. Formulas, values, and data validation rules are also preserved in supported formats.Are formatting and formulas preserved during export?
Yes, Syncfusion offers a pre-built Docker image on Docker Hub based on an ASP.NET Core project, which requires no additional .NET code from your side. Configure your React app’s saveUrl to point to this containerized server for file exports (e.g., for Excel/CSV processing). It’s lightweight, secure, and deployable on any platform supporting Docker, like Kubernetes or AWS EKS.Is there a Docker image available for easy deployment of the export server?

Conclusion
Thank you for reading! Exporting Excel, CSV, and PDF from React apps is fast and reliable with the Syncfusion React Spreadsheet. Use the Ribbon for a familiar user experience, or use the save() method for full control in custom UIs. With beforeSave and saveComplete, you can optimize performance, pass custom parameters, and support advanced workflows like Blob-based handling, while keeping export generation reliable on the server.
Try it out today and let us know your thoughts in the comments!
If you’re a Syncfusion user, you can download the setup from the license and downloads page. Otherwise, you can download a free 30-day trial.
You can also contact us through our support forums, support portal, or feedback portal for queries. We are always happy to assist you!


 No spam, just valuable updates.