

The use of the Flutter platform grows day by day and so the need for sophisticated widgets does, too. Syncfusion understands the needs of developers and offers solutions to their requirements.
If you are a Flutter developer, you may already know about the beautiful set of feature-rich UI widgets we are currently providing in our Flutter package. We are excited to extend our contribution to the Flutter developer community with a new Maps widget in our 2020 Volume 2 release.
The Syncfusion Flutter Maps widget is a data-visualization library written natively in Dart that displays a geographical area from GeoJSON data. It has highly interactive and customizable features that enrich the end-user experience by presenting the data of regions in more intuitive ways.
In this blog post, we will discuss the features of the Maps widget one by one and I will guide you through how to add this widget to a Flutter application.
Data labels
Data labels provide basic information about shapes or regions by displaying their names or any custom text. If required, you can trim or hide the labels when they exceed their region bounds. You can also customize the text style.
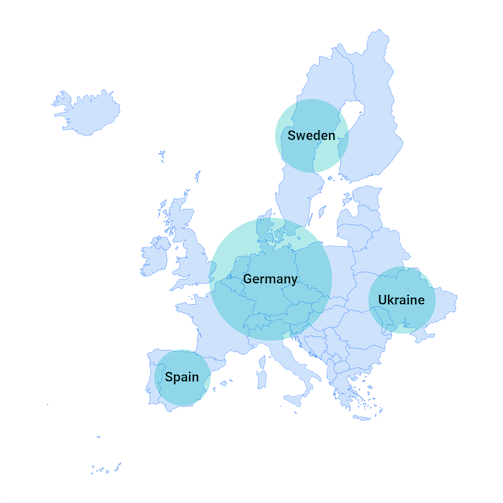
Shape and region colors
You can categorize a shape or region on a map by customizing its color based on its underlying data. Flutter Maps supports two types of color mapping:
- Equal color mapping.
- Range color mapping.
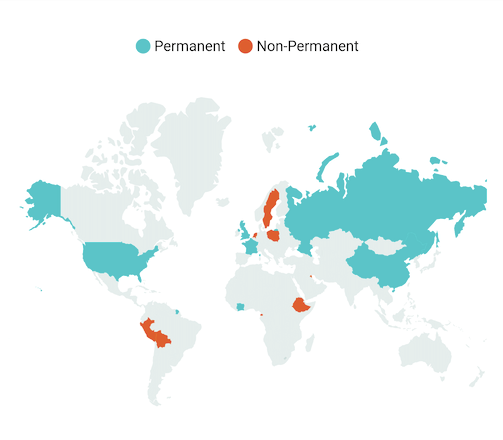
Equal color mapping
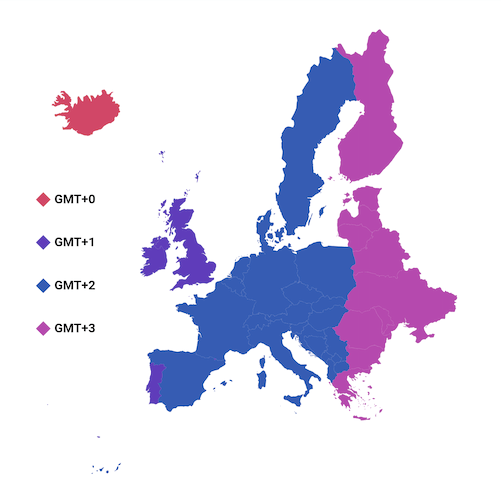
Apply a specific color to a region based solely on its data. For example, you can apply colors to countries of the world based on their type of membership in the UN.
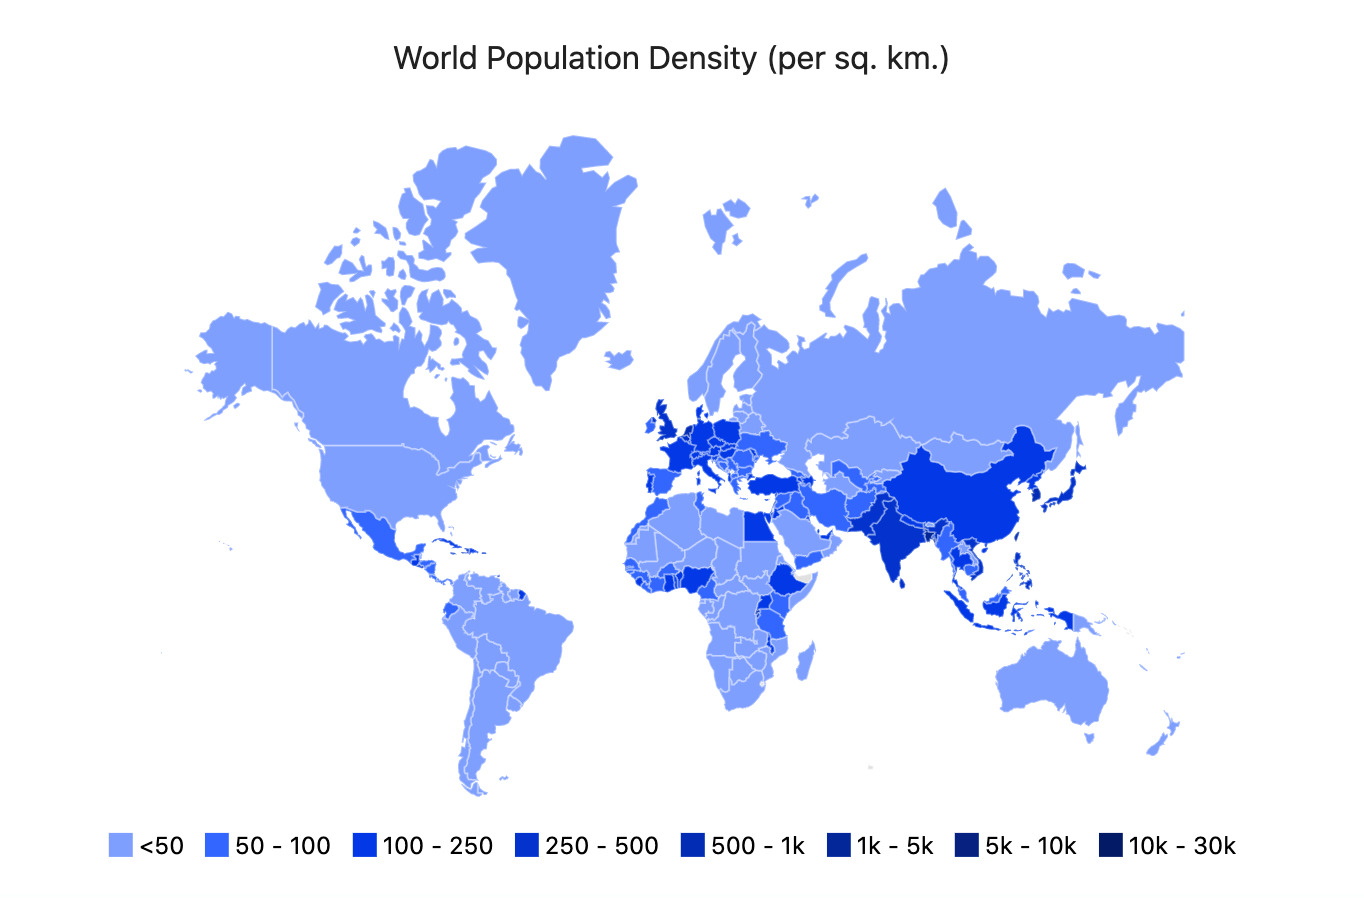
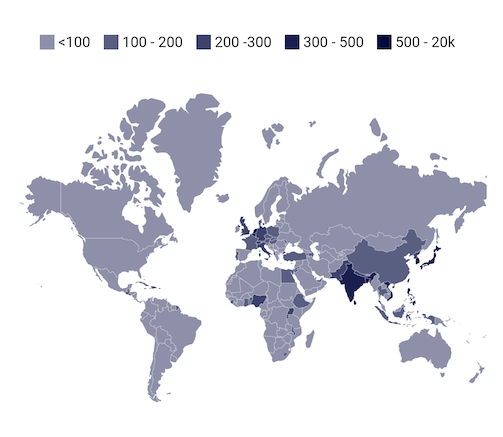
Range color mapping
Apply colors to the regions if their data falls within a specific range. For example, you can apply colors to countries based on their population density.
Bubbles
Bubbles help you add information to regions, such as population density, number of users, etc. They can also be rendered in different colors and sizes based on the data of their respective regions.
Color customization
You can customize the colors of the bubbles and their transparency based on the data of the regions.
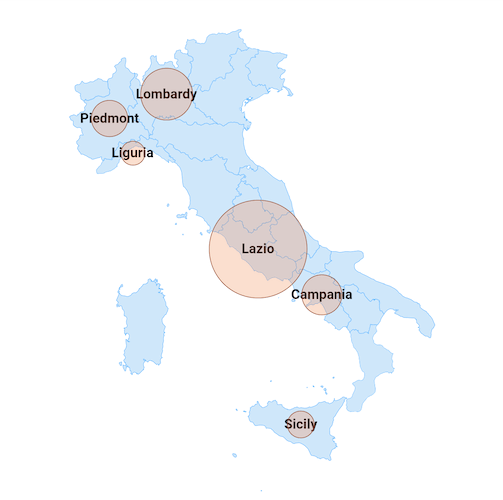
Size customization
You can render the bubbles in different sizes based on the data to enhance their readability.
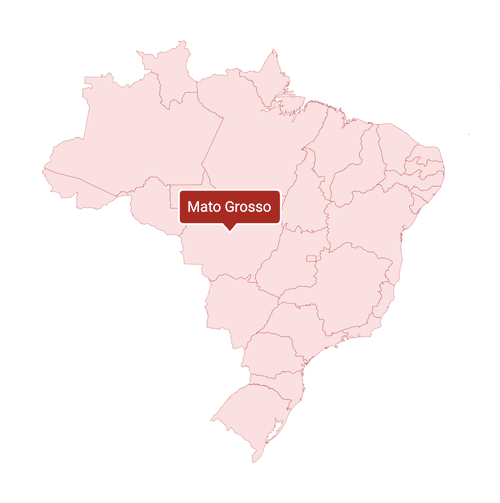
Tooltip
A tooltip is used to display information about regions and bubbles during tap or click interaction. It can be enabled for both regions and bubbles.
Shape tooltip
You can show a tooltip for the shapes or regions on tapping or clicking interactions. Additional information about a particular shape can be shown using the tooltip.
Bubble tooltip
You can enable a tooltip for the bubbles. On tapping or clicking a bubble, the additional information about a particular bubble’s shape will be shown to the user.

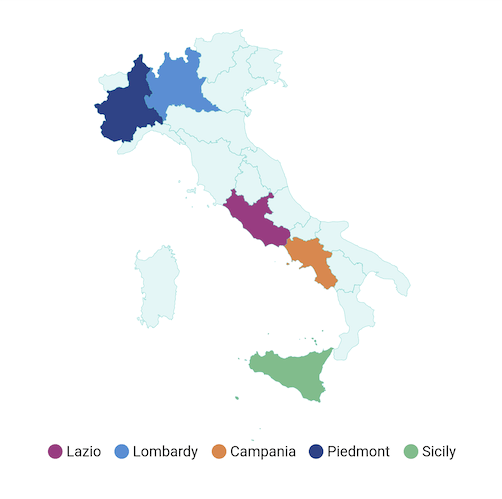
Legend
Legends provide clear information about the data plotted in maps using colors and brief text. You can also use the legend toggling feature to let the end-user visualize only the required shapes or regions and their data much easier.
Position
You can move the legend to any one of the four sides of a map or a custom position.
Appearance
You can customize the default shape, size, and appearance of the legend icons and text.
Selection
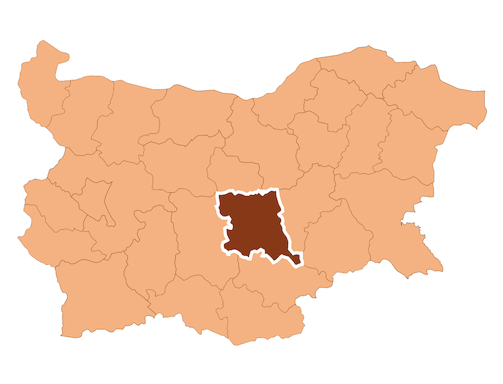
Selection is used to highlight a region by tapping or clicking on the selected area. You can use the callback function for functionalities like navigating to a different page or showing detailed information about the selected region.
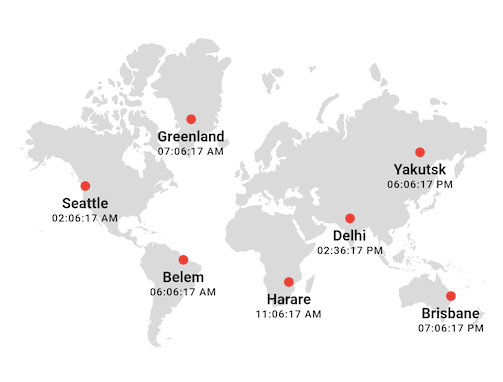
Markers
Markers are used to denote locations with exact latitude and longitude on maps. You can use built-in shapes such as circles, diamonds, squares, and triangles, or any type of custom widget as a marker as shown in the following image.
Add Flutter Maps to your application
This section explains how to add the Flutter Maps widget to your application and use its basic features.
Step 1: Create a basic Flutter application
Create a simple project using the instructions provided in the Get started with your first Flutter app documentation.
Step 2: Add the dependency
Add the Syncfusion Flutter Maps dependency to your pubspec.yaml file.
dependencies:
  syncfusion_flutter_maps: ^18.2.44-beta
Step 3: Get the packages
Run the following command to get the required packages.
$ flutter pub get |
Step 4: Import the package
Now, import the library using the following code.
import 'package:syncfusion_flutter_maps/maps.dart';
Step 5: Initialize the Maps widget
After importing the package, initialize the Maps widget as a child of any widget, like in the following code example.
@override
Widget build(BuildContext context) {
return Scaffold(
body: SfMaps(),
);
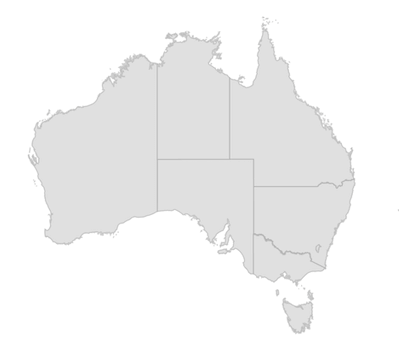
}Step 6: Render a map in the Maps widget
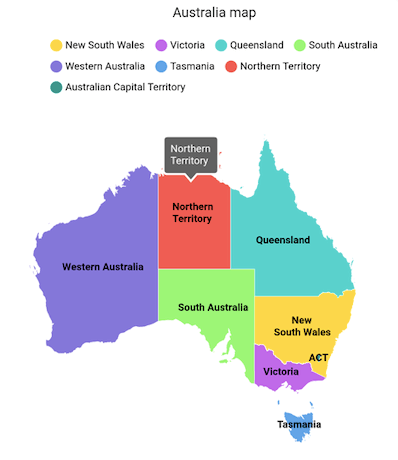
Add the GeoJSON file for the shape layer. We are going to render a map of Australia. Get the australia.json file here and add it to the assets folder of your application.The actual geographical rendering is done in each MapShapeLayer method using the delegate property. The path of the .json file that contains the GeoJSON data has to be set to the MapShapeLayerDelegate.shapeFile, as shown in the following code snippet. The MapShapeLayerDelegate.shapeDataField is used to refer to the unique field name in the .json file to identify each shape. The usage of this property is explained in the next section.
@override
Widget build(BuildContext context) {
  return Scaffold(
    body: SfMaps(
      layers: [
        MapShapeLayer(
          delegate: const MapShapeLayerDelegate(
            shapeFile: 'assets/australia.json',
            shapeDataField: 'STATE_NAME',
          ),
        ),
      ],
    ),
  );
}
Step 7: Render basic map elements
Add the basic map elements, such as title, data labels, legend, and tooltip, as shown in the following code snippet. By default, the values specified for the shapeDataField in the GeoJSON file will be used in elements like data labels, tooltip, and legend for their shapes.However, it is also possible to use a data source and customize these elements. The shapeDataField will be used to map the data returned in MapShapeLayerDelegate.primaryValueMapper from the data source.Once this mapping is done, you can customize the elements using mappers like dataLabelMapper, shapeColorMappers, shapeTooltipTextMapper, etc.
List data;
@override
void initState() {
data = [
Model('New South Wales', Color.fromRGBO(255, 215, 0, 1.0),
' New\nSouth Wales'),
Model('Queensland', Color.fromRGBO(72, 209, 204, 1.0), 'Queensland'),
Model('Northern Territory', Colors.red.withOpacity(0.85),
'Northern\nTerritory'),
Model('Victoria', Color.fromRGBO(171, 56, 224, 0.75), 'Victoria'),
Model('South Australia', Color.fromRGBO(126, 247, 74, 0.75),
'South Australia'),
Model('Western Australia', Color.fromRGBO(79, 60, 201, 0.7),
'Western Australia'),
Model('Tasmania', Color.fromRGBO(99, 164, 230, 1), 'Tasmania'),
Model('Australian Capital Territory', Colors.teal, 'ACT')
];
super.initState();
}
@override
Widget build(BuildContext context) {
return Scaffold(
body: Container(
height: 520,
child: Center(
child: SfMaps(
title: const MapTitle(text: 'Australia map'),
layers: [
MapShapeLayer(
delegate: MapShapeLayerDelegate(
shapeFile: 'assets/australia.json',
shapeDataField: 'STATE_NAME',
dataCount: data.length,
primaryValueMapper: (int index) => data[index].state,
dataLabelMapper: (int index) => data[index].stateCode,
shapeColorValueMapper: (int index) => data[index].color,
shapeTooltipTextMapper: (int index) => data[index].stateCode,
),
showDataLabels: true,
showLegend: true,
enableShapeTooltip: true,
tooltipSettings: MapTooltipSettings(color: Colors.grey[700],
strokeColor: Colors.white, strokeWidth: 2
),
strokeColor: Colors.white,
strokeWidth: 0.5,
dataLabelSettings: MapDataLabelSettings(
textStyle: TextStyle(
color: Colors.black,
fontWeight: FontWeight.bold,
fontSize:
Theme
.of(context)
.textTheme
.caption
.fontSize)),
),
],
),
),
),
);
}
class Model {
Model(this.state, this.color, this.stateCode);
String state;
Color color;
String stateCode;
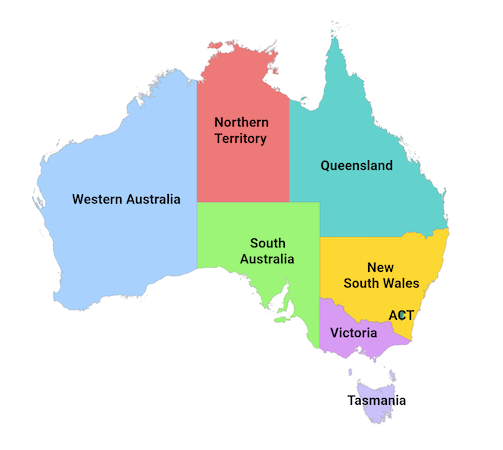
}After executing this code example, we will get output like the following screenshot.
What’s next?
In our upcoming releases, we plan to include more exciting features in the Maps widget. Some of the features you can expect are:
- Support for imagery services, such as Bing Maps, OpenStreetMap, etc.
- Zooming and panning.
- Custom widget support for tooltip.
- Hover support for all the elements in the web platform.
- Legend support for bubbles.
- Animation for all interactions.
- A tooltip for markers.
Conclusion
In this blog post, we walked you through our new Syncfusion Flutter Maps widget and its features. You can try this widget and share your feedback in the comments section below. This widget is available in our 2020 Volume 2 release. You can check out the other new widgets and features added to this release on our What’s New page.
Check out the complete user guide and see our samples in this GitHub location. Additionally, you can check out our demo apps in Google Play Store, App Store, and on our website.
If you need a new widget for the Flutter framework or new features in our existing widgets, you can contact us through our support forum, Direct-Trac, or feedback portal. As always, we are happy to assist you!


 No spam, just valuable updates.