

In this blog, we‘ll see how to integrate the Syncfusion React Image Editor with the Rich Text Editor component.
Syncfusion’s React Rich Text Editor is a feature-rich WYSIWYG HTML and Markdown editor. It is widely used to create blogs, forum posts, note sections, support tickets, messaging applications, and more. It allows users to insert images, links, tables, and lists with modular architectures.
The React Image Editor is a UI component for editing and enhancing images, with built-in support for cropping, rotating, flipping, zooming, and filtering. You can annotate images with shapes such as rectangles, ellipses, lines, and text, as well as freehand drawings.
Create intuitive content editing experiences with Syncfusion React Rich Text Editor. Easily add WYSIWYG editing, formatting, images, links, tables, and lists to blogs, emails, messages, and more.
Explore React Rich Text EditorGetting started
Let’s create a React application and configure the Syncfusion React components in it.
Step 1: Create a new React application.
First, install the create-react-app npm package in the desired location using the following command.
npx create-react-app my-app
Note: Refer to the Getting Started with React Apps documentation to create a React app using the npm and yarn commands.
Step 2: Add the Syncfusion NPM packages.
The NPM public registry contains all the Syncfusion Essential JS 2 packages that are currently available. In this application, we’ll use the React Rich Text Editor, Image Editor, and Dialog (to hold the Image Editor) components.
Use the following commands to install the NuGet packages of these components.
npm install @syncfusion/ej2-react-richtexteditor –save-dev
npm install @syncfusion/ej2-react-image-editor –save-dev
npm install @syncfusion/ej2-react-popups –save-dev
Step 3: Add the CSS references for the Syncfusion React components.
After the NuGet package installation, the following CSS files for the Syncfusion React components will be available in the ../node modules/@syncfusion package folder. Add them as references in the src/App.css file.
@import '../node_modules/@syncfusion/ej2-base/styles/bootstrap5.css';
@import '../node_modules/@syncfusion/ej2-icons/styles/bootstrap5.css';
@import '../node_modules/@syncfusion/ej2-buttons/styles/bootstrap5.css';
@import '../node_modules/@syncfusion/ej2-splitbuttons/styles/bootstrap5.css';
@import '../node_modules/@syncfusion/ej2-inputs/styles/bootstrap5.css';
@import '../node_modules/@syncfusion/ej2-lists/styles/bootstrap5.css';
@import '../node_modules/@syncfusion/ej2-navigations/styles/bootstrap5.css';
@import '../node_modules/@syncfusion/ej2-react-popups/styles/bootstrap5.css';
@import '../node_modules/@syncfusion/ej2-react-richtexteditor/styles/bootstrap5.css';
@import '../node_modules/@syncfusion/ej2-react-image-editor/styles/bootstrap5.css';
Note: For more details, refer to the getting started documentation for the React Rich Text Editor, ImageEditor, and Dialog components.
Step 4: Add the React Rich Text Editor to the app.
Now, add the following code in the src/App.js file to add the Syncfusion React Rich Text Editor component and inject the required services.
import './App.css';
import { HtmlEditor, Image, Inject, Link, QuickToolbar, RichTextEditorComponent, Toolbar } from '@syncfusion/ej2-react-richtexteditor';
import * as React from 'react';

function App() {
  var rteObj;
  return (
    <div>
      <RichTextEditorComponent
        id="rteImageEditor"
        ref={(scope) => {
          rteObj = scope;
        }}>
        <p>
          Integrating an image editor with a React Rich Text Editor can be achieved using a library such as React-Image-Editor.
          <img
            id="img1"
            style={{ height: 335 }}
            src="https://ej2.syncfusion.com/demos/src/image-editor/images/bridge.png"
          ></img>
        </p>
        <p>
          This library provides an easy-to-use API that allows developers to quickly and easily add an image editor to their React Rich Text Editor. It provides a variety of features, including image cropping, resizing, rotation, and more. Additionally, it supports a wide range of image formats, including JPEG, PNG, and GIF. With the help of this library, developers can easily add an image editor to their React Rich Text Editor, allowing users to customize the images they include in their documents.
        </p>
        <Inject services={[Toolbar, Image, Link, HtmlEditor, QuickToolbar]} />
      </RichTextEditorComponent>
    </div>
  );
}

export default App;
Step 5: Add the Image Editor custom toolbar item in the image quick toolbar.
The image quick toolbar feature lets users quickly insert images into the Rich Text Editor. To add a custom Image Editor toolbar item to the image quick toolbar, you will need to do the following:
- Configure the required options for the image quick toolbar, such as align and remove.
- Include the Image Editor custom toolbar item in the quickToolbarSettings.image property of the Rich Text Editor.
Refer to the following code example.
Import ‘./App.css’;
import { HtmlEditor, Image, Inject, Link, QuickToolbar, RichTextEditorComponent, Toolbar } from ‘@syncfusion/ej2-react-richtexteditor’;
import * as React from ‘react’;

function App() {
  var rteObj;
  const quickToolbarSettings = {
    image: [
      ‘Replace’,
      ‘Align’,
      ‘Caption’,
      ‘Remove’,
      ‘-‘,
      ‘InsertLink’,
      ‘OpenImageLink’,
      ‘EditImageLink’,
      ‘RemoveImageLink’,
      ‘Display’,
      ‘AltText’,
      {
        tooltipText: ‘Image Editor’,
        template:
          ‘<button class=”e-tbar-btn e-btn” id=”imageEditor”><span class=”e-btn-icon e-icons e-rte-image-editor”></span>’,
      },
    ],
  };

  return (
    <div>
      <RichTextEditorComponent
        id=”rteImageEditor”
        ref={(scope) => {
          rteObj = scope;
        }}
        quickToolbarSettings={quickToolbarSettings}
        height={450}>
        <p>
          Integrating an image editor with a React Rich Text Editor can be achieved by using a library such as React-Image-Editor.
          <img
            id=”img1”
            style={{ height: 350 }}
           src=”https://ej2.syncfusion.com/demos/src/image-editor/images/bridge.png”
          ></img>
        </p>
        <p>This library provides an easy-to-use API that allows developers to quickly and easily add an image editor to their React Rich Text Editor. It provides a variety of features, including image cropping, resizing, rotation, and more. Additionally, it supports a wide range of image formats, including JPEG, PNG, and GIF. With the help of this library, developers can easily add an image editor to their React Rich Text Editor, allowing users to customize the images they include in their documents. </p>
        <Inject services={[Toolbar, Image, Link, HtmlEditor, QuickToolbar]} />
      </RichTextEditorComponent>
    </div>
  );
}

export default App;
Refer to the following image.
Step 6: Integrate the React Image Editor with the Rich Text Editor.
Next, add the following code into the src/App.js file to integrate the React Image Editor with the Rich Text Editor component.
Import ‘./App.css’;
import { HtmlEditor, Image, Inject, Link, QuickToolbar, RichTextEditorComponent, Toolbar, NodeSelection  } from ‘@syncfusion/ej2-react-richtexteditor’;
import * as React from ‘react’;
import { DialogComponent } from ‘@syncfusion/ej2-react-popups’;
import { ImageEditorComponent } from ‘@syncfusion/ej2-react-image-editor’;

function App() {
  const dlgButtons = [
    {
      buttonModel: { content: ‘Insert’, isPrimary: true },
      click: onInsert.bind(this),
    },
    { buttonModel: { content: ‘Cancel’ }, click: onCancel },
  ];

  const selection = new NodeSelection();
  const header = ‘Image Editor’;
  var dialogObj;
  var imageEditorObj;
  var rteObj;
  var range;
  var saveSelection;
  var dataURL;
  var isLoaded = false;
  const quickToolbarSettings = {
    image: [
      ‘Replace’,
      ‘Align’,
      ‘Caption’,
      ‘Remove’,
      ‘-‘,
      ‘InsertLink’,
      ‘OpenImageLink’,
      ‘EditImageLink’,
      ‘RemoveImageLink’,
      ‘Display’,
      ‘AltText’,
      {
        tooltipText: ‘Image Editor’,
        template:
          ‘<button class=”e-tbar-btn e-btn” id=”imageEditor”><span class=”e-btn-icon e-icons e-rte-image-editor”></span>’,
      },
    ],
  };

  function onInsert() {
    if (rteObj.formatter.getUndoRedoStack().length === 0) {
      rteObj.formatter.saveData();
    }
    saveSelection.restore();
    var canvas = document.createElement(
      ‘CANVAS’
    );
    var ctx = canvas.getContext(‘2d’);
    const imgData = imageEditorObj.getImageData();
    canvas.height =imgData.height;
    canvas.width = imgData.width;
    ctx.putImageData(imgData, 0,0);
    isLoaded = true;
    rteObj.executeCommand(“editImage”, { url: canvas.toDataURL(), width:{width: canvas.width}, height:{height:canvas.height}, selection: saveSelection });
    rteObj.formatter.saveData();
    rteObj.formatter.enableUndo(rteObj);
    dialogObj.hide();
  }

  function onCancel() {
    dialogObj.hide();
  }
  function onToolbarClick(args) {
    if (args.item.tooltipText === ‘Image Editor’) {
      range = selection.getRange(document);
      saveSelection = selection.save(range, document);
      dialogObj.show();
    }
  }
  function OnBeforeOpen() {
    var imageELement;
    var selectNodes = rteObj.formatter.editorManager.nodeSelection.getNodeCollection(range);
    if(selectNodes.length==1&& selectNodes[0].tagName==”IMG”)
    {
      imageELement = selectNodes[0];
      imageELement.crossOrigin = ‘anonymous’;
      var canvas = document.createElement(‘CANVAS’);
      var ctx = canvas.getContext(‘2d’);
      canvas.height = imageELement.offsetHeight;
      canvas.width = imageELement.offsetWidth;
      imageELement.onload = function () {
        ctx.drawImage(imageELement, 0, 0, canvas.width, canvas.height);
        dataURL = canvas.toDataURL();
        if (!isLoaded) {
          imageEditorObj.open(dataURL);
        }
      }
    }
  }

  return (
    <div>
      <RichTextEditorComponent
        id=”rteImageEditor”
        ref={(scope) => {
          rteObj = scope;
        }}
        quickToolbarSettings={quickToolbarSettings}
        toolbarClick= {onToolbarClick}>
        <p>
          Integrating an image editor with a React Rich Text Editor can be achieved by using a library such as React-Image-Editor.
          <img
            id=”img1”
            style={{ height: 335 }}
           src=”https://ej2.syncfusion.com/demos/src/image-editor/images/bridge.png”
          ></img>
        </p>
        <p>This library provides an easy-to-use API that allows developers to quickly and easily add an image editor to their React Rich Text Editor. It provides a variety of features, including image cropping, resizing, rotation, and more. Additionally, it supports a wide range of image formats, including JPEG, PNG, and GIF. With the help of this library, developers can easily add an image editor to their React Rich Text Editor, allowing users to customize the images they include in their documents.</p>
        <Inject services={[Toolbar, Image, Link, HtmlEditor, QuickToolbar]} />
      </RichTextEditorComponent>

      <DialogComponent
        id=”ImageEditorDialog”
        ref={(scope) => {
          dialogObj = scope;
        }}
        buttons={dlgButtons}
        beforeOpen={OnBeforeOpen}
        header={header}
        visible={false}
        showCloseIcon={true}
        width=”800px”
        height=”800px”
        isModal={true}
      >
        <div className=”dialogContent”>
          <ImageEditorComponent
            height=”335px”
            ref={(scope) => {
              imageEditorObj = scope;
            }}
          />
        </div>
      </DialogComponent>
    </div>
  );
}

export default App;
Then, add the following styles in the src/App.css file for the Image Editor toolbar item icon.
.e-rte-quick-popup .e-rte-quick-toolbar .e-rte-image-editor::before {
content: “\e730”;
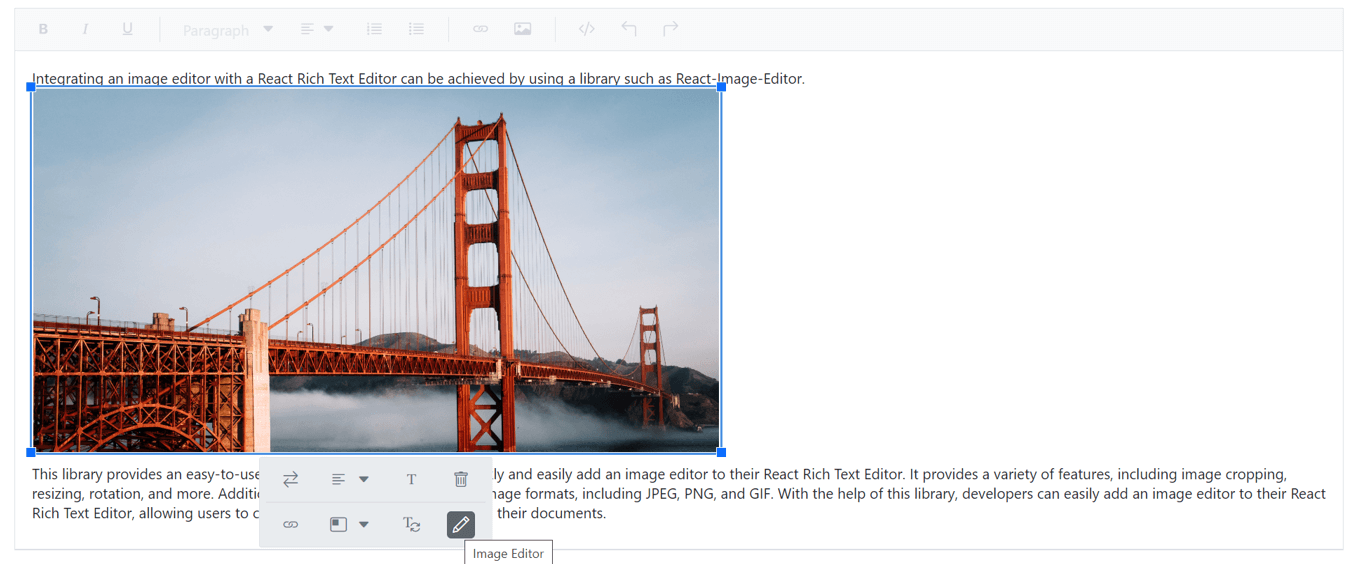
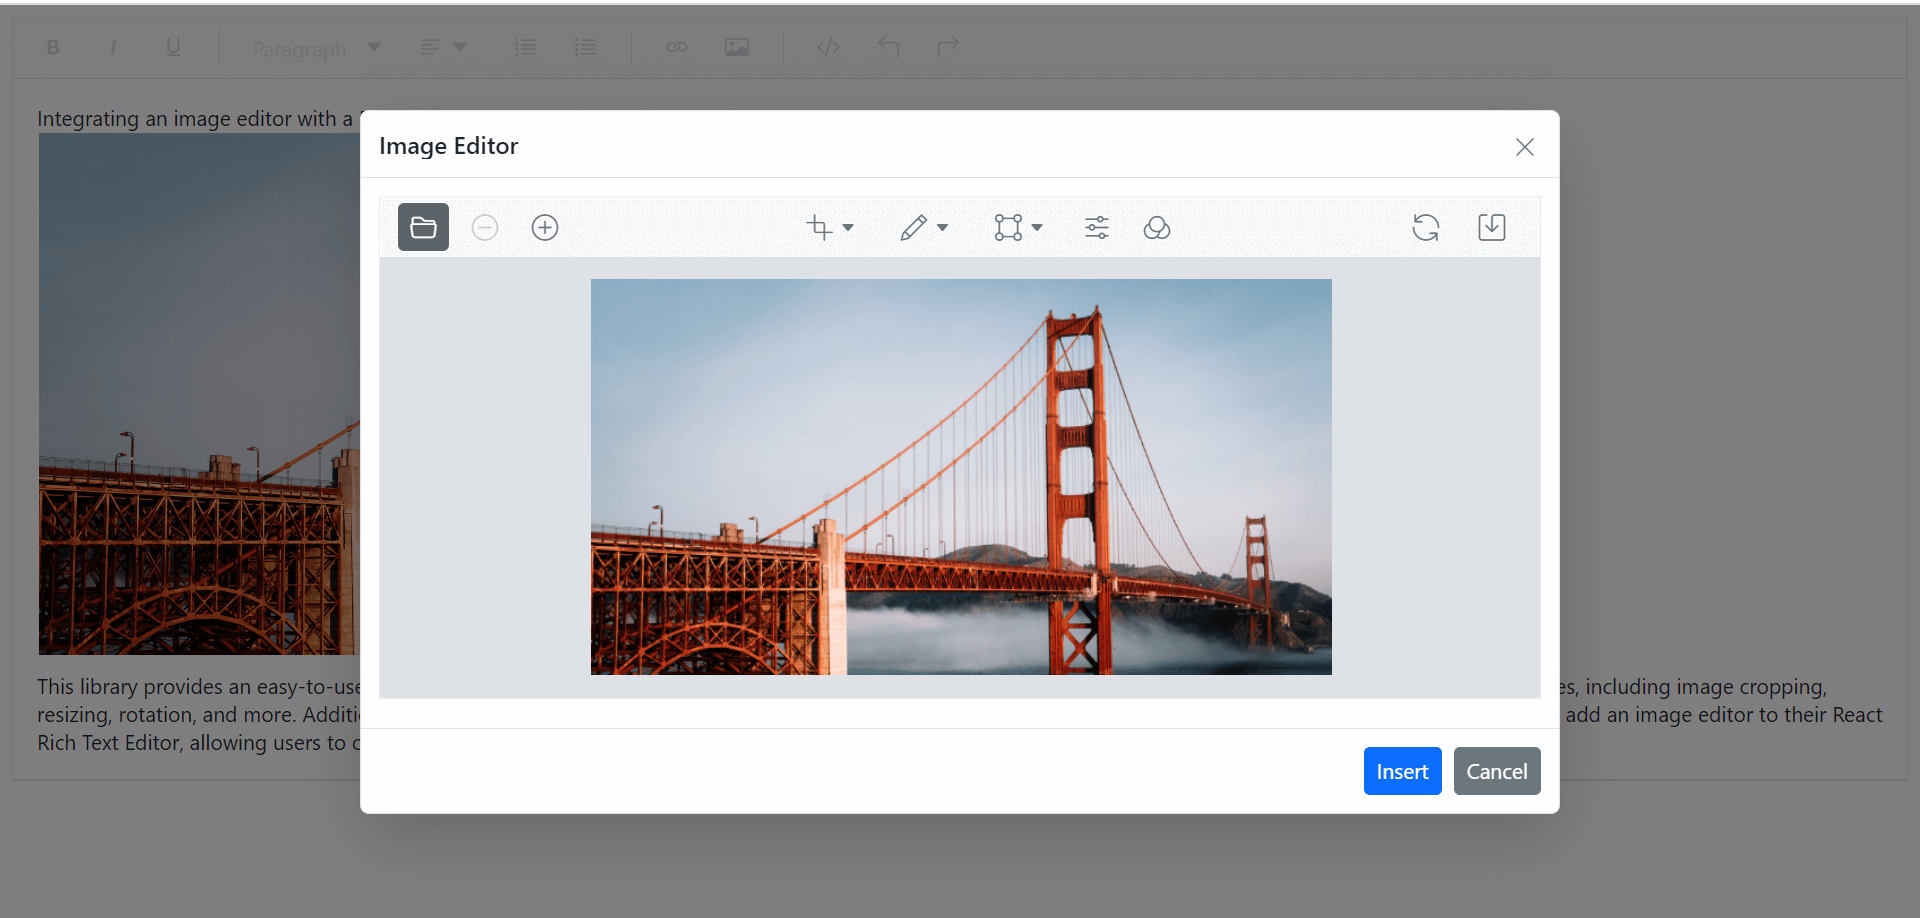
}Select an image in the Rich Text Editor content; it will show the image quick toolbar. Select the ImageEditor button from the toolbar. A dialog will open with the image editing tools.
The Insert and Cancel buttons will be rendered at the bottom of the dialog. When we choose the Insert button, the edited image will be inserted into the Rich Text Editor content.
Refer to the following image.
GitHub reference
Check out the complete code example for integrating the React Image Editor with the Rich Text Editor on GitHub.
Conclusion
Thanks for reading! In this blog, we’ve seen how to integrate the Syncfusion React Image Editor with the Rich Text Editor component. Try out the steps in this blog and provide your feedback in the comments section below!
If you are new to Syncfusion, try our controls’ features by downloading a free trial. You can also explore our online demos and documentation to explore the other user-friendly features we support.
For questions, you can contact us through our support forums, support portal, or feedback portal. We are always happy to assist you!
 No spam, just valuable updates.