
The Syncfusion Flutter Maps widget is a data-visualization library written natively in the Dart language. It displays a geographical area from GeoJSON data. It has highly interactive and customizable features that enrich the end-user experience by presenting the data of the regions in more intuitive ways. An introduction blog about the Maps widget can be read here.
In this blog, we are going to focus on one of the most important features in most real-world applications, like e-commerce apps: location tracking. For example, use it to check out the current location of an order at any given time. Though there are many ways to visualize this data, maps would be the perfect one for most cases. This can be done with the Syncfusion Flutter Maps widget using some of its built-in features.
We are going to combine the markers feature in the Maps widget with the geolocator and geocoding packages for the location tracking feature in the Flutter application. We will discuss adding the markers in the Maps widget and how they can be used to denote locations in the maps along with custom widgets.
Let’s start exploring them!
Add Flutter Maps to your application
This section explains the procedure to add the Flutter Maps widget to your application.
- Add the Syncfusion Flutter Maps dependency to the pubspec.yaml file.
dependencies:
  syncfusion_flutter_maps: ^18.2.44-beta
- Run the following command to get the required packages.
$ flutter pub get - Now, import the library using the following code.
import 'package:syncfusion_flutter_maps/maps.dart';
- After importing the package, initialize the Maps widget as a child to any widget, like in the following code example.
@override Widget build(BuildContext context) { return Scaffold( body: SafeArea( child: Center( child: Padding( padding: const EdgeInsets.all(8.0), child: SfMaps(), ), ), ), ); } - Add the GeoJSON file for the shape layer. Here, we are going to render the USA map. Get this usa.json file and add it to the assets folder and in the pubspec.yaml file of your application. The actual geographical rendering is done in each MapShapeLayer method using the delegate property. The path of the .json file that contains the GeoJSON data has to be set to the MapShapeLayerDelegate.shapeFile, as shown in the following code snippet. The MapShapeLayerDelegate.shapeDataField is used to refer to the unique field name in the .json file to identify each shape.
  @override
  Widget build(BuildContext context) {
    return Scaffold(
      body: SafeArea(
        child: Center(
          child: Padding(
            padding: const EdgeInsets.all(8.0),
            child: SfMaps(
              layers: [
                MapShapeLayer(
                  delegate: MapShapeLayerDelegate(
                    shapeFile: 'assets/usa.json',
                    shapeDataField: 'name',
                  ),
                ),
              ],
            ),
          ),
        ),
      ),
    );
  }
After executing the above code, we will get output like in the following screenshot.
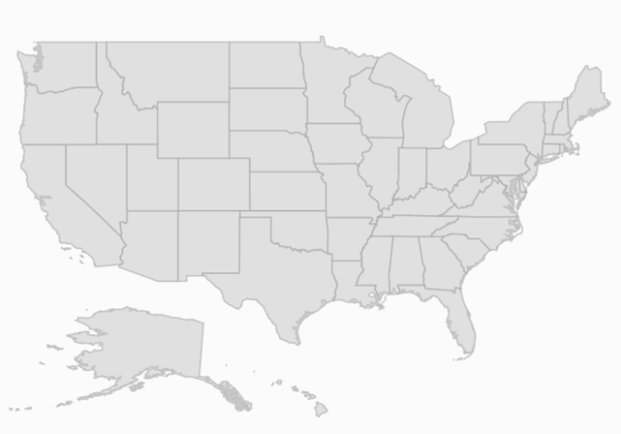
Flutter Maps
After finishing the initial rendering, it’s time to add markers in it.
Adding markers
Markers can be easily positioned on maps at the required latitude and longitude. Markers provide built-in shapes to display, such as circles, squares, triangles, and diamonds. Or use a custom widget as a marker, like cars for the cab-booking apps, bikes for food delivery apps, and so on.
If you want to add markers in the loading time itself, you can refer to this link in our user guide. Here, we are going to focus on adding markers dynamically alone for our use case. For this, you will need the help of the MapShapeLayerController class. It allows you to modify the markers collection dynamically by adding, removing, updating, and deleting the markers.
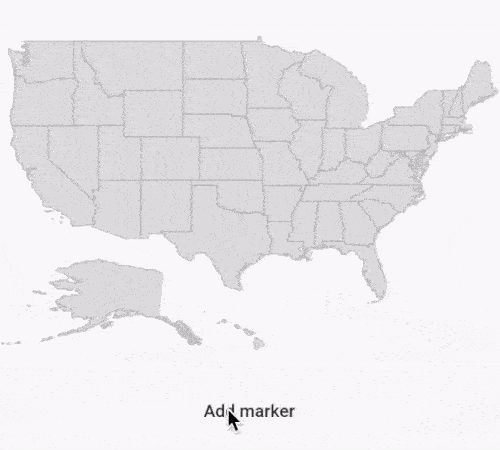
In the following code snippet, we will see how we can add a marker dynamically at a specific latitude and longitude using the insertMarker method in the MapShapeLayerController class. Here, I am adding a built-in marker at Washington, D.C., on the button click for demo purposes. In the upcoming sections, we will add markers at the current destination locations and we will update the other marker’s location whenever the location changes.
Once the insertMarker method is called, the markerBuilder property will be called for the respective index. This is where you have to return the MapMarker, which can be changed based on the current index.
Refer to the following code example.
class _LocationTrackerBlogState extends State {

  final MapShapeLayerController _layerController = MapShapeLayerController();

  @override
  void dispose() {
    _layerController.dispose();
    super.dispose();
  }

  @override
  Widget build(BuildContext context) {
    return Scaffold(
      body: SafeArea(
        child: Center(
          child: Padding(
            padding: const EdgeInsets.all(8.0),
            child: Column(
              children: [
                SfMaps(
                  layers: [
                    MapShapeLayer(
                      controller: _layerController,
                      delegate: MapShapeLayerDelegate(
                        shapeFile: 'assets/usa.json',
                        shapeDataField: 'name',
                      ),
                      markerBuilder: (BuildContext context, int index) {
                        return MapMarker(
                          latitude: 38.8951,
                          longitude: -77.0364,
                        );
                      },
                    ),
                  ],
                ),
                FlatButton(
                  child: Text('Add marker'),
                  onPressed: () {
                    _layerController.insertMarker(0);
                  },
                )
              ],
            ),
          ),
        ),
      ),
    );
  }
After executing this code example, we will get output like the following .gif image.
Let’s improve the application UI
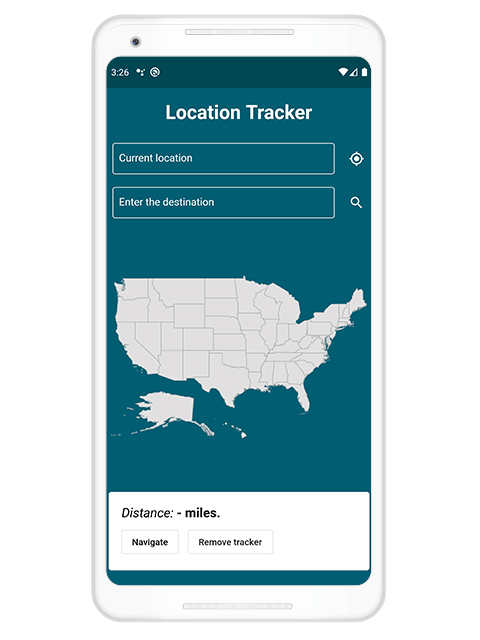
Before tracking the real-time location, let’s make some UI improvements in the application. We will not dive deep into the UI design part here. Don’t get startled by the sudden increase in total lines of codes. All of the widgets used here are very basic and there are already many references and articles for them.
You can see some of the onPressed callbacks are left empty. This is where the actual marker updates the location tracking when it happens. We will get to that shortly.
class _LocationTrackerBlogState extends State {

  final MapShapeLayerController _layerController = MapShapeLayerController();
  final TextEditingController _currentLocationTextController =
      TextEditingController();
  final TextEditingController _destinationLocationTextController =
      TextEditingController();

  double _distanceInMiles;

  Position _currentPosition, _destinationPosition;

  @override
  void dispose() {
    _layerController.dispose();
    _currentLocationTextController.dispose();
    _destinationLocationTextController.dispose();
    super.dispose();
  }

  @override
  Widget build(BuildContext context) {
    return Scaffold(
      backgroundColor: const Color(0xFF096770),
      body: SafeArea(
        child: Column(
          children: [
            //Title widget
            Padding(
              padding: const EdgeInsets.all(20.0),
              child: Text(
                'Location Tracker',
                style: TextStyle(
                    fontSize: 30,
                    color: Colors.white,
                    fontWeight: FontWeight.bold),
              ),
            ),
            Row(
              children: [
                //Current location text field.
                Expanded(
                  child: Container(
                    padding: EdgeInsets.all(10),
                    child: TextField(
                      controller: _currentLocationTextController,
                      style: TextStyle(color: Colors.white),
                      decoration: InputDecoration(
                        contentPadding: EdgeInsets.only(
                            left: 10, right: 3, top: 3, bottom: 3),
                        enabledBorder: const OutlineInputBorder(
                          borderSide: const BorderSide(color: Colors.white),
                        ),
                        focusedBorder: const OutlineInputBorder(
                          borderSide: const BorderSide(color: Colors.white),
                        ),
                        hintText: 'Current location',
                        hintStyle: TextStyle(color: Colors.white),
                      ),
                    ),
                  ),
                ),
                //Current location clickable icon.
                IconButton(
                  icon: Icon(
                    Icons.my_location,
                    color: Colors.white,
                  ),
                  tooltip: 'My location',
                  onPressed: () async {},
                )
              ],
            ),
            Row(
              children: [
                //Destination location text field.
                Expanded(
                  child: Container(
                    padding: EdgeInsets.all(10),
                    child: TextField(
                      controller: _destinationLocationTextController,
                      style: TextStyle(color: Colors.white),
                      decoration: InputDecoration(
                        hintStyle: TextStyle(color: Colors.white),
                        contentPadding: EdgeInsets.only(
                            left: 10, right: 3, top: 3, bottom: 3),
                        hintText: 'Enter the destination',
                        enabledBorder: const OutlineInputBorder(
                          borderSide: const BorderSide(color: Colors.white),
                        ),
                        focusedBorder: const OutlineInputBorder(
                          borderSide: const BorderSide(color: Colors.white),
                        ),
                      ),
                    ),
                  ),
                ),
                //Destination location clickable icon.
                IconButton(
                  icon: Icon(
                    Icons.search,
                    color: Colors.white,
                  ),
                  tooltip: 'Search',
                  onPressed: () async {},
                )
              ],
            ),
            //Maps widget container
            Container(
              child: Expanded(
                child: Padding(
                  padding: const EdgeInsets.all(8.0),
                  child: SfMaps(
                    layers: [
                      MapShapeLayer(
                          controller: _layerController,
                          delegate: MapShapeLayerDelegate(
                            shapeFile: 'assets/usa.json',
                            shapeDataField: 'name',
                      )),
                    ],
                  ),
                ),
              ),
            ),
            //Widget for starting location and stopping location
            //tracking. It also shows the current distance between the
            //current and destination location in miles.
            Card(
              child: Padding(
                padding: const EdgeInsets.all(20.0),
                child: Column(
                  crossAxisAlignment: CrossAxisAlignment.start,
                  mainAxisAlignment: MainAxisAlignment.spaceEvenly,
                  children: [
                    RichText(
                      text: TextSpan(
                        children: [
                          TextSpan(
                              text: '${_distanceInMiles?.toStringAsFixed(2) ?? '-'} miles.',
                              style: TextStyle(
                                  fontSize: 20,
                                  fontStyle: FontStyle.italic,
                                  color: Colors.black)),
                          TextSpan(
                              text: '${'-'} miles.',
                              style: TextStyle(
                                  fontWeight: FontWeight.bold,
                                  fontSize: 20,
                                  color: Colors.black))
                        ],
                      ),
                    ),
                    SizedBox(height: 10),
                    Row(
                      children: [
                        OutlineButton(
                          child: Text('Navigate'),
                          textColor: Colors.black,
                          onPressed: () async {},
                        ),
                        SizedBox(
                          width: 15,
                        ),
                        OutlineButton(
                          child: Text('Remove tracker'),
                          onPressed: () {},
                        )
                      ],
                    ),
                  ],
                ),
              ),
            )
          ],
        ),
      ),
    );
  }
After executing this code example, we will get output like the following .gif image.
![]()
Flutter geolocation plugins
From this point, we will need the help of two popular packages in the pub.dev file i.e. the geolocator and geocoding. It provides some of the interesting features out of the box. Though there are many, we will make use of the below features and combine them with Syncfusion Flutter Maps widget.
- Get the current location of the device.
- Get continuous location updates.
- Calculate the distance (in meters) between the two geocoordinates.
Adding the required plugins
Add the geolocator and geocoding packages in the pubspec.yaml file.
dependencies:
  syncfusion_flutter_maps: ^18.2.54-beta
  geolocator: ^6.0.0+4
  geocoding: ^1.0.3
Then, run the following command.
$ flutter pub get |
Adding the necessary permissions
It is mandatory to enable the few platform-specific permissions in the Android and iOS projects. Since, the steps are specified clearly in the documentation of the package itself, I am not going to repeat them again here.
Please make sure these lines are added in the android/app/src/main/AndroidManifest.xml.

And in the ios/Runner/Info.plist, the following lines of code should be there.

Adding a marker at the current location
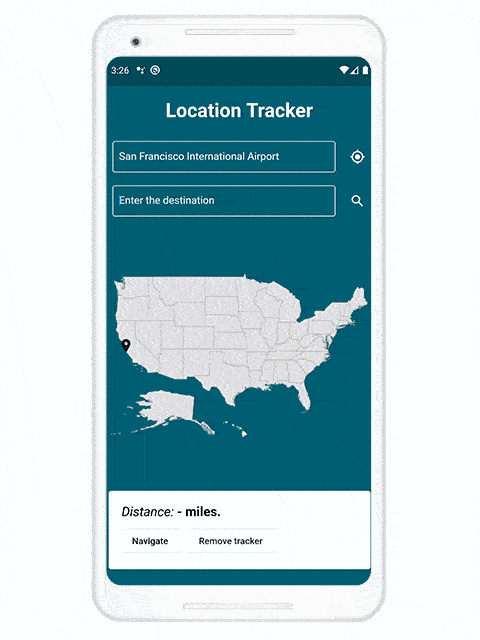
In the onPressed callback of the Icons.my_location, we will request the current location through the getCurrentPosition method. We will use the MapShapeLayerController.insertMarker method to add the marker at the current location. We will also request the current location’s address from the placemarkFromCoordinates method by passing the obtained current latitude and longitude as the arguments. The current location’s address will be updated in the TextField by setting the _currentLocationTextController.text.
Refer to the following code.
IconButton(
   icon: Icon(
           Icons.my_location,
           color: Colors.white,
        ),
    tooltip: 'My location',
    onPressed: () async {
        _currentPosition = await getCurrentPosition(
               desiredAccuracy: LocationAccuracy.high);
        List addresses = await placemarkFromCoordinates(
        _currentPosition.latitude, _currentPosition.longitude);
        _currentLocationTextController.text = addresses[0].name;
        _layerController.insertMarker(0);
    },
 )
The markerBuilder will now look like this.
MapShapeLayer(
    controller: _layerController,
    markerBuilder: (BuildContext context, int index) {
      if (index == 0) {
        //current position
        return MapMarker(
            latitude: _currentPosition.latitude,
            longitude: _currentPosition.longitude,
            child: Icon(Icons.location_on));
      }
      return null;
    },
    delegate: MapShapeLayerDelegate(
      shapeFile: 'assets/usa.json',
      shapeDataField: 'name',
    )),
After executing this code example, we will get output like the following .gif image.
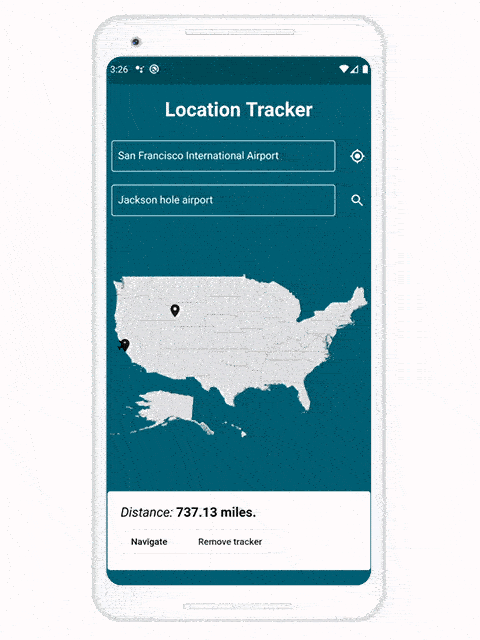
You can see that both the TextField and marker updated properly. In the emulator location, I have set the current location as San Francisco International Airport. If you are using a real device, the actual location will be shown to you.
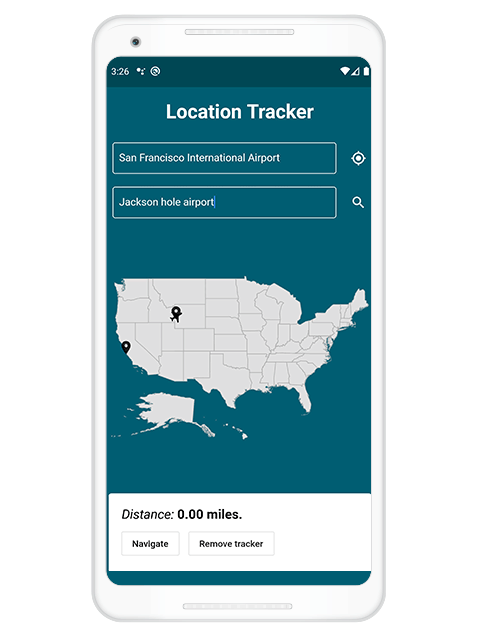
Adding a marker at the destination location
In the onPressed callback of the Icons.search, we will get the latitude and longitude of the destination address from the locationFromAddress method. This will accept the address as an argument. This latitude and longitude will then be used to add a marker at the destination location. You can get the current address as a string from the _destinationLocationTextController.text.
There is also an API for finding the distance between the current and destination locations. You can use the distanceBetween method for this requirement. It will accept the current and destination latitude and longitude coordinates as inputs and return the distance in meters. We will do a simple math calculation to convert this to miles.
Refer to the following code example.
IconButton(
  icon: Icon(
    Icons.search,
    color: Colors.white,
  ),
  tooltip: 'Search',
  onPressed: () async {
    List places = await locationFromAddress(
        _destinationLocationTextController.text);
    _destinationPosition = Position(
        longitude: places[0].longitude,
        latitude: places[0].latitude);
    _layerController.insertMarker(1);

    //1 mile = 0.000621371 * meters
    setState(() {
     _distanceInMiles = distanceBetween(
      _currentPosition.latitude,
      _currentPosition.longitude,
      _destinationPosition.latitude,
      _destinationPosition.longitude) *
      0.000621371;
    });
  },
)
Then, the process will be the same as the previous one. The markerBuilder will now look like the following.
MapShapeLayer(
    controller: _layerController,
    markerBuilder: (BuildContext context, int index) {
      if (index == 0) {
        //current position
        return MapMarker(
            latitude: _currentPosition.latitude,
            longitude: _currentPosition.longitude,
            child: Icon(Icons.location_on));
      } else if (index == 1) {
        //destination position
        return MapMarker(
            latitude: _destinationPosition.latitude,
            longitude: _destinationPosition.longitude,
            child: Icon(Icons.location_on));
      }
      return null;
    },
    delegate: MapShapeLayerDelegate(
      shapeFile: 'assets/usa.json',
      shapeDataField: 'name',
    )),
After executing this code example, we will get output like the following .gif image.
Updating the marker to the current location
We now have a current location and a destination location. Let’s add another marker and update its position whenever the current location changes. Once the Navigate button is clicked, we will add another marker, a flight icon, in the current location. As the location changes, this icon will move towards the destination. For listening to the location changes, we will use the getPositinoStream() method. Whenever the callback is called, we will update the position of this marker using the MapShapeLayerController.updateMarkers() method. We will also update the _distanceInMiles field, which in turn will update the TextSpan, which shows the remaining distance.
Refer to the following code example.
  OutlineButton(
  child: Text('Navigate'),
  textColor: Colors.black,
  onPressed: () async {
    _layerController.insertMarker(2);
    _positionStream = getPositionStream()
        .listen((Position position) {
      _currentPosition = position;
      //1 mile = 0.000621371 * meters
      setState(() {
        _distanceInMiles = distanceBetween(
            _currentPosition.latitude,
            _currentPosition.longitude,
            _destinationPosition.latitude,
            _destinationPosition.longitude) *
            0.000621371;
      });
      _layerController.updateMarkers([2]);
    });
  },
),
The markerBuilder will now look like the following.
MapShapeLayer(
    controller: _layerController,
    markerBuilder: (BuildContext context, int index) {
      if (index == 0) {
        //current position
        return MapMarker(
            latitude: _currentPosition.latitude,
            longitude: _currentPosition.longitude,
            child: Icon(Icons.location_on));
      } else if (index == 1) {
        //destination position
        return MapMarker(
            latitude: _destinationPosition.latitude,
            longitude: _destinationPosition.longitude,
            child: Icon(Icons.location_on));
      } else if (index == 2) {
        //flight current position
        return MapMarker(
            latitude: _currentPosition.latitude,
            longitude: _currentPosition.longitude,
            child: Transform.rotate(
                      angle: 45,
                      child: Icon(Icons.flight)),
               );
         }
      return null;
    },
    delegate: MapShapeLayerDelegate(
      shapeFile: 'assets/usa.json',
      shapeDataField: 'name',
    )),
After executing this code example, we will get output like the following .gif image.
Stopping the location tracking
Whenever we want to stop the location tracking, we can use the cancel() method of the StreamSubscription. This will stop the stream listening. You can then use the MapShapeLayerController.removeMarkerAt() method to remove the marker.
Refer to the following code example.
OutlineButton(
  child: Text('Remove tracker'),
  onPressed: () {
    _layerController.removeMarkerAt(2);
    _positionStream.cancel();
  },
)
After executing this code example, we will get output like the following .gif image.
Conclusion
In this blog post, I walked you through how the Syncfusion Flutter Maps widget can be used for location tracking in your Flutter application with the help of the awesome geolocator and geocoding packages. Try out this widget and share your feedback in the comments section below.
You can check out the complete user guide and see our samples in this GitHub location. Additionally, you can check out our demo apps in the Google Play Store, App Store, and on our website.
If you need a new widget for the Flutter framework or new features in our existing widgets, you can contact us with suggestions through our support forum, Direct-Trac, or feedback portal. As always, we are happy to assist you!


 No spam, just valuable updates.
Comments (4)
Hi Mohamed,
Thank you a lot for this article.
Could you clarify what is Position class in
“`Position _currentPosition, _destinationPosition; “`
line?
Thank you in advance,
KR
Hi,
This is a class from the dependent package of the Geolocator package.
https://pub.dev/documentation/geolocator_platform_interface/latest/geolocator_platform_interface/Position-class.html
Regards,
Samsudeen
Hi MOHAMED,
How can I track movement with a polyline, so live tracking with a groenig polyline
Regardeer,
Theo Mars
Hi Theo,
In this blog, we have explained how we can update the marker from the current location to the destination location. You can refer to the below sample for updating the polylines from one marker location to another marker location with animation in the below sample.
Sample – https://flutter.syncfusion.com/#/maps/tile-layer/polylines
Code snippet – https://github.com/syncfusion/flutter-examples/blob/master/lib/samples/maps/tile_layer/vector_layer/polylines.dart
Please let us know if you need any further assistance in this.
Regards,
Meikandan