

Installers are the software components responsible for installing, maintaining, and uninstalling software. Installers give your users their first impression of your software product before they even start using it. So, creating an attractive and impressive experience is important.
Installers are programmed to perform a required set of operations automatically rather than doing them one by one manually. They obviously reduce the time spent on manual processes.
The installers are sharable and can be run in any number of machines without any restrictions. Removing the installed files can be done easily in a single click by uninstalling the installer from control panel.
In this blog, we are going to discuss creating an installer using the WiX toolset. We’ll be:
Prerequisites
You need the following tools before proceeding further:
- WiX toolset—Download the latest WiX toolset.
- Visual Studio and its corresponding WiX toolset extension.
What is the WiX toolset?
The WiX toolset is an open-source project developed by Microsoft to build Windows installation packages based on XML source code. The WiX project supports:
- Shipping files of larger sizes.
- Performing custom actions.
- Outperforming registry actions.
The rest of this blog will demonstrate the step-by-step procedure to create WiX and bootstrapper applications. Download the complete source for these sample applications on our website.
Create an MSI using WiX toolset
Step 1: Open Visual Studio and create a new project by clicking File->New->Project.
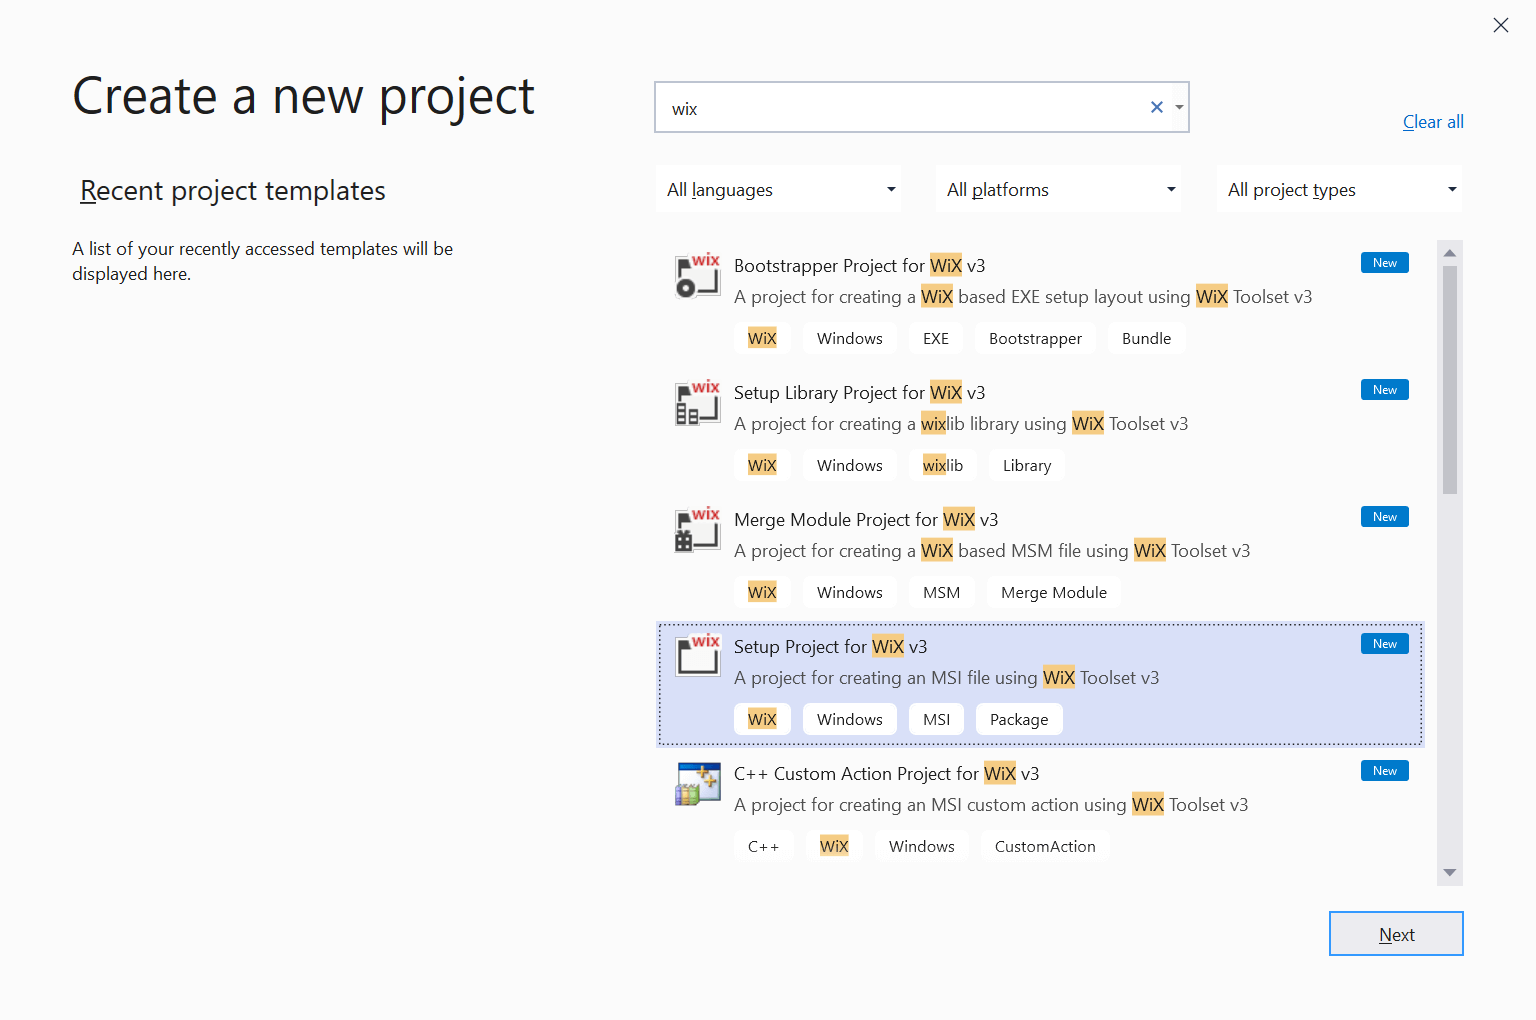
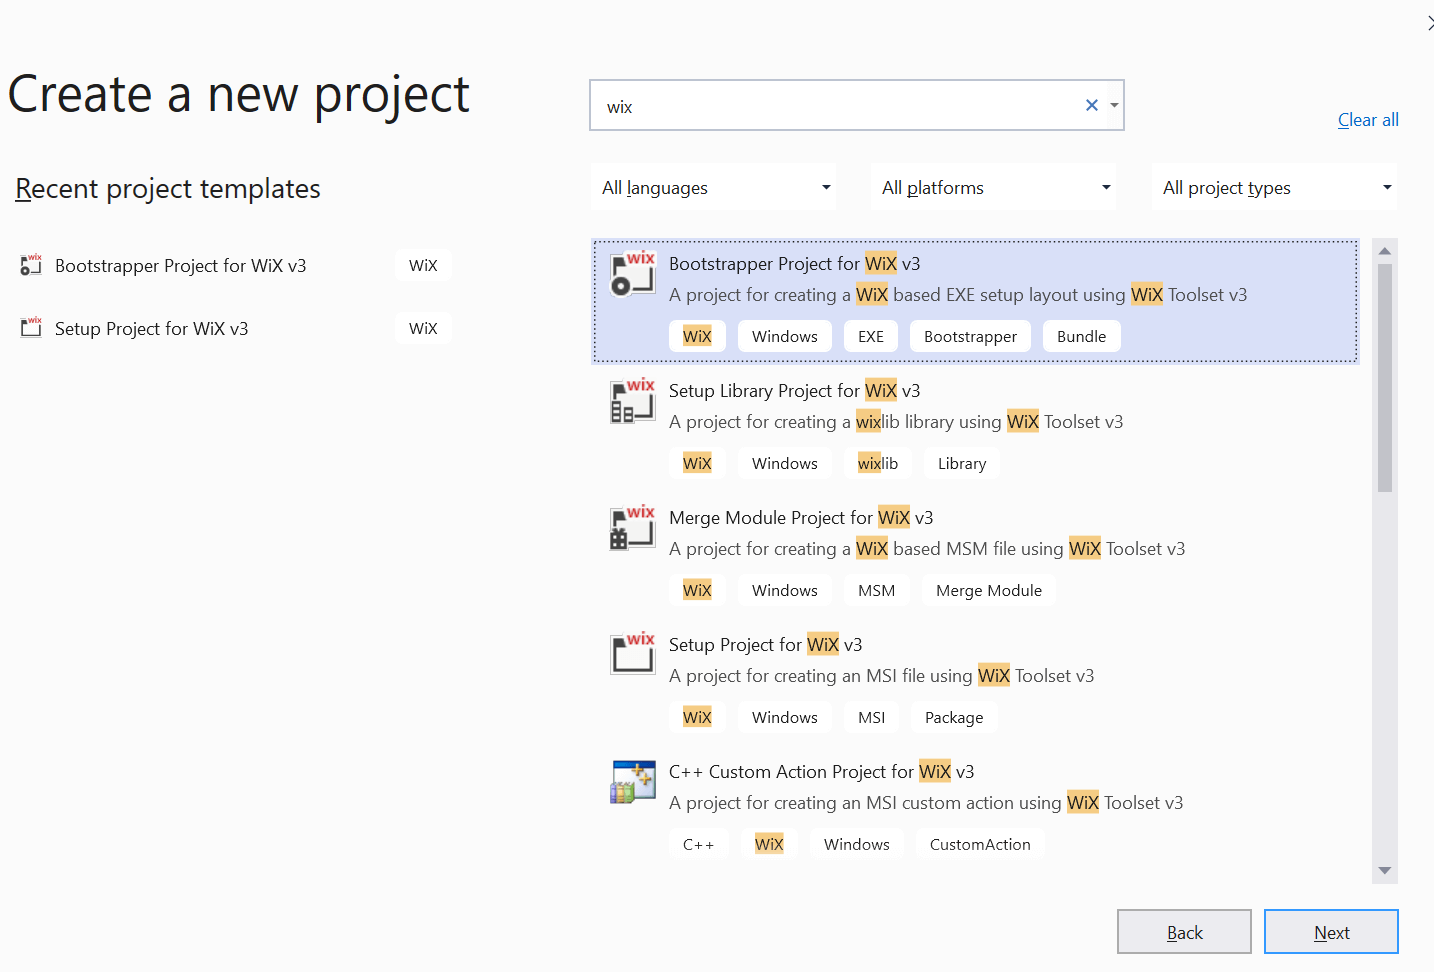
Step 2: The Create a new project dialog will open. In the search box, search for WiX and select the Setup Project for WiX v3
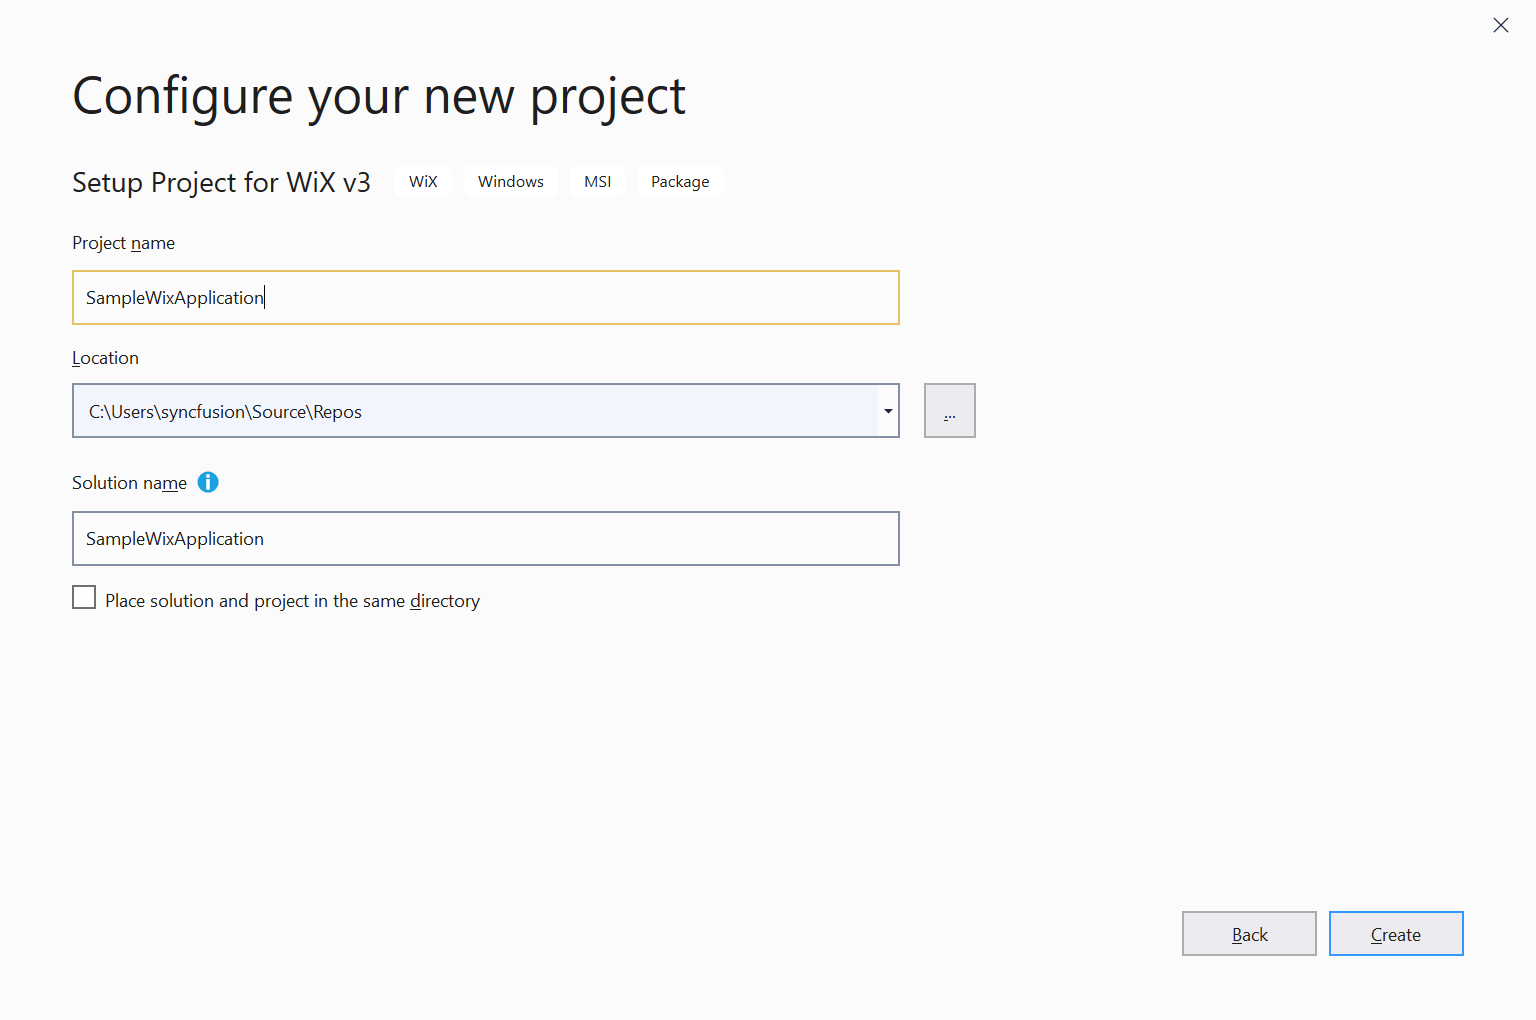
Step 3: Provide a name for the project and click Create. Here I have named the project SampleWixApplication.
The project will be created.
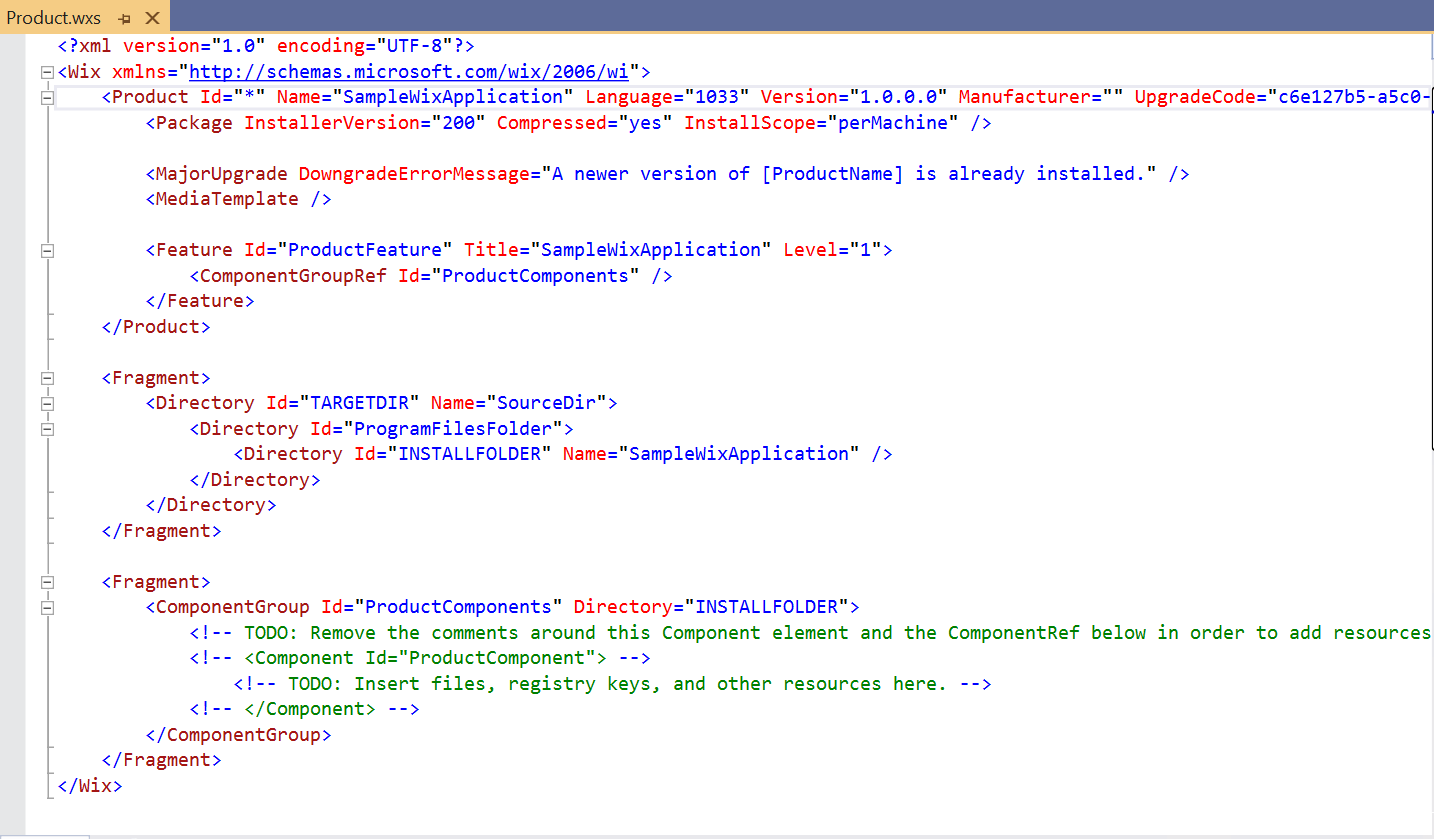
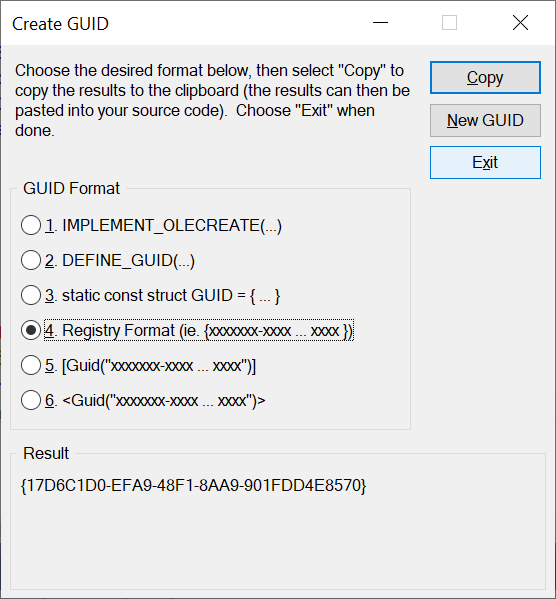
Step 4: In this example, we are shipping a text file to the Program Files location. Provide the product ID and manufacturer at the top of the application. You can create the product ID in Visual Studio by clicking Tools-> Create GUID.
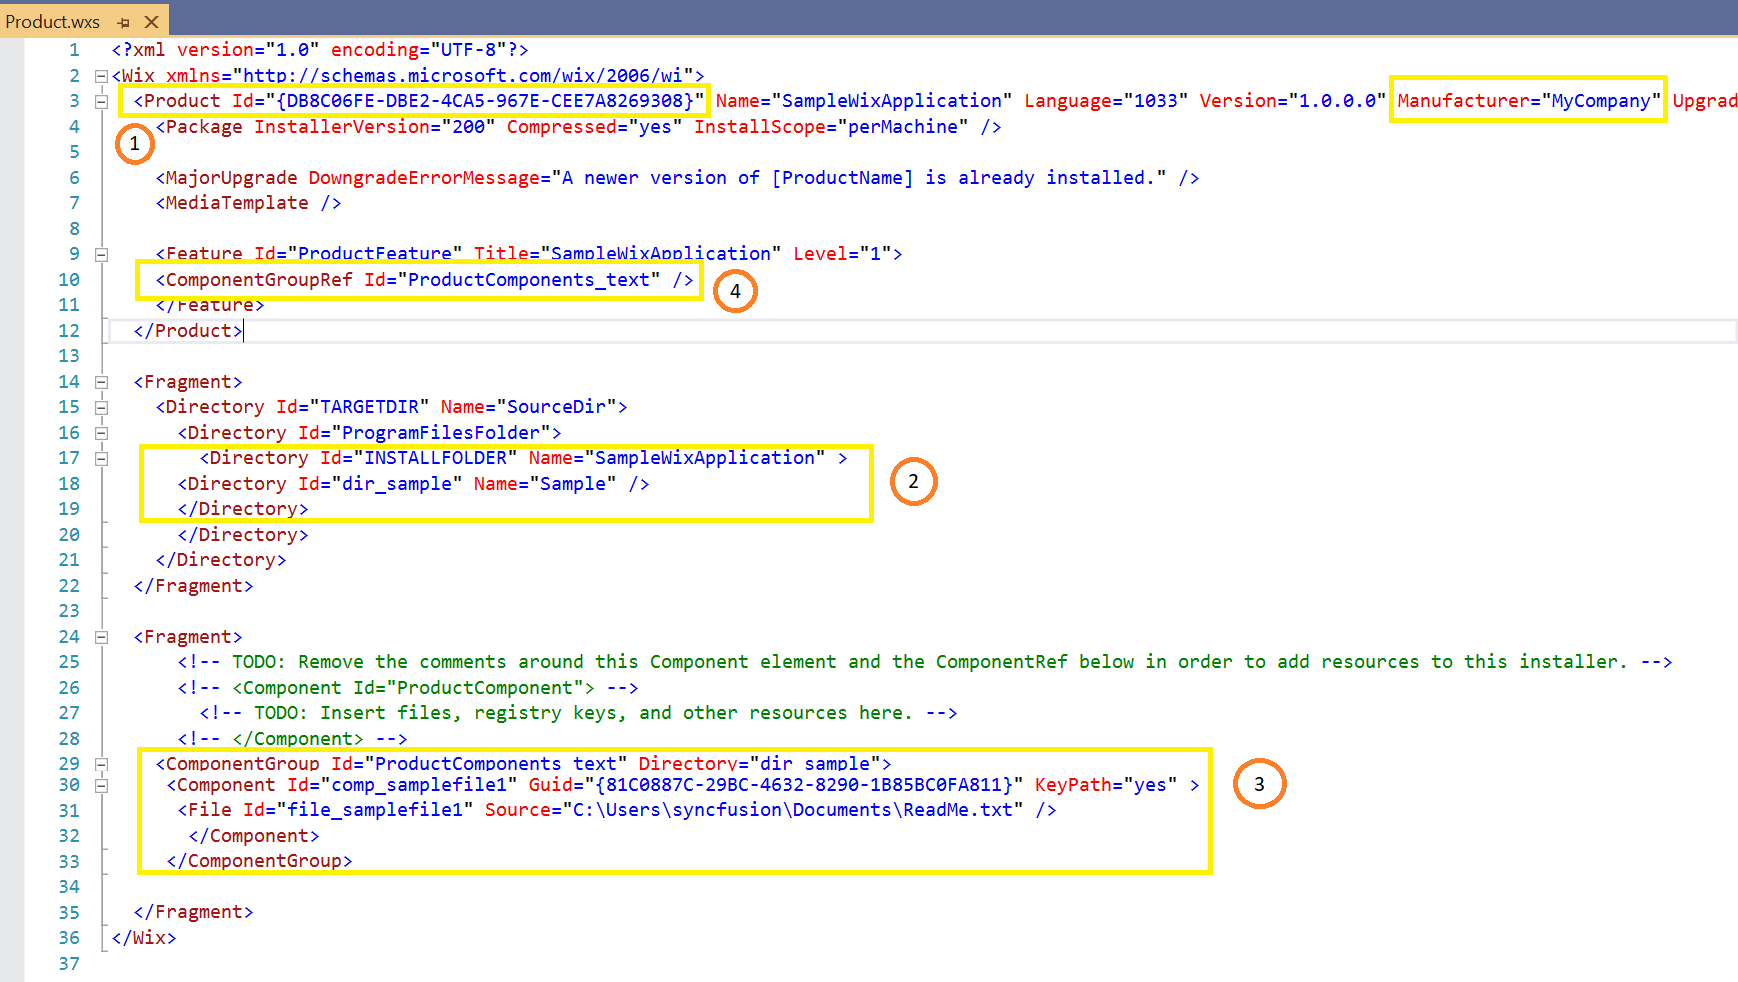
Step 5: In the TARGETDIR tag, remove the closing tag of INSTALLFOLDER and include the code to create a new directory inside the INSTALLFOLDER directory tag.
[Product.wxs]
      <Directory Id="INSTALLFOLDER" Name="SampleWixApplication" >
      <Directory Id="dir_sample" Name="Sample" />
      </Directory>
Step 6: Remove the default component group inside the Fragment. In the ComponentGroup tag inside the Fragment, include the code for shipping the text file.
[Product.wxs]
     <ComponentGroup Id="ProductComponents_text" Directory="dir_sample">

     <Component Id="comp_samplefile1" Guid="{81C0887C-29BC-4632-8290-1B85BC0FA811}" KeyPath="yes" >

      <File Id="file_samplefile1" Source="C:\Users\syncfusion\Documents\ReadMe.txt" />
          </Component>

     </ComponentGroup>
Step 7: In the Feature tag, remove the default component group reference and include the ComponentGroupRef ID as a reference for the component to be shipped.
[Product.wxs]
<ComponentGroupRef Id="ProductComponents_text" />
Step 8: Build the application and the MSI will be created along with cab files in the application’s output location. If you wish to copy the output .msi file to another location, copy the .cab file also, as it should be placed parallel to the .msi file.
Output location:
C:\Users\%%username%%\Documents\SampleWixApplication\SampleWixApplication\bin\
Release\SampleWixApplication.msi

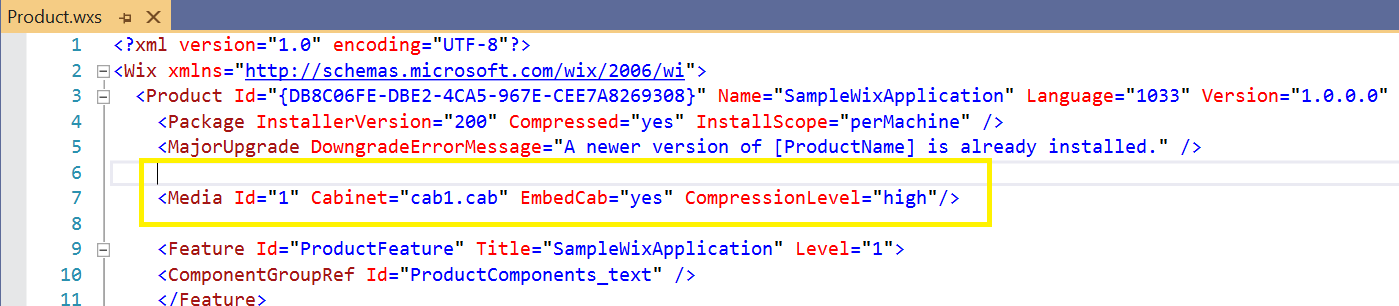
Note: We can embed the cab files in the MSI package itself by replacing the MediaTemplate tag with the following code snippet.
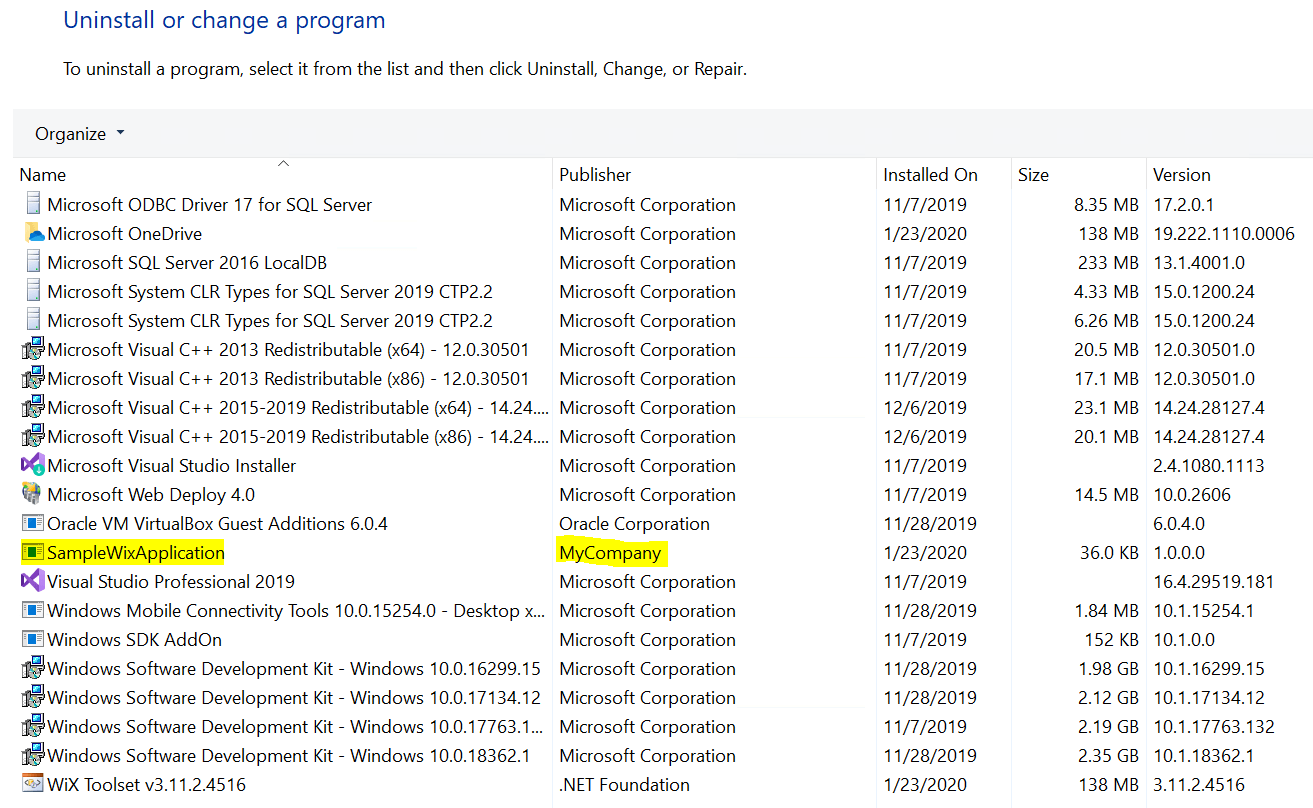
Step 9: Run the MSI file and the text file will be shipped to the location specified.

You can find the installed information in the Control Panel.
Creating a simple .exe using WiX Bootstrapper with default UI
In the bootstrapper application, we can convert the MSI file into an executable (.exe) application:
Step 1: Open Visual Studio.
Step 2: Create a new project by clicking File->New->Project.
Step 3: In the Create a new project dialog, search for WiX and select the Bootstrapper Project for WiX v3
Step 4: Provide a name for your project and click Create.
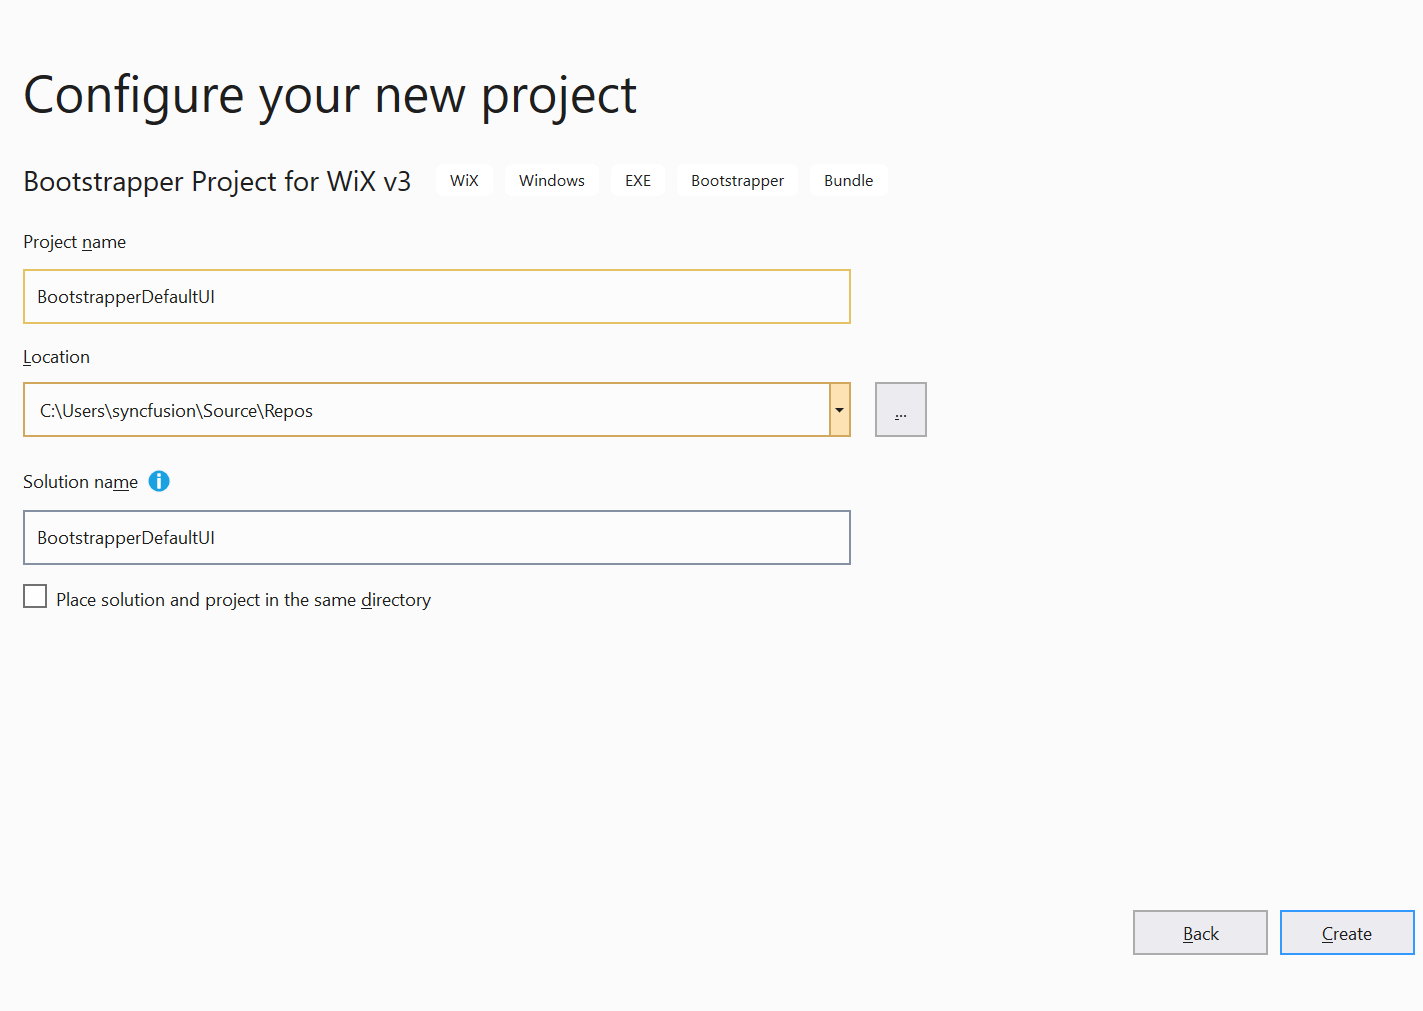
Project will be created
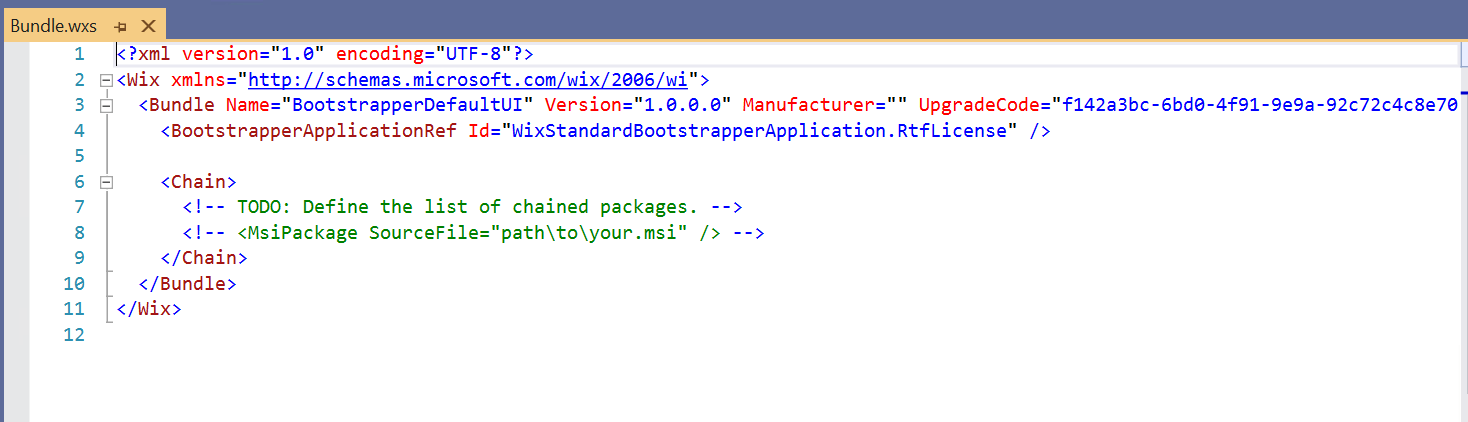
Step 5: Provide the manufacturer and the .msi file location you want to pack inside the Chain tag.
[Bundle.wxs]
<!--MSI file to be packed-->
<MsiPackage Id="Sample" Name="Wixdata" SourceFile="C:\SampleWixApplication\SampleWixApplication.msi" />
Step 6: Build the application and the .exe will be created in the application output location.

Step 7: Run the .exe and the default UI will be displayed.

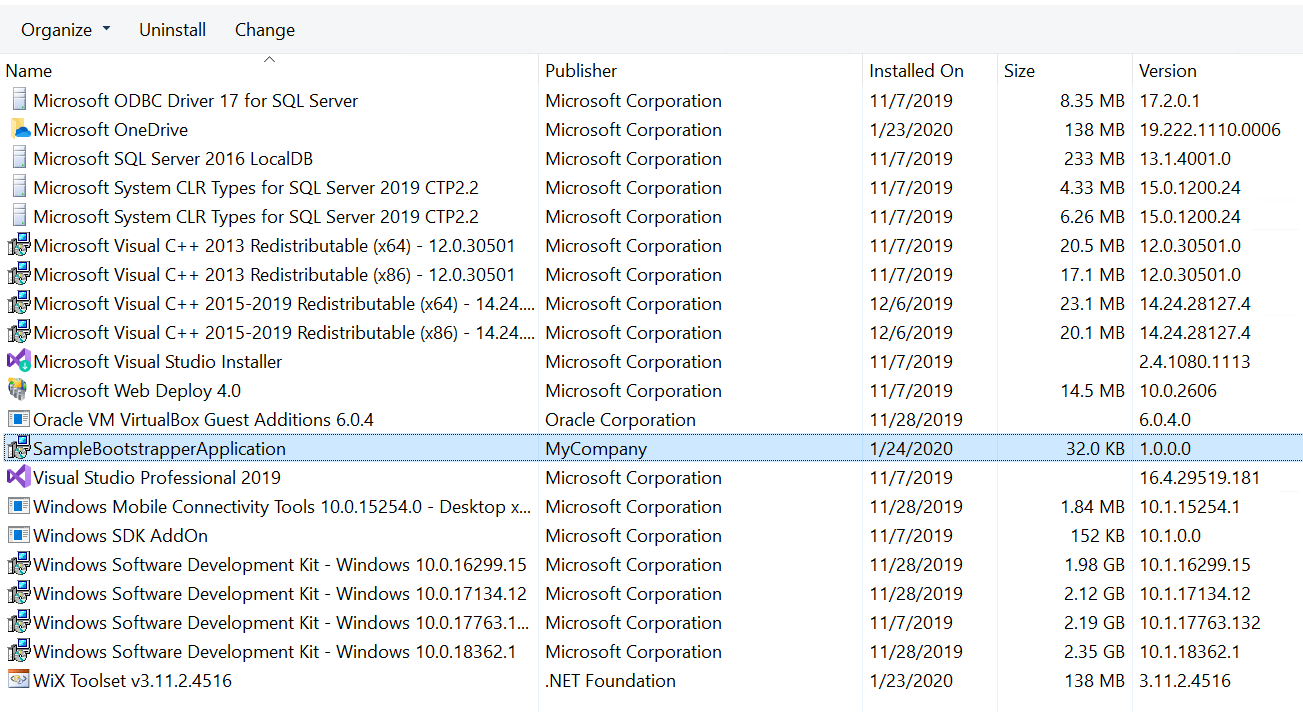
Step 8: Once installed, you can find installation information in the control panel.
Creating a custom UI installer
Creating a custom UI installer involves the creation of two different projects:
- Creating a custom UI for the bootstrapper application.
- Integrating the custom UI with the bootstrapper project.
Creating a custom UI for the bootstrapper application
Step 1: Open Visual Studio and create a new project by clicking File->New->Project.
Step 2: The Create a new project window will open. In that, select the WPF App (.NET Framework) option and click Next.
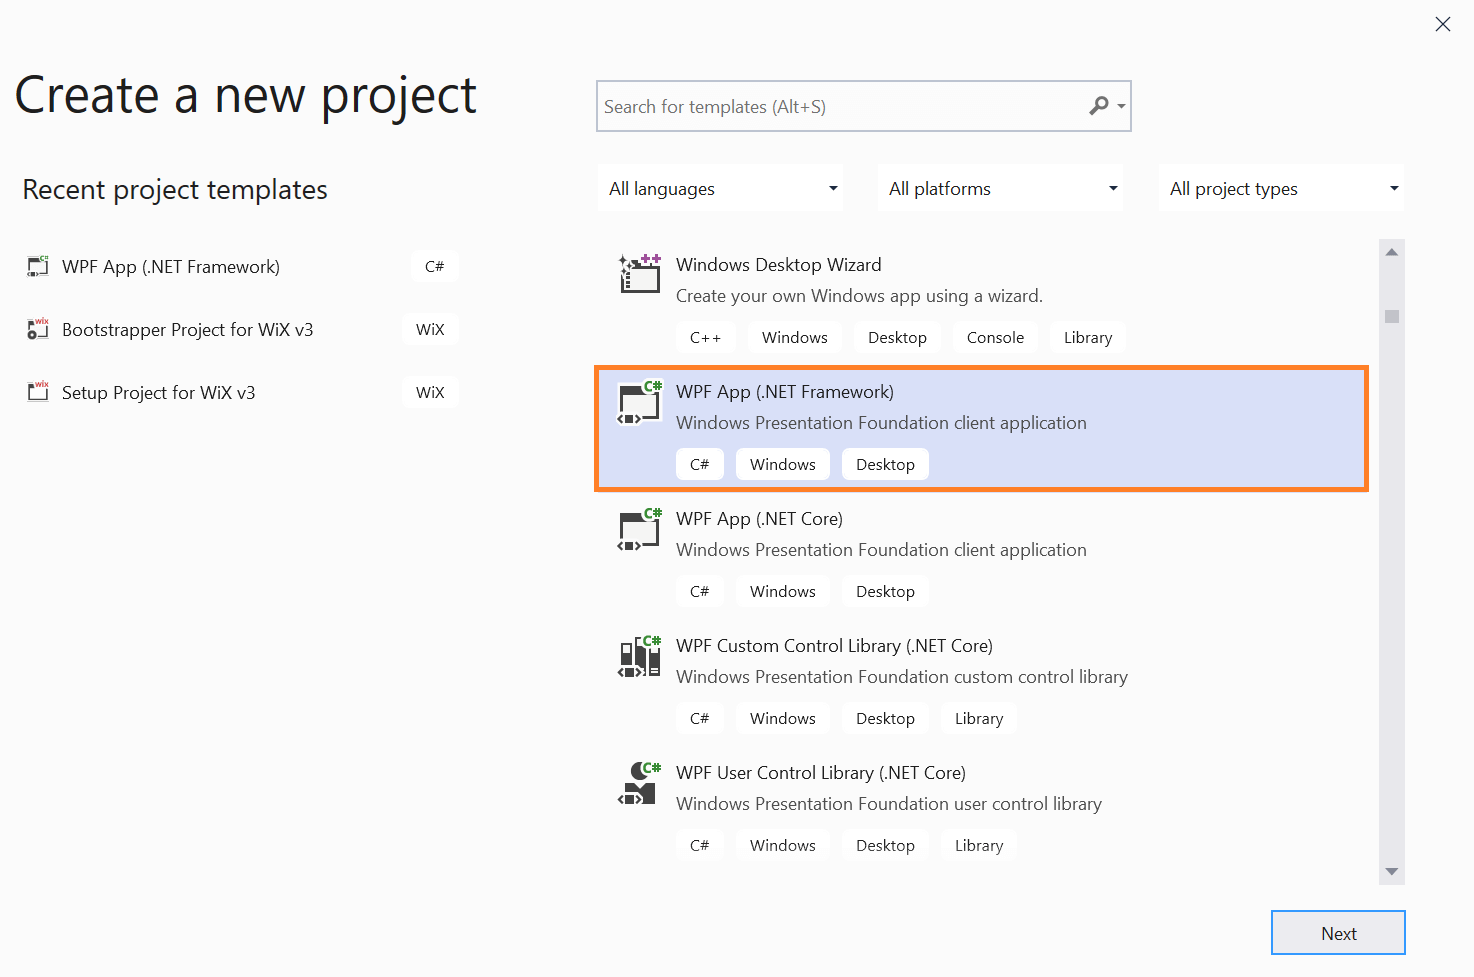
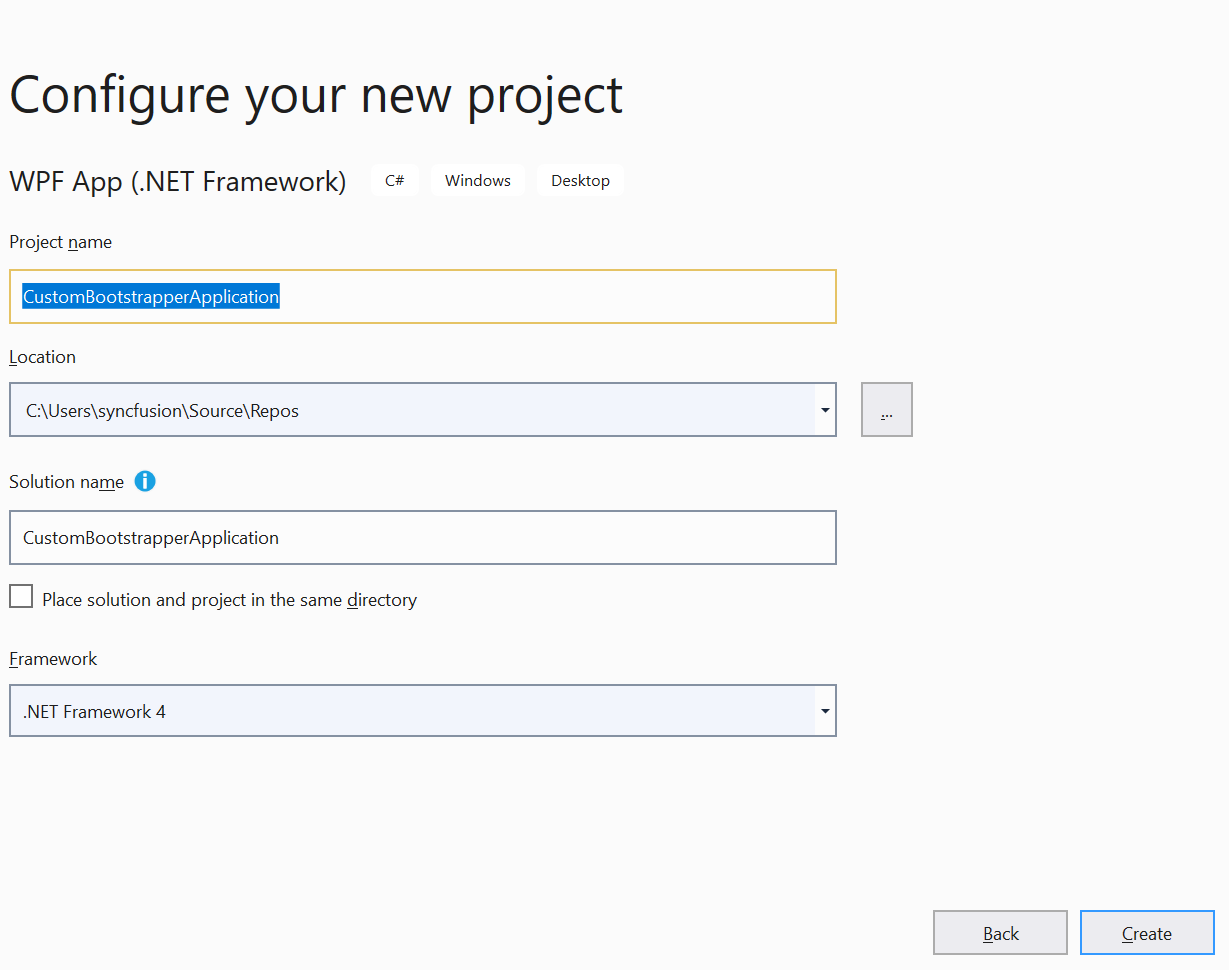
Step 3: Provide a name for your project and click Create.
Now the project will be created.
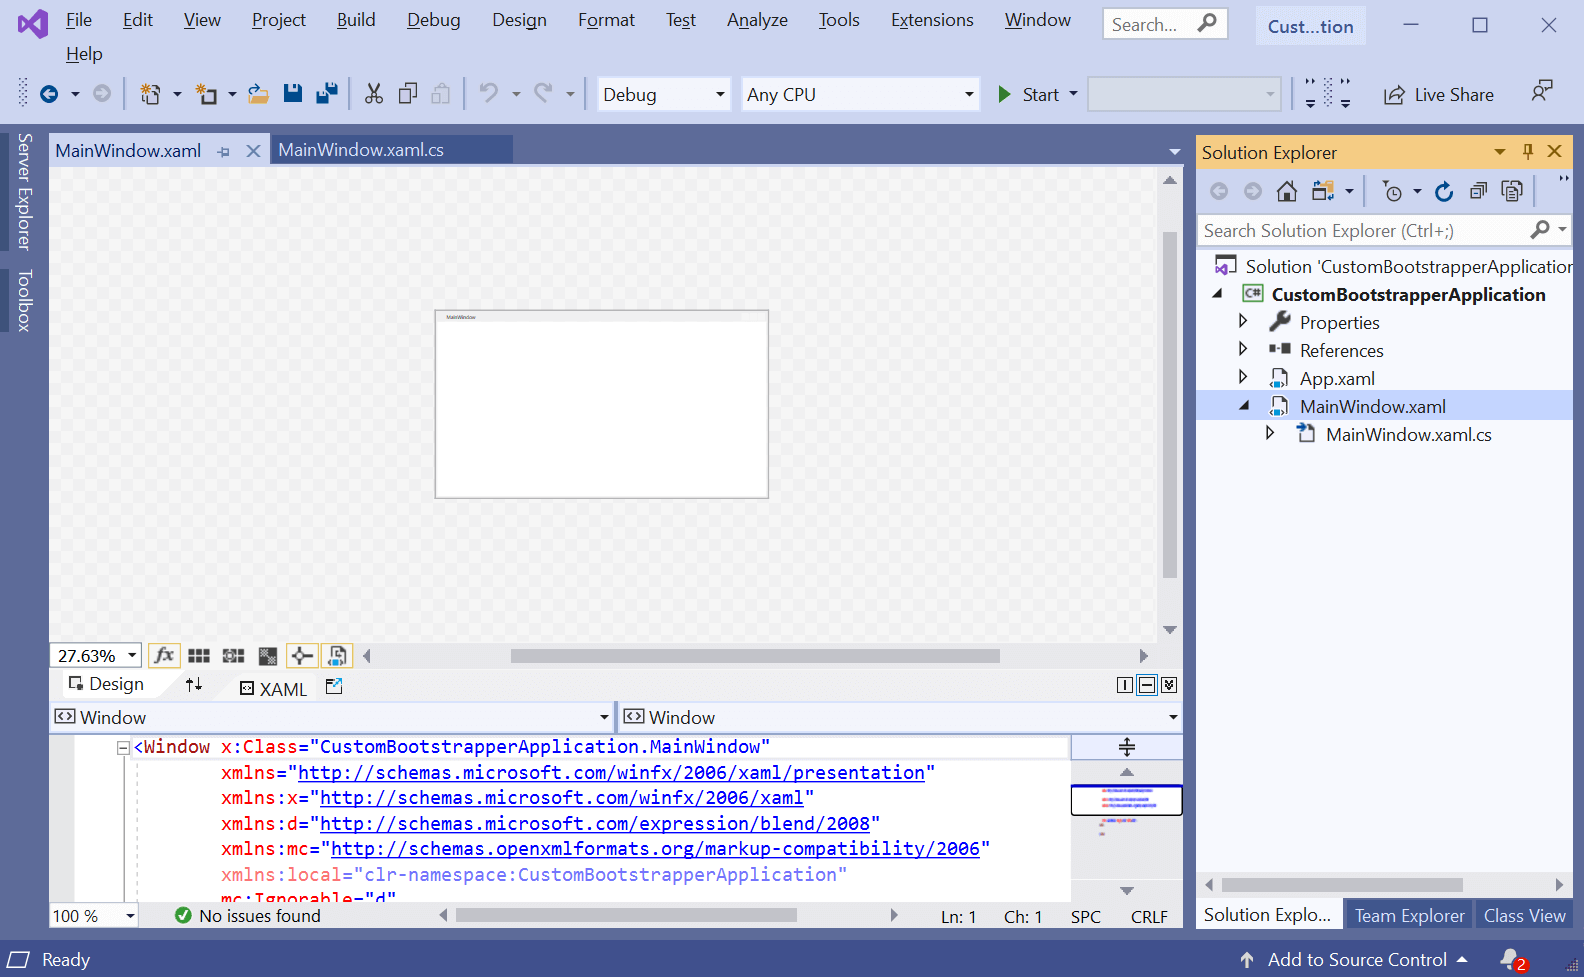
Step 4: Delete the App.xaml and App.xaml.cs files, as they are not required.
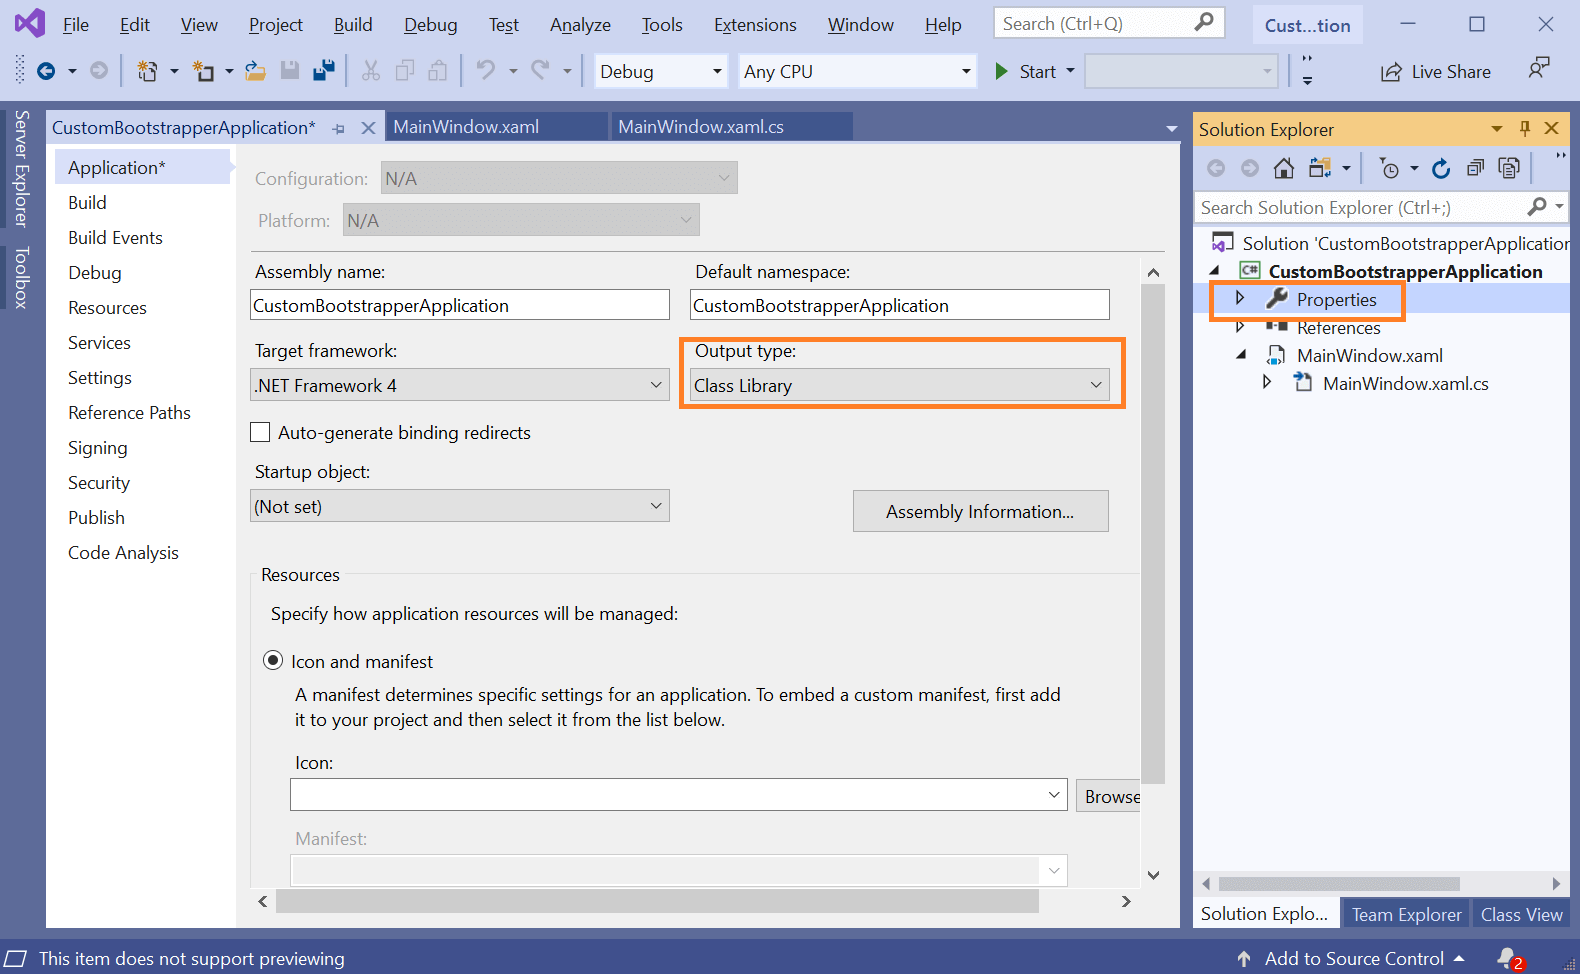
Step 5: Double-click the Properties option and change the Output type of the application to Class Library.
Step 6: In the MainWindow.xaml, provide the required design for the installer. In this example, we have provided a simple design for Install and Uninstall.
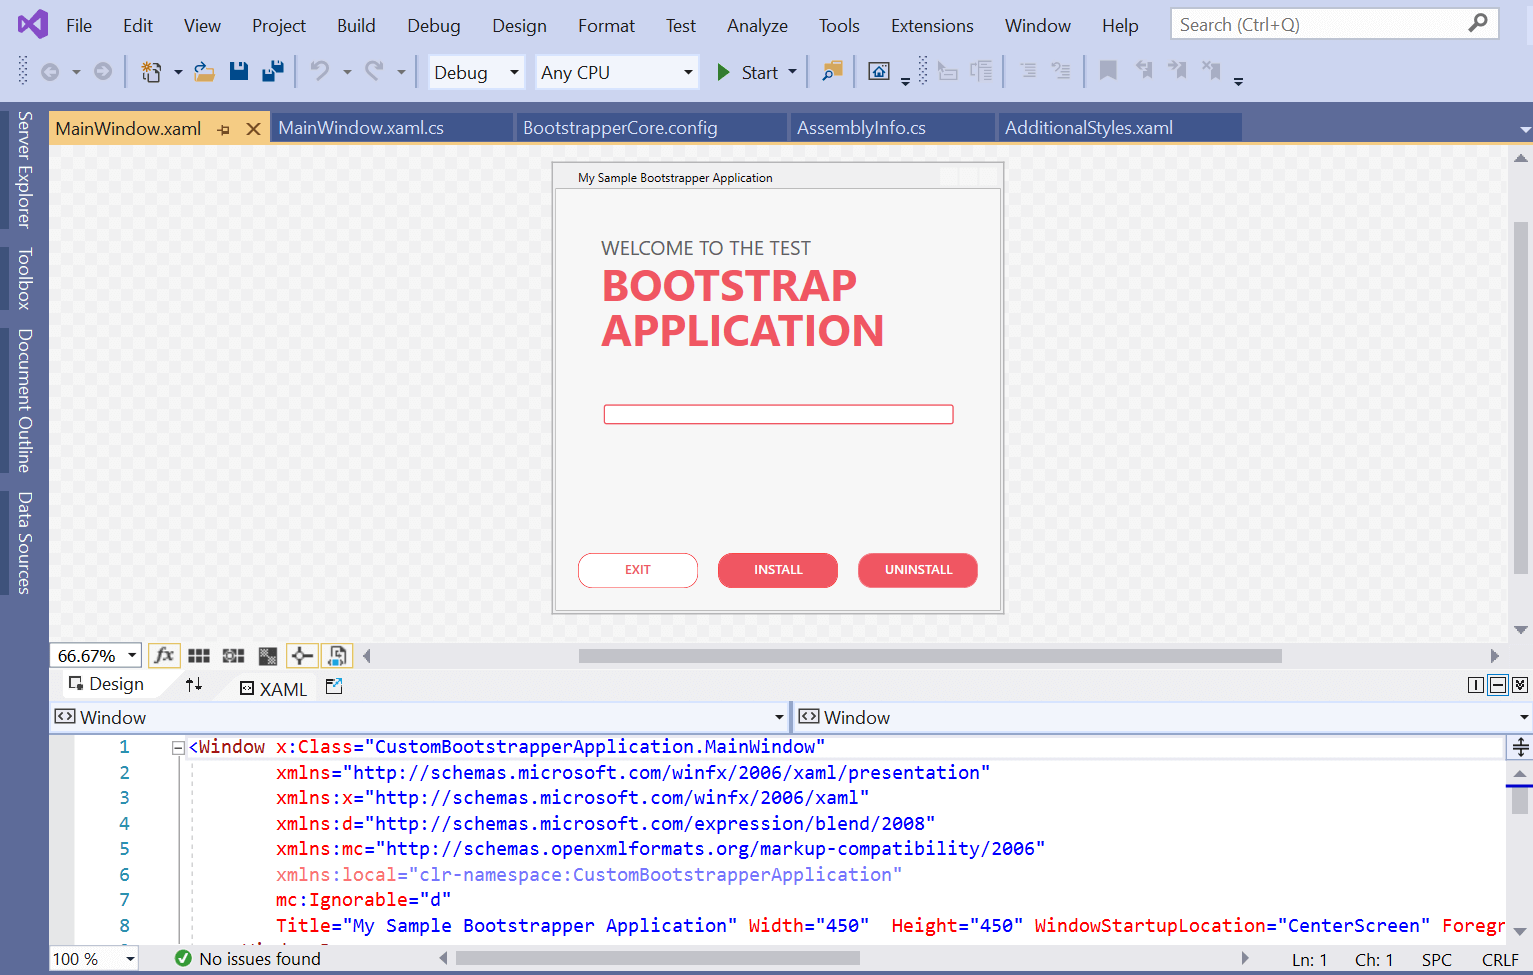
The following is the code snippet for the design.
[MainWindow.xaml]
<Window x:Class="CustomBootstrapperApplication.MainWindow"
        xmlns="http://schemas.microsoft.com/winfx/2006/xaml/presentation"
        xmlns:x="http://schemas.microsoft.com/winfx/2006/xaml"
        xmlns:d="http://schemas.microsoft.com/expression/blend/2008"
        xmlns:mc="http://schemas.openxmlformats.org/markup-compatibility/2006"
        xmlns:local="clr-namespace:CustomBootstrapperApplication"
        mc:Ignorable="d"
        Title="My Sample Bootstrapper Application" Width="450"  Height="450" WindowStartupLocation="CenterScreen" Foreground="#F05662"  ResizeMode="CanMinimize" FontFamily="Segoe UI" Background="Black">
    <Window.Resources>
        <ResourceDictionary>
            <ResourceDictionary.MergedDictionaries>
                <ResourceDictionary Source="AdditionalStyles.xaml"/>
            </ResourceDictionary.MergedDictionaries>
        </ResourceDictionary>
    </Window.Resources>
    <Grid Background="#f7f7f7">
        <Label Content="WELCOME TO THE TEST" HorizontalAlignment="Left" Margin="40,40" FontStyle="Normal" Foreground="#606060" FontSize="20px"></Label>
        <Label Content="BOOTSTRAP" HorizontalAlignment="Left" Margin="40,60" FontWeight="Bold" FontSize="44px" Foreground="#F05662"></Label>
        <Label Content="APPLICATION" HorizontalAlignment="Left" Margin="40,105" FontWeight="Bold" FontSize="44px" Foreground="#F05662"></Label>
        <StackPanel Height="300" Width="400" Orientation="Vertical" VerticalAlignment="Center" HorizontalAlignment="Center" Margin="0,150,0,0">
            <ProgressBar x:Name="progressBar" Height="20" Width="350" Background="White" VerticalAlignment="Bottom" Margin="0,80,0,0" Style="{StaticResource ProgressBarstyle}"/>
            <Label x:Name="process" Content="" FontStyle="Normal" Margin="20,0,0,0" Foreground="#606060" FontSize="14px"/>
            <StackPanel Orientation="Horizontal" Margin="0,100,0,0" HorizontalAlignment="Right">
                <Button Content="EXIT" Height="35" Width="120"  Click="Exit_Button_Click" Background="White" Foreground="#F05662" BorderBrush="Red" Style="{DynamicResource PrimaryButtonStyle}"/>
                <Button Content="INSTALL" Height="35" Width="120" Margin="20,0,0,0"  Visibility="Visible"  Name="Install_Button" Click="Install_Button_Click" Background="#F05662" Style="{DynamicResource PrimaryButtonStyle}" BorderBrush="Red"/>
                <Button Content="UNINSTALL" Visibility="Visible" Height="35" Width="120" Margin="20,0,0,0" Style="{DynamicResource PrimaryButtonStyle}" Name="Uninstall_Button" Click="Uninstall_Button_Click" Background="#F05662" BorderBrush="#F05662" />
            </StackPanel>
        </StackPanel>
    </Grid>
</Window>
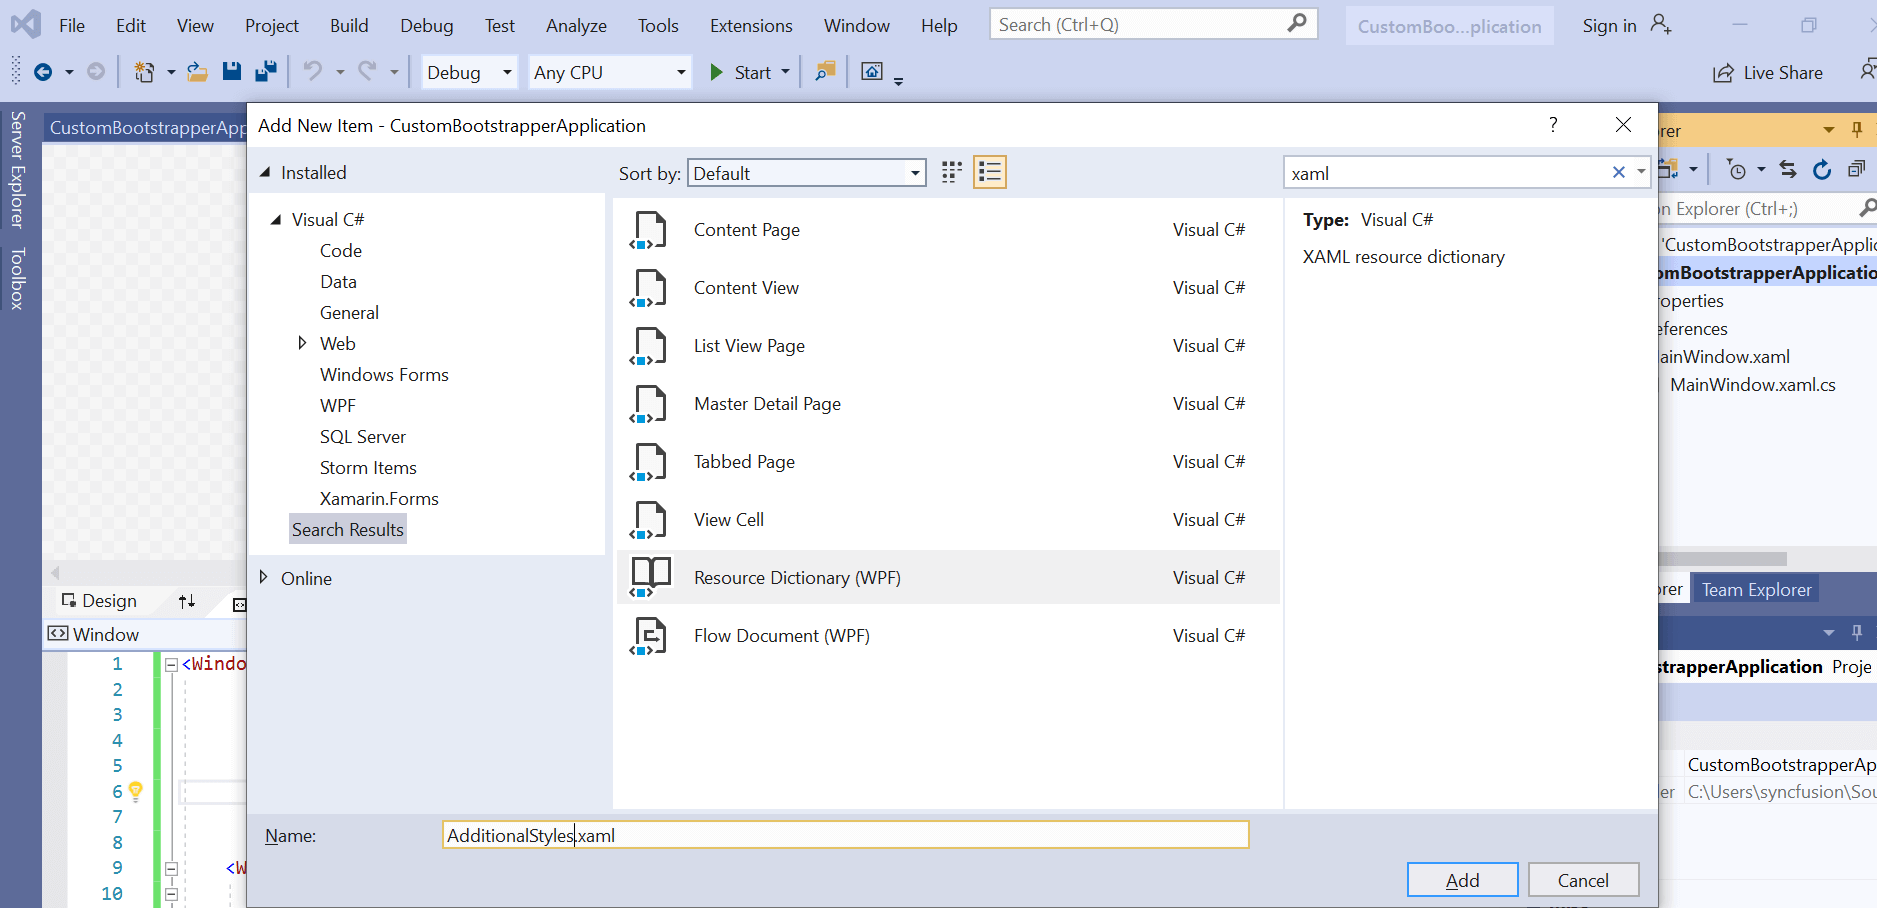
Step 7: As we have added styles to the design, add the XAML file to the project and include the necessary code for the design. Right-click the project, click Add->New Item and search for xaml in the search box. Select Resource Dictionary (WPF), provide name for the file, and click Add.
[AdditionalStyles.xaml]
<ResourceDictionary xmlns="http://schemas.microsoft.com/winfx/2006/xaml/presentation"
                    xmlns:x="http://schemas.microsoft.com/winfx/2006/xaml"
                    xmlns:local="clr-namespace:CustomBootstrapperApplication">

    <Style x:Key="PrimaryButtonStyle" TargetType="{x:Type Button}">
        <Setter Property="Background" Value="#0450CC"/>
        <Setter Property="BorderBrush" Value="#0450CC"/>
        <Setter Property="Foreground" Value="#FFFFFF"/>
        <Setter Property="BorderThickness" Value="0.5"/>
        <Setter Property="HorizontalContentAlignment" Value="Center"/>
        <Setter Property="VerticalContentAlignment" Value="Center"/>
        <Setter Property="HorizontalAlignment" Value="Right"/>
        <Setter Property="VerticalAlignment" Value="Center"/>
        <Setter Property="Padding" Value="1"/>
        <Setter Property="FontSize" Value="13"/>
        <Setter Property="FontWeight" Value="SemiBold"/>
        <Setter Property="FontFamily" Value="Resources\Font\#ASAP"/>
        <Setter Property="Focusable" Value="True"/>
        <Setter Property="Width" Value="84"/>
        <Setter Property="Height" Value="32"/>
        <Setter Property="FocusVisualStyle" Value="{x:Null}"/>
        <Setter Property="Cursor" Value="Hand"/>
        <Setter Property="Template">
            <Setter.Value>
                <ControlTemplate TargetType="{x:Type Button}">
                    <Border x:Name="border" CornerRadius="14" BorderBrush="{TemplateBinding BorderBrush}" BorderThickness="{TemplateBinding BorderThickness}" Background="{TemplateBinding Background}" SnapsToDevicePixels="true">
                        <ContentPresenter x:Name="contentPresenter" Focusable="False" HorizontalAlignment="{TemplateBinding HorizontalContentAlignment}" Margin="{TemplateBinding Padding}" RecognizesAccessKey="True" SnapsToDevicePixels="{TemplateBinding SnapsToDevicePixels}" VerticalAlignment="{TemplateBinding VerticalContentAlignment}"/>
                    </Border>
                    <ControlTemplate.Triggers>
                        <Trigger Property="IsEnabled" Value="false">
                            <Setter Property="Background" TargetName="border" Value="#F05662"/>
                            <Setter Property="BorderBrush" TargetName="border" Value="#F05662"/>
                            <Setter Property="Opacity" Value="0.5"/>
                        </Trigger>
                    </ControlTemplate.Triggers>
                </ControlTemplate>
            </Setter.Value>
        </Setter>
    </Style>

    <!--Control colors.-->
    <Color x:Key="WindowColor">#FFE8EDF9</Color>
    <Color x:Key="ContentAreaColorLight">#FFC5CBF9</Color>
    <Color x:Key="ContentAreaColorDark">#FF7381F9</Color>

    <Color x:Key="DisabledControlLightColor">#FFE8EDF9</Color>
    <Color x:Key="DisabledControlDarkColor">#FFC5CBF9</Color>
    <Color x:Key="DisabledForegroundColor">#FF888888</Color>

    <Color x:Key="SelectedBackgroundColor">#FFC5CBF9</Color>
    <Color x:Key="SelectedUnfocusedColor">#FFDDDDDD</Color>

    <Color x:Key="ControlLightColor">White</Color>
    <Color x:Key="ControlMediumColor">#FFF05662</Color>
    <Color x:Key="ControlDarkColor">#FFF05662</Color>

    <Color x:Key="ControlMouseOverColor">#FF3843C4</Color>
    <Color x:Key="ControlPressedColor">#FF211AA9</Color>


    <Color x:Key="GlyphColor">#FF444444</Color>
    <Color x:Key="GlyphMouseOver">sc#1, 0.004391443, 0.002428215, 0.242281124</Color>

    <!--Border colors-->
    <Color x:Key="BorderLightColor">#FFCCCCCC</Color>
    <Color x:Key="BorderMediumColor">#FF888888</Color>
    <Color x:Key="BorderDarkColor">#FF444444</Color>

    <Color x:Key="PressedBorderLightColor">#FF888888</Color>
    <Color x:Key="PressedBorderDarkColor">#FF444444</Color>

    <Color x:Key="DisabledBorderLightColor">#FFAAAAAA</Color>
    <Color x:Key="DisabledBorderDarkColor">#FF888888</Color>

    <Color x:Key="DefaultBorderBrushDarkColor">Black</Color>

    <!--Control-specific resources.-->
    <Color x:Key="HeaderTopColor">#FFC5CBF9</Color>
    <Color x:Key="DatagridCurrentCellBorderColor">Black</Color>
    <Color x:Key="SliderTrackDarkColor">#FFC5CBF9</Color>

    <Color x:Key="NavButtonFrameColor">#FF3843C4</Color>

    <LinearGradientBrush x:Key="MenuPopupBrush"
                     EndPoint="0.5,1"
                     StartPoint="0.5,0">
        <GradientStop Color="{DynamicResource ControlLightColor}"
                Offset="0" />
        <GradientStop Color="{DynamicResource ControlMediumColor}"
                Offset="0.5" />
        <GradientStop Color="{DynamicResource ControlLightColor}"
                Offset="1" />
    </LinearGradientBrush>

    <LinearGradientBrush x:Key="ProgressBarIndicatorAnimatedFill"
                     StartPoint="0,0"
                     EndPoint="1,0">
        <LinearGradientBrush.GradientStops>
            <GradientStopCollection>
                <GradientStop Color="#F05662"
                    Offset="0" />
                <GradientStop Color="#F05662"
                    Offset="0.4" />
                <GradientStop Color="#F05662"
                    Offset="0.6" />
                <GradientStop Color="#F05662"
                    Offset="1" />
            </GradientStopCollection>
        </LinearGradientBrush.GradientStops>
    </LinearGradientBrush>
    <Style x:Key="ProgressBarstyle"
       TargetType="{x:Type ProgressBar}">
        <Setter Property="Template">
            <Setter.Value>
                <ControlTemplate TargetType="{x:Type ProgressBar}">
                    <Grid MinHeight="10"
              MinWidth="200"
              Background="{TemplateBinding Background}">
                        <VisualStateManager.VisualStateGroups>
                            <VisualStateGroup x:Name="CommonStates">
                                <VisualState x:Name="Determinate" />
                                <VisualState x:Name="Indeterminate">
                                    <Storyboard>
                                        <ObjectAnimationUsingKeyFrames Duration="00:00:00"
                                                 Storyboard.TargetName="PART_Indicator"
                                                 Storyboard.TargetProperty="Background">
                                            <DiscreteObjectKeyFrame KeyTime="00:00:00">
                                                <DiscreteObjectKeyFrame.Value>
                                                    <SolidColorBrush>Transparent</SolidColorBrush>
                                                </DiscreteObjectKeyFrame.Value>
                                            </DiscreteObjectKeyFrame>
                                        </ObjectAnimationUsingKeyFrames>

                                    </Storyboard>
                                </VisualState>
                            </VisualStateGroup>
                        </VisualStateManager.VisualStateGroups>
                        <Border x:Name="PART_Track"
                  CornerRadius="2"
                  BorderThickness="1">
                            <Border.BorderBrush>
                                <SolidColorBrush Color="#F05662" />
                            </Border.BorderBrush>
                        </Border>
                        <Border x:Name="PART_Indicator"
                  CornerRadius="2"
                  BorderThickness="1"
                  HorizontalAlignment="Left"
                  Background="{TemplateBinding Foreground}"
                  Margin="3">
                            <Border.BorderBrush>
                                <LinearGradientBrush StartPoint="0,0"
                                   EndPoint="0,1">
                                    <GradientBrush.GradientStops>
                                        <GradientStopCollection>
                                            <GradientStop Color="{DynamicResource BorderLightColor}"
                                  Offset="0.0" />
                                            <GradientStop Color="{DynamicResource BorderMediumColor}"
                                  Offset="1.0" />
                                        </GradientStopCollection>
                                    </GradientBrush.GradientStops>
                                </LinearGradientBrush>

                            </Border.BorderBrush>
                            <Grid ClipToBounds="True"
                  x:Name="Animation">
                                <Rectangle x:Name="PART_GlowRect"
                         Width="100"
                         HorizontalAlignment="Left"
                         Fill="{StaticResource ProgressBarIndicatorAnimatedFill}"
                         Margin="-100,0,0,0" />
                            </Grid>
                        </Border>
                    </Grid>
                </ControlTemplate>
            </Setter.Value>
        </Setter>
        <Setter Property="Background">
            <Setter.Value>
                <LinearGradientBrush EndPoint="0,1"
                           StartPoint="0,0">
                    <GradientStop Color="{DynamicResource ControlLightColor}"
                      Offset="0" />
                    <GradientStop Color="{DynamicResource ControlMediumColor}"
                      Offset="1" />
                </LinearGradientBrush>
            </Setter.Value>
        </Setter>
        <Setter Property="Foreground">
            <Setter.Value>
                <LinearGradientBrush EndPoint="0.5,1"
                           StartPoint="0.5,0">
                    <GradientStop Color="{DynamicResource ControlMediumColor}"
                      Offset="0" />
                    <GradientStop Color="{DynamicResource ControlDarkColor}"
                      Offset="1" />
                </LinearGradientBrush>
            </Setter.Value>
        </Setter>
    </Style>
</ResourceDictionary>
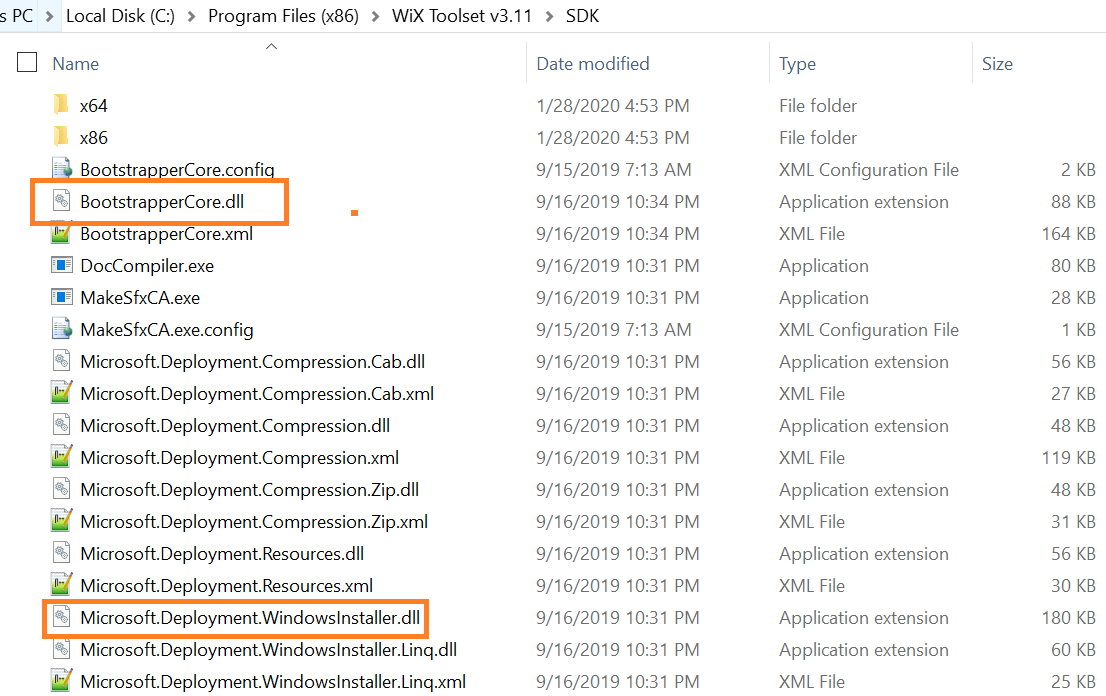
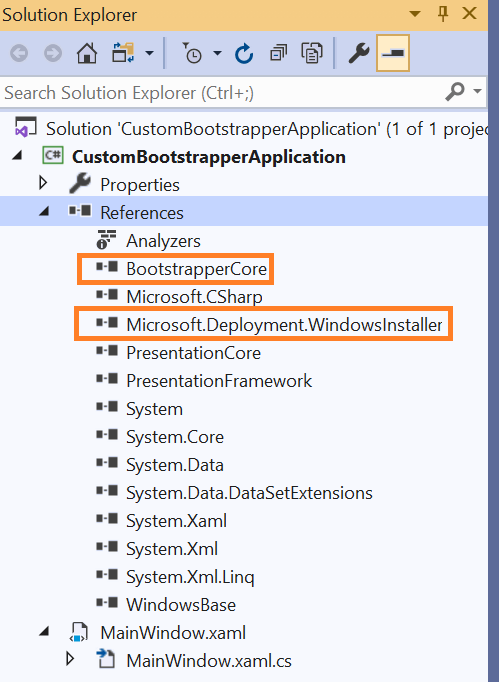
Step 8: Add BootstrapperCore.dll and Microsoft.Deployment.WindowsInstaller.dll as references from the WiX installed location.
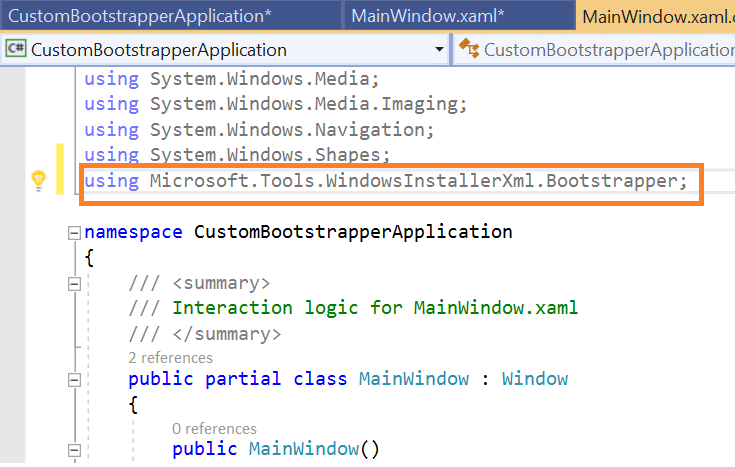
Step 9: In the MainWindow.xaml.cs file, include the namespace for the bootstrapper.
[MainWindow.xaml.cs]
using Microsoft.Tools.WindowsInstallerXml.Bootstrapper;
Include the necessary bootstrapper events, properties, and methods for different button-click events in the MainWindow.xaml.cs file:
- DetectPackageComplete—This event checks whether the package is already installed or not.
- PlanComplete—This event is triggered when planning to install is done. It informs the burn to proceed with the installation.
- ExecuteBegin—This event is triggered when the bootstrapper engine has started installing or uninstalling the packages.
- ExecuteComplete—This event is triggered when the bootstrapper engine has completed installing or uninstalling the packages.
- ExecuteProgress—This event gets fired by the engine while executing on payload.
[MainWindow.xaml.cs]
using Microsoft.Tools.WindowsInstallerXml.Bootstrapper;
using System;
using System.Collections.Generic;
using System.Linq;
using System.Text;
using System.Windows;
using System.Windows.Controls;
using System.Windows.Data;
using System.Windows.Documents;
using System.Windows.Input;
using System.Windows.Media;
using System.Windows.Media.Imaging;
using System.Windows.Navigation;
using System.Windows.Shapes;

namespace CustomBootstrapperApplication
{
    /// <summary>
    /// Interaction logic for MainWindow.xaml
    /// </summary>
    public partial class MainWindow : Window
    {
        private bool isInstall;
        /// <summary>
        /// Initializes a new instance of the MainView class.
        /// </summary>
        public MainWindow(BootstrapperApplication bootstrapper)
        {
            InitializeComponent();
            this.Bootstrapper = bootstrapper;
            this.Bootstrapper.DetectPackageComplete += this.OnDetectPackageComplete;
            this.Bootstrapper.PlanComplete += this.OnPlanComplete;
            this.Bootstrapper.ExecuteProgress += this.OnExecuteProgress;
            this.Bootstrapper.ExecuteComplete += this.OnExecuteComplete;
            this.Bootstrapper.ExecuteBegin += this.OnExecuteBegin;
        }
        public BootstrapperApplication Bootstrapper { get; private set; }

        private void Exit_Button_Click(object sender, RoutedEventArgs e)
        {
            CustomUI.BootstrapperDispatcher.InvokeShutdown();
        }

        private void Install_Button_Click(object sender, RoutedEventArgs e)
        {
            isInstall = true;
            Install_Button.Visibility = Visibility.Collapsed;
            process.Content = "Waiting to Install...";
            Bootstrapper.Engine.Plan(LaunchAction.Install);
        }

        private void Uninstall_Button_Click(object sender, RoutedEventArgs e)
        {
            isInstall = false;
            Uninstall_Button.Visibility = Visibility.Collapsed;
            process.Content = "Waiting to Uninstall...";
            Bootstrapper.Engine.Plan(LaunchAction.Uninstall);
        }

        private void OnExecuteComplete(object sender, ExecuteCompleteEventArgs e)
        {

            this.Dispatcher.Invoke(System.Windows.Threading.DispatcherPriority.Normal, new Action(
                      delegate ()
                      {
                          if (isInstall)
                          {
                              process.Content = "Installed";
                          }
                          else
                          {
                              process.Content = "Uninstalled";
                          }
                      }));

        }
        private void OnExecuteBegin(object sender, ExecuteBeginEventArgs e)
        {
            this.Dispatcher.Invoke(System.Windows.Threading.DispatcherPriority.Normal, new Action(
                      delegate ()
                      {
                          if (isInstall)
                          {
                              process.Content = "Installing...";
                          }
                          else
                          {
                              process.Content = "Uninstalling...";
                          }
                      }));
        }

        private void OnDetectPackageComplete(object sender, DetectPackageCompleteEventArgs e)
        {
            this.Dispatcher.Invoke(System.Windows.Threading.DispatcherPriority.Normal, new Action(
                      delegate ()
                      {
                          if (e.PackageId == "Sample")
                          {
                              if (e.State == PackageState.Absent)
                              {
                                  Install_Button.Visibility = Visibility.Visible;
                                  Uninstall_Button.Visibility = Visibility.Collapsed;

                              }

                              else if (e.State == PackageState.Present)
                              {
                                  Uninstall_Button.Visibility = Visibility.Visible;
                                  Install_Button.Visibility = Visibility.Collapsed;

                              }
                          }
                      }));
        }

        private void OnPlanComplete(object sender, PlanCompleteEventArgs e)
        {
            if (e.Status >= 0)
                Bootstrapper.Engine.Apply(System.IntPtr.Zero);
        }

        private void OnExecuteProgress(object sender, ExecuteProgressEventArgs e)
        {
            this.Dispatcher.Invoke(System.Windows.Threading.DispatcherPriority.Normal, new Action(
                      delegate ()
                      {
                          progressBar.Value = e.ProgressPercentage;
                      }));
        }
    }
}
Step 10: Add a class file and include the changes for initializing the custom UI, determining the installation conditions and displaying the UI.
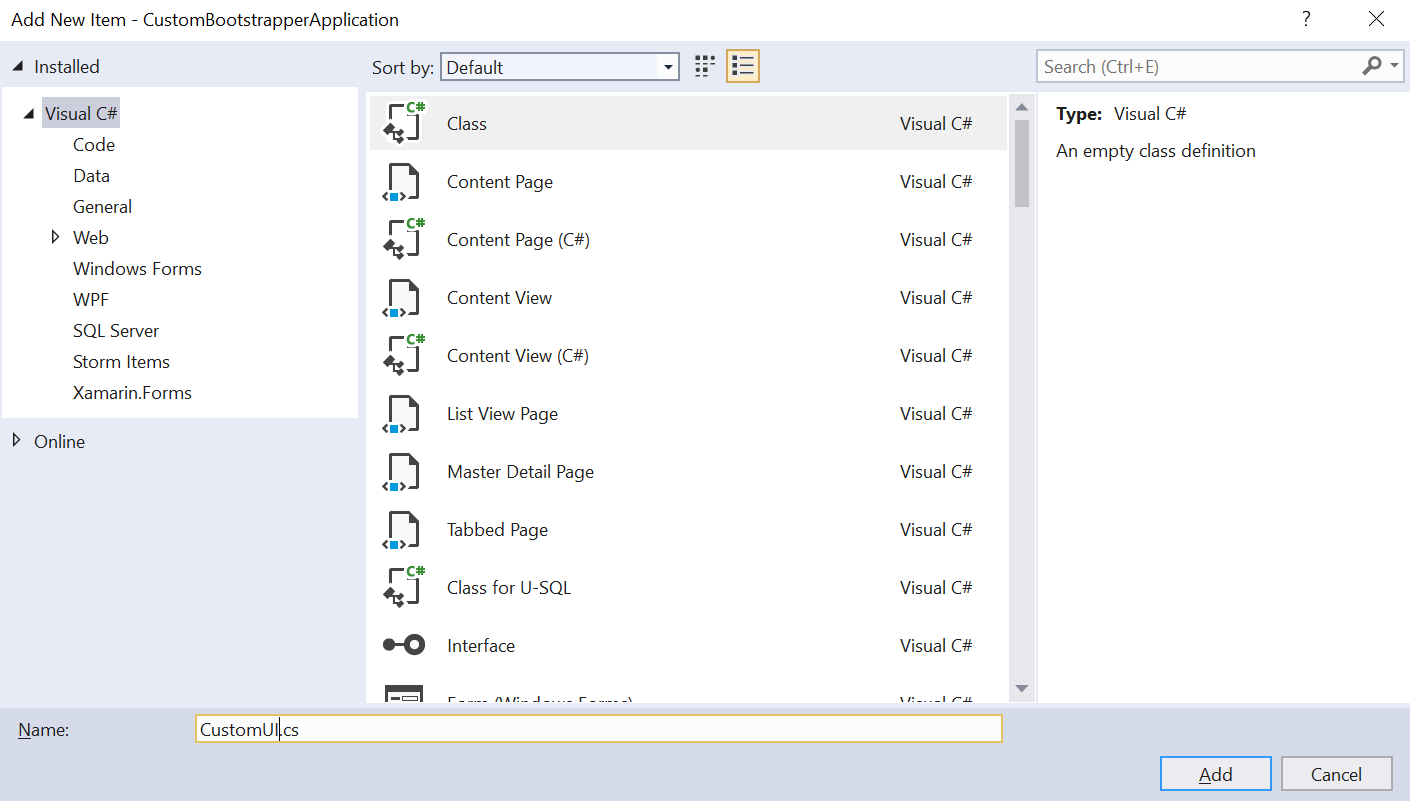
[CustomUI.cs]
using Microsoft.Tools.WindowsInstallerXml.Bootstrapper;
using System;
using System.Collections.Generic;
using System.Linq;
using System.Text;
using System.Windows.Threading;

namespace CustomBootstrapperApplication
{
    class CustomUI : BootstrapperApplication
    {
        static public Dispatcher BootstrapperDispatcher { get; private set; }

        // public static MainWindow view;

        protected override void Run()
        {
            this.Engine.Log(LogLevel.Verbose, "Launching Custom UI");
            BootstrapperDispatcher = Dispatcher.CurrentDispatcher;

            MainWindow view = new MainWindow(this);
            view.Bootstrapper.Engine.Detect();
            view.DataContext = view;
            view.Closed += (sender, e) => BootstrapperDispatcher.InvokeShutdown();
            view.Show();

            Dispatcher.Run();
            this.Engine.Quit(0);
        }
    }
}
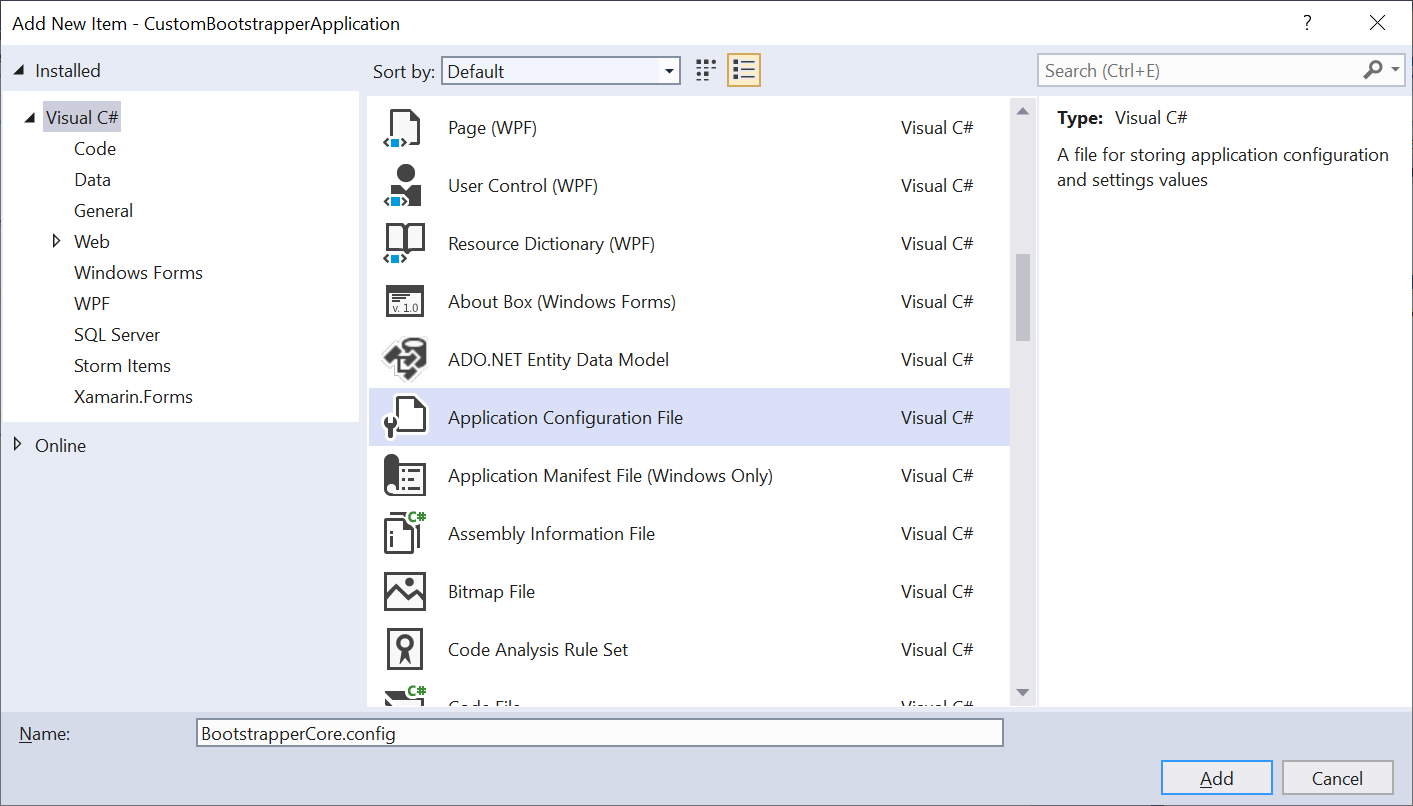
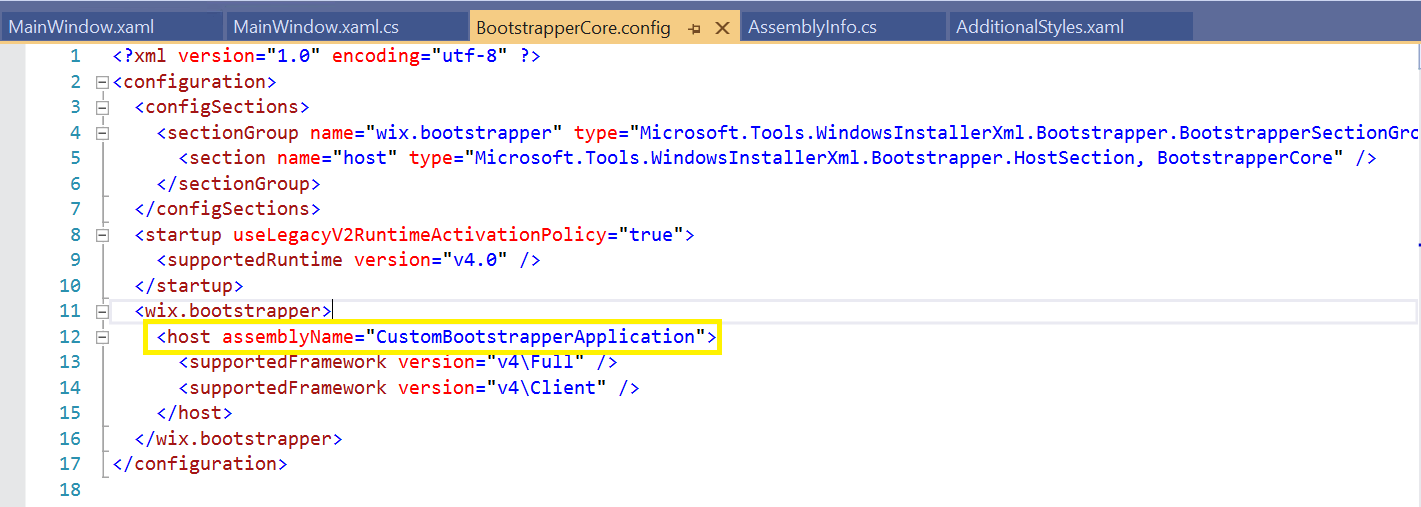
Step 11: Add a config file to include the required configurations for the installer. Include the Assembly Name in the assemblyName attribute, set copy local to true for this file.
[BootstrapperCore.config]
<?xml version="1.0" encoding="utf-8" ?>
<configuration>
  <configSections>
    <sectionGroup name="wix.bootstrapper" type="Microsoft.Tools.WindowsInstallerXml.Bootstrapper.BootstrapperSectionGroup, BootstrapperCore">
      <section name="host" type="Microsoft.Tools.WindowsInstallerXml.Bootstrapper.HostSection, BootstrapperCore" />
    </sectionGroup>
  </configSections>
  <startup useLegacyV2RuntimeActivationPolicy="true">
    <supportedRuntime version="v4.0" />
  </startup>
  <wix.bootstrapper>
    <host assemblyName="CustomBootstrapperApplication">
      <supportedFramework version="v4\Full" />
      <supportedFramework version="v4\Client" />
    </host>
  </wix.bootstrapper>
</configuration>
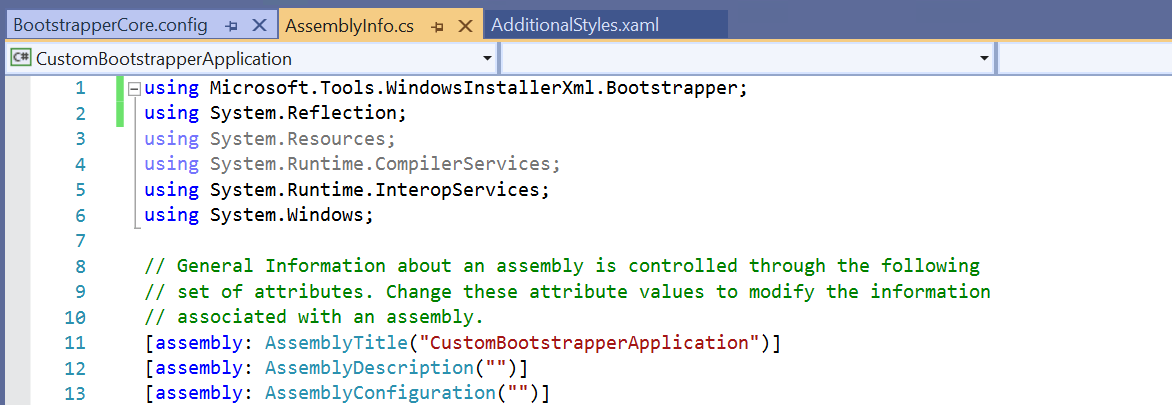
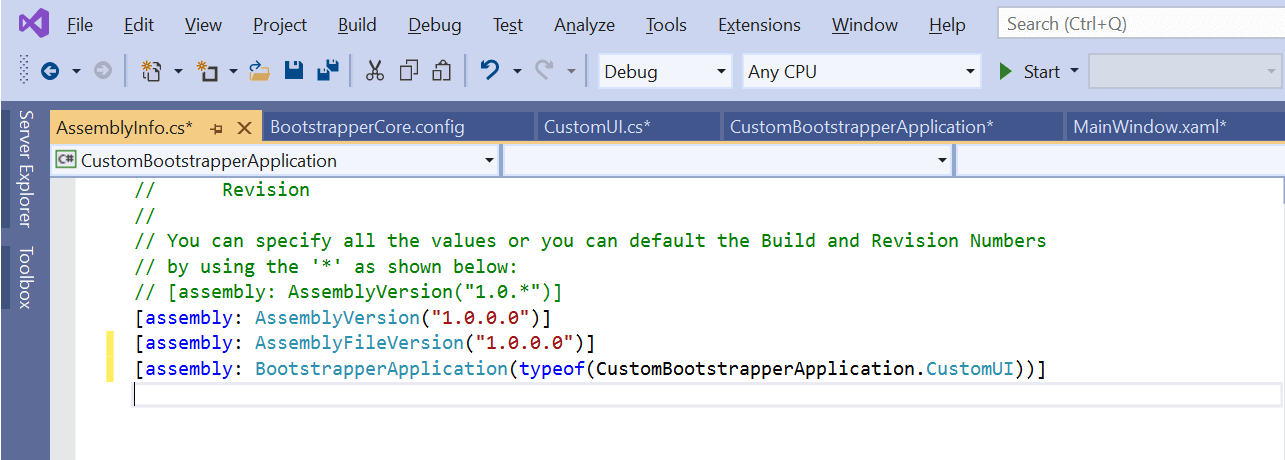
Step 12: In the AssemblyInfo.cs file, include the bootstrapper namespace and the changes to make this class a bootstrapper application. The structure will be {assemblyname.class}.
[AssemblyInfo.cs]
using Microsoft.Tools.WindowsInstallerXml.Bootstrapper;
[assembly: BootstrapperApplication(typeof(CustomBootstrapperApplication.CustomUI))]
Step 13: Now, compile the project and it will be compiled successfully.
Integrating the custom UI with the bootstrapper project
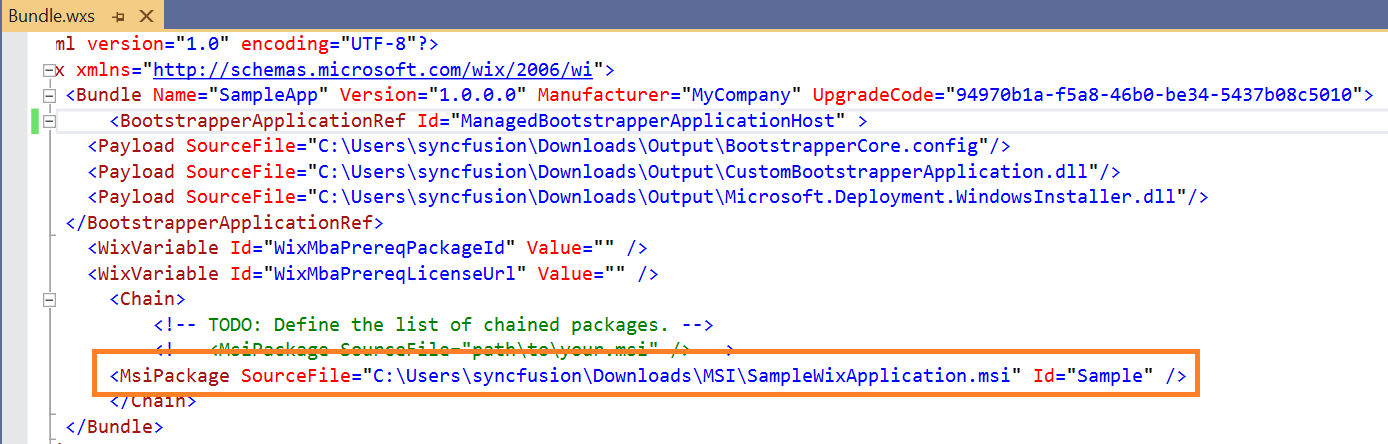
Step 1: Refer to the previous steps to create a bootstrapper project. In the bootstrapper project, change the bootstrapper application reference ID to “ManagedBootstrapperApplicationHost”.
[Bundle.wxs]
<BootstrapperApplicationRef Id="ManagedBootstrapperApplicationHost" >

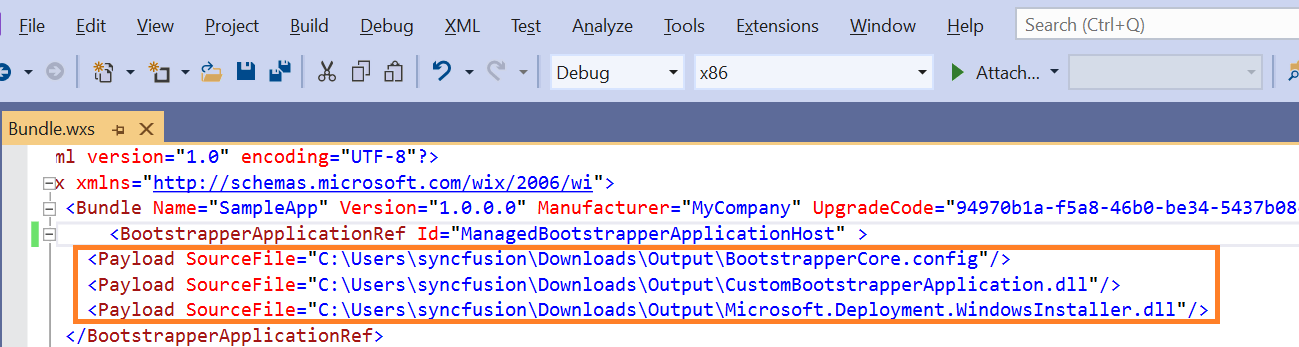
Step 2: Include the necessary source files for the custom design. The files will be present in the output location of the CustomBootstrapperApplication.
[Bundle.wxs]
      <Payload SourceFile="C:\Users\syncfusion\Downloads\Output\BootstrapperCore.config"/>
      <Payload SourceFile="C:\Users\syncfusion\Downloads\Output\CustomBootstrapperApplication.dll"/>
      <Payload SourceFile="C:\Users\syncfusion\Downloads\Output\Microsoft.Deployment.WindowsInstaller.dll"/>
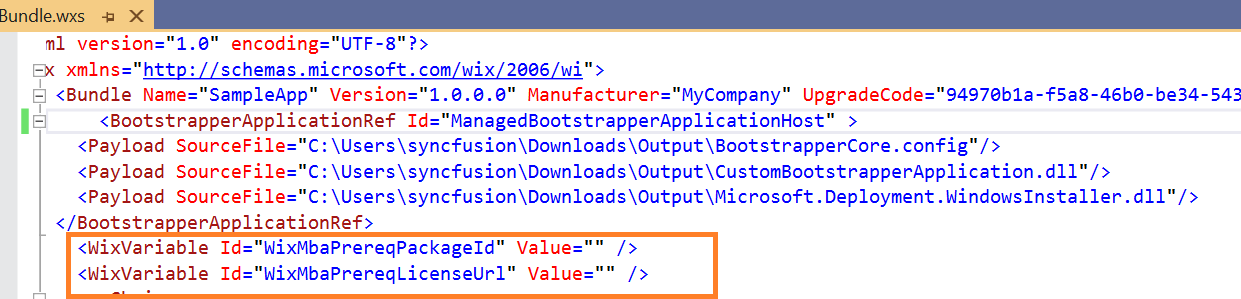
Step 3: Include the default variables for the advanced WiX functionality.
[Bundle.wxs]
<WixVariable Id="WixMbaPrereqPackageId" Value="" />
<WixVariable Id="WixMbaPrereqLicenseUrl" Value="" />
Step 4: Include the MSI to be packed and compile the project.
[Bundle.wxs]
<MsiPackage SourceFile="C:\Users\syncfusion\Downloads\MSI\SampleWixApplication.msi" Id="Sample" />

Step 5: Now, the application will be created with our custom design.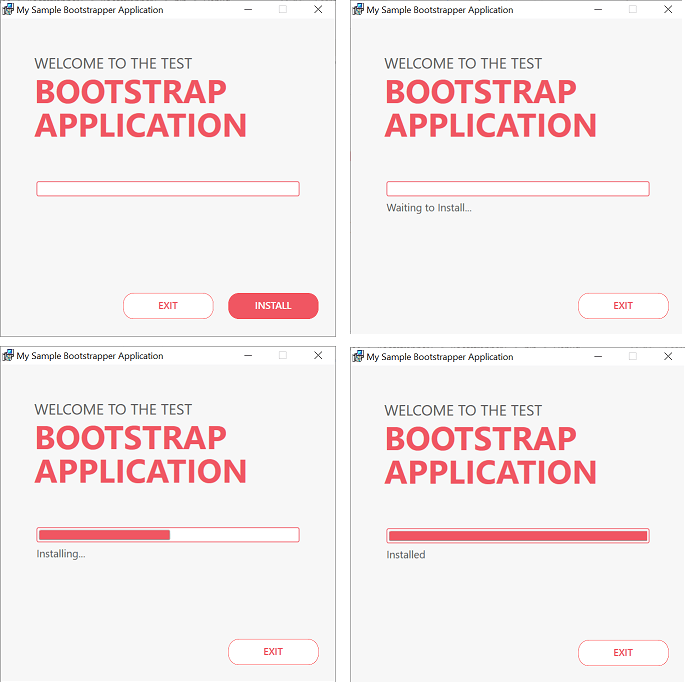
Conclusion
I hope you now have a clear idea of creating a simple MSI installer, a simple executable for the MSI installer, and a customized installer with a better user interface. Please share your feedback as a comment to this blog.
Syncfusion has 1,600 components and frameworks for WinForms, WPF, ASP.NET (Web Forms, MVC, Core), UWP, Xamarin, Flutter, JavaScript, Angular, Blazor, Vue, and React. Use them to boost your application development speed.
 No spam, just valuable updates.
Comments (6)
Thanks for this guide, everything works great!
Fantastic….thank you very much.
Everything works great but I’ve gone further and implemented an update function using MajorUpgrade. However, I have a problem where when it upgrades it opens the old version’s installer and requires me to click uninstall otherwise it won’t uninstall. I was wondering if you know how to make this process automatic, I’ve looked around a fair bit and while I’ve seen some solutions that sort of address this issue, they don’t have the code setup anything like this so I haven’t been able to transfer it across.
Hi Joshua,
Thanks for commenting on this post. You can refer to “Major Upgrade” (https://docs.microsoft.com/en-us/archive/blogs/alexshev/from-msi-to-wix-part-8-major-upgrade) for more details about upgrading and for implementation, refer to this (https://wixtoolset.org/documentation/manual/v3/howtos/updates/major_upgrade.html). For removing the older versions, refer to “How to remove older version” (http://windows-installer-xml-wix-toolset.687559.n2.nabble.com/Automatic-remove-of-older-version-td5589138.html) and “Automatic removal of older version” (https://www.firegiant.com/wix/tutorial/upgrades-and-modularization/replacing-ourselves/).
If you still require any assistance on this, please post your queries/issues in WixToolset (https://wixtoolset.org/documentation/mailinglist/) and they will assist you with the details.
Thanks,
Manivannan
A really good step by step tutorial that works great for WiX v3. However, I have problems with the implementation for WiX v4. Is there possibly a supplement to the tutorial, which adjustments are necessary here, so that it also works with the V4?
Hi there,
Did you find what you are looking for? I need an example for v4 too. Thanks for any help !