
TL;DR: Learn how to simplify financial management with the Flutter Expense Tracker Sample! Track income, expenses, budgets, and savings effortlessly. This blog covers key features like cross-platform support, interactive data visualization, responsive UI, optimized state management, and efficient local storage. Plus, discover how reusable Flutter widgets streamline development.
Introduction: Take control of your finances with Flutter expense tracker sample
In today’s world, keeping track of your expenses, planning budgets for various tasks, and saving money whenever possible have become more important than ever, especially with the rising cost of living. This is crucial for improving financial stability and managing your finances effectively. However, managing finances can be overwhelming. With the right tools, it becomes effortless.
We are excited to introduce the Expense Tracker Sample, which simplifies financial management by tracking income, expenses, budgets, and savings in our daily life. You can explore the Flutter Expense Tracker Sample in the Syncfusion Flutter Sample Browser for easy financial tracking.
This blog provides an overview of the features and design tactics used in the Expense Tracker Sample, highlighting its structure and capabilities. Whether you’re a developer seeking best practices or a Flutter enthusiast exploring financial apps, this blog will help you understand the basic idea of efficient expense tracker samples.
Navigating your finances: Core pages overview
The Expense Tracker Sample includes seven essential pages that help the user to handle and visualize their transactions, savings, and budgets easily.
- Setup page: Gathers necessary user information during onboarding.
- Import page: Allows users to import existing financial data or explore the sample with predefined data while tapping on the ‘Continue with sample data’ button.
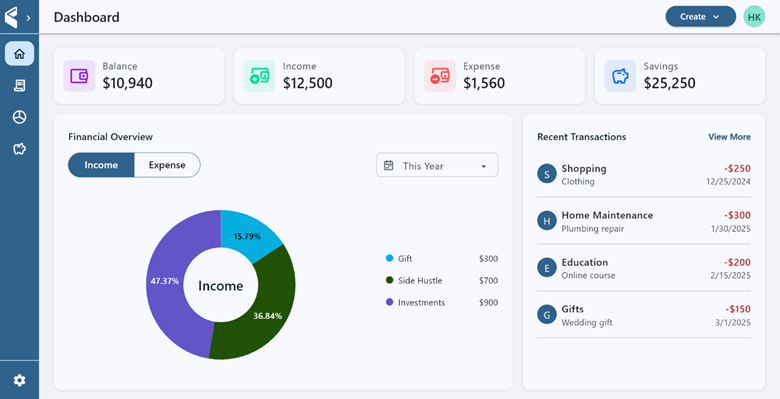
- Dashboard page: Displays consolidated with visual insights.
- Transaction page: Displays income and expense records with advanced filters. Users can also create, edit, or delete transactions.
- Budgets page: Helps users efficiently track and manage budgets with create, edit, and delete options.
- Savings page: Helps users to manage and monitor savings with create, edit and delete options.
- Settings page: Allows customization of user preferences, themes, currency and date formats.
Each page is optimized for easy navigation, clear data presentation, and smooth functionality across all devices.
Key factors of the expense tracker sample
In addition to the unique pages mentioned earlier, the Flutter Expense Tracker Sample stands out due to several key factors that enhance its usability and effectiveness in improving the user experience. These include,
- Cross-Platform Support
- Easy Data Visualization with Appealing UI
- Fully Responsive Design
- Optimized State Management
- Local Data Storage Management
- Reused the Most Commonly used Flutter Widgets
Let’s take a closer look at each of these key factors below.
Cross-platform support
The Expense Tracker Sample is designed to run seamlessly across multiple platforms, ensuring a smooth user experience:
- Windows
- macOS
- Android
- iOS
- Linux
- Web
Cross-platform considerations: Handling windows security restrictions
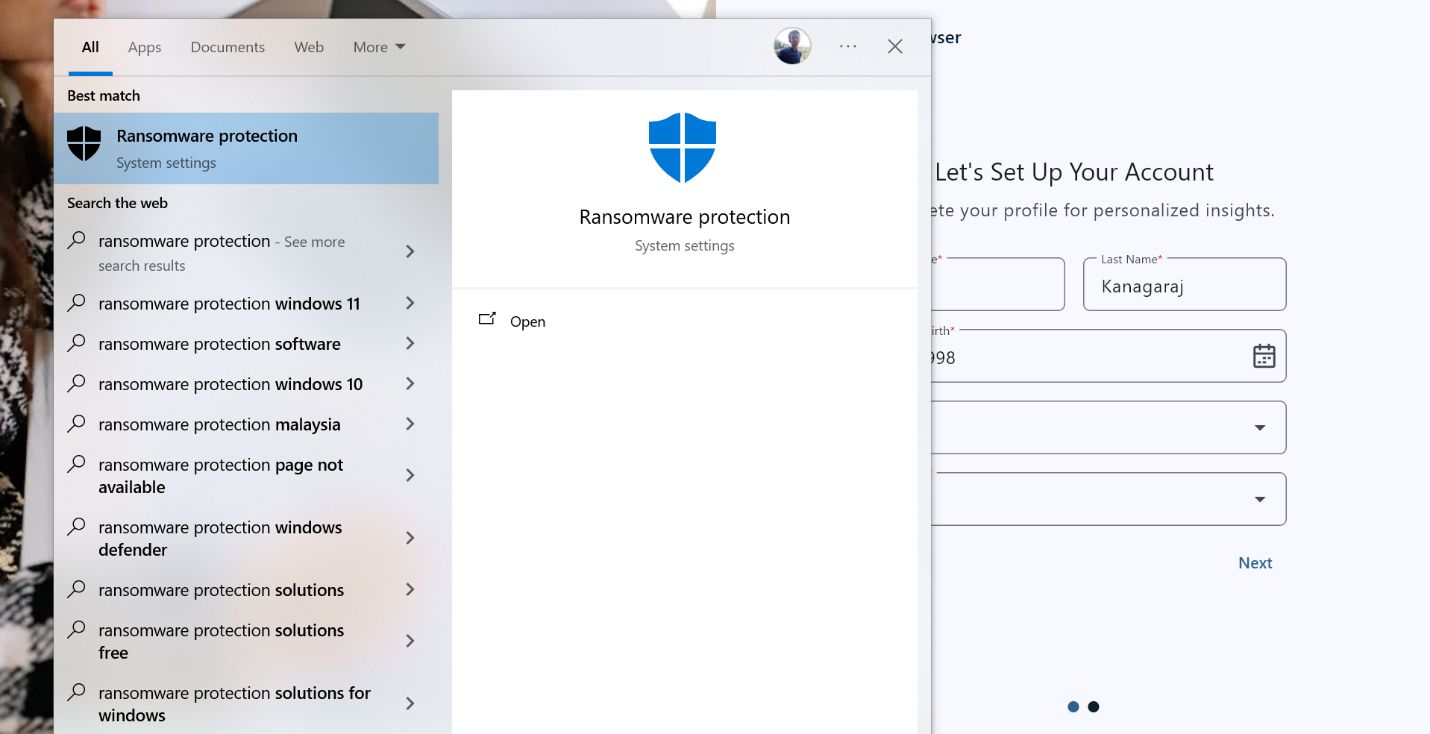
When running the Expense Tracker Sample on Windows, some users may experience that the Next Button in the Setup Page is not functioning after providing all the required user information. This is due to the default security system in Windows. To resolve this, kindly follow these steps:
- Open Ransomware Protection in Windows Security.
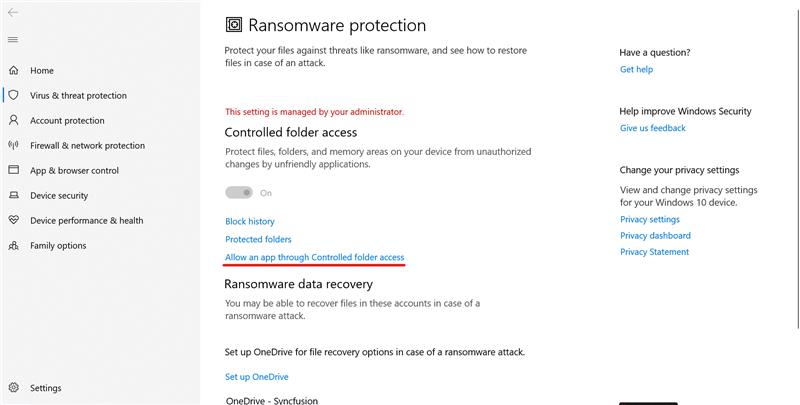
2. Click on Allow an app through controlled folder access.
3. Select add an allowed app → Recently blocked apps.
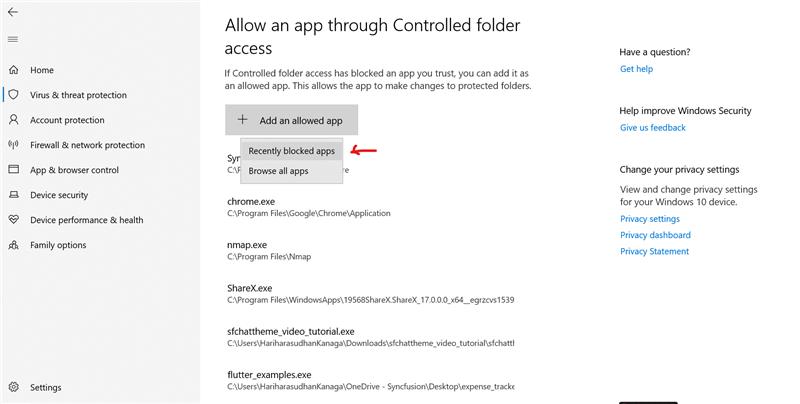
- Locate your Expense Tracker sample and grant access.
- Restart the application. The Next button should now function correctly.
Note: This is a known security-related behavior in Windows platform.
Easy data visualization with appealing UI
In the Flutter Expense Tracker sample, we used several Syncfusion Flutter widgets listed below to visualize the data easily and attractively.
- Syncfusion Flutter Charts
- Syncfusion Flutter DataGrid
- Syncfusion Flutter Date Range Picker
- Syncfusion Flutter Gauges
- Syncfusion Flutter XlsIO
Fully responsive design
We designed the Expense Tracker sample to be responsive, ensuring a seamless experience across all devices, including desktops, tablets, and mobile phones. The UI automatically adjusts to different screen sizes for a consistent and user-friendly layout.
When we do not have direct control over the parent widget’s size:
- Mobile – Less than 600 px width
- Tablet – Between 600 px and 1050 px width
- Desktop – Greater than 1050 px width
Refer to the following code example.
/// Determines if the screen width corresponds to a mobile device.
/// A device is considered mobile if its width is less than 600 pixels.
bool isMobile(BuildContext context) {
  return MediaQuery.of(context).size.width < 600.0;
}

/// Determines if the screen width corresponds to a tablet device.
/// A device is considered a tablet when its width is between 600 and 1050 pixels.
/// A device is considered a desktop when it exceeds 1050 pixels.
bool isTablet(BuildContext context) {
  final double screenWidth = MediaQuery.of(context).size.width;
  return screenWidth >= 600.0 && screenWidth < 1050.0;
}
When we have direct control over the parent widget’s size:
- Mobile – Less than 600 px width
- Tablet – Between 600 px and 850 px width
- Desktop – Greater than 850 px width
Refer to the following code example.
/// Defines different device types based on screen width.
/// This is useful when we have control over the parent widget's size.
enum DeviceType { desktop, mobile, tablet }

/// Determines the device type based on the parent's size constraints.
/// Use this method when the exact parent size is known; otherwise, use isMobile or isTablet.
DeviceType deviceType(Size size) {
  if (size.width >= 850) {
    /// If the width is 850 pixels or more, classify it as a desktop device.
    return DeviceType.desktop;
  } else if (size.width >= 600) {
    /// If the width is between 600 and 850 pixels, classify it as a tablet device.
    return DeviceType.tablet;
  } else {
    /// If the width is below 600 pixels, classify it as a mobile device.
    return DeviceType.mobile;
  }
}
No matter what device users prefer, the layout adjusts automatically for the best experience.
Optimized state management
To ensure smooth performance and efficient UI updates, the Flutter Expense Tracker Sample uses Flutter’s built-r widget along with the Provider package for state management. This approach:
- Is simple and easy to use
- Improves code readability and maintainability
- Rebuilds only necessary widgets when needed
CRUD operations:
- Users can create, edit, and delete financial entries on the transaction, savings, and budget pages.
- The UI updates dynamically for a smoother user experience.
Local storage
- Used Flutter Path Provider package for local data storage across all platforms (excluding Web platform)
- Used Flutter Shared Preferences package for local data storage in Web storage.
In the Flutter Expense Tracker Sample, we store the user data in the local storage using the Excel file format. Unless the user deletes or resets the local data, the existing data will be maintained throughout the Flutter Expense Tracker Sample.
Reused the most commonly used Flutter widgets
In the Flutter Expense Tracker Sample, we have utilized several commonly used Flutter widgets in multiple places based on our UI requirements:
For example, in Expense Tracker Sample, instead of manually defining the same card-like UI multiple times, we created a reusable widget that returns a need which includes the necessary padding, shadow color, white background color, border radius, etc. This reduces code duplication and ensures a uniform appearance across the sample. So instead of implementing this card-like UI every time, we have implemented it once and reused it whenever needed.
Refer to the following code example.
class ETCommonBox extends StatelessWidget {
  . . .

  @override
  Widget build(BuildContext context) {
    return DecoratedBox(
      key: globalKey,
      decoration: BoxDecoration(
        borderRadius: BorderRadius.circular(12),
        color: Theme.of(context).colorScheme.surface,
        boxShadow: const [
          BoxShadow(
            blurRadius: 2,
            offset: Offset(0, 1),
            color: Color.fromRGBO(0, 0, 0, 0.12),
          ),
        ],
      ),
      child: Padding(
        padding: edgeInsets ?? EdgeInsets.all(isMobile(context) ? 16.0 : 24.0),
        child: child,
      ),
    );
  }
}
To keep the code clean and well-structured, we have created reusable widgets based on our use cases. This improves the readability and ensures consistency by reducing repetitive implementations.
Why the expense tracker sample matters
The Flutter Expense Tracker Sample serves more than just a demonstration. It’s a real-world template for building a fully functional financial sample which includes:
- Easy visualization of data using attractive Syncfusion Flutter Charts, Syncfusion Flutter Gauges, and Syncfusion Flutter DataGrid.
- Advanced filtering options based on transaction type and custom date ranges.
- CRUD Operations to create, edit, or delete all transactions.
- Data management using local storage.
- A fully responsive UI that adapts for all devices, like mobile, desktop, and tablet.
Developers can leverage the Flutter Expense Tracker sample to gain hands-on experience with Flutter’s robust development capabilities, ensuring they create scalable, high-performance applications.
What’s next?
We hope you enjoyed learning about the key features of the Flutter Expense Tracker Sample in this blog. But this is just the beginning!
In our upcoming blog posts, we’ll take a closer look at each page of the Flutter Expense Tracker Sample, starting with the Setup and Import Pages. We’ll explore:
- Design considerations
- State management implementation
- Data processing techniques
Stay tuned as we continue to explore the Flutter Expense Tracker Sample, highlighting its unique features and attractive UI design elements on each page.

Conclusion
Thanks for reading! This blog explored how the Flutter Expense Tracker Sample can help simplify financial management by offering key features like cross-platform support, responsive UI, optimized state management, and efficient local data storage. With the ability to track income, expenses, budgets, and savings, managing your finances becomes easy and seamless.
The existing customers can download the new version of Essential Studio on the license and downloads page. If you are not a Syncfusion customer, try our 30-day free trial to check out our incredible features.
You can also contact us through our support forums, support portal, or feedback portal. We are always happy to assist you!


 No spam, just valuable updates.