
Calendars vary from country to country. For example, a work schedule in California is different from one in India. So, a world-class scheduler should satisfy its users by letting them use regional calendars to schedule their appointments.
The Syncfusion WinUI Scheduler is used to schedule and manage appointments through an intuitive user interface, similar to the Windows Calendar. It supports the following calendar types:
- Gregorian
- Hebrew
- Hijri
- Korean
- Persian
- Taiwan
- Thai
- UmAlQura
Note: The default calendar type is Gregorian.
All these calendar types in the WinUI Scheduler support a complete set of scheduling functionalities, such as event management, minimum and maximum dates, the first day of the week customization, RTL, localization, and special date customization.
In this blog, we will explore the Hijri calendar and learn how to use the basic scheduling functionalities in it.
Note: If you are new to our Scheduler control, please read the Getting started with the WinUI Scheduler documentation before proceeding.
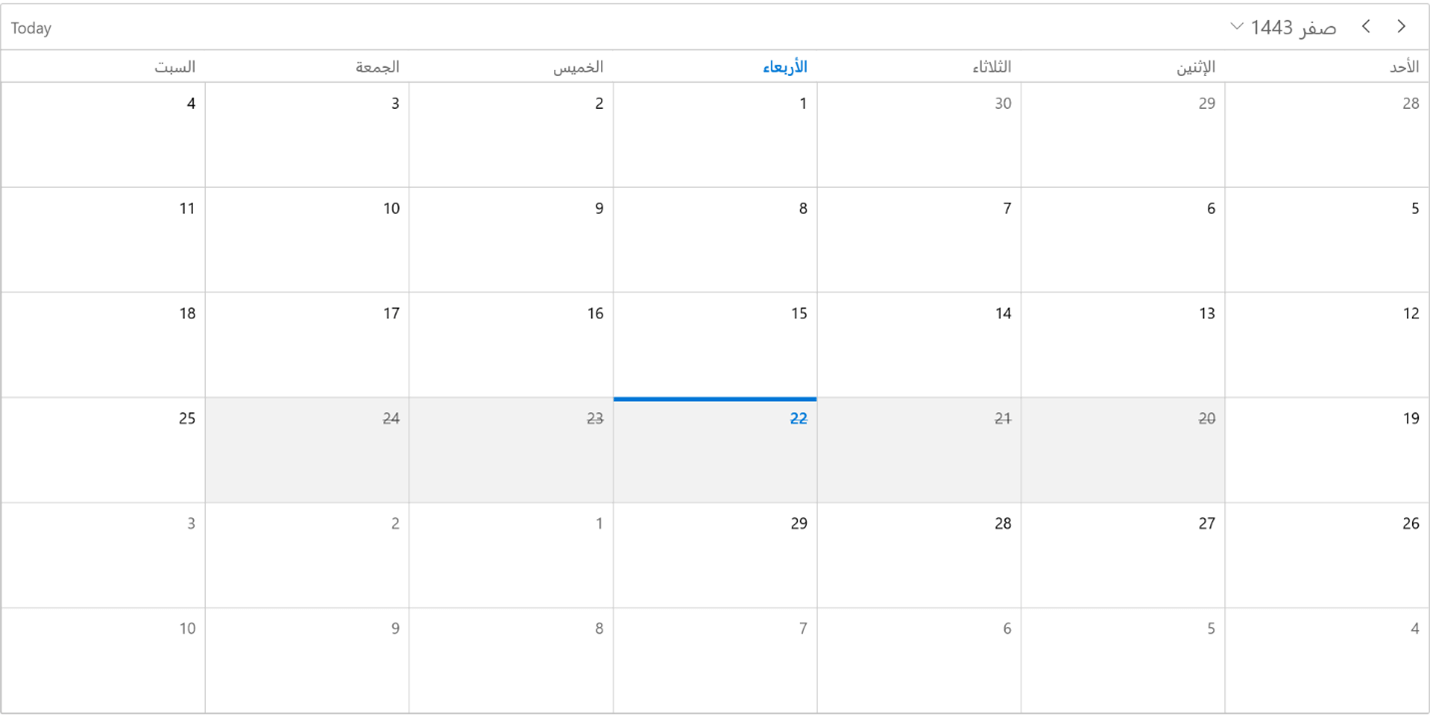
Hijri calendar
The Islamic or Hijri calendar is a lunar calendar consisting of 12 months in a year with 354 or 355 days.
You can easily display the Hijri calendar in the WinUI Scheduler by using the CalendarIdentifier property.
Refer to the following code example.
xmlns:scheduler="using:Syncfusion.UI.Xaml.Scheduler"

<scheduler:SfScheduler x:Name="scheduler"
                       CalendarIdentifier="HijriCalendar" >
</scheduler:SfScheduler>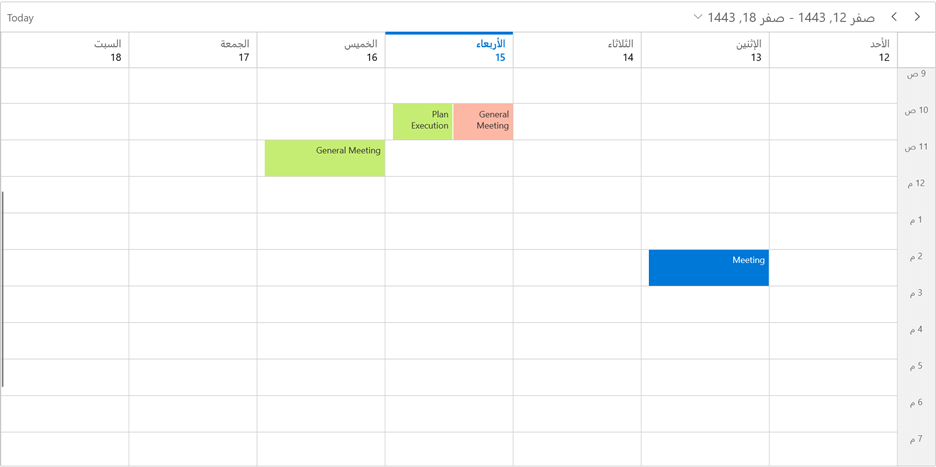
Multiple scheduler views
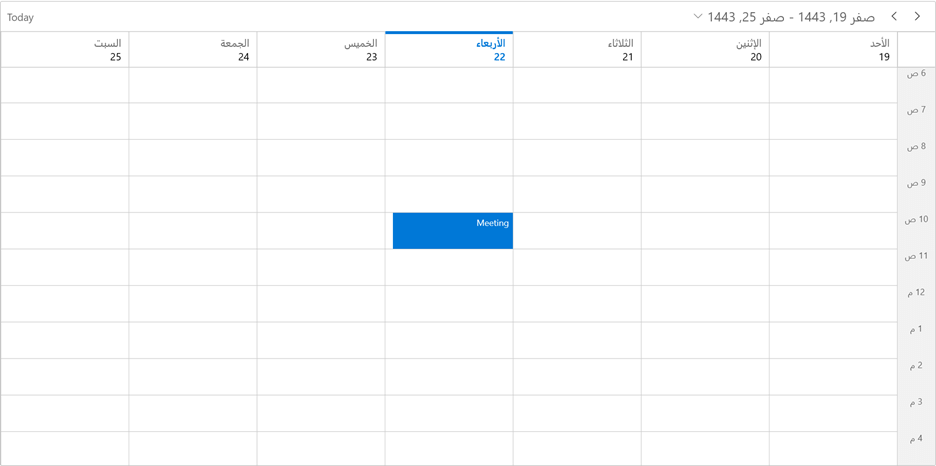
The Scheduler dates are displayed based on the calendar types. The WinUI Scheduler supports eight types of views (day, week, workweek, month, timeline day, timeline week, timeline workweek, and timeline month) to display dates.
You can assign the required view by using the ViewType property like in the following code example.
<scheduler:SfScheduler x:Name="scheduler"
                       CalendarIdentifier="HijriCalendar"
                       ViewType="Week">
</scheduler:SfScheduler>
First day of week
By default, the WinUI Scheduler will be rendered with Sunday as the first day of the week. You can easily change it by using the FirstDayOfWeek property of the Scheduler based on the calendar type.
Refer to the following code example.
<scheduler:SfScheduler x:Name="scheduler"
                       FirstDayOfWeek="Thursday"
                       CalendarIdentifier="HijriCalendar"
                       ViewType="Week">
</scheduler:SfScheduler>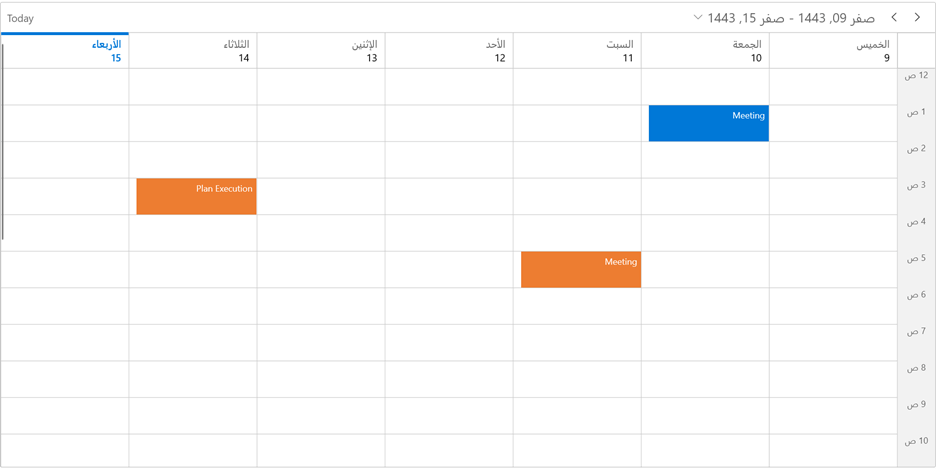
Appointments
You can easily add appointments to the calendar in the WinUI Scheduler in either of two ways:
- Create an appointment with start-time and end-time values by declaring the calendar type and respective calendar type date. Refer to the following code example.
// Creating an instance for the schedule appointment collection.
var appointments = new ScheduleAppointmentCollection();
// Adding schedule appointment in the schedule appointment collection.
appointments.Add(new ScheduleAppointment()
{
   Subject = "Meeting",
   // StartTime and EndTime values specified with calendar type and calendar date.
   StartTime = new DateTime (1443, 02, 22, 10, 0, 0, new HijriCalendar()),
   EndTime = new DateTime(1443, 02, 22, 11, 0, 0, new HijriCalendar()),
});
// Adding the schedule appointment collection to the ItemsSource.

this.scheduler.ItemsSource = appointments;
- Create an appointment with start and end times by declaring the local system date. In this case, the system date will be converted to the relevant calendar type date. Refer to the following code example.
// Creating an instance for the schedule appointment collection.
var appointments = new ScheduleAppointmentCollection();
// Adding schedule appointment in the schedule appointment collection.
appointments.Add(new ScheduleAppointment()
{
   Subject = "Meeting",
  // StartTime and EndTime values specified with local system date will be converted to the Hijiri calendar.
   StartTime = new DateTime(2021, 09, 29, 10, 0, 0, 0),
   EndTime = new DateTime(2021, 09, 29, 11, 0, 0, 0),
});
// Adding the schedule appointment collection to the ItemsSource.
this.scheduler.ItemsSource = appointments;
Resource grouping
The WinUI Scheduler allows you to add Resources to the calendar. You can group the resources by either resource or date using the ResourceGroupType property based on the calendar type.
// Adding schedule resource in the scheduler resource collection.
var ResourceCollection = new ObservableCollection<SchedulerResource>()
{
    new SchedulerResource() { Name = "Sophia", Foreground = new SolidColorBrush(Colors.White), Background = new SolidColorBrush((Color.FromArgb(255, 157, 101, 201))), Id = "1000" },
    new SchedulerResource() { Name = "Zoey Addison", Foreground = new SolidColorBrush(Colors.White), Background = new SolidColorBrush(Color.FromArgb(255, 240, 138, 93)), Id = "1001" },
   new SchedulerResource() { Name = "James William", Foreground = new SolidColorBrush(Colors.White), Background = new SolidColorBrush(Color.FromArgb(255,103, 155, 155)), Id = "1002" },
};

// Adding the scheduler resource collection to the schedule resources of SfScheduler.
this.scheduler.ResourceCollection = ResourceCollection;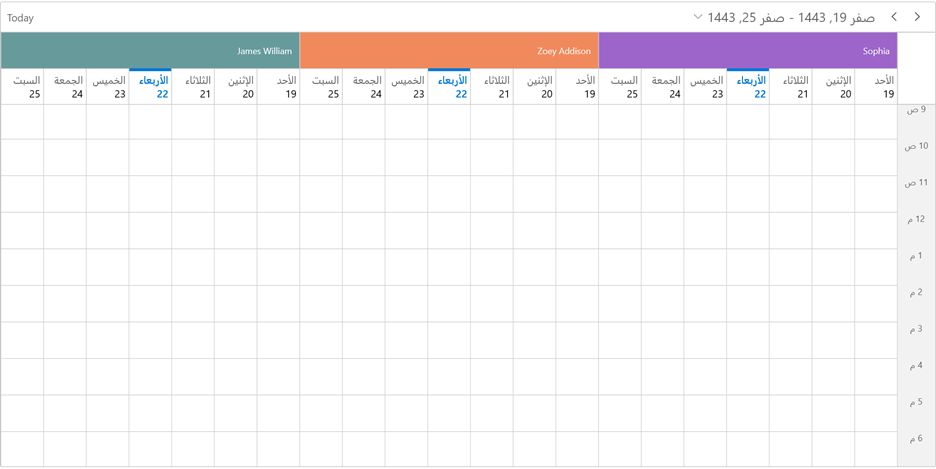
Assigning appointments to Scheduler resources
You can associate the resources with the appointments by assigning the Id property of the resources in the ResourceIdCollection API of the ScheduleAppointment class.
// Creating an instance for the schedule appointment collection.
var scheduleAppointmentCollection = new ScheduleAppointmentCollection();
//Adding schedule appointment in the schedule appointment collection.
var appointment = new ScheduleAppointment()
{
// StartTime and EndTime values specified with local system date will be converted to the Hijiri calendar.
    StartTime = new DateTime(2021, 09, 29, 10, 0, 0),
    EndTime = new DateTime(2021, 09, 29, 11, 0, 0),
    Subject = "General Meeting",
    //Add Scheduler Resource Id to the schedule appointment.
   ResourceIdCollection = new ObservableCollection<object>() { "1000", "1001" }
};
//Adding the schedule appointment to the schedule appointment collection.
scheduleAppointmentCollection.Add(appointment);
//Adding the schedule appointment collection to the ItemsSource of SfScheduler.
this.scheduler.ItemsSource = scheduleAppointmentCollection;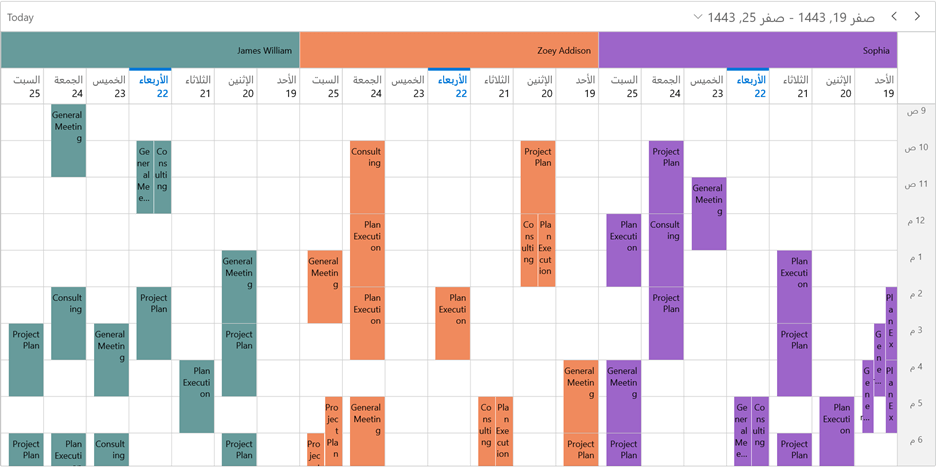
Range for visible dates
You can keep your users from selecting dates outside a specified time range and prevent navigation beyond the minimum and maximum dates. There are two ways:
- Set the Scheduler minimum and maximum date values by declaring the calendar type and calendar type date.
// DateTime value specified with calendar type and calendar date.
this.scheduler.MinimumDate = new DateTime(1443, 02, 22, 10, 0, 0, new HijriCalendar());
this.scheduler.MaximumDate = new DateTime(1443, 05, 22, 11, 0, 0, new HijriCalendar());
- Set the Scheduler minimum and maximum dates by declaring a local system date. In this case, the system date will be converted to the relevant calendar type date.
// DateTime value specified with local system date will be converted to the Hijiri calendar.
this.scheduler.MinimumDate = new DateTime(2021, 02, 22, 10, 0, 0);
this.scheduler.MaximumDate = new DateTime(2021, 05, 22, 11, 0, 0);
Programmatic date navigation
Using the DisplayDate property, you can programmatically navigate the dates for the supported calendar types. There are two ways:
- Set the Scheduler display date value by declaring the calendar type and calendar type date.
// DateTime value specified with calendar type and calendar date.
this.scheduler.DisplayDate= new DateTime(1443, 02, 22, 10, 0, 0, new HijriCalendar());
- Set the Scheduler display date value by declaring a local system date. Here, the system date will be converted to the relevant calendar type date.
// DateTime value specified with local system date will be converted to the Hijiri calendar.
this.scheduler.DisplayDate= new DateTime(2021, 09, 29, 10, 0, 0);
Programmatic date selection
Use the SelectedDate property to programmatically select the dates for the calendar. Use either of these ways:
- Set the Scheduler selected date value by declaring the calendar type and calendar type date.
// DateTime value specified with calendar type and calendar date.
this.scheduler.SelectedDate = new DateTime(1443, 02, 22, 10, 0, 0, new HijriCalendar());
- Set the Scheduler display date value by declaring a local system date. Here, the system date will be converted to the relevant calendar type date.
// DateTime value specified with local system date will be converted to the Hijiri calendar.
this.scheduler.SelectedDate = new DateTime(2021, 09, 29, 10, 0, 0);
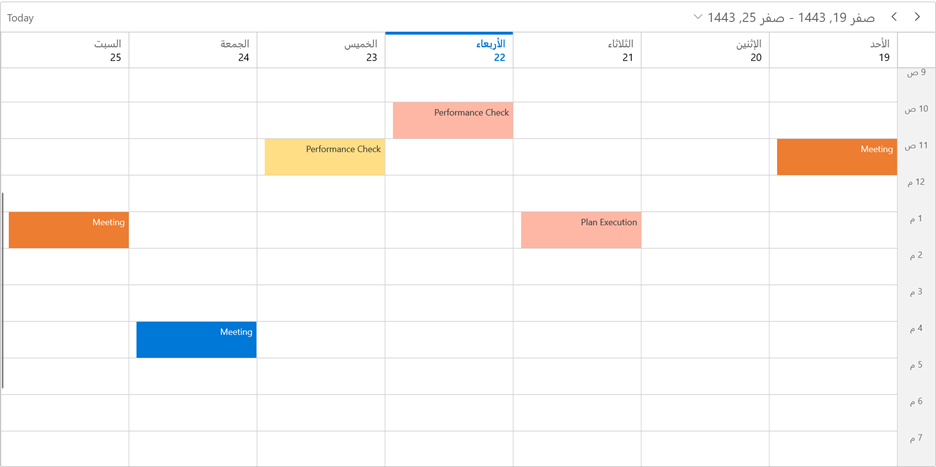
Highlight time region
You can highlight a special time region in days and timeline views in all the supported calendar types. To do so, please take either of these steps:
- Create a special time region with start and end time values by declaring the calendar type and calendar type date.
this.scheduler.DaysViewSettings.SpecialTimeRegions.Add(new SpecialTimeRegion
{
   // StartTime and EndTime value specified with calendar type and calendar date.
   StartTime = new DateTime(1443, 02, 22, 10, 0, 0, new HijriCalendar()),
   EndTime = new DateTime(1443, 02, 22, 11, 0, 0, new HijriCalendar()),
   CanEdit = true,
   Background = new SolidColorBrush(Colors.LightGray),
   Foreground = new SolidColorBrush(Colors.White),
});
- Create the special time region with start and end time values by declaring a local system date. Here, the system date will be converted to the relevant calendar type date.
this.scheduler.DaysViewSettings.SpecialTimeRegions.Add(new SpecialTimeRegion
{
 // StartTime and EndTime value specified with local system date will be converted to the Hijiri calendar.
    StartTime = new System.DateTime(2021, 09, 29, 13, 0, 0),
    EndTime = new System.DateTime(2021, 09, 29, 14, 0, 0),
    CanEdit = false,
    Background = new SolidColorBrush(Colors.LightGray),
    Foreground = new SolidColorBrush(Colors.White),
});
Highlight blackout date
Also, you can highlight a blackout day in month view in the calendar. You can allocate or restrict specific dates for the predefined events. Use either of these ways:
- Add a blackout date value by declaring the calendar type and calendar type date.
this.scheduler.BlackoutDates = GetBlackoutDates();

/// <summary>
/// Method to get blackout date collections.
/// </summary>
// <returns>The blackoutDateCollection.</returns>
private ObservableCollection<DateTime> GetBlackoutDates()
{
    var blackoutDateCollection = new ObservableCollection<DateTime>()
    {
       // DateTime value specified with calendar type and calendar date.
        new DateTime(1443, 02, 20, 10, 0, 0, new HijriCalendar()),
        new DateTime(1443, 02, 21, 10, 0, 0, new HijriCalendar()),
        new DateTime(1443, 02, 22, 10, 0, 0, new HijriCalendar()),
        new DateTime(1443, 02, 23, 10, 0, 0, new HijriCalendar()),
        new DateTime(1443, 02, 24, 10, 0, 0, new HijriCalendar()),
     };
    return blackoutDateCollection;
}
- Add the blackout date value by declaring a local system date. The system date will be converted to the relevant calendar type date.
this.scheduler.BlackoutDates = GetBlackoutDates();

/// <summary>
/// Method to get blackout date collections.
/// </summary>
// <returns>The blackoutDateCollection.</returns>
private ObservableCollection<DateTime> GetBlackoutDates()
{
    var blackoutDateCollection = new ObservableCollection<DateTime>()
    {
// DateTime value specified with local system date will be converted to the Hijiri calendar.
        new DateTime(2021, 09, 27, 10, 0, 0),
        new DateTime(2021, 09, 28, 10, 0, 0),
        new DateTime(2021, 09, 29, 10, 0, 0),
        new DateTime(2021, 09, 30, 10, 0, 0),
    };
      return blackoutDateCollection;
}
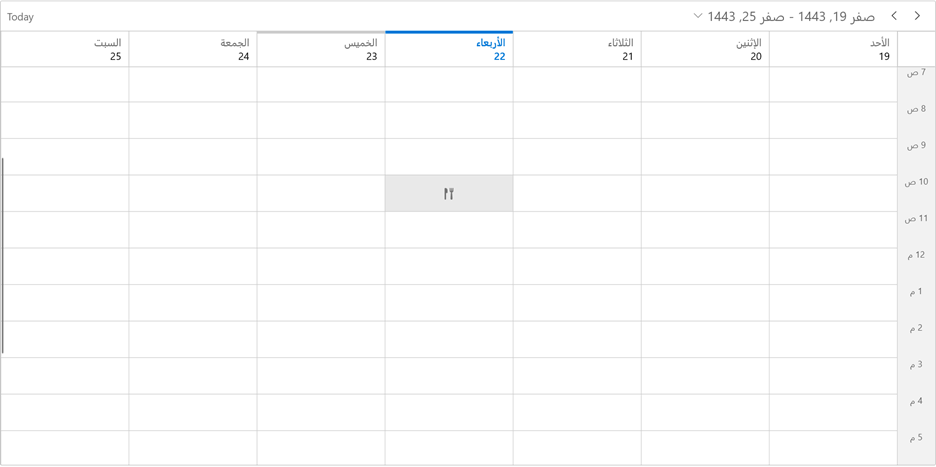
Flow direction
The WinUI Scheduler flow direction automatically switches to RightToLeft for the following calendar types:
- Hebrew
- Hijri
- UmAlQura
- Persian
Localization
You can localize the Scheduler based on the language using the Language property. The default value of the Language property is en-US.
Also, you can localize the custom string (for example: Today and Appointment editor window details) in the Scheduler by adding the resource files for the required language.
In the following example, we have set the Language property value as ar, which represents the Arabic language.
<scheduler:SfScheduler x:Name="scheduler"
                       Language="ar"
                       CalendarIdentifier="HijriCalendar"
                       ViewType="Week">
</scheduler:SfScheduler>
Note: For more details, refer to the Calendar Types in WinUI Scheduler demo on GitHub.
Conclusion
Thanks for reading! In this blog post, we did a quick overview of the calendar types in the WinUI Scheduler and other basic scheduling functionalities. With these features, you can easily reach your global audience by helping them schedule appointments in their local calendars.
Also, read our WinUI Scheduler documentation, where you can find detailed explanations of all Scheduler’s other features with code examples. Feel free to try out the WinUI demos on GitHub and share your feedback or ask questions in the comments section.
If you aren’t a customer yet, you can try our 30-day free trial to check out these features.
You can contact us through our support forum, Direct-Trac, or feedback portal. We are happy to assist you!
 No spam, just valuable updates.