

The Syncfusion Flutter DataGrid is also known as Flutter DataTable. You can use it to display and manipulate data in a tabular view. Its rich feature set includes row selection, sorting, column sizing, row height customization, swiping, and more. In addition, the Flutter DataGrid provides editing support in the 2021 Volume 2 release.
In this blog, I will walk you through how to enable the new editing feature and its options with code examples.
How to enable editing in Flutter DataGrid
Our Flutter DataGrid does not have a built-in feature to show an editor when a cell enters edit mode. We have to load a widget as an editor in the DataGrid when a cell is in edit mode.
Follow these steps to enable the editing feature in your Flutter DataGrid:
Step 1: First, set the allowEditing property of DataGrid as true to enable the editing feature. You can enable the editing feature only when the selectionMode property is set to a value other than none and the navigationMode property is set as cell. So, set these two properties accordingly.
Refer to the following code example.
@override
Widget build(BuildContext context) {
  return Scaffold(
     appBar: AppBar(
       title: const Text('Syncfusion Flutter DataGrid'),
     ),
     body: SfDataGrid(
       source: employeeDataSource,
       allowEditing: true,
       columnWidthMode: ColumnWidthMode.fill,
       selectionMode: SelectionMode.single,
       navigationMode: GridNavigationMode.cell,
       columns: <GridColumn>[
           GridColumn(
               columnName: 'id',
               label: Container(
                   padding: EdgeInsets.all(16.0),
                   alignment: Alignment.centerRight,
                   child: Text(
                     'ID',
                   ))),
           GridColumn(
               columnName: 'name',
               label: Container(
                   padding: EdgeInsets.all(8.0),
                   alignment: Alignment.centerLeft,
                   child: Text('Name'))),
           GridColumn(
               columnName: 'designation',
               label: Container(
                   padding: EdgeInsets.all(8.0),
                   alignment: Alignment.centerLeft,
                   child: Text(
                     'Designation',
                     overflow: TextOverflow.ellipsis,
                   ))),
           GridColumn(
               columnName: 'salary',
               label: Container(
                   padding: EdgeInsets.all(8.0),
                   alignment: Alignment.centerRight,
                   child: Text('Salary'))),
        ],
      ),
   );
}
Step 2: Next, load a relevant widget when a cell enters edit mode by using the buildEditWidget method. Then, override this method from the DataGridSource class and return the required widget based on the column.
In the following example, we are going to load the TextField for all the columns in the Flutter DataGrid. It will decide the keyboard type and alignment based on the numeric and text columns. For users’ convenience, we have provided the submitCell method as an argument. Users can call the submitCell method when the TextField.onSubmitted property is called. When you call this method, the Flutter DataGrid will call the DataGridSource.onCellSubmit method automatically. So, users can write the logic there to commit the edited cell values to DataGridRow and DataGridCell.
Refer to the following code example.
@override
Widget? buildEditWidget(DataGridRow dataGridRow,
  RowColumnIndex rowColumnIndex, GridColumn column, CellSubmit submitCell) {

    final String displayText = dataGridRow
            .getCells()
            .firstWhereOrNull((DataGridCell dataGridCell) =>
                dataGridCell.columnName == column.columnName)
            ?.value
            ?.toString() ??
        '';

    // The new cell value must be reset.
    // To avoid committing the [DataGridCell] value that was previously edited
    // into the current non-modified [DataGridCell].
    newCellValue = null;

    final bool isNumericKeyBoardType =
        column.columnName == 'id' || column.columnName == 'salary';

    return Container(
      padding: const EdgeInsets.all(8.0),
      alignment:
          isNumericKeyBoardType? Alignment.centerRight : Alignment.centerLeft,
      child: TextField(
        autofocus: true,
        controller: editingController..text = displayText,
        textAlign: isNumericKeyBoardType? TextAlign.right : TextAlign.left,
        decoration: InputDecoration(
            contentPadding: const EdgeInsets.fromLTRB(0, 0, 0, 16.0),
        ),
        keyboardType:
            isNumericKeyBoardType ? TextInputType.number : TextInputType.text,
        onChanged: (String value) {
          if (value.isNotEmpty) {
            if (isNumericKeyBoardType) {
              newCellValue = int.parse(value);
            } else {
              newCellValue = value;
            }
          } else {
            newCellValue = null;
          }
        },
        onSubmitted: (String value) {
          submitCell();
        },
     ),
  );
}
Step 3: Finally, override the onCellSubmit method in the DataGridSource class and implement the logic to commit the edited cell value to the underlying model or DataGridCell. You don’t need to call the notifyListeners method here. The Flutter DataGrid will call it automatically.
Refer to the following code example.
/// Helps to hold the new value of all editable widgets.
/// Based on the new value we will commit the new value into the corresponding
/// DataGridCell on onCellSubmit method.
dynamic newCellValue;
/// Help to control the editable text in [TextField] widget.
TextEditingController editingController = TextEditingController();
@override
void onCellSubmit(DataGridRow dataGridRow, RowColumnIndex rowColumnIndex,
GridColumn column) {
final dynamic oldValue = dataGridRow
.getCells()
.firstWhereOrNull((DataGridCell dataGridCell) =>
dataGridCell.columnName == column.columnName)
?.value ??
'';
final int dataRowIndex = dataGridRows.indexOf(dataGridRow);
if (newCellValue == null || oldValue == newCellValue) {
return;
}
if (column.columnName == 'id') {
dataGridRows[dataRowIndex].getCells()[rowColumnIndex.columnIndex] =
DataGridCell<int>(columnName: 'id', value: newCellValue);
_employees[dataRowIndex].id = newCellValue as int;
} else if (column.columnName == 'name') {
dataGridRows[dataRowIndex].getCells()[rowColumnIndex.columnIndex] =
DataGridCell<String>(columnName: 'name', value: newCellValue);
_employees[dataRowIndex].name = newCellValue.toString();
} else if (column.columnName == 'designation') {
dataGridRows[dataRowIndex].getCells()[rowColumnIndex.columnIndex] =
DataGridCell<String>(columnName: 'designation', value: newCellValue);
_employees[dataRowIndex].designation = newCellValue.toString();
} else {
dataGridRows[dataRowIndex].getCells()[rowColumnIndex.columnIndex] =
DataGridCell<int>(columnName: 'salary', value: newCellValue);
_employees[dataRowIndex].salary = newCellValue as int;
}
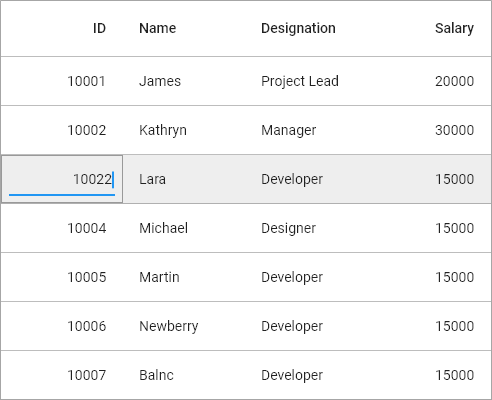
}After executing the previous code, we will get output like the following screenshot.
Note: For more information, refer to our How to perform editing in Flutter DataGrid demo.
Entering edit mode on a single tap
By default, a cell enters edit mode when we double-tap on it. Also, you can customize this behavior to move a cell to edit mode on a single tap by setting the SfDataGrid.editingGestureType as tap.
Refer to the following code example.
@override
Widget build(BuildContext context) {
  return Scaffold(
    body: SfDataGrid(
      source: _employeeDataSource,
      allowEditing: true,
      selectionMode: SelectionMode.single,
      navigationMode: GridNavigationMode.cell,
      editingGestureType: EditingGestureType.tap,
      columns: [
        GridColumn(
          columnName: 'id',
          label: Container(
            padding: EdgeInsets.symmetric(horizontal: 16.0),
            alignment: Alignment.centerRight,
            child: Text(
              'ID',
              overflow: TextOverflow.ellipsis,
            ),
          ),
        ),
        GridColumn(
          columnName: 'name',
          label: Container(
            padding: EdgeInsets.symmetric(horizontal: 16.0),
            alignment: Alignment.centerLeft,
            child: Text(
              'Name',
              overflow: TextOverflow.ellipsis,
            ),
          ),
        ),
        GridColumn(
          columnName: 'designation',
          label: Container(
            padding: EdgeInsets.symmetric(horizontal: 16.0),
            alignment: Alignment.centerLeft,
            child: Text(
              'Designation',
              overflow: TextOverflow.ellipsis,
            ),
          ),
        ),
        GridColumn(
          columnName: 'salary',
          label: Container(
            padding: EdgeInsets.symmetric(horizontal: 16.0),
            alignment: Alignment.centerRight,
            child: Text(
              'Salary',
              overflow: TextOverflow.ellipsis,
            ),
          ),
        ),
      ],
    ),
  );
}
Disable editing for a specific column
The Flutter DataGrid provides support to enable and disable editing values in a specific column. You can achieve this using the GridColumn.allowEditing property.
In the following code example, we are going to enable the editing feature for the id column.
@override
Widget build(BuildContext context) {
  return Scaffold(
    body: SfDataGrid(
      source: _employeeDataSource,
      allowEditing: true,
      selectionMode: SelectionMode.single,
      navigationMode: GridNavigationMode.cell,
      columns: [
        GridColumn(
          columnName: 'id',
          allowEditing: false,
          label: Container(
            padding: EdgeInsets.symmetric(horizontal: 16.0),
            alignment: Alignment.centerRight,
            child: Text(
              'ID',
              overflow: TextOverflow.ellipsis,
            ),
          ),
        ),
        GridColumn(
          columnName: 'name',
          label: Container(
            padding: EdgeInsets.symmetric(horizontal: 16.0),
            alignment: Alignment.centerLeft,
            child: Text(
              'Name',
              overflow: TextOverflow.ellipsis,
            ),
          ),
        ),
        GridColumn(
          columnName: 'designation',
          label: Container(
            padding: EdgeInsets.symmetric(horizontal: 16.0),
            alignment: Alignment.centerLeft,
            child: Text(
              'Designation',
              overflow: TextOverflow.ellipsis,
            ),
          ),
        ),
        GridColumn(
          columnName: 'salary',
          label: Container(
            padding: EdgeInsets.symmetric(horizontal: 16.0),
            alignment: Alignment.centerRight,
            child: Text(
              'Salary',
              overflow: TextOverflow.ellipsis,
            ),
          ),
        ),
      ],
    ),
  );
}
Methods
The Flutter DataGrid will call the following methods in the DataGridSource class when a cell moves to edit mode:
- onCellBeginEdit: When a cell is in edit mode.
- canSubmitCell: Before the DataGridSource.onCellSubmit method is called. You can use this method when you don’t want to end the editing, based on any criteria.
- onCellSubmit – When the cell editing is completed.
- onCellCancelEdit – When the Esc key is pressed in the web and desktop platforms to reset the edited cell value.
Note: For more information, refer to the Editing in Flutter DataGrid documentation.
Conclusion
Thanks for reading! I hope you enjoyed this blog and learned how to enable the editing feature in the Flutter DataGrid. This feature is available in our 2021 Volume 2 release. To see all the updates in this release, please check our Release Notes and What’s New pages.
Browse our documentation to learn more about our Flutter widgets. You can also see our Flutter app with many examples in this GitHub repository. Don’t miss our demo app in Google Play, the App Store, the Microsoft Store, Snapcraft, the Microsoft App Center, and on our website.
If you are not a customer yet, you can start a 30-day free trial to check out these features.
Also, if you wish to send us feedback or would like to submit any questions, please feel free to post them in the comments section of this blog post. You can also contact us through our support forum, feedback portal, or Direct-Trac support system. We are always happy to assist you!


 No spam, just valuable updates.