

GitHub Actions is a CI/CD platform that helps us to automate the deployment process of applications using the GitHub repository. We can build, test, and deploy our applications to the Azure App Service using GitHub Actions. This blog will demonstrate the procedure to deploy a Blazor server-side app to the Azure App Service using GitHub Actions.
Prerequisites
Before starting to create and deploy the Blazor application, you need to have the following tools installed:
Step 1: Create Azure Web App in Azure App Service
Microsoft’s Azure App Service is a platform as a service (PaaS) solution. We can use it to host web apps, REST APIs, and backend services for mobile apps. In this blog, we use Azure App Service to host a Blazor server-side application as a web app.
First, open the Azure portal and select Azure App Service. Then, click Create to create an Azure web app.
After that, you need to enter several details to finalize the Azure web app.
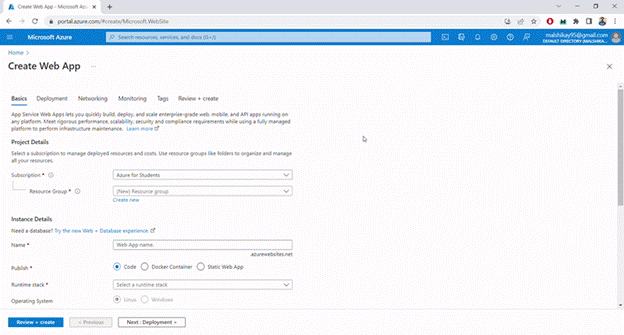
In the previously pictured form, select the resource group first. If there isn’t a resource group, create a resource group by clicking Create New. Second, provide a unique name for the app. Third, select the runtime stack to build and run the application. For this example, I select .NET 6 as the runtime stack for the Blazor server-side application, Linux as the operating system, and East Asia as the region.
Once the application is created, click on the application name. Now, you will see an option named Get publish profile. Make sure to download the published profile from there and save it locally, since we will use it in one of the next steps with the GitHub Repository.

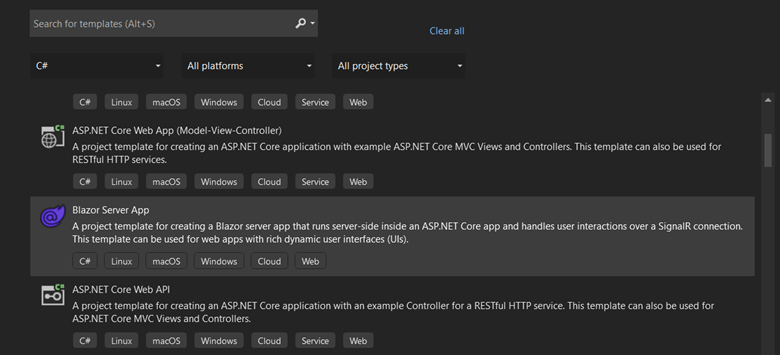
Step 2: Create the Blazor Server-Side Application
In this step, we create a Blazor server-side application using Visual Studio 2022. First, open Visual Studio and create a new project with the Blazor Server App template. Then, select .NET 6 as the framework for this project.
After creating the project, run it, and check that everything is working.
Step 3: Configure the YAML File for GitHub Workflow
Now, we create the YAML file to create the GitHub workflow for GitHub Actions. First, navigate to the Blazor application project folder created in the previous step. Then, create a directory named .github followed by a directory named workflows inside the .github directory.
After that, create a YAML file named demo.yml inside the workflows directory and update it with the following code.
name: Build and deploy Blazor App
# use this 'on' to trigger the workflow
on:
  push: # trigger when pushing the commits into main branch
    branches:
      - main
  workflow_dispatch:

jobs:
  build:
    runs-on: windows-latest  # OS or machine to run each job
    steps: # steps - series of tasks to run the job
      - uses: actions/checkout@v2#Setup .NET Core SDK
      - name: Set up .NET Core
        uses: actions/setup-dotnet@v1
        with:# Use latest version of dotnet 6
          dotnet-version: '6.0.x'# include pre-release of dotnet
          include-prerelease: true

      - name: Build with dotnet# run the command for build the dotnet app
        run: dotnet build --configuration Release

      - name: dotnet publish# run the command to pack the build files and dependencies into folder for deployment
        run: dotnet publish -c Release -o ${{env.DOTNET_ROOT}}/myapp

      - name: Upload artifact for deployment job#Reference a specific upload artifact
        uses: actions/upload-artifact@v2

        with:
          name: .net-app
          path: ${{env.DOTNET_ROOT}}/myapp

  deploy:
    runs-on: windows-latest
    needs: build #contains the output from the build job#set environment
    environment:
      name: 'Production'# use deploy-to-webapp step in the job and look at the output of the dependent job. Then find the webapp-url and set it for URL in the environment
      url: ${{ steps.deploy-to-webapp.outputs.webapp-url }}

    steps:
      - name: Download artifact from build job#Reference a specific download artifact from build job
        uses: actions/download-artifact@v2
        with:
          name: .net-app

      - name: Deploy to Azure Web App
        id: deploy-to-webapp# Reference the deploy web app
        uses: azure/webapps-deploy@v2
        with:#use app name
          app-name: 'blazordemo-git'
          slot-name: 'Production'#use publish profile from the GitHub secrets
          publish-profile: ${{ secrets.AZUREAPPSERVICE_PUBLISHPROFILE }}
          package: .
In the previous script, the name property in the first line is issued to define the GitHub workflow name. Then, the trigger conditions are defined to execute the workflow. Based on these configurations, the workflow will be triggered when a commit is pushed into the main branch.
After that, a new job is initialized to build the Blazor server-side application. We include the necessary commands to build the application. Finally, a new deployment job is created to deploy the application to the Azure App Service as a web app. In this example, I have used secrets from the publish profile. I will show you how to create this in the next step. The publish profile contains information and settings used to deploy the application to Azure.
Step 4: Configure the Secrets and Deploy the Application
In this step, we create a GitHub repository for the Blazor application and add secret data to it. For this, we need to use the publish profile downloaded in step 1.

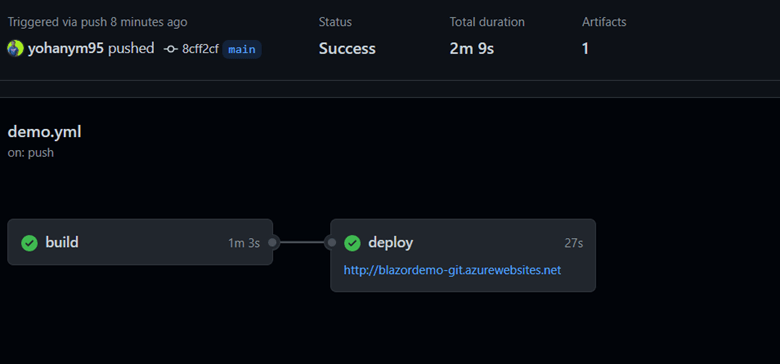
After adding the secret data, we push the changes to the GitHub repository. Then, the action will trigger and start the GitHub workflow. It will run two jobs, one to build and another to deploy the application. You can check the status of the action in the Action tab, as shown in the following screenshot.
Once the application is deployed, go to the portal and check the created web app.
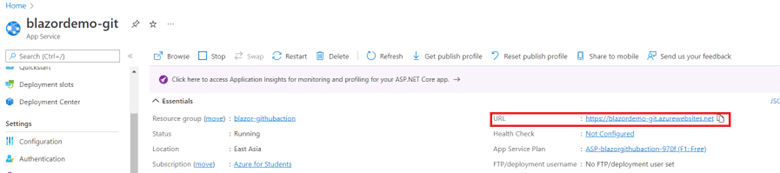
You will see the status is running. If you need to stop this application, click Stop.
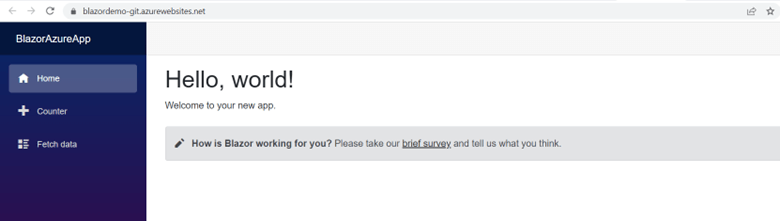
Click the URL to check the website.
Conclusion
This article discussed how to deploy a Blazor server-side application to the Azure App Service using GitHub Actions. With the increasing popularity of GitHub Actions and Blazor applications, it is an advantage to understand how to automate your CI/CD process by combining them.
I hope this article helps you in your next Blazor project. Thank you for reading.
Syncfusion’s Blazor component suite offers over 70 UI components. They work with both server-side and client-side (WebAssembly) hosting models seamlessly. Use them to build marvelous apps!
If you have any questions or comments, you can contact us through our support forums, support portal, or feedback portal. We are always happy to assist you!


Related blogs
- Simple Steps to Integrate a Blazor WebAssembly Project with an Existing ASP.NET Core Application
- A Full-Stack Web App Using Blazor WebAssembly and GraphQL: Part 6
- Download Files from Azure Blob Storage with Blazor WebAssembly and ASP.NET Web API
- CRUD Operations Using Blazor and MongoDB [Webinar Show Notes]
 No spam, just valuable updates.