

TL;DR: The blog explains how Syncfusion’s Blazor DataGrid simplifies creating a master-detail view, allowing developers to display hierarchical, interrelated data in a single grid. It walks through real-world scenarios (like employee records with sales orders and schedules), demonstrates setup, and highlights how the grid improves clarity, usability, and data visualization
Do you think it is tough to deal with or display a huge volume of interrelated data in a single data grid? If so, then you haven’t tried out our DataGrid. This blog post will show you how easily you can visualize data in a master-detail hierarchy in a single grid view in Blazor. Create feature-rich data tables with Syncfusion Blazor DataGrid. Easily add sorting, filtering, editing, paging, templates, and export options to your Blazor apps.
Master-detail view
So, what is this term, master-detail view? Let’s look at a real-time example. If a company is recording its employee details from its sales department, it would only make sense to categorize and show them in a meaningful way. The company could categorize their data meaningfully based on personal details, lists of sales orders, contact address, their meeting schedules with customers, and so on.
Here, the list of salesperson names displayed with limited details in the top grid UI is referred to as the “master” data view. The relevant information of the selected master data item will be shown inside the “detail” area.
 Thus, the master-detail view allows you to visualize the parent-child relationships by displaying the categorized grid data in a hierarchical style. The “detail” area displays the corresponding child information of the selected parent grid record and it could either display a child grid or any kind of customized information inside it.
Designing a master-detail view
First, let me list out the Syncfusion Blazor components that I’m going to use to design this master-detail view.
Master view
I’ll be using a Blazor DataGrid component to design the top-level master grid UI view with limited fields like each salesperson’s name, designation, city and phone number.
Detail view
To design the detail view, I’ll be using the following list of Blazor components:
- DataGrid: To display the sales order-related data of the selected salesperson from a master view.
- Maps: To visualize the location and contact address of a salesperson.
- Scheduler: To display the meeting schedules of a salesperson with their customers.
- Customized template: To show the personal information of a salesperson.
- Tabs: To place all these components as individual tab items inside the Tabs component.
Now, let’s dive in deep and see how to design the master-detail view using these Syncfusion Blazor components.
Data sources for master-detail view
I’m going to build four model classes to employ in this master-detail view creation:
- Salesperson: Bind to master grid’s data source.
- Orders: Bind to child data grid’s data source based on the ID of the selected salesperson. I’ll retrieve the order data from a remote service. https://js.syncfusion.com/demos/ejservices/Wcf/Northwind.svc/Orders
- Location: Bind to Maps DataSource based on the city of the selected salesperson.
- MeetingSchedule: Bind to Scheduler DataSource based on the ID of the selected salesperson.
The Salesperson model class acts as a master data source, whereas the other model classes, Orders, Location, and MeetingSchedule, act as children of the Salesperson model. I’m categorizing the data in this way to present them in a one-to-many kind of relationship.
Let me create a Blazor server app and add the required model classes first. I’ll create a new model class file inside the Data folder with the name Salesperson. In this class file, I’ll add the class definitions for the previously listed four classes with the required properties and methods to generate appropriate data, which you can reference from this GitHub repository.
After creating the required model classes, access them inside the index.razor component under the pages folder, where I’m planning to design the master-detail grid view. Add the following @code directive in the index.razor file.
@code {
    private List<Salesperson> Employees;
    private List<Location> MapPoints;
    private List<MeetingSchedule> ScheduleData;

    protected override void OnInitialized()
    {
        Employees = Salesperson.GetSalesperson();
        MapPoints = Location.GetLocation();
        ScheduleData = MeetingSchedule.GetMeetingData();
    }
}
Creating a master view
To design the master view, we should add the Syncfusion Blazor DataGrid component to the created Blazor app. You’ll also need to preconfigure this project to start using Syncfusion Blazor components by referring to this Getting started page or a quick-start video about Blazor DataGrid.
Add the following code example in index.razor file to create a master grid and bind the salesperson data source to it by assigning the @Employees object variable to the DataSource property of SfGrid.
<SfGrid Width="1200px" DataSource="@Employees">
    <GridColumns>
        <GridColumn Field=@nameof(Salesperson.FirstName) HeaderText="Name" Width="110"></GridColumn>
        <GridColumn Field=@nameof(Salesperson.Title) HeaderText="Title" Width="110"></GridColumn>
        <GridColumn Field=@nameof(Salesperson.City) HeaderText="City" Width="110"></GridColumn>
        <GridColumn Field=@nameof(Salesperson.Phone) HeaderText="Phone" Width="110"></GridColumn>
    </GridColumns>
</SfGrid>
This will display the flat master-detail view, as depicted in this following image.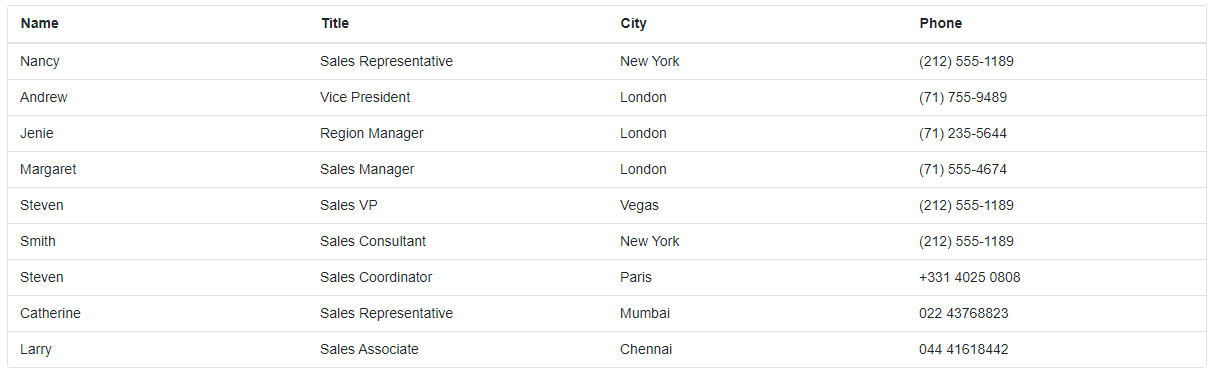
Creating a detail view
Now, for each of these master rows, we need to display the detailed information when the user selects a particular master row. To do so, use the detail template feature of DataGrid. The additional information will be displayed while expanding or collapsing the selected master row.
Inside the SfGrid tag, add the DetailTemplate and then place the required components inside it directly. In the following code example, you can see the Tab component is initially being placed and then the other components are added one by one inside it.
<SfGrid Width="1200px" DataSource="@Employees">
    <GridTemplates>
        <DetailTemplate>
            <SfTab Height="350" HeaderPlacement="HeaderPosition.Top">
                <TabItems> </TabItems>
            </SfTab>
        </DetailTemplate>
    </GridTemplates>
    <GridColumns>
        <GridColumn Field=@nameof(Salesperson.FirstName) HeaderText="Name" Width="110"></GridColumn>
        <GridColumn Field=@nameof(Salesperson.Title) HeaderText="Title" Width="110"></GridColumn>
        <GridColumn Field=@nameof(Salesperson.City) HeaderText="City" Width="110"></GridColumn>
        <GridColumn Field=@nameof(Salesperson.Phone) HeaderText="Phone" Width="110"></GridColumn>
    </GridColumns>
</SfGrid>
NOTE: Make sure to import the appropriate namespaces inside the _imports.razor file to start using components like Maps, Scheduler, Tab, and DataManager in this example.
Before proceeding to add the child components, access the details of the currently selected master grid record using the context variable inside the detail template. Then make use of this context object to access the other column values of the currently selected row throughout the design of this detailed view. Also, filter the location data based on the currently selected employee ID, which will then be bound to the Maps component.
<SfGrid Width="1200px" DataSource="@Employees">
    <GridTemplates>
        <DetailTemplate>
            @{
                Salesperson Employee = context as Salesperson;
                List<Location> MapDatum = MapPoints.Where(p => p.name == Employee.City).ToList();
            }
           <SfTab Height="350" HeaderPlacement="HeaderPosition.Top">
                <TabItems> </TabItems>
            </SfTab>
        </DetailTemplate>
    </GridTemplates>
Display customized information
Now, create four tab items and place each child component in one. In the first tab, simply display the customized personal information about the selected salesperson. For that, access the details using the context variable Employee and then make the necessary customizations. Also apply a few style definitions to achieve this customized look inside the <style> section.
<SfGrid Width="1200px" DataSource="@Employees">
    <GridTemplates>
        <DetailTemplate>
            <SfTab Height="350" HeaderPlacement="HeaderPosition.Top">
                <TabItems>
                    <TabItem>
                        <ChildContent>
                            <TabHeader Text="Personal Info"></TabHeader>
                        </ChildContent>
                        <ContentTemplate>
                            <div>
                                <div style="float:left;padding:45px;padding-top:70px"><img class="photo" src="@UriHelper.ToAbsoluteUri($"https://blazor.syncfusion.com/demos/images/Grid/{Employee.EmployeeID}.png")" alt="@Employee.EmployeeID" /></div>
                                <div style="padding-top:42px">
                                    <span style="font-size: x-large;font-weight: bold;">@Employee.FirstName @Employee.LastName</span><br />
                                    <h6 style="font-weight:400 !important;">@Employee.Title</h6><br />
                                    <span class="title">Country:</span> <span class="content">@Employee.Country</span><br />
                                    <span class="title">Postal Code:</span> <span class="content">@Employee.Postal</span><br />
                                    <span class="title">Mail:</span> <span class="content">@Employee.Email</span>
                                </div>
                            </div>
                        </ContentTemplate>
                    </TabItem>
                </TabItems>
            </SfTab>
        </DetailTemplate>
    </GridTemplates>
Note: Make sure to inject the Microsoft.AspNetCore.Components.NavigationManager in index.razor file to work with URIs and navigation in C# code.
Check the following screenshot to see how it displays the customized information of the selected row.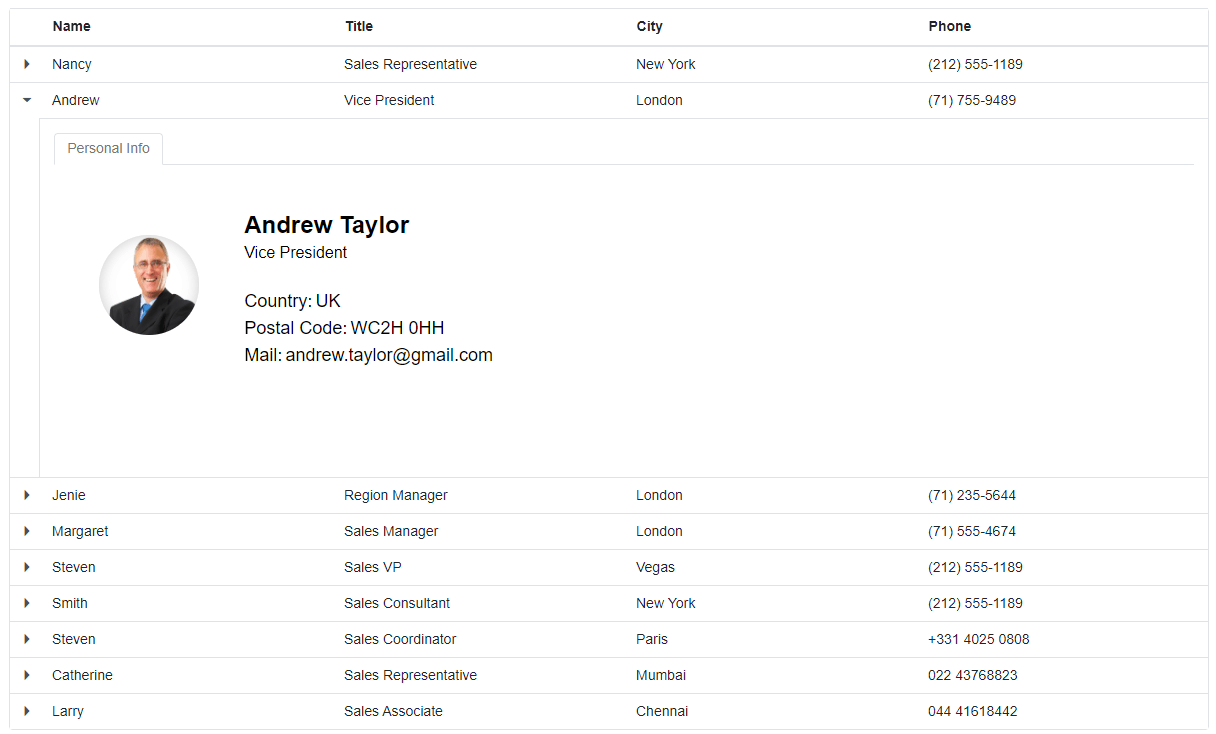
Display sales details in a child grid
In the second tab item, add a child grid to display the sales order details of the selected person. In this child DataGrid, retrieve the orders data from a remote data source. For this, make use of the DataManager component. Also define a Query property to filter the order details based on the currently selected master data’s employee ID value, so that only those filtered records from the Orders table will be bound to the child DataGrid.
<TabItem>
    <ChildContent>
        <TabHeader Text="Sales Details"></TabHeader>
    </ChildContent>
    <ContentTemplate>
        <div style="padding:25px">
        <SfGrid Width="740px" TValue="Orders" Query="@(new Query().Where("EmployeeID", "equal", Employee.EmployeeID))" AllowPaging="true">
        <GridPageSettings PageSize="4"></GridPageSettings>
        <SfDataManager Url="https://js.syncfusion.com/demos/ejservices/Wcf/Northwind.svc/Orders" CrossDomain="true"></SfDataManager>
        <GridColumns>
            <GridColumn Field=@nameof(Orders.OrderID) HeaderText="ID" Width="50"> </GridColumn>
            <GridColumn Field=@nameof(Orders.ShipName) HeaderText="Name" Width="110"></GridColumn>
            <GridColumn Field=@nameof(Orders.ShipCity) HeaderText="City" Width="90"></GridColumn>
            <GridColumn Field=@nameof(Orders.OrderDate) HeaderText="Date" Format="d" Type="ColumnType.Date" TextAlign="TextAlign.Right" Width="70"></GridColumn>
            <GridColumn Field=@nameof(Orders.Freight) HeaderText="Order Value" Format="c2" TextAlign="TextAlign.Right" Width="70"></GridColumn>
        </GridColumns>
        </SfGrid>
        </div>
    </ContentTemplate>
</TabItem>
This will display the order details in a child data grid as shown in the following image.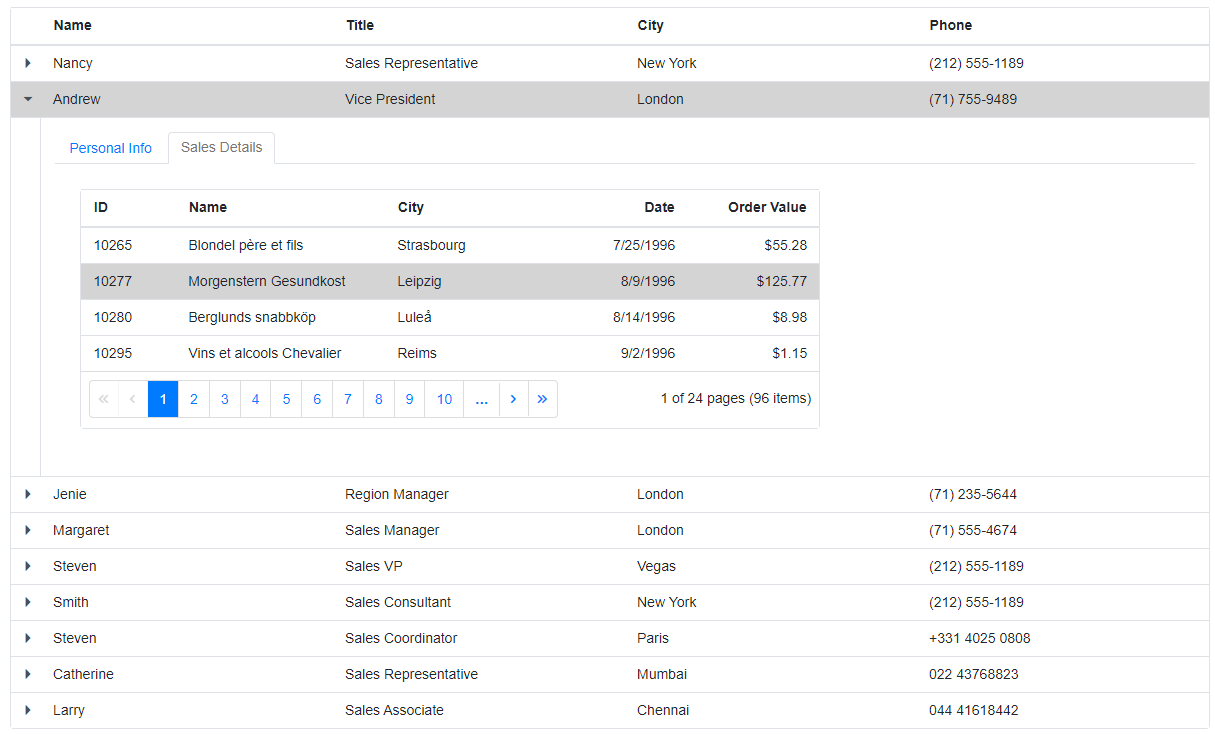
Display location using maps component
In the third tab item, add the Maps component to visualize the location of the currently selected master data item. Also, display the customized address information beside the Maps component. Here, assign the filtered location data to the data source of Maps component by accessing the variable @MapDatum which was initialized during the context variable creation.
<DetailTemplate>
            @{
                Salesperson Employee = context as Salesperson;
                List<Location> MapDatum = MapPoints.Where(p => p.name == Employee.City).ToList();
            }
<TabItem>
    <ChildContent>
        <TabHeader Text="Contact Address"></TabHeader>
    </ChildContent>
    <ContentTemplate>
    <div style="padding:25px">
      <div style="height:260px;width:450px;float:left">
        <SfMaps>
          <MapsCenterPosition Latitude="@MapDatum[0].latitude" Longitude="@MapDatum[0].longitude"></MapsCenterPosition>
          <MapsZoomSettings Enable="false" ZoomFactor=10></MapsZoomSettings>
          <MapsLayers>
            <MapsLayer LayerType="ShapeLayerType.OSM" AnimationDuration=0>
            <MapsMarkerSettings>
              <MapsMarker Visible="true" DataSource="@MapDatum" Height='30' Width='30' Shape='Syncfusion.Blazor.Maps.MarkerType.Image' ImageUrl='https://blazor.syncfusion.com/demos/styles/images/maps/ballon.png'>
              </MapsMarker>
            </MapsMarkerSettings>
            </MapsLayer>
          </MapsLayers>
        </SfMaps>
      </div>
      <div style="width:265px;float:left;padding:40px">
        <h4>Contact Address:</h4>
        <span>@Employee.Address</span>,<br />
        <span>@Employee.City</span>,<br />
        <span>@Employee.Country</span><br />
        <span>Phone: </span><span>@Employee.Phone</span>
      </div>
    </div>
    </ContentTemplate>
</TabItem>
The following screenshot shows the Maps component depicting the current location of the selected master data item.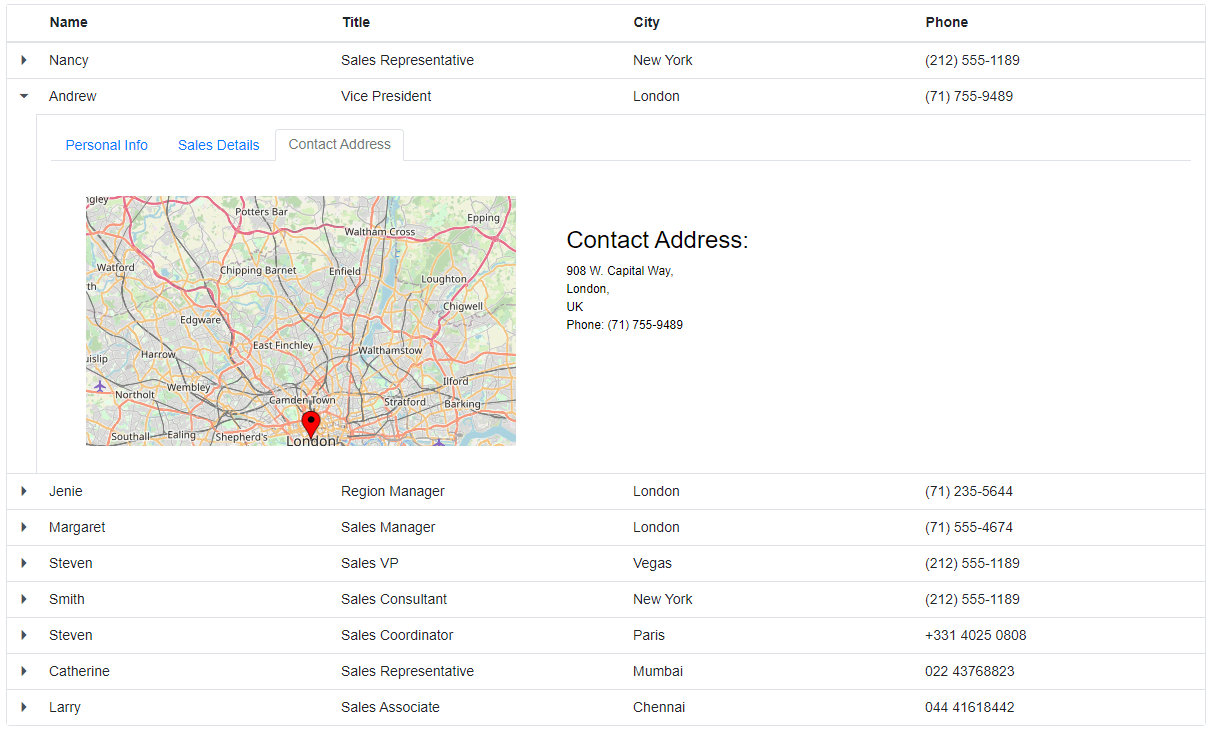
Display meeting schedules in a Scheduler
Finally, in the fourth tab item, add the Scheduler component to display the meeting schedules of the currently selected master data item. To display the meeting schedules, bind the Scheduler data source with the @ScheduleData variable by accessing data from the MeetingSchedule model class. Also, set a Query property to filter the appointment data based on the currently selected master record’s employee ID value. The following code example illustrates this.
<TabItem>
    <ChildContent>
        <TabHeader Text="Meeting Schedules"></TabHeader>
    </ChildContent>
    <ContentTemplate>
      <div style="width:450px;padding:25px">
        <SfSchedule TValue="MeetingSchedule" Height="260px" SelectedDate="new DateTime(2020, 3, 2)" CurrentView="View.Agenda">
          <ScheduleEventSettings DataSource="@ScheduleData" Query="@(new Query().Where("EID", "equal", Employee.EmployeeID))"></ScheduleEventSettings>
        </SfSchedule>
      </div>
    </ContentTemplate>
</TabItem>
The following screenshot displays the meeting schedules of the currently selected salesperson in an Agenda view.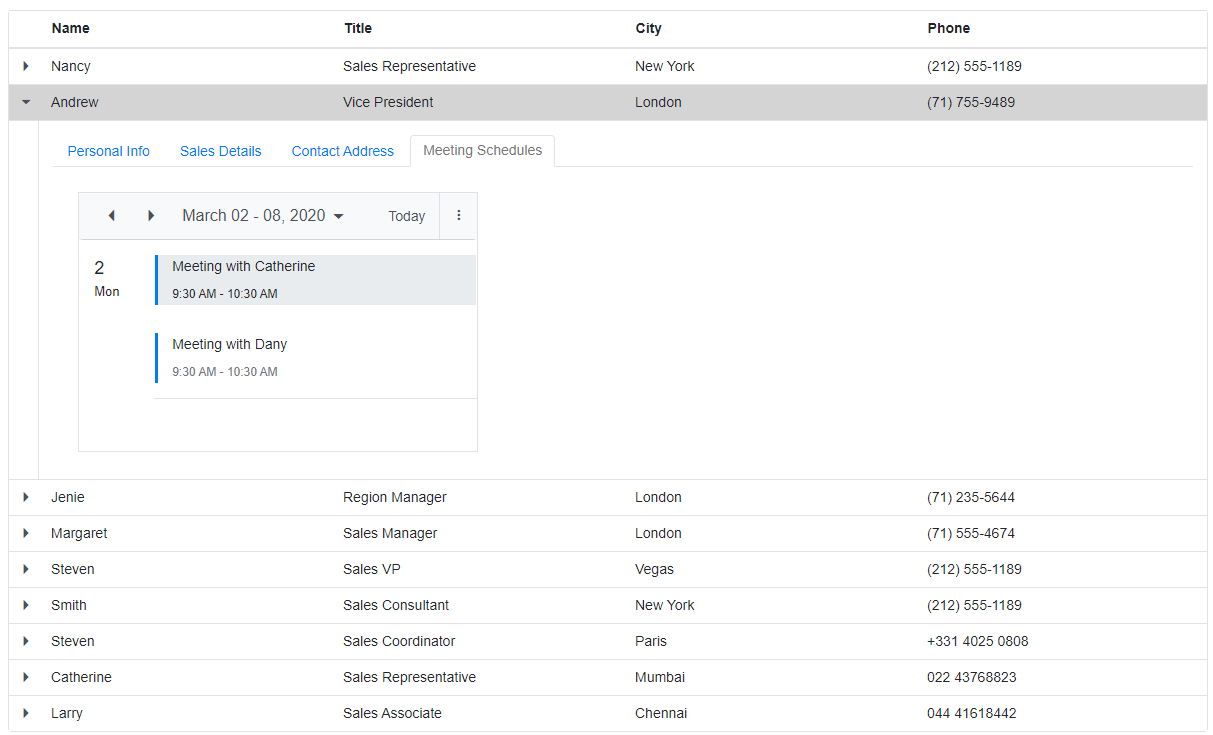
FAQ
1. What is a master-detail view?
A master-detail view refers to a user interface pattern where a primary (master) data set is displayed, and upon selecting an item, related (detail) information is shown, typically in a secondary area or component.
2. Which components are used to create a master-detail view in Blazor?
The following Syncfusion Blazor components are commonly used:
- DataGrid: For displaying the master and detail views.
- Maps: To visualize location data.
- Scheduler: For displaying meeting schedules.
- Tabs: To organize multiple components within the detail view.
3. How are the master and detail data sources structured?
- Master Data Source: Typically consists of a single model (e.g., Salesperson) that contains basic information.
- Detail Data Sources: Can include multiple related models (e.g., Orders, Location, MeetingSchedule) that provide detailed information based on the selected master record.
4. Can I customize the detail view?
Yes! The detail view can be customized using various UI components. You can add tabs to include different kinds of information such as personal details, sales history, location maps, or schedules.
5. How do I retrieve detail information based on the selected master record?
You can use context variables within the detail template to access properties of the selected master record, which allows you to filter detail data according to the selected item’s ID.
6. Is it possible to perform data operations like editing in the master-detail view?
Yes, you can enable editing for both master and detail grids independently, allowing users to update information as needed.
7. Where can I find the complete source code for the example?
The complete source code can be downloaded from the GitHub repository linked in the blog post.
8. Why would I use Syncfusion Blazor DataGrid for a master-detail view?
Syncfusion Blazor DataGrid offers an extensive set of features, such as built-in templates, efficient data binding, and responsiveness, making it easier to implement a sophisticated UI with minimal code.
9. What is the final outcome of implementing a master-detail view?
The outcome is a structured and hierarchical data representation that improves user experience, providing quick access to relevant details while minimizing visual clutter.
10. Can I visualize other types of data in the master-detail view?
Yes, you can incorporate various Syncfusion components to visualize different types of data, such as charts for sales reports or additional widgets, depending on your application’s requirements.

Conclusion
I hope now you can add and display further relevant information in separate tabs inside the detail view for the currently selected master record. You can easily add any of the Blazor UI components inside the detail template of the master DataGrid. For example, you can also visualize a sales report in a chart by displaying it in another tab item, which you can learn how to do in this demo.
You can download the complete source code of this example from the GitHub repository. I hope this blog post helped you understand the master-detail views and now you can start to create your own master-detail view using Syncfusion Blazor components with minimal lines of code.
If you’re a Syncfusion user, you can download the setup from the license and downloads page. Otherwise, you can download a free 30-day trial.
You can also contact us through our support forum, support portal, or feedback portal for queries. We are always happy to assist you!


 No spam, just valuable updates.
Comments (4)
hi, this example can have similar with asp.net with mvc5? i very glad to see, Hierarchy Grid
Hi Francisco,
There are few changes needed to create this same example in ASP.NET MVC 5, when you try to integrate other custom components into the ASP.NET MVC Data Grid. In MVC, you may need to make use of the DetailTemplate option along with the DetailDataBound event to render other components like Chart, Scheduler or any other custom components into the Data Grid. In case, if you would like to implement the Hierarchy Grid alone, then you can use the ChildGrid property. Refer the following examples, to know how to implement the Hierarchy grid and DetailTemplate option in ASP.NET MVC Grid.
Hierarchy Grid example: https://ej2.syncfusion.com/aspnetmvc/Grid/MasterDetailsExport#/material
Detail Template: https://ej2.syncfusion.com/aspnetmvc/Grid/DetailTemplate#/material
Integrate custom components: https://ej2.syncfusion.com/aspnetmvc/documentation/grid/row/#rendering-custom-component
Regards,
C. Uma Maheswari
Can we apply editing on both parent and client?
You can enable and perform editing operations on both parent and child grids separately, but it is not possible to edit them together at the same time.
To perform editing action in Blazor Grid, please refer to the below links.
https://blazor.syncfusion.com/documentation/datagrid/editing/
https://blazor.syncfusion.com/demos/datagrid/inline-editing?theme=bootstrap4