

Introduction
The command pattern is a behavioral design pattern. This pattern encapsulates a request as an object that contains all the information about the request, including requests for queues or logs, allowing for much more complex architectures. It even allows operations like undo and redo.
In this blog post, we’ll learn how to implement the command pattern in C# and we’ll see in which use cases it can be useful.
Parts of the command design pattern
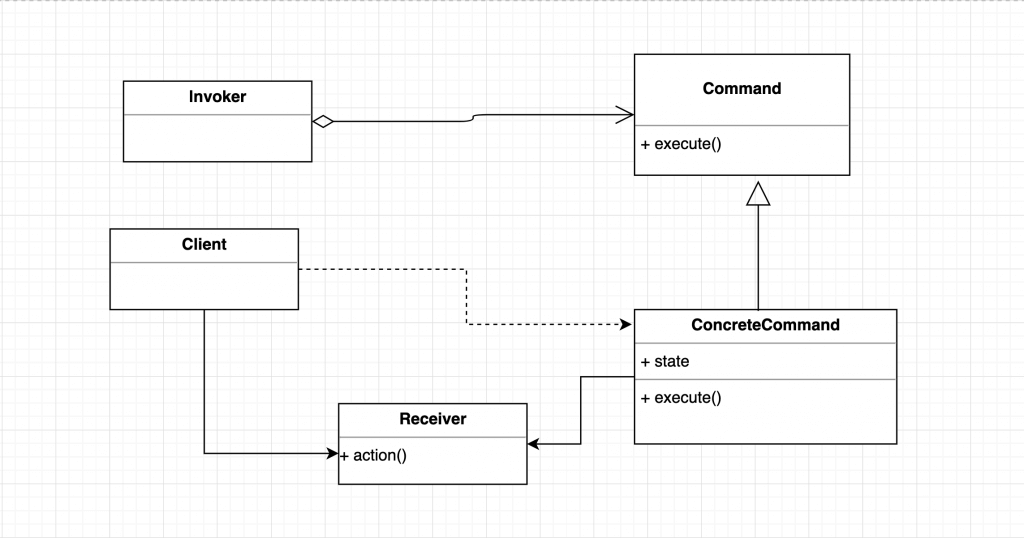
The command pattern is divided into five parts:
- The Command declares an interface for the execution of an operation.
- The ConcreteCommand defines a binding between a Receiver and an action.
- The Client creates a ConcreteCommand object and sets a Receiver for the command.
- The Invoker demands the command carry out its request.
- The Receiver knows how to execute the operations associated with the action of the request.
The command pattern is part of the GoF’s formal list of design patterns. So, let’s look at the class diagram for the command pattern and try to understand it.
Using the code
Let’s see how to do a simple command pattern implementation by writing a small Dine & Chef application. The idea is a table order at a restaurant: the waiter takes an order, which is the customer’s command. For the kitchen staff, this order is then queued. The waiter informs the chef that there is a fresh order, and the chef has enough data to prepare the meal.
Let’s first generate a class that represents an item being ordered to start building our application.
public class Tag
{
    public string TagName { get; set; }
}

public class MenuItem
{
    public string Item { get; set; }
    public int Quantity { get; set; }
    public int TableNumber { get; set; }
    public List Tags { get; set; }

    public void DisplayOrder()
    {
        Console.WriteLine("Table No: " + TableNumber);
        Console.WriteLine("Item: " + Item);
        Console.WriteLine("Quantity: " + Quantity);
        Console.Write("\tTags: ");
        foreach (var item in Tags)
        {
            Console.Write(item.TagName);
        }
    }
}
First, we’ll create our command interface and then create three concrete commands: Insert, Remove, and Modify order.
public abstract class OrderCommand
{
    public abstract void Execute(List order, MenuItem newItem);
}
public class NewOrderCommand : OrderCommand
{
    public override void Execute(List order, MenuItem newItem)
    {
        order.Add(newItem);
    }
}

public class RemoveOrderCommand : OrderCommand
{
    public override void Execute(List order, MenuItem newItem)
    {
        order.Remove(order.Where(x => x.Item == newItem.Item).First());
    }
}

public class ModifyOrderCommand : OrderCommand
{
    public override void Execute(List order, MenuItem newItem)
    {
        var item = order.Where(x => x.Item == newItem.Item).First();
        item.Quantity = newItem.Quantity;
        item.Tags = newItem.Tags;
        item.TableNumber = newItem.TableNumber;
    }
}
DineChefRestaurant is our receiver class, so let’s set it up.
public class DineChefRestaurant
{
    public List Orders { get; set; }

    public DineChefRestaurant()
    {
        Orders = new List();
    }

    public void ExecuteCommand(OrderCommand command, MenuItem item)
    {
        command.Execute(this.Orders, item);
    }

    public void ShowOrders()
    {
        foreach (var item in Orders)
        {
            item.DisplayOrder();
        }
    }
}
In this case, our invoker is the DineChef class.
public class DineChef
{
    private DineChefRestaurant order;
    private OrderCommand orderCommand;
    private MenuItem menuItem;

    public DineChef()
    {
        order = new DineChefRestaurant();
    }

    public void SetOrderCommand(int dineCommand)
    {
        orderCommand = new DineTableCommand().GetDineCommand(dineCommand);
    }

    public void SetMenuItem(MenuItem item)
    {
        menuItem = item;
    }

    public void ExecuteCommand()
    {
        order.ExecuteCommand(orderCommand, menuItem);
    }

    public void ShowCurrentOrder()
    {
        order.ShowOrders();
    }
}

public class DineTableCommand
{
    //Dine table method
    public OrderCommand GetDineCommand(int dineCommand)
    {
        switch (dineCommand)
        {
            case 1:
                return new NewOrderCommand();
            case 2:
                return new ModifyOrderCommand();
            case 3:
                return new RemoveOrderCommand();
            default:
                return new NewOrderCommand();
        }
    }
}
We are finally setting up a client to use the invoker.
class Program
{
    static void Main(string[] args)
    {
        DineChef dineChef = new DineChef();
        dineChef.SetOrderCommand(1); /* Insert Order */
        dineChef.SetMenuItem(new MenuItem()
        {
            TableNumber = 1, Item = "Super Mega Burger", Quantity = 1,
            Tags = new List() { new Tag() { TagName = "Jalapenos,"}, new Tag() { TagName = " Cheese," }, new Tag() { TagName = " Tomato" }}
        });
        dineChef.ExecuteCommand();

        dineChef.SetOrderCommand(1); /* Insert Order */
        dineChef.SetMenuItem(new MenuItem()
        {
            TableNumber = 1, Item = "Cheese Sandwich", Quantity = 1,
            Tags = new List(){ new Tag() { TagName = "Spicy Mayo,"} }
        });
        dineChef.ExecuteCommand();
        dineChef.ShowCurrentOrder();

        dineChef.SetOrderCommand(3); /* Remove the Cheese Sandwich */
        dineChef.SetMenuItem(new MenuItem()
        {
            TableNumber = 1, Item = "Cheese Sandwich"
        });
        dineChef.ExecuteCommand();
        dineChef.ShowCurrentOrder();

        dineChef.SetOrderCommand(2);/* Modify Order */
        dineChef.SetMenuItem(new MenuItem()
        {
            TableNumber = 1, Item = "Super Mega Burger", Quantity = 1,
            Tags = new List() { new Tag() { TagName = "Jalapenos,"}, new Tag() { TagName = " Cheese" }}
        });
        dineChef.ExecuteCommand();
        dineChef.ShowCurrentOrder();
        Console.ReadKey();
    }
}
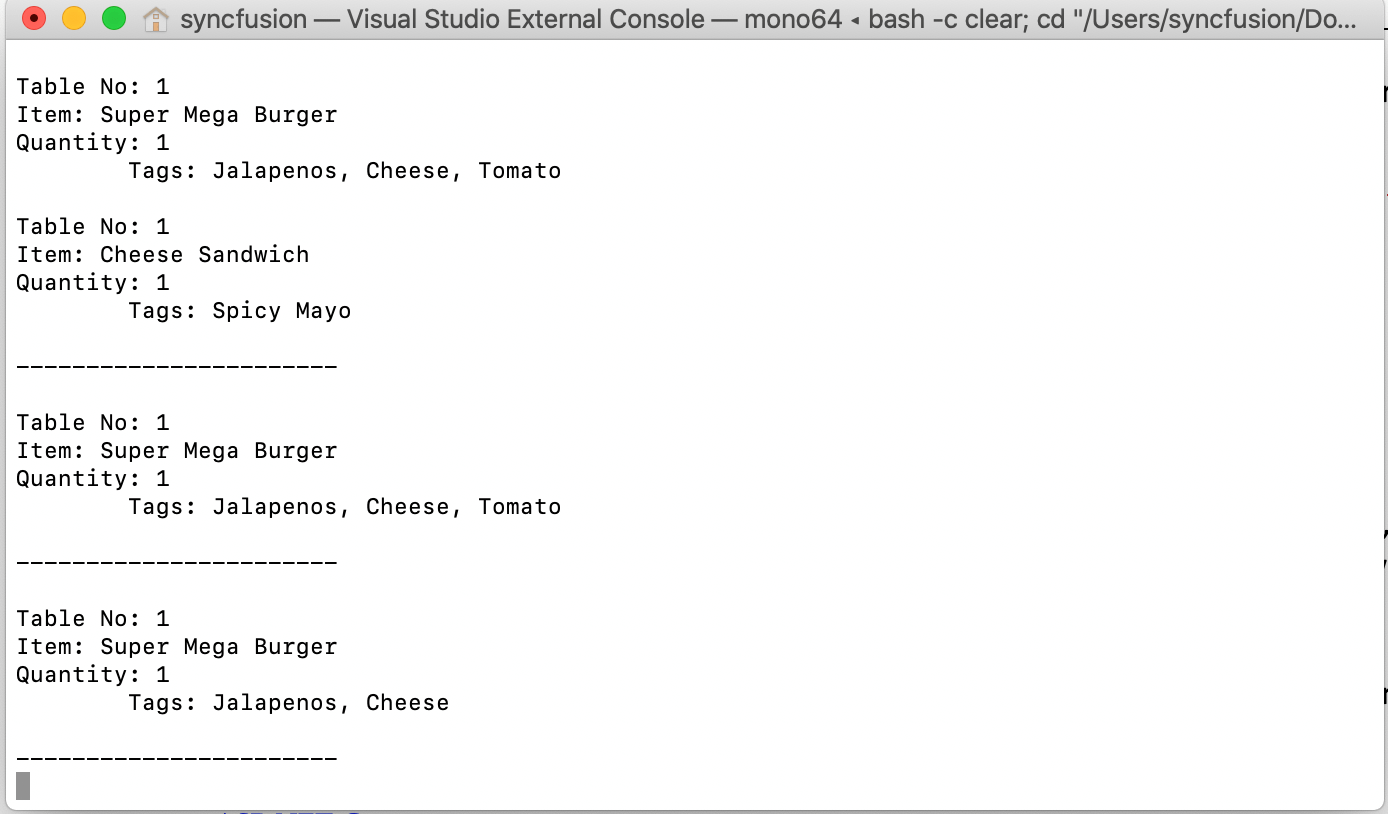
As the receiver (the DineChefRestaurant class) processes the orders, the contents of the order are changed. Here’s the sample project output.
Conclusion
The command pattern is a very good way to decrease the coupling between sender and receiver. The command pattern will also be helpful for wizards, progress bars, GUI buttons, menu actions, and other transactional behaviors. To download all the code examples shown in this tutorial, click here.
Syncfusion provides about 1,000 controls to ease the work of developers in various platforms. You can make use of them in your application development in these platforms:
If you have any questions, please let us know in the comments section below. You can also contact us through our support forum, Direct-Trac, or Feedback Portal. We are always happy to assist you!
 No spam, just valuable updates.
Comments (3)
Notice that the remote control doesn’t know anything about turning on the stereo. That information is contained in a separate command object. This reduces the coupling between them.
This is incorrect. The commands should have a reference to receiver (DineChefRestaurant). And in the receiver, you should perform the actual adding, removing and modification. The command classes only call the DineChefRestaurant methods.
As per your comments, I agree, the command should have a reference to the receiver. In my example too, I execute the command with receiver reference, in which I am passing the reference (Order Collection from DineChefRestaurant) in execute the command.
public class NewOrderCommand : OrderCommand
{
public override void Execute(List order, MenuItem newItem)
{
order.Add(newItem);
}
}