WPF controls
for Fast and Scalable Business Application Development

Why you need Syncfusion WPF controls
The Syncfusion WPF controls is a package of over 155 modern WPF UI controls, 55+ WPF Charts, and document processing libraries for building beautiful,
high performance line-of-business WPF applications.

155+ components
A library of 155+ WPF UI components, 55+ WPF Charts, and document processing libraries to build modern WPF applications.

AI-ready UI components
From AI-ready components to AI-powered services like the HelpBot and Code Studio, Syncfusion helps you build intelligent apps faster and get support when you need it.

High Performance
Excellent performance is critical for a good user experience. All our controls are built for incredible performance.

10+ modern themes
Professional themes that make your applications look beautiful. Customize these built-in themes using our WPF Theme Studio.

Demos and training
A wide range of product demos and training, including video tutorials, documentation, and KBs.

Dedicated support
Truly unlimited dedicated support system via the public forum, feature & feedback page, live chat, and support tickets.

Hassle-free licensing
Simple, straightforward, and no hidden fees. Guaranteed.

Frequent updates
Four major updates per year with new features and controls. In addition, get minor improvements and bug fixes every week to stay up to date.
AI-Powered Tools for Developers
Explore the complete Syncfusion® AI ecosystem: AI-ready UI components, smart developer tools like Code Studio (an AI code editor) and instant support with the AI-powered HelpBot. Everything you need to build intelligent, modern apps faster.
Explore Our AI ToolsAI Coding Assistant
The Syncfusion AI Coding Assistant supercharges WPF development with intelligent, context-aware code suggestions tailored to Syncfusion UI components. Easily set up and customize projects in AI-driven IDEs like VS Code, Cursor, and Syncfusion Code Studio.
Get Started with AI AssistantGet the Demo Application
Explore the full capabilities of our WPF controls on your device by installing our sample browser applications from the below app stores and view samples code in GitHub.


See how our controls can be transformed into beautiful and efficient WPF apps

See how our controls can be transformed into beautiful and efficient WPF apps

See how our controls can be transformed into beautiful and efficient WPF apps

See how our controls can be transformed into beautiful and efficient WPF apps

Most popular WPF controls
155+ WPF CONTROLS
Build Document Workflows in WPF
Integrate a powerful PDF Viewer, rich DOCX Editor, and full‑featured Spreadsheet Editor into your WPF applications, alongside robust document processing libraries, to create smooth document experiences. Empower users to work with documents interactively while developers automate processing behind the scenes.
Syncfusion WPF What’s New, Blogs and Testimonials


Frequently Asked Questions
Why should I choose Syncfusion WPF controls?
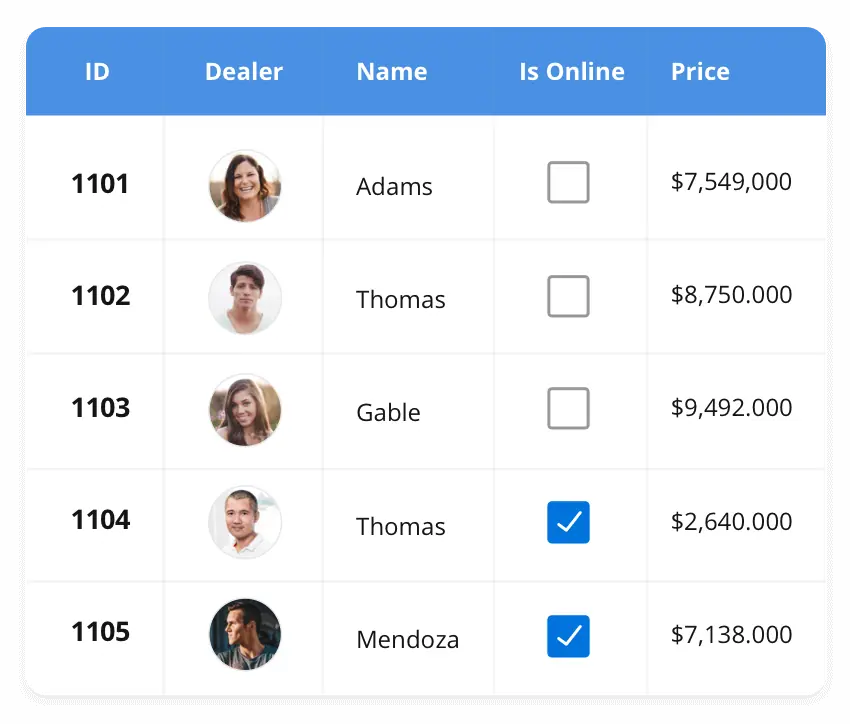
- 155+ WPF controls, including a lightning-fast data grid, and high-performance chart, scheduler, and docking controls.
- 10+ themes to provide a beautiful, modern look to your application.
- They're some of the best WPF controls on the market that offer feature-rich UIs to interact with your software.
- Several complex and Office-inspired controls such as DataGrid, PDF Viewer, RichTextBox, Spreadsheet, and Diagram.
- Syncfusion WPF controls come in NuGet packages on NuGet.org for easy development process
Where can I find the Syncfusion WPF controls demos and sample applications?
You can find our WPF controls demos hereWPF controls demos.
Can I deploy an application that uses Syncfusion WPF controls to unlimited clients?
Yes, you can deploy an application that uses Syncfusion WPF controls to unlimited clients. We only license on a per-developer basis and do not charge any runtime, royalty, or deployment fees. More details on our licensing model can be found hereMore details about licensing model.
I have a Syncfusion developer license. Am I eligible to access the Bold Report Viewer SDK package?
Yes, you are. More details on our Bold Report Viewer SDK can be found hereLearn more about Report Viewer SDK.
Can I download and utilize the Syncfusion WPF controls for free?
No, this is a commercial product and requires a paid license. However, a free community license is also available for companies and individuals whose organizations have less than $1 million USD in annual gross revenue, 5 or fewer developers, and 10 or fewer total employees.
How do I get started with Syncfusion WPF controls?
A good place to start would be our comprehensive getting started documentation.
Do Syncfusion WPF controls support .NET 10?
All our controls and document processing libraries are compatible with .NET 9. You can easily migrate to .NET Core to take advantage of the .NET Core framework.


Our Customers Love Us


See Real Success Stories
Developers around the world trust Syncfusion’s Essential Studio to simplify complex projects and speed up delivery. With a vast library of UI controls, powerful SDKs, and reliable support, Essential Studio helps teams build enterprise-ready applications with confidence.
Read Our Customer StoriesIndustry
Software development
75% Cost reduction
50% Faster development
Industry
Utilities (oil and gas)
450+ hours saved
Streamlined processes and hours of development effort saved.
Advanced, flexible features
Empowered users through robust and versatile functionality.
Industry
Software and technology
1000+ of hours saved
Accelerated development with enterprise-ready UI components.
Efficient file management
Streamlined workflows with document libraries without building them from scratch.
Industry
Software and technology
2 Years of delay avoided
Two years of delays prevented with proactive planning.
On-time delivery
Projects delivered on schedule using trusted controls.
Industry
IT services and IT consulting
Improved performance
Large datasets handled with easy customization and quick debugging.
Highly customizable
Plug-and-play controls with quick template integration.
Industry
Professional services
Instant access
Quick availability of features and resources.
Reduced dependencies
Fewer dependencies for faster development.
Rated by users across the globe
Curious? Try It for Free.
No credit card required.
Awards
Greatness—it’s one thing to say you have it, but it means more when others recognize it. Syncfusion® is proud to hold the following industry awards.
Recent activities in WPF tutorials and blogs
The WPF tutorial videos and blog posts will guide you in creating your first app with the WPF controls. They’ll give you problem-solving ideas, describe features and their functionality, announce the new feature availability, explain WPF controls best practices, and describe example scenarios using the WPF controls. Check out our recent activity on our blog and tutorial video channels for WPF.