
Real-World .NET MAUI Succinctly®

CHAPTER 6
Working with Web API and JSON
It’s very common for applications to exchange data with remote services, either on-premises or on the cloud. .NET MAUI supports several communication protocols and data exchange formats, but certainly the most common scenario is to work with data in a platform-independent and API-driven approach.
For instance, a web service might serve different types of applications (desktop, mobile, web clients). In an ideal world, it should not know in advance what the caller application is or with which development platform it has been written, so data exchange should happen with standardized cross-platform and cross-device formats. From the point of view of development with Microsoft technologies, this can be done by developing Web API solutions that expose data as JSON and that can be consumed by any kind of application, including cross-platform projects created with .NET MAUI.
This chapter explains how to consume Web APIs and how to exchange data with a Web API service using JSON as the standard format.
Assumptions for this chapter
The companion solution for this chapter is more complex and articulated than all the other ones in the book. In fact, it includes a complete ASP.NET Web API project and a .NET MAUI project based on the Model-View-ViewModel pattern. For this reason, I assume you will open the sample solution for Chapter 5 in Visual Studio 2022, and that you will follow the reading while looking at the source code in the IDE. I will only highlight and list the code snippets that are relevant to the topic of this chapter.
Based on this consideration, some knowledge of the Model-View-ViewModel (MVVM) pattern is also required. You can read an introduction in my book, .NET MAUI Succinctly. If you wish to fully try the solution, and you want to publish the Web API project to Azure, I recommend you do the following:
- Create an Azure account. A free account is available for 12 months (please carefully read the terms of use).
- Read the documentation about creating a SQL database on Azure.
- Read the documentation about publishing an ASP.NET Core project to Azure.
Once you have set this up, you are ready to walk through the sample solution and this chapter.
Understanding the sample solution
The companion example for this chapter is made of three main components, described in more detail in the next paragraphs:
· A SQL database called Books hosted on Azure. This database contains a simplified list of books.
· A Web API project, deployed to Azure, that exposes calls to read, write, update, and delete books from the database.
· A .NET MAUI project that displays the list of books and allows for adding new books to the database.
Creating the database and publishing the Web API project in Azure has been the perfect choice for the current example, since I do not own a physical web server, and I can work with a real remote environment rather than showing local debugging. Let’s take a closer look at the individual components of the architecture.
Understanding the database
The companion solution for this chapter works with a database called Books, which contains a simplified list of books. For each book, the database contains the title, the author’s name, and the ISBN code. You can easily recreate the database on Azure using SQL Server Management Studio or Visual Studio 2022, connecting to the Azure database engine and running the script shown in Code Listing 12. Notice how a Basic profile is selected, which allows for creating a free database, limited to 1 GB of storage.
Code Listing 12
CREATE DATABASE [Books] (EDITION = 'Basic', SERVICE_OBJECTIVE = 'Basic', MAXSIZE = 1 GB) WITH CATALOG_COLLATION = SQL_Latin1_General_CP1_CI_AS; GO ALTER DATABASE [Books] SET COMPATIBILITY_LEVEL = 100 GO ALTER DATABASE [Books] SET ANSI_NULL_DEFAULT OFF GO ALTER DATABASE [Books] SET ANSI_NULLS OFF GO ALTER DATABASE [Books] SET ANSI_PADDING OFF GO ALTER DATABASE [Books] SET ANSI_WARNINGS OFF GO ALTER DATABASE [Books] SET ARITHABORT OFF GO ALTER DATABASE [Books] SET AUTO_SHRINK OFF GO ALTER DATABASE [Books] SET AUTO_UPDATE_STATISTICS ON GO ALTER DATABASE [Books] SET CURSOR_CLOSE_ON_COMMIT OFF GO ALTER DATABASE [Books] SET CONCAT_NULL_YIELDS_NULL OFF GO ALTER DATABASE [Books] SET NUMERIC_ROUNDABORT OFF GO ALTER DATABASE [Books] SET QUOTED_IDENTIFIER OFF GO ALTER DATABASE [Books] SET RECURSIVE_TRIGGERS OFF GO ALTER DATABASE [Books] SET AUTO_UPDATE_STATISTICS_ASYNC OFF GO ALTER DATABASE [Books] SET DATE_CORRELATION_OPTIMIZATION OFF GO ALTER DATABASE [Books] SET ALLOW_SNAPSHOT_ISOLATION ON GO ALTER DATABASE [Books] SET PARAMETERIZATION SIMPLE GO ALTER DATABASE [Books] SET READ_COMMITTED_SNAPSHOT ON GO ALTER DATABASE [Books] SET MULTI_USER GO ALTER DATABASE [Books] SET QUERY_STORE = ON GO ALTER DATABASE [Books] SET QUERY_STORE (OPERATION_MODE = READ_WRITE, CLEANUP_POLICY = (STALE_QUERY_THRESHOLD_DAYS = 7), DATA_FLUSH_INTERVAL_SECONDS = 900, INTERVAL_LENGTH_MINUTES = 60, MAX_STORAGE_SIZE_MB = 10, QUERY_CAPTURE_MODE = AUTO, SIZE_BASED_CLEANUP_MODE = AUTO) GO ALTER DATABASE [Books] SET READ_WRITE GO |
You can enter some sample data manually, or you can run the script shown in Code Listing 13 to add a couple of books to the table.
Code Listing 13
USE Books GO SET ANSI_NULLS ON GO SET QUOTED_IDENTIFIER ON GO CREATE TABLE [dbo].[Books]( [Id] [int] IDENTITY(1,1) NOT NULL, [Title] [nvarchar](50) NOT NULL, [Author] [nvarchar](50) NOT NULL, [ISBN] [nvarchar](50) NULL, CONSTRAINT [PK_Books] PRIMARY KEY CLUSTERED ( [Id] ASC )WITH (PAD_INDEX = OFF, STATISTICS_NORECOMPUTE = OFF, IGNORE_DUP_KEY = OFF, ALLOW_ROW_LOCKS = ON, ALLOW_PAGE_LOCKS = ON) ON [PRIMARY] ) ON [PRIMARY] GO SET IDENTITY_INSERT [dbo].[Books] ON GO INSERT [dbo].[Books] ([Id], [Title], [Author], [ISBN]) VALUES (1, N'Xamarin.Forms Succinctly', N'Alessandro Del Sole', N'978-1-64200-175-4') GO INSERT [dbo].[Books] ([Id], [Title], [Author], [ISBN]) VALUES (2, N'Visual Studio 2019 for Mac Succinctly', N'Alessandro Del Sole', N'978-1-64200-177-8') GO SET IDENTITY_INSERT [dbo].[Books] OFF GO |
You could improve the table by adding the publication date or a Boolean column to mark a record as logically deleted, without actually removing the record from the database, but this is left to you as an exercise.
Understanding the Web API project
The Web API project is responsible for working against the database using Entity Framework, and it returns JSON responses depending on the request. For example, it will return a JSON array when a GET call is made to retrieve the list of books. The project has been created following this very detailed article published by Syncfusion®, and I recommend you do the same if you want to recreate the sample project on your own. One important thing to note is about securing the API, which I will also recall in the next paragraphs, when appropriate.
The article explains how to implement authorization and authentication based on JSON Web Tokens (JWT) and is a way to include an authorization code inside the API calls. Authorization and authentication implementations can be very different between companies’ policies, customer requirements, and app architecture. For example, your requirements might be implementing custom authentication with a username and password; or you might need an Active Directory authentication system if your application works within a domain; or you might work with bearer tokens. For this reason, the sample Web API service does not require any authentication.
In this way, you will be able to implement your own system based on your requirements. I will point out, where appropriate, how to add tokens and user credentials inside the API calls. In addition, the companion project also implements the TokenController class discussed in the Syncfusion® article for your convenience, so it will be very easy for you to implement the JWT tokens discussed in the article itself. The next paragraphs highlight the most relevant parts of the project.
Project setup
The BooksApi project that you find under the Chapter5 folder of the companion code is a regular ASP.NET Core Web API project created with Visual Studio 2022 and targeting .NET 7. It works with the following NuGet packages:
· Microsoft.EntityFrameworkCore
· Microsoft.EntityFrameworkCore.SqlServer
These are required to work against the remote database. The appsettings.json file contains the connection string. In the sample code, you can find a placeholder that needs to be replaced with the actual connection string, identified by the DefaultConnection variable as follows.
"ConnectionStrings": {
"DefaultConnection": "YOUR_CONNECTION_STRING_GOES_HERE"
},
For SQL Azure databases, it can be retrieved in the Azure portal. The connection string must be added to the application services, so the following lines must be added in the Program.cs file right after the declaration of the builder variable:
// requires a using Microsoft.EntityFrameworkCore; directive
var connection = builder.Configuration.
GetConnectionString("DefaultConnection");
builder.Services.AddDbContextPool<BooksContext>(options =>
options.UseSqlServer(connection));
Tip: The sample project is based on .NET 7, and therefore, it is using the so-called implicit statements feature introduced with .NET 5. In the Program.cs file, you do not see the usual namespace and class definitions, which are inferred by the compiler.
Another relevant part is the BooksController.cs file, whose implementation is discussed along with the data model in the next paragraphs.
Data model implementation
The data model consists of a Book class that maps the Books table in the database, and looks like the following:
public partial class Book
{
public int Id { get; set; }
public string Title { get; set; }
public string Author { get; set; }
public string Isbn { get; set; }
}
A specialized instance of the DbContext class is then needed to connect the database to the data model, as represented in Code Listing 14.
Code Listing 14
using Microsoft.EntityFrameworkCore;
public partial class BooksContext : DbContext { public BooksContext(DbContextOptions<BooksContext> options) : base(options) { } public virtual DbSet<Book> Books { get; set; } protected override void OnModelCreating(ModelBuilder modelBuilder) { modelBuilder.Entity<Book>(entity => { entity.Property(e => e.Author) .IsRequired() .HasMaxLength(50); entity.Property(e => e.Isbn) .HasColumnName("ISBN") .HasMaxLength(50); entity.Property(e => e.Title) .IsRequired() .HasMaxLength(50); }); OnModelCreatingPartial(modelBuilder); } partial void OnModelCreatingPartial(ModelBuilder modelBuilder); } |
As you can see, the OnModelCreating method performs the actual binding between the table and the data model, including some validations.
Tip: Don’t forget to replace the sample connection string in the appsettings.json file with the proper one.
API calls implementation and testing
The API calls are implemented inside a controller class called BooksController. The first thing to do in the controller is implement a constructor that will receive an instance of the context class via dependency injection:
private readonly BooksContext _context;
public BooksController(BooksContext context)
{
_context = context;
}
The next piece of code is related to retrieving the list of books from the database. There are two GetBooks methods: one to get the full list, and one to get an individual book based on its ID:
[HttpGet]
public async
Task<ActionResult<IEnumerable<Book>>> GetBooks()
{
return await _context.Books.ToListAsync();
}
[HttpGet("{id}")]
public async Task<ActionResult<Book>> GetBooks(int id)
{
var books = await _context.Books.FindAsync(id);
if (books == null)
{
return NotFound();
}
return books;
}
The code is executed asynchronously, and data is obtained via methods from the DbContext class: ToListAsync for the full list and FindAsync for the individual object. Adding a new Book object to the database is done via the POST verb and the PostBook method, as follows:
[HttpPost]
public async Task<ActionResult<Book>> PostBook(Book book)
{
_context.Books.Add(book);
await _context.SaveChangesAsync();
return CreatedAtAction("GetBooks",
new { id = book.Id }, book);
}
The Book object that will be added to the database is received by the API call in the form of a JSON object, and you will see how to package this in .NET MAUI shortly. Notice how the API call returns a CreatedAtAction object, which matches the 201 HTTP status code (Created) with the ID of the new record.
Updating an existing Book object can be performed via the PutBook method, which leverages the PUT verb and works as follows:
public async Task<IActionResult> PutBook(int id, Book book)
{
if (id != book.Id)
{
return BadRequest();
}
_context.Entry(book).State = EntityState.Modified;
try
{
await _context.SaveChangesAsync();
}
catch (DbUpdateConcurrencyException)
{
if (!BooksExists(id))
{
return NotFound();
}
else
{
throw;
}
}
return NoContent();
}
private bool BooksExists(int id)
{
return _context.Books.Any(e => e.Id == id);
}
Like for adding an object, the Book entity instance is still received from the caller clients. One difference is that the entity state changes to EntityState.Modified, and the code also checks for concurrency exceptions. This method returns a NoContent response, which matches the 204 HTTP status code. The very last method is called DeleteBook, which receives only the ID for the Book object you want to delete, and whose code is the following:
[HttpDelete("{id}")]
public async Task<ActionResult<Book>> DeleteBook(int id)
{
var books = await _context.Books.FindAsync(id);
if (books == null)
{
return NotFound();
}
_context.Books.Remove(books);
await _context.SaveChangesAsync();
return books;
}
The code is very easy, and this is a standard implementation. However, if you want to store the full history of the data, I recommend you add a BIT column called IsDeleted to the database, add a same-named property of type bool to the Book class, and replace the DbContext.Remove invocation as follows:
Book.IsDeleted = true;
In this way, the code will not physically remove the record from the database; rather, it will mark it as logically deleted. If you go for this option, you might also want to change the GetBooks method body as follows:
return await _context.Books.Where(b=>b.IsDeleted == false).ToListAsync();
Once the most relevant pieces of code are clear, it’s time to test the API calls. You can do this by starting the Web API project for debugging on the local machine, or you can deploy it to Azure (or to an on-premises server) for the most realistic experience. Whichever option you choose, you need a tool to make and test API calls. One of the most popular and free tools is Postman. With Postman, you can make API calls with any of the HTTP verbs, and you can include all the information needed for the request through a simple user interface. Whatever your deploy option is, take note of the Web API address.
In Postman, open a new tab to make a GET call, and paste the URL of your Web API service and the /api/books suffix. When you’re ready, simply click Send. After a few seconds, you will see the list of books in the results window, in the form of a JSON array, as shown in Figure 12.
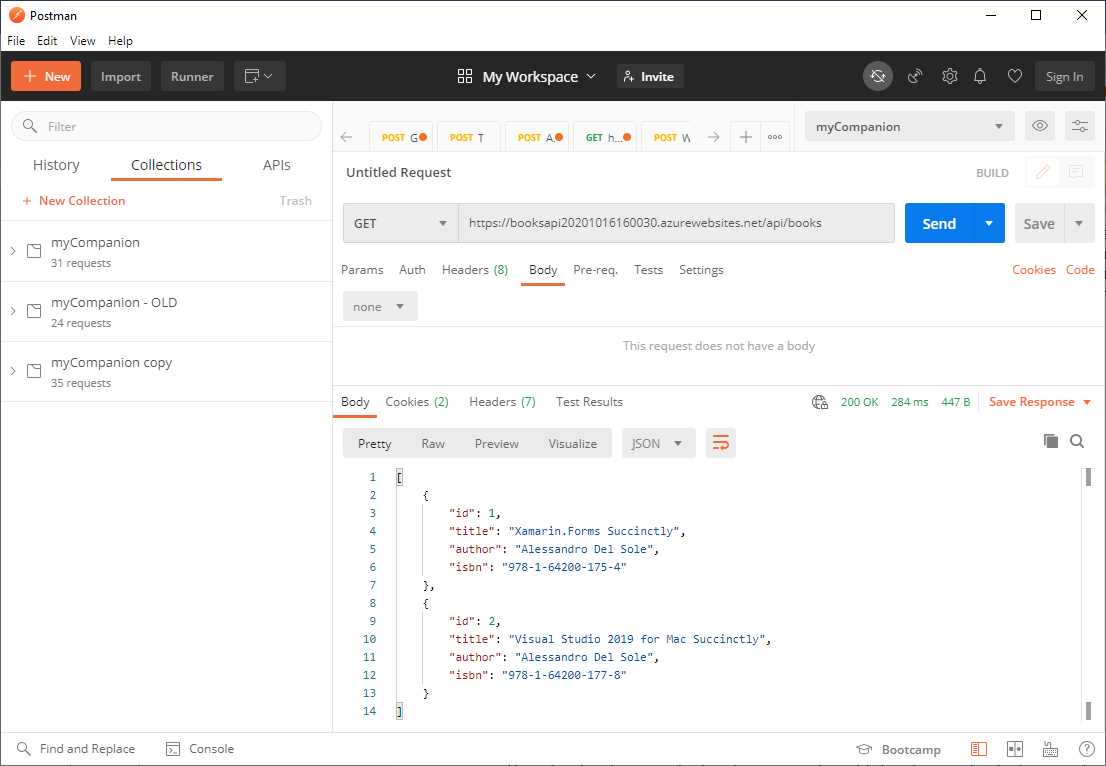
Figure 22: Getting the list of books with Postman
Adding a new book can be done by changing the HTTP verb to POST and specifying the data in the Body tab. If you select the raw view, you can write the JSON directly, as shown in Figure 13.
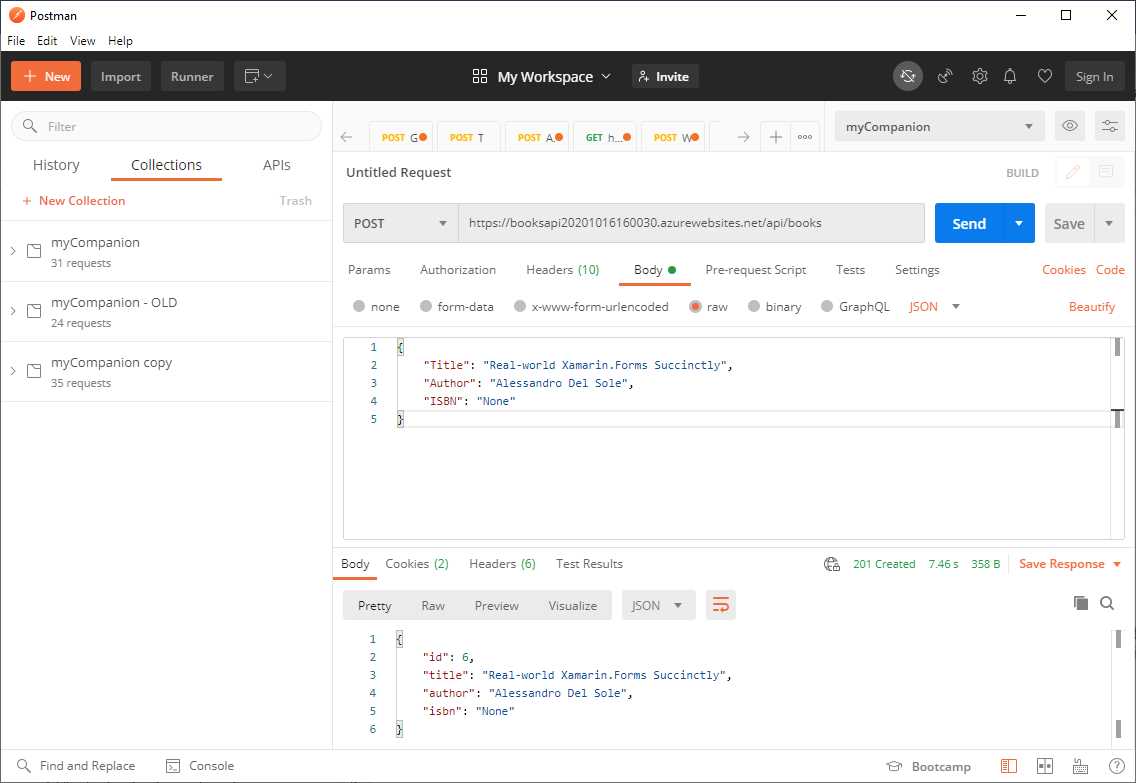
Figure 33: Adding a new object with a POST request
Another required step is opening the Headers tab and adding a new header tag of type Content-Type in the KEY column, with a value of application/json. When you click Send, the PostBook API call will be invoked, and the new object written into the database. The response contains the full properties for the newly added object, and the most important one is the new record ID.
Tip: If the Web API implements a custom authentication mechanism with a username and password, these will be included in the JSON sent to the API. If the implementation relies on a token, this will instead be included in the Authorization tab, where you will find a dropdown list of the most popular token types.
If you want to double-check, make the GET call again to see the list of books, and you will see that the new one is available. Updating a book will work very similarly: you will need to write the full list of Book properties and change the HTTP verb from POST to PUT.
The URL of the API call will also need to include the book ID in the following way: /api/books/1, where 1 is the record ID. Deleting a book instance is also easy. You must change the HTTP verb to DELETE and pass the record ID into the URL like you did for the PUT call. Then in the Body tab, you select none, as the request has no body. Once you have ensured the API calls work outside of any application and development environment, you can move on to understanding how to consume the API in .NET MAUI.
Understanding the .NET MAUI project
The .NET MAUI project provides the following points of interest:
· The user interface displays a list of books with a CollectionView and allows for loading, adding, and deleting books with specific buttons. All these views are bound to properties and commands in a ViewModel called BookViewModel.
· The ViewModel calls methods to work with data in a service class called WebApiService and send broadcast messages to the user interface, which will react by informing the user about the result of data operations.
· Data with the API is exchanged by serializing and deserializing JSON objects. This is done via the Newtonsoft.Json library, the de facto standard library for .NET and C#. Actually, starting with .NET Standard 2.0, Microsoft has introduced the System.Text.Json API, which provides built-in objects to work with JSON data, without the need for third-party libraries. You are totally free to use this API instead of Newtonsoft.Json, but the fact is that, in the real world, you will still find millions of projects that use the latter. If you are starting a new project, you can still make a choice, but if you are maintaining an existing project, you will probably work with Netwonsoft.Json.
Tip: Due to the popularity of Newtonsoft.Json, Microsoft has also created some documentation to help migrate to System.Text.Json.
The final result of the work is shown in Figure 14, where you can see a list of books, and in Figure 15, where you can see the insertion of a new book. You can keep both figures as a reference, since I will not list the XAML code (which you can instead follow through the companion source code).
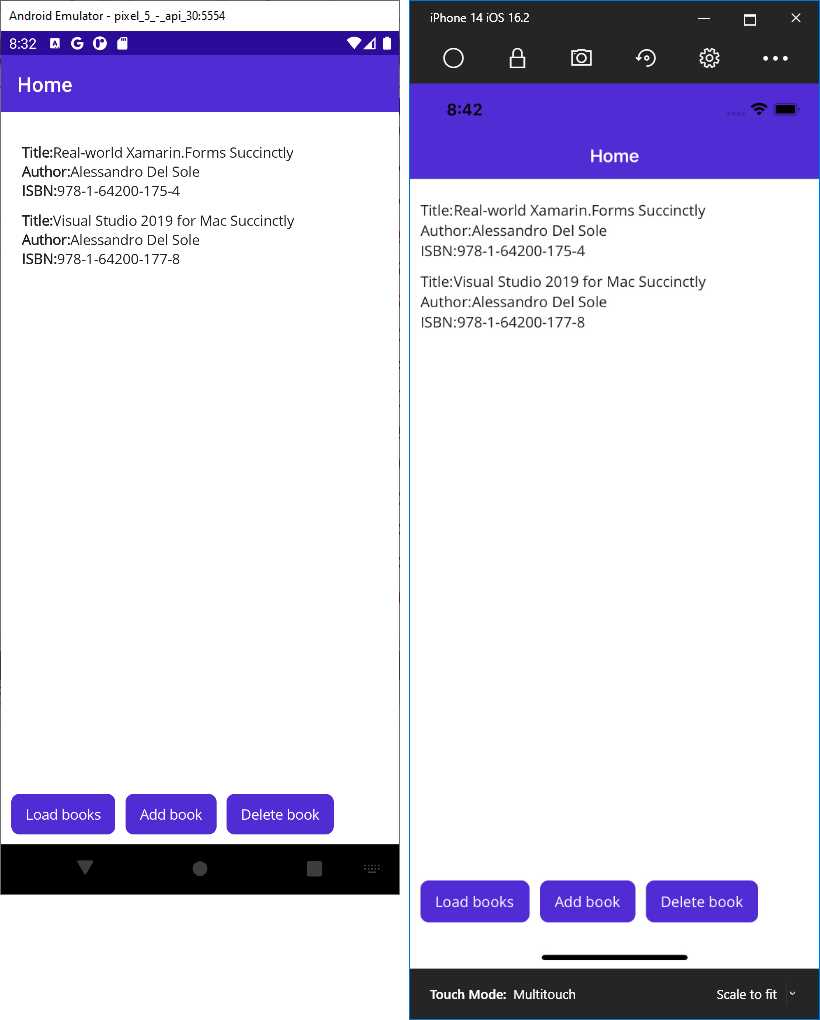
Figure 14: The sample app displays a list of books

Figure 45: The sample app allows for adding and saving a new book
Calling Web APIs from .NET MAUI
Calling Web APIs from .NET MAUI is not difficult and is accomplished via the HttpClient class and its methods. It is good practice to group methods that work with a Web API into a separate class. In the sample project, it’s called WebApiService, and it exposes methods to read, write, and delete data.
Another good practice is to write reusable methods, avoiding code that targets only a specific data type. With this in mind, a method called GetDataAsync sends a GET request to the specified endpoint and is implemented as follows:
public static async Task<HttpResponseMessage> GetDataAsync(string url,
string id = null)
{
HttpResponseMessage response;
try
{
using (var client = new HttpClient())
{
if (id != null) url = $"{url}/{id}";
response = await client.GetAsync(url);
}
}
catch (HttpRequestException)
{
response = new HttpResponseMessage(HttpStatusCode.ServiceUnavailable);
}
catch
{
response = new HttpResponseMessage(HttpStatusCode.InternalServerError);
}
return response;
}
The reason for the id optional parameter is that, with a single method, you can obtain either the full list of objects from the specified endpoint (in our example, a list of books) or an individual object from the specific API overload. The actual API call is done by the HttpClient.GetAsync method, and the resulting response is returned as it is to the caller (the BooksViewModel class, in our case), which will be responsible for data processing. Multiple catch statements return a different HTTP error. This is to demonstrate how you can control the different error types in your logic that you might get from a Web API service.
As I mentioned previously, the companion source code provides all the necessary code files to implement JWT tokens to secure the API calls, but this is left to you as an exercise. API calls can be currently invoked with the so-called anonymous authentication. This is because it is not possible to demonstrate all the possible authentication solutions and at the same time to offer a working example. However, a few hints can be provided. If your Web API requires a token, you can add the following line after instantiating the HttpClient class:
client.DefaultRequestHeaders.Authorization =
new AuthenticationHeaderValue("Bearer", "Your Oauth token");
The constructor of the AuthenticationHeaderValue receives the Bearer literal and the authorization token and is assigned to the Authorization property of the request’s headers. If your Web API services rely on Windows domain authentication, you can create an instance of the HttpClient class, specifying it needs to use the default Windows user credentials:
var client =
new HttpClient(new HttpClientHandler() { UseDefaultCredentials = true });
The following is a method that invokes a Web API to delete data and is very similar to the previous method:
public static async Task<HttpResponseMessage>
DeleteDataAsync(string url, int id)
{
HttpResponseMessage response;
try
{
using (var client = new HttpClient())
{
string fullUri = $"{url}/{id}";
response = await client.DeleteAsync(fullUri);
}
}
catch (HttpRequestException)
{
response = new HttpResponseMessage(HttpStatusCode.ServiceUnavailable);
}
catch
{
response = new HttpResponseMessage(HttpStatusCode.InternalServerError);
}
return response;
}
The only difference is that this method invokes HttpClient.DeleteAsync to send a DELETE request. The next method, called WriteDataAsync, is very interesting. Its purpose is to send a POST request to a Web API, and its implementation takes advantage of .NET generics, so it can be reusable:
public static async Task<HttpResponseMessage>
WriteDataAsync<T>(T data, string url, string id = null)
{
HttpResponseMessage response;
try
{
using (var client = new HttpClient())
{
client.DefaultRequestHeaders.Accept.Clear();
client.DefaultRequestHeaders.Accept.Add(
new MediaTypeWithQualityHeaderValue("application/json"));
string json = JsonConvert.SerializeObject(data);
var content =
new StringContent(json, Encoding.UTF8, "application/json");
if (id != null) url = $"{url}/{id}";
response = await client.PostAsync(url, content);
}
}
catch (HttpRequestException)
{
response = new HttpResponseMessage(HttpStatusCode.ServiceUnavailable);
}
catch
{
response = new HttpResponseMessage(HttpStatusCode.InternalServerError);
}
return response;
}
For a better understanding of the code, you can focus on two steps you manually made in Postman. The first step was adding the application/json content-type information to the request’s headers. In the code, this is done by adding to the DefaultRequestHeaders collection a new object of type MediaTypeWithQualityHeaderValue, which receives the specified MIME type as an argument.
The second step you made in Postman was specifying the JSON markup for the new book you wanted to add to the database via API. In the code, this takes two lines. The first line serializes the object you want to write into JSON via the JsonConvert.SerializeObject method. The second line creates an instance of the StringContent class based on the serialized data, the encoding, and the MIME type. In fact, it’s not enough for the API to receive the serialized object, but it is also necessary for the API to know which text encoding and data format is used. Finally, the API call is made by invoking HttpClient.PostAsync.
Hints about editing existing data
Existing data can be updated by sending a HTTP PUT request to the API via the HttpClient.PutAsync method. You have different alternatives:
· You can create a method that works like WriteDataAsync, but that invokes PutAsync instead.
· You can keep everything in one method, adding a bool parameter to WriteDataAsync, such as IsUpdate, and invoking PutAsync if IsUpdate is true, or PostAsync if it is false.
· You could handle the update scenario inside the Post method of the API controller (in our case, it’s PostBook). The client could still send a POST request, and then the API decides how to dispatch the request, which would need the WriteDataAsync method to send a bool additional parameter.
I would personally choose the second option, which allows for having less code and doesn’t create confusion in the API code.
Implementing broadcast messages
In the next section, you will see how to implement methods that work against data in the ViewModel. When such methods complete their tasks, they need to notify the user interface. This is accomplished via broadcast messages. In Xamarin.Forms you would have done this via the MessagingCenter class, but in Chapter 1, you learned that this has been deprecated in .NET MAUI when targeting .NET 7.
So, following the lesson learned in Chapter 1, first install the CommunityToolkit.Mvvm NuGet package, and then add the code represented in Code Listing 15.
Code Listing 15
using CommunityToolkit.Mvvm.Messaging.Messages;
namespace WorkingWithWebApi.Messages { public class DataStatusMessage : ValueChangedMessage<DataStatus> { public DataStatusMessage(DataStatus value) : base(value) {
} }
public enum DataStatus { BookSaved, BookDeleted, BookError } } |
The DataStatusMessage class handles an object of type DataStatus. This is an enumeration that represents the possible status for the data handled by the ViewModel, for example, when the data is saved or deleted, or when there is an error.
The methods described in the next section will send messages via the Send method of the WeakReferenceMessenger class, whereas the user interface will subscribe to these messages via the Register method of the same class.
Deserializing JSON responses
All the methods in the WebApiService class return an object of type HttpResponseMessage. Among others, this object exposes a StatusCode property, of type HttpStatusCode, which contains the code for the result of the API call and the Content property, of type HttpContent, which contains the actual response from the API.
The responsibility for analyzing the status code and for the response content is of any ViewModel. In the sample app, one ViewModel called BooksViewModel is available. Here, a method called LoadBooksAsync is invoked by a command called LoadBooksCommand and gets the lists of books from the Web API as follows:
private async Task LoadBooksAsync()
{
string url = "https://yourdomainname.azurewebsites.net/api/books";
var result = await WebApiService.GetDataAsync(url);
switch (result.StatusCode)
{
case HttpStatusCode.OK:
string resultString =
await result.Content.ReadAsStringAsync();
var deserialized =
JsonConvert.DeserializeObject<List<Book>>(resultString);
Books = new ObservableCollection<Book>(deserialized);
return;
default:
WeakReferenceMessenger.Default.
Send(new DataStatusMessage(DataStatus.ServerError));
return;
}
}
As you can see, the ViewModel handles the status code returned by the GetDataAsync method, and in case of errors, sends a broadcast message that the user interface will catch to display a warning to the user (see the MainPage.xaml.cs file in the companion source code for the implementation). In the case of success, the response of the API call is first converted into a plain string. Then, because the code expects a list of books as the response, the JsonConvert.DeserializeObject converts the obtained string into a specialized List<Book> object.
The next line of code creates an ObservableCollection<Book> instance, because this type of collection is used to data-bind collections to the user interface. The behavior is similar for the AddBookAsync method, which invokes the WebApiService.PostAsync method to write a new book into the database:
private async Task AddBookAsync()
{
if (NewBook != null)
{
string url = "https://yourdomainname.azurewebsites.net/api/books"
var result = await WebApiService.WriteDataAsync(NewBook, url);
switch (result.StatusCode)
{
case HttpStatusCode.OK:
case HttpStatusCode.Created:
string resultString = await result.Content.
ReadAsStringAsync();
var deserialized = JsonConvert.
DeserializeObject<Book>(resultString);
Books.Add(deserialized);
WeakReferenceMessenger.Default.
Send(new DataStatusMessage(DataStatus.BookSaved));
return;
default:
WeakReferenceMessenger.Default.
Send(new DataStatusMessage(DataStatus.ServerError));
return;
}
}
}
The behavior is similar to the LoadBooksAsync method. Here the code also handles the Created HTTP status code. In this case, JsonConvert.DeserializeObject returns the individual Book instance that has been added to the database, and this will be added to the Books collection of the ViewModel so that the user interface can update accordingly.
The DeleteBookAsync in the ViewModel is also similar:
private async Task DeleteBookAsync()
{
string url =
"https://yourdomainname.azurewebsites.net/api/books";
var result =
await WebApiService.DeleteDataAsync(url, SelectedBook.Id);
switch (result.StatusCode)
{
case HttpStatusCode.OK:
string resultString = await result.Content.ReadAsStringAsync();
// Do anything you need with the deleted object...
Book deserializedBook =
JsonConvert.DeserializeObject<Book>(resultString);
Books.Remove(SelectedBook);
WeakReferenceMessenger.Default.
Send(new DataStatusMessage(DataStatus.BookDeleted));
return;
default:
WeakReferenceMessenger.Default.
Send(new DataStatusMessage(DataStatus.ServerError));
return;
}
}
The WebApiService.DeleteDataAsync method returns a Book object representing the deleted one, in case you need to display information to the user. The corresponding instance represented by the SelectedBook property is also removed from the Books collection.
All the work done so far needs to be bound to the user interface. This is the topic of the next section.
Implementing the user interface
Keeping Figures 14 and 15 as reference, the XAML code that defines the user interface is represented in Code Listing 16.
Code Listing 16
<?xml version="1.0" encoding="utf-8" ?> <ContentPage xmlns="http://schemas.microsoft.com/dotnet/2021/maui" xmlns:x="http://schemas.microsoft.com/winfx/2009/xaml" x:Class="WorkingWithWebApi.MainPage" Padding="0,20,0,0"> <Grid x:Name="LayoutRoot" BackgroundColor="White"> <Grid.RowDefinitions> <RowDefinition /> <RowDefinition Height="60"/> </Grid.RowDefinitions> <CollectionView ItemsSource="{Binding Books}" Margin="10,0,10,0" SelectionMode="Single" SelectedItem="{Binding SelectedBook, Mode=TwoWay}"> <CollectionView.ItemTemplate> <DataTemplate> <StackLayout Margin="10,10,0,0"> <StackLayout Orientation="Horizontal"> <Label Text="Title:" FontAttributes="Bold"/> <Label Text="{Binding Title}" /> </StackLayout> <StackLayout Orientation="Horizontal"> <Label Text="Author:" FontAttributes="Bold"/> <Label Text="{Binding Author}" /> </StackLayout> <StackLayout Orientation="Horizontal"> <Label Text="ISBN:" FontAttributes="Bold"/> <Label Text="{Binding Isbn}" /> </StackLayout> </StackLayout> </DataTemplate> </CollectionView.ItemTemplate> </CollectionView> <Grid x:Name="NewBookGrid" IsVisible="False" BindingContext="{Binding}" BackgroundColor="White" Margin="30"> <Grid.RowDefinitions> <RowDefinition /> <RowDefinition Height="50"/> </Grid.RowDefinitions> <StackLayout Margin="10,10,0,0" BindingContext="{Binding NewBook}"> <StackLayout> <Label Text="Title:" FontAttributes="Bold"/> <Entry Text="{Binding Title}" /> </StackLayout> <StackLayout> <Label Text="Author:" FontAttributes="Bold"/> <Entry Text="{Binding Author}" /> </StackLayout> <StackLayout> <Label Text="ISBN:" FontAttributes="Bold"/> <Entry Text="{Binding Isbn}" /> </StackLayout> </StackLayout> <Button Grid.Row="1" Text="Save" Command="{Binding AddBookCommand}"/> </Grid> <StackLayout Grid.Row="1" Orientation="Horizontal"> <Button Text="Load books" Margin="10,0,0,0" Command="{Binding LoadBooksCommand}" /> <Button Text="Add book" x:Name="AddBookButton" Clicked="AddBookButton_Clicked" Margin="10,0,0,0"/> <Button Text="Delete book" x:Name="DeleteBookButton" Command="{Binding DeleteBookCommand}" Margin="10,0,0,0"/> </StackLayout> </Grid> </ContentPage> |
The following is a list of relevant points in Code Listing 16:
· The Books collection is the data source for the CollectionView. Each Label in the data template is bound to a property of the Book class.
· The second Grid acts like a pop-up when adding new objects, and it contains Entry views that are bound to properties of a new Book instance.
· The Button views at the bottom are bound to commands in the ViewModel, except for the AddBookButton object, which handles a Clicked event for the sake of simplicity.
The code-behind for the page is instead represented in Code Listing 17.
Code Listing 17
using CommunityToolkit.Mvvm.Messaging; using WorkingWithWebApi.Messages; using WorkingWithWebApi.ViewModel;
namespace WorkingWithWebApi { public partial class MainPage : ContentPage { private BookViewModel ViewModel { get; set; }
public MainPage() { InitializeComponent(); WeakReferenceMessenger.Default.Register<DataStatusMessage>( this, (sender, message) => { ManageDataStatusChanged(message); }); ViewModel = new BookViewModel(); BindingContext = ViewModel; }
private async void ManageDataStatusChanged(DataStatusMessage message) { var value = message.Value; switch(value) { case DataStatus.BookDeleted: await DisplayAlert("Deleted", "The specified book was deleted", "OK"); break; case DataStatus.BookSaved: LayoutRoot.BackgroundColor = Colors.White; NewBookGrid.IsVisible = false; break; case DataStatus.BookError: await DisplayAlert("Error", "An error has occurred", "OK"); LayoutRoot.BackgroundColor = Colors.White; NewBookGrid.IsVisible = false; break; default: break; } } private void AddBookButton_Clicked(object sender, EventArgs e) { LayoutRoot.BackgroundColor = Colors.LightGray; NewBookGrid.IsVisible = true; ViewModel.NewBook = new Model.Book(); } } } |
The following is a list of relevant points for Code Listing 17:
· The constructor of the page subscribes to messages sent by instances of the DataStatusMessage class and initializes an instance of the ViewModel.
· The ManageDataStatusChanged method is invoked when broadcast messages are intercepted and shows the appropriate user interface depending on the message.
· The Clicked event handler for the AddBookButton object shows the user interface to add a new Book.
When in doubt, keep Figures 14 and 15 as references, as well as the companion source code. Working with Web APIs and JSON is really easy and fast in .NET MAUI, and with a bit of knowledge of the Model-View-ViewModel pattern, you can create a very flexible and solid architecture.
Chapter summary
This chapter discussed a key topic in real-world development, which is invoking Web API from a .NET MAUI project and deserializing JSON responses, based on a SQL database.
You have seen how Web API makes it easy to work with data, taking advantage of the Entity Framework, and of the implementation of HTTP verbs (GET, POST, PUT, and DELETE). You’ve also seen how easy it is to invoke a Web API service from .NET MAUI via the HttpClient class, and how to customize the request. Finally, you have seen how to deserialize a response using the de facto standard library called Newtonsoft.Json, and how to turn the returned JSON into a .NET data model.
The communication between the mobile app and the Web API shown in this chapter relies on the HTTPS protocol, which offers high-level security. However, this might not be enough, and you might be required to take a step further by detecting certificate pinning attacks. This is covered in the next chapter.
- An ever-growing .NET MAUI control suite with rich feature sets.
- DataGrid, Charts, ListView, Scheduler, and more.
- Active community and dedicated support.
- Phone, tablet, and desktop support.