
React.js Succinctly®

CHAPTER 9
Let’s Build a Game with React
The Memory Grid Game
Let’s use what we learned so far to build something from scratch with React. Instead of building a boring example app, let’s build a somewhat entertaining game.
I love memory games; I think they are a fantastic way to “maintain” your useful short-term memory. I picked a popular and simple memory game for us to build together. This game has many names with many variations, but I’ll just call it “the memory grid.”
This game will show the player a grid with many cells and highlight a few random ones. The player is expected to memorize the positions of the highlighted cells. The game will then clear the highlighted cells and challenge the user to recall their positions from memory.
I picked this game because it’s not a trivial example, but is still simple enough to fit in one chapter. The game also has a few moving parts: there will be nested components with different states on different levels, there will be timers, and there will be user input through clicks.
To see a demo of what exactly we will be building in this chapter, you can play the final version of the memory grid game here.
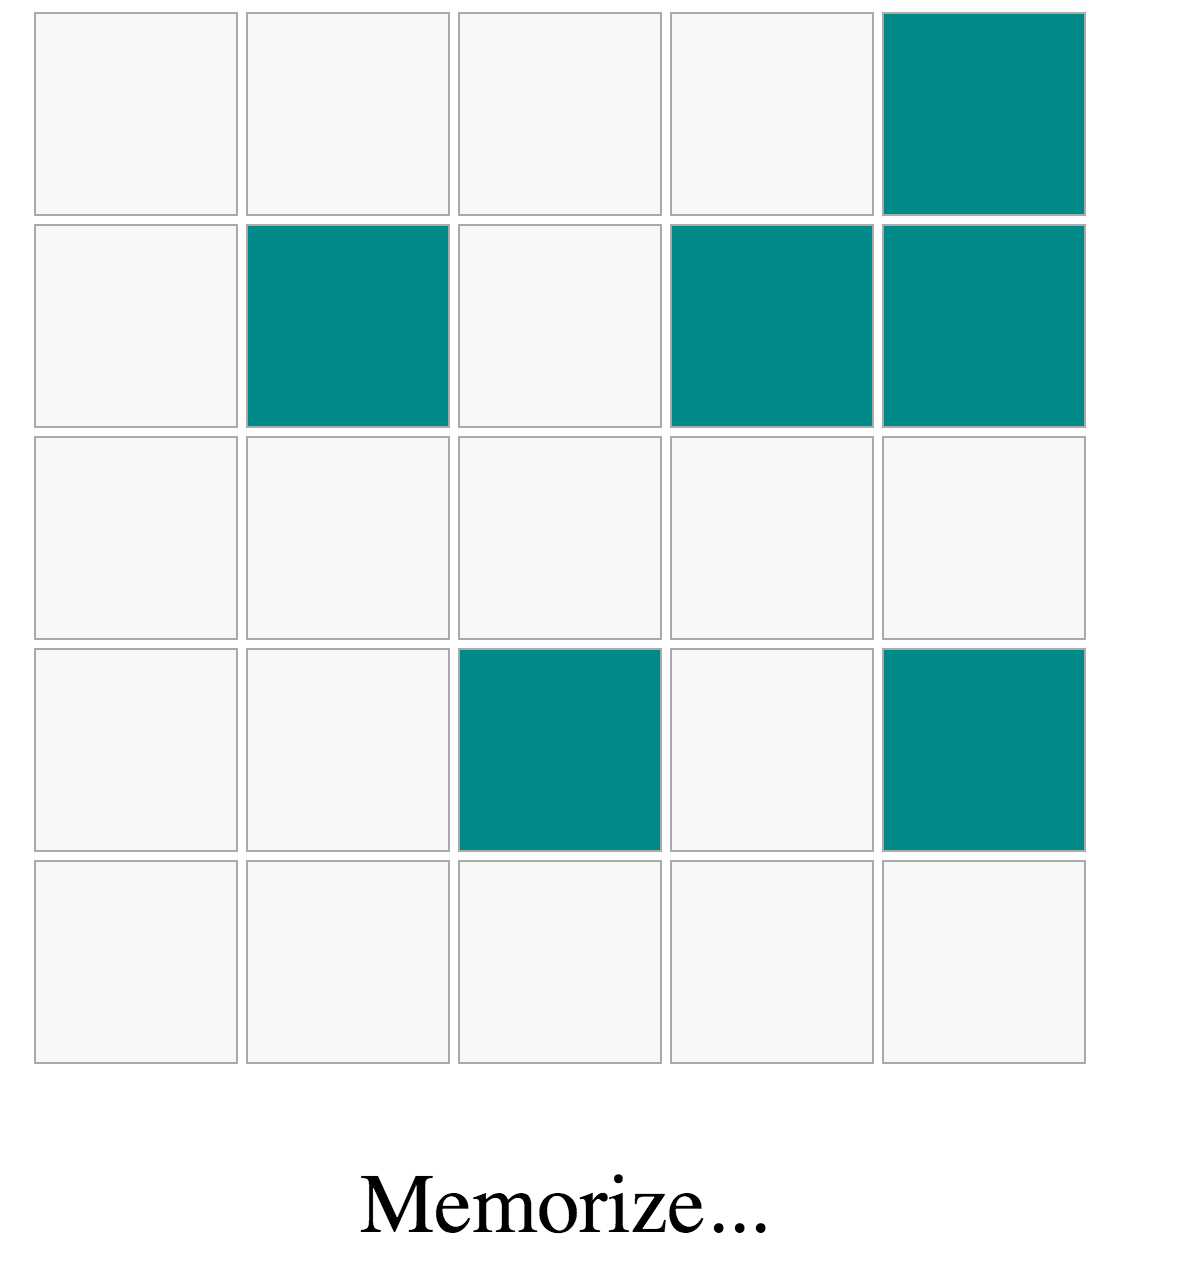
Figure 8: The Memorize State
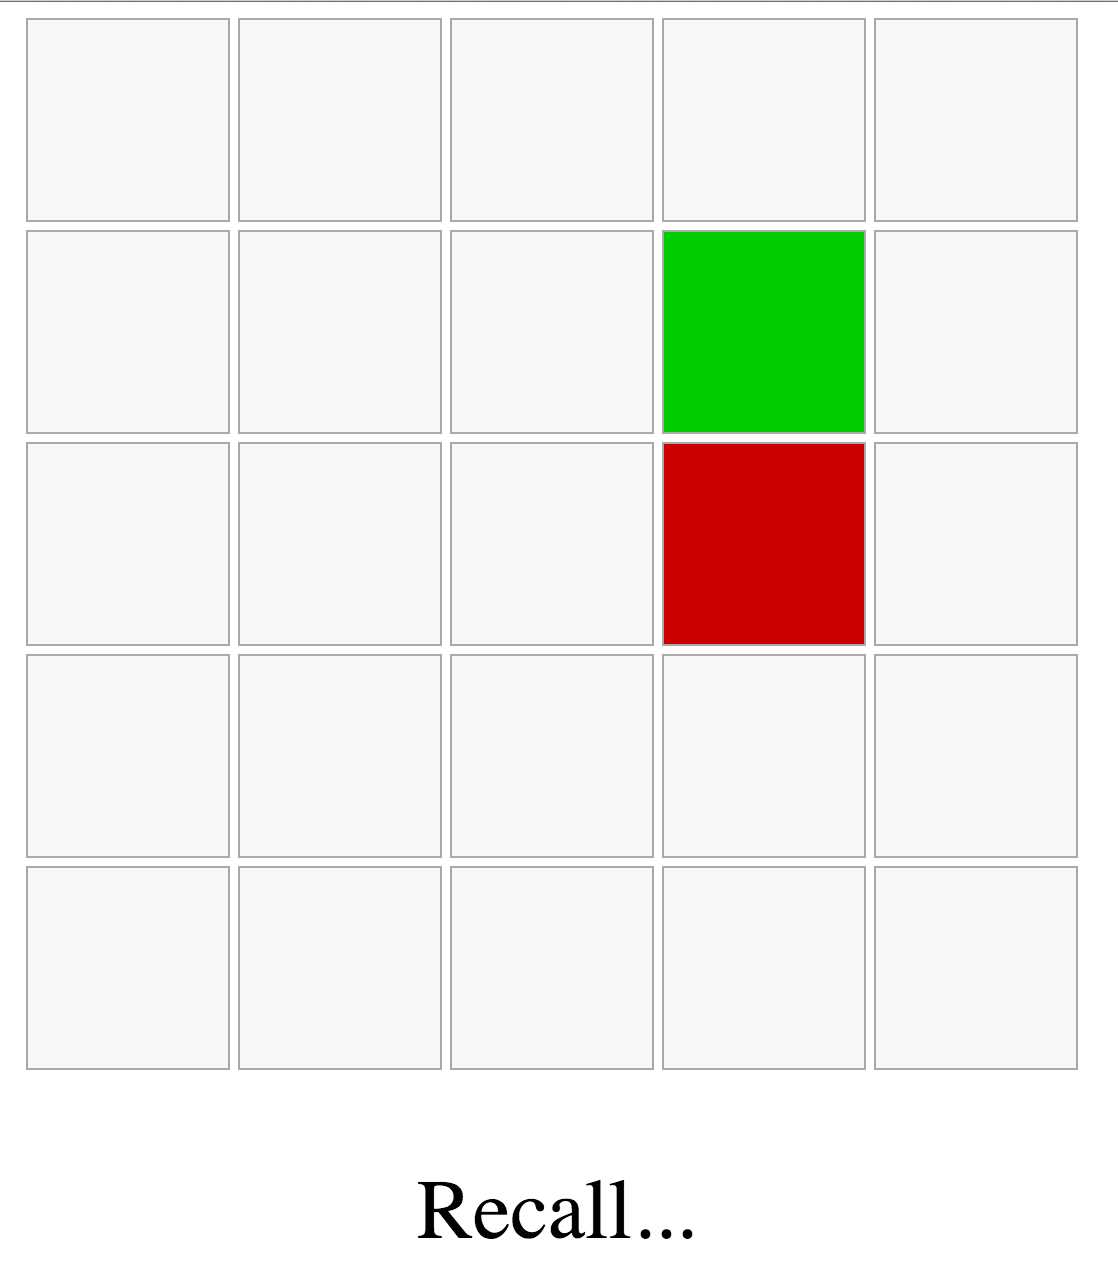
Figure 9: The Recall State
Here’s what the client told us when they requested the game:
You start with an empty grid that is X by Y (make it configurable). Tell the player to get ready, then highlight a number of cells (also configurable) for a few seconds while telling the user to memorize those cells. The game then goes into “Recall” mode, where the user is challenged to remember those cells after we clear the cells from the grid. If they guess a correct cell, mark it green, and if they guess a wrong cell, mark it red. They win if they guess all the right cells with a maximum of two wrong attempts.
This request is not too bad; you’ll be lucky to get a detailed request like that from a client. Usually, client requests are vague and you have to innovate around them—that’s why we need agility in the process by always engaging the clients when we have something ready to be tested.
As with any complex problem, the key to getting to a solution is to split the problem into small, manageable chunks. Focus on the smallest testable increment that you can do next that would push the project forward a tiny bit, and implement just that.
Implementation increments
Increment 1: Make some decisions
- We will use a locally hosted React app, because that’s realistically what you’ll be doing from now on. This would mean that we need to do a few configuration steps to get things working. Alternatively, you can do the whole game on sites like jsbin.com or codepen.io, but I’d recommend that you follow along and get a local React app working. It’s not too hard, I promise.
- We will use JSX for this project. This means we need a tool to process all files that have JSX in them for React. We will use Babel.js to do that.
- We will use JSPM, the JavaScript Package Manager, to invoke Babel.js and bundle our app for the browser. JSPM is possibly the easiest way to start a local React project.
- We will use the modern ES2015 JavaScript syntax. By using Babel.js, we don’t have to worry about browser support (which might be irrelevant by the time you read this anyway). We’ll also use the React class syntax to define our components.
- We will be as modular as possible; we’ll put every component in its own file, and we’ll try to keep components small and pure.
- We will not be spending a lot of time on the styling of the game. We’re doing this to learn React. We’ll do minimal styling where needed.
- We will not write tests for this game to keep it simple. This is a bad decision, and unless you’re writing an example for a sSuccinctly series book, do not make a similar decision.
- We will focus on readability over performance.
- We will minimize the use of component state where possible.
Note: I’ll be intentionally “planting” some bugs and problems in this game and potentially introduce other not-so-intentional ones. Try to identify problems as we make progress on the game. I’ll solve the intentional ones eventually (after I challenge you to find them), but if you find other bugs, please make sure to report them with an issue on the GitHub project of the game.
When you’re done following along in this book, the full source code of the game is available here.
Increment 2: Write the full specifications of the game
The client’s paragraph is a good start, but there are gaps in the specifications that we should attempt to fill:
- The game starts out with a grid rendered in the center of the screen, with X rows and Y columns. By default, it will start as 5 × x5.
- Under the initial grid, a hint message will read “Get Ready…”
- After two seconds, the hint message under the grid will change to “Memorize…” and the grid will highlight Z cells in blue. The Z cells will be picked randomly. By default, Z will be 6.
- The user can’t do anything up to this point except watch what’s happening.
- After two more seconds, the hint message under the grid will change to “Recall…”, and the grid will clear the six highlighted cells.
- The game will remember the positions of the highlighted cells before it clears them.
- At this point, the user can click on any cell. Clicking on a cell that was highlighted before will turn it green. Clicking on the other cells that were not highlighted will turn them red.
- In the footer, we’ll show the number of remaining correct guesses needed to win the game. Every new correct guess will decrement that number.
- The user loses the game if they click three wrong cells.
- The user wins the game if they guess all six cells correctly with no more than two wrong attempts.
- If the user wins the game, the message under the grid will read “Well Played.” If they lose, the message will read “Game Over.”
- When the game is over, it will display the active cells that the user could not guess.
Obviously, this is a lot more than what the client detailed for us, but it’s the minimum that makes sense to me. I assumed a few things while coming up with the specs, and the client may not like them. A logical thing to do after we have this list on paper is to make sure that the client likes everything about it.
If approved by the client, the list will be the initial contract between you and the client. We can go back to it for reference.
If you can’t come up with the whole list at once, that’s okay. Some people might even argue that a list like this up front is closer to a waterfall model than to a lean one. Look at this list as really the MVP (minimal viable product) of the game, which is what the client wanted, but we made it detailed so that it can map to a list of tasks. This list is not constant; we might need to modify things, and we will certainly add more to it.
Increment 3: Get a React app running locally with JSPM
Time for the exciting stuff: open up your terminal and create a new directory for the game. Name it memory-grid-game.
Code Listing 81: mkdir
~ $ mkdir memory-grid-game |
Note: I'll be assuming a Linux-based environment for all the commands in this example. On Microsoft Windows, the commands and outputs might be slightly different.
The JSPM library can be installed using Node Package Manager (NPM). We’ll need an active Node.js installation to be able to install NPM libraries. The easiest way to install Node.js depends on what Ooperating Ssystem you’re using. On Mac &and Linux, I’ve never had any issues with Node Version Manager (NVM).
For Microsoft Windows, there are some alternatives to NVM. There is nvm-windows, and there is nodist. You can also always just use the direct installer available here.
Once you have Nnode installed, you’ll also get NPM with it. You should be able to check the version with the -v argument. Here are the versions I am using right now:
Code Listing 82: nNode vVersion
~ $ node -v v5.10.1 ~ $ npm -v 3.8.3 |
Go ahead and install JSPM now.:
Code Listing 83: jspmJSPM iInstall
~ $ npm install jspm –g ~ $ cd memory-grid-game ~/memory-grid-game $ npm init # Answer the questions ~/memory-grid-game $ npm install jspm --save-dev ~/memory-grid-game $ jspm init Would you like jspm to prefix the jspm package.json properties under jspm? [yes]: Enter server baseURL (public folder path) [./]: Enter jspm packages folder [./jspm_packages]: Enter config file path [./config.js]: Configuration file config.js doesn't exist, create it? [yes]: Enter client baseURL (public folder URL) [/]: Do you wish to use a transpiler? [yes]: Which ES6 transpiler would you like to use, Babel, TypeScript or Traceur? [babel]: |
I kept all the default answers as isthey were for the jspm init command.
At this point, JSPM will install all the system dependencies it needs and put them all under a jspm_packages directory. This includes Babel.js.
Note: You should track your increments with Git. If you use Git, don’t forget to add both node_modules and jspm_packages to .gitignore at this point.
JSPM is ready. We can now start a local React app. We need an index.html file first. I’ll use a global include of the latest React and ReactDOM here for simplicity, but you can also use JSPM itself to load a local copy of React using an import statement.
On the root level of the memory-grid-game directory, create an index.html file.:
Code Listing 84: index.html— – JSPM Template
<!doctype html> <head> <script src="jspm_packages/system.js"></script> <script src="config.js"></script> <script src="https://fb.me/react-15.1.0.js"></script> <script src="https://fb.me/react-dom-15.1.0.js"></script> </head> <body> <div id="react"> Loading... </div> <script> System.import('lib/main.js'); </script> </body> </html> |
The div with id="react" is where we’re going to mount our React app.
Now in lib/main.js, import a Container component, which will be the main top-level component for our app, and then mount that component in the div#react element.
Code Listing 85: lib/main.js - —Rendering the Container Component
import Container from "./Container"; ReactDOM.render( <Container />, document.getElementById("react") ); |
Note: In any import line, when we import from a local JavaScript file, like “Container.js” in the previous example, we can omit the “.js” as JSPM assumes it’s the default.
Let’s create a “Hello React” line in the Container component to test everything.
Code Listing 86: lib/Container.js - —Hello React
class Container extends React.Component { render() { return <div>Hello React</div>; } } export default Container; |
Go ahead and use your favorite command- line web server to serve the memory-grid-game directory over a web server. My favorite is the NPM package serve.
Code Listing 87: Running a lLocal sServer with serve
~/memory-grid-game $ npm install serve –g ~/memory-grid-game $ serve serving /Users/samer/memory-grid-game on port 3000 |
Note: At the time of this writing, JSPM used Babel 5.x, which did not require configuring any presets. Babel 6 is different. When JSPM supports Babel 6, you’ll potentially need to do a few different things. I’ll write a follow-up blog post about what you need to do differently for Babel 6 on JSPM. Look for it here.
In a browser window, go to http://localhost:3000/ now, and you should see “Hello React.”

Figure 10: Hello React
Increment 4: Create an empty X by Y grid
I always start a React app with a Container component. You’ll find examples where this component is named “App” or “Main.” It’s a good idea to have a top-level wrapper component because sometimes you need to control your actual starting component, and you can’t do that from within.
It’s now time to “think in React.” What components do we need? Where should the state live? What actions do we need to plan a flow for in our components? There are no immediately right answers to these questions. Start with what makes sense to you at this moment, and iterate as you go.
Let’s start with a Game component. The Container component will mount one instance of the Game component and pass it the rows and columns variables as props:
Code Listing 88: lib/Container.js— - Container Class
import Game from "./Game"; class Container extends React.Component { render() { return ( <div> <Game rows={5} columns={5} /> </div> ); } } export default Container; |
The Game component will have this.props.rows rows and this.props.columns columns, both of which have a value of 5.
Having these two variables passed down from Container gives us the power to later render another game with different grid dimensions.
Within the Game component, we’ll need to draw a grid and show a message and some stats under that grid. We’ll worry about the message and stats in a later increment.
We definitely need a Cell component to represent one cell in the grid. The Cell component is important, as it will have its own logic, style, and actions.
Should we create a Row component? We don’t really have anything specific to a row in the grid, but a Row component will probably make the grid code read better. So we’ll create one.
Should we create a Grid component to represent that section of the game? You’ll probably be tempted to do that, but I think it will just introduce an un-needed level of complexity, so let's start by drawing rows and columns directly in the Game component itself.
Do we have to manage any state yet? To answer this question, let’s answer this other question: dDo we need React to re-render the DOM when something changes? If yes, that thing should be in a state somewhere. So far, however, nothing we defined should trigger a reload in the UI. Everything is an initial property to drive the initial UI.
We have a Row component and a Cell component. We need to render this.props.rows Row instances, and within each row, we need to render this.props.columns Cell instances.
This sounds like a nested loop. We can’t do regular loops in JSX. We have two options:
- Prepare the grid in a variable with loops, then put that variable inside the returned JSX.
- Prepare a data matrix (rRows ×x Ccolumns), then map that matrix into Rows and Cells components inside the returned JSX.
You might be tempted to do the first option, which I think is a bit imperative. The second option, although it might sound weird, is the more declarative way of rendering this grid, and it would make things easier going forward.
If we think ahead for a bit, we need to eventually pick random cells in the grid, and we need to remember them. Having a data structure representing the grid cells and giving a unique idid tofor every cell will certainly help us with these tasks.
Instead of preparing DOM nodes in the nested loops we identified, we’re going to create a data matrix (which is just an array of arrays), give each cell in that matrix a unique id, then map the matrix arrays into Rows and Cells components. Here’s what I came up with:
Code Listing 89: lib/Row.js – —The Row Component
class Row extends React.Component { render() { return ( <div className="row"> {this.props.children} </div> ); } } export default Row; |
Code Listing 90: lib/Cell.js —– The Cell Component
class Cell extends React.Component { render() { return ( <div className="cell"> {this.props.id} </div> ); } } export default Cell; |
Code Listing 91: lib/Game.js— – The Game Component
import Row from "./Row"; import Cell from "./Cell"; class Game extends React.Component { render() { let matrix = [], row; for (let r = 0; r < this.props.rows; r++) { row = []; for (let c = 0; c < this.props.columns; c++) { row.push(`${r}${c}`); } matrix.push(row); } return ( <div className="grid"> {matrix.map((row, ri) => ( <Row key={ri}> {row.map(cellId => <Cell key={cellId} id={cellId} />)} </Row> ))} </div> ); } } export default Game; |
I added these minimal styles to get the cells divs to look like a grid:
Code Listing 92: In index.html head eElement - —CSS Styles
... <style> body { text-align: center; } .cell { width: 100px; height: 100px; display: inline-block; border: 1px solid #aaa; background: #f8f8f8; margin-right: 4px; } </style> ... |
This is what I see when I refresh the browser now:
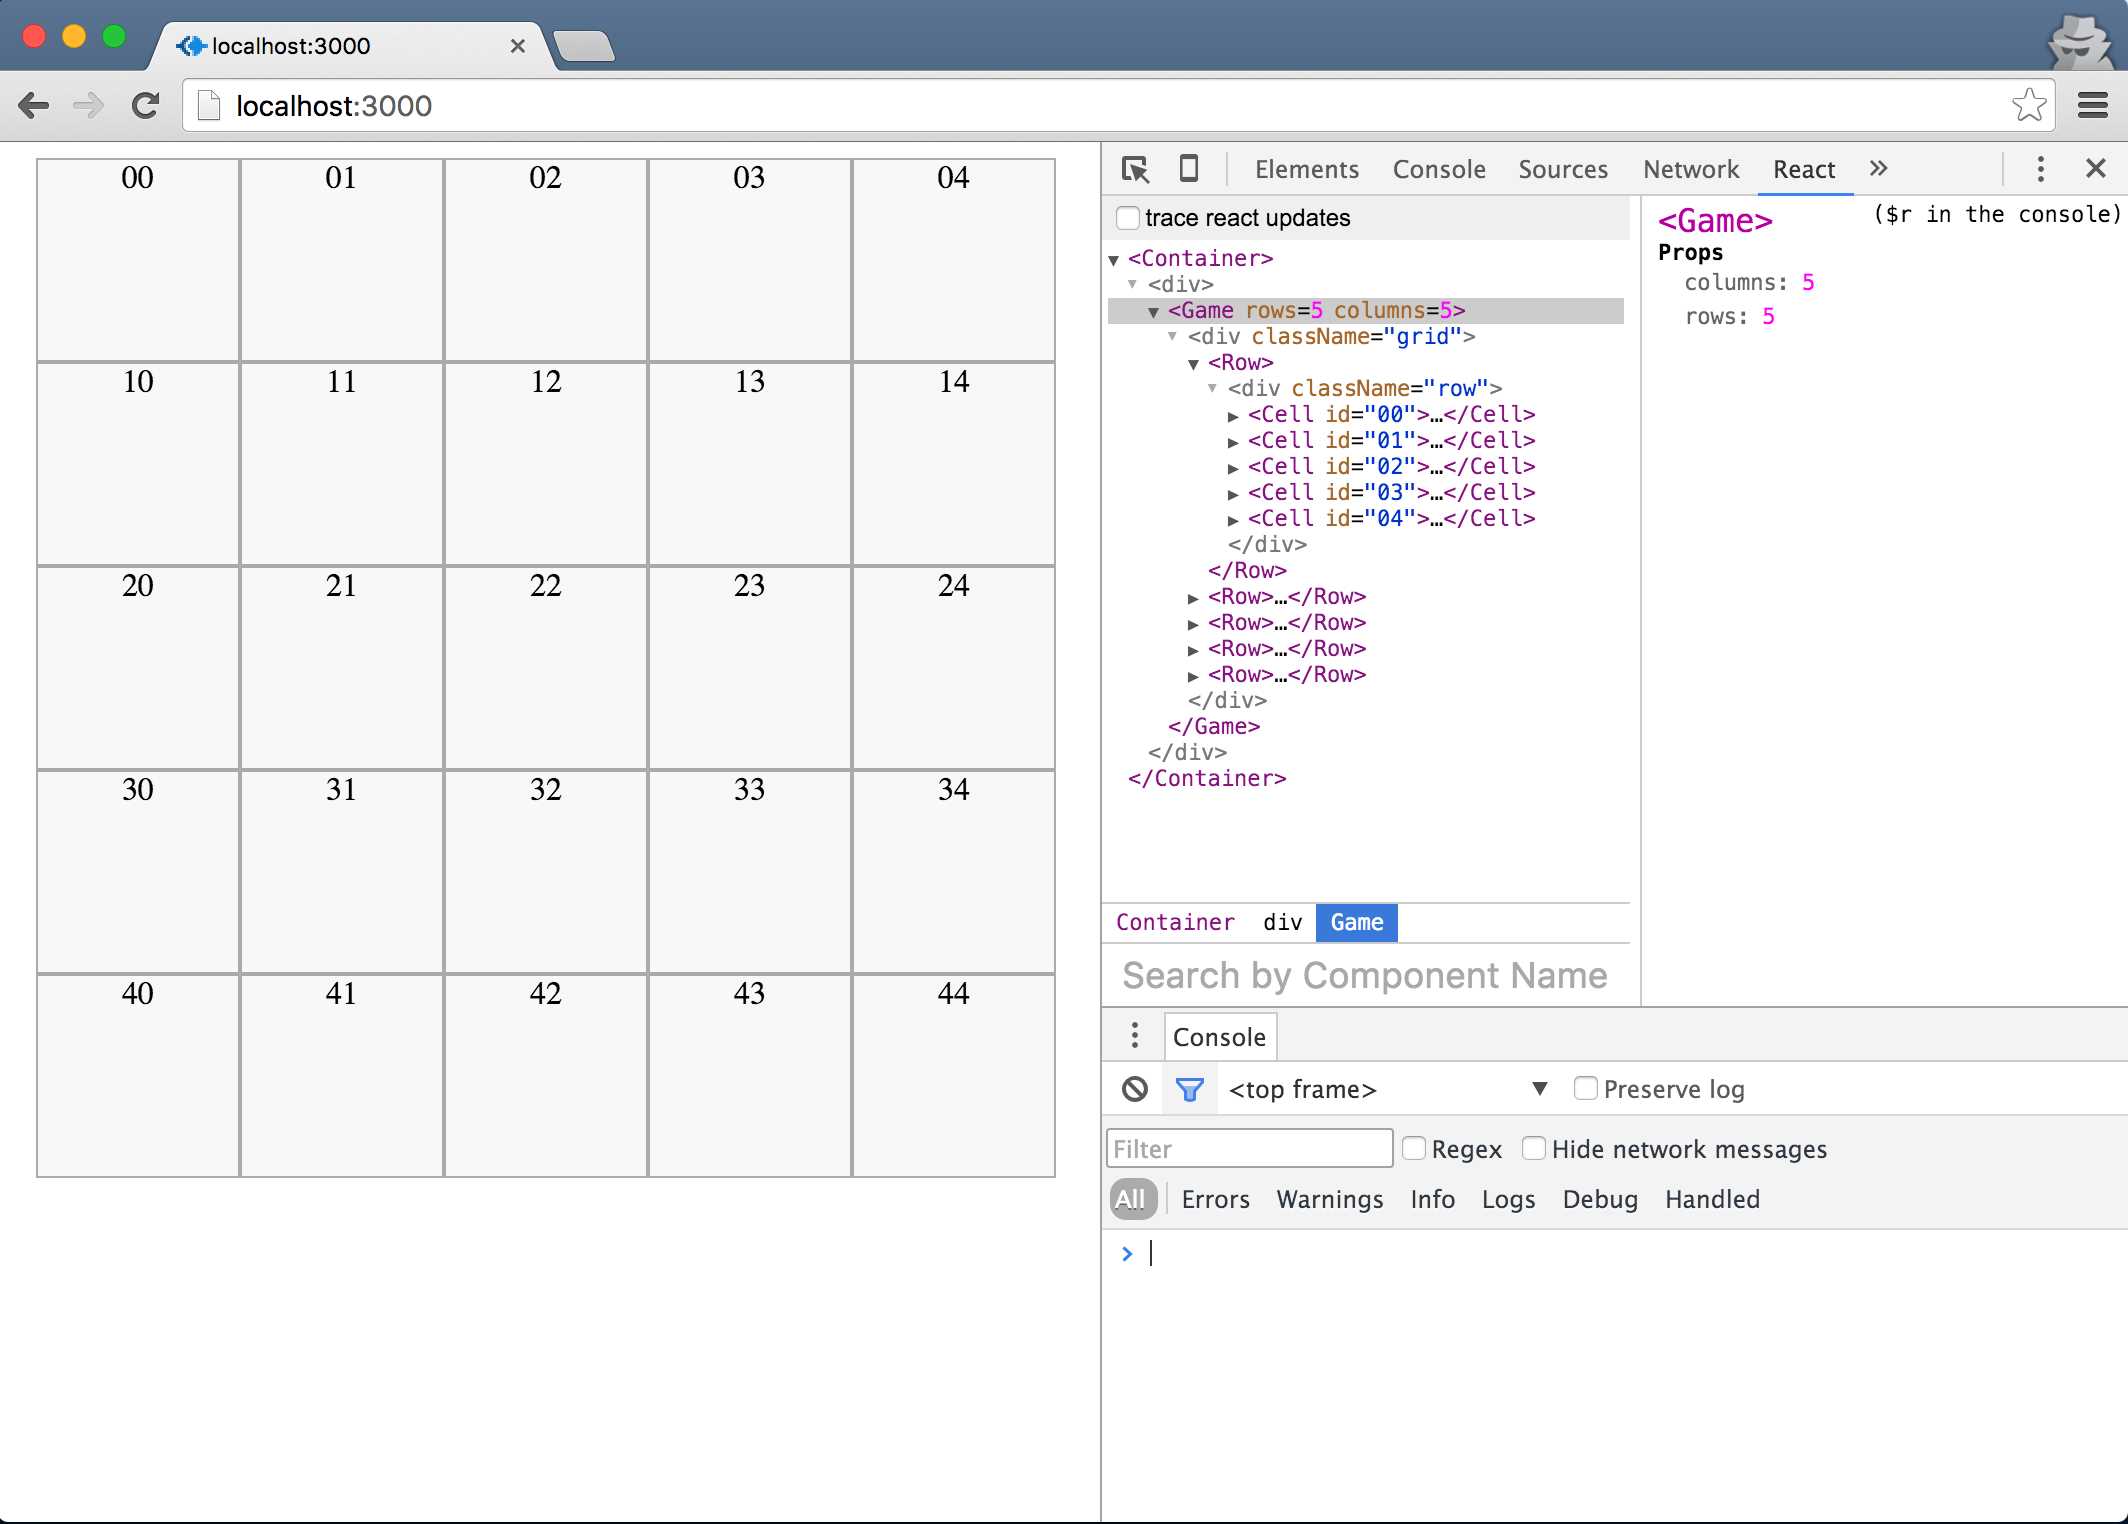
Figure 11: Empty Grid
Questions about the code so far:
- In the Row component, since this is just a wrapper around a number of cells, all we need to do in there is render all the children of the instance. We do this in React using this.props.children, which is a special structure that holds one or more elements. In this case, it has five Cell components. We also could have made a Row component responsible for rendering the five Cell components directly inside its render function. Which approach do you think is better? Why?
- We came up with a unique id for every cell by concatenating the row index with the column index. Ids of the cells for our default grid will be strings like “00”, “01”, … “44”. We’re showing the ids on the grid for testing, but they will not be part of the final product. We could have also just used a serial number for the ids here. Which approach do you think is better? Why?
Note: Did you identify any problems with the code so far? There is one problem in Game.js, which we will solve in Increment 6. Try to identify it.
Increment 5: Get Ready… Memorize… Recall…
Before we get into the details of the grid, let’s prepare the three game states: “ready,” “memorize,” and “recall.”
The game starts with a “ready” state. After two seconds, we need to switch that to a “memorize” state, and after two more seconds, we need to switch that to a “recall” state. We can use the browser timers to accomplish this with setTimeout.
When the game state changes, we want to display a hint line in the UI of the game, right below the grid. Let’s put that logic in a Footer component. To keep this component pure, we’ll assume that it will receive the gameState as a prop, and we’ll use defaultProps to prepare an object of user-friendly hints to display to the user.
Code Listing 93: lib/Footer.js – —The Footer Component
class Footer extends React.Component { render() { return ( <div className="footer"> <div className="hint"> {this.props.hints[this.props.gameState]}... </div> </div> ); } } Footer.defaultProps = { hints: { ready: "Get Ready", memorize: "Memorize", recall: "Recall" } } export default Footer; |
We use defaultProps to plan for the future; instead of hard-coding the hints object in the component instance, we’ll have a way to use a Footer component instance with different hints if we need to. For example, when it’s time to render this game in a different language, we have a higher level of control over these hints.
The Game component instance will render a <Footer />, passing in a gameState prop.
The gameState variable is not the best example of whether something should go into the component state or not, because I picked a name that’s already hinting at it. But the same question we asked before applies here: dDo we need React to re-render the UI when this gameState variable changes? Absolutely.
Every time the gameState changes, we want to re-render the mounted Footer component instance to update the hint line. Putting the gameState variable on the state of the Game component instance will make React do that for us.
To go from “ready” to “memorize” to “recall,” we can use two setTimeout calls, which should start when we mount the Game component in the browser.
Code Listing 94: In lib/Game.js – —Adding Footer with Timers
... import Footer from "./Footer"; class Game extends React.Component { constructor(props) { super(props); this.state = { gameState: 'ready' }; } componentDidMount() { setTimeout(() => this.setState({ gameState: 'memorize' }), 2000); setTimeout(() => this.setState({ gameState: 'recall' }), 4000); } render() { ... } } ... |
To complete the feature, the Footer component instance needs access to the gameState as a prop. When I am creating components for readability and organization, I usually pass the whole state object down to them so that I don’t have to worry about items I add later to the state.
In Game’s render(), right under the grid:
Code Listing 95: Within lib/Game.js render() function—- Spreading the state Oobject for Footer
... // The Matrix Map <Footer {...this.state} /> ... |
The three-dots spread operator will take this.state and spread all of its keys as props for the Footer component.
When we refresh the browser now, we should see a “Get Ready…” hint. After two seconds, it should switch to “Memorize…”, and after two more seconds, it should switch to “Recall…”.
The timers code in componentDidMount is okay, but it could be better. The “recall” state does not depend on the “memorize” state at all, which means if the first line fails, the second one might still run. That’s not ideal and could lead to problems down the line.
We should only go to a “recall” state once we are in a “memorize” state. setState does not guarantee its operation to be synchronous, but it does provide a second argument optional callback. The function we pass as a callback will be executed once the setState operation is complete.
So we can do the following:
Code Listing 96: In lib/Game.js -— setState Callback
componentDidMount() { setTimeout(() => { this.setState({ gameState: 'memorize' }, () => { setTimeout(() => this.setState({ gameState: 'recall' }), 2000); }); }, 2000); } |
The timer to set gameState as “recall” will now only getbe invoked if the first setState is complete and the game is in the “memorize” state.
Increment 6: Highlight Z random cells on the grid during the memorize state
Have you identified the problem I mentioned in Increment 4?
We computed the data matrix in the render method, which means that every time React computes the component’s virtual DOM, it will create a new matrix object. If you put a console.log line in the render, you’ll see that it getis called three times with gameState changes, and each time we’re creating a new matrix object.
Note: Putting console.log lines in the render() function can often be used to uncover unexpected problems. Don’t be alarmed with how many times React invokes the render() function—React will only take to the real DOM what needs to change.
This is avoidable simply by moving the matrix computation into the component’s constructor function instead. The constructor function gets is executed only once when React creates the component instance out of the component class.
However, since we need to access the data matrix in the render function, we’ll need to either put it on the state (this.state.matrix) or use an instance variable (this.matrix). Both approaches are valid, but we should put on the state only what requires a React DOM refresh.
The data matrix isn’t changing once we mount the component: Wwe’re only using it to give the cells unique ids and declaratively mapping the structure into Rows and Cells. Using an instance variable here should suffice.
Here’s the exact matrix we have for our 5 × x5 grid:
Code Listing 97: The Data Matrix for the 5 x× 5 Grid
[ ["00", "01", "02", "03", "04"], ["10", "11", "12", "13", "14"], ["20", "21", "22", "23", "24"], ["30", "31", "32", "33", "34"], ["40", "41", "42", "43", "44"] ] |
We want to pick Z random cells from that matrix. We’ll pass this Z variable into the Game component instance as a prop. Let’s call it activeCellsCount and give it a default value of 6. We need to update the Container component source so that the activeCellsCount is passed from there.:
Code Listing 98: In lib/Container.js render() Ffunction – —Adding activeCellsCount
... <div> <Game rows={5} columns={5} activeCellsCount={6} /> </div> ... |
An easy way to pick random elements from an array is to use a library like Underscore or Lodash.
Lodash has a sampleSize function which can do that, but what we have here is an array of arrays, not just one array, so we need to flatten it first. Luckily, we can also use Lodash to flatten our array of arrays.
Here’s the update code for the Game constructor function:
Code Listing 99: In lib/Game.js - —Picking Rrandom vValues uUsing Llodash
import _ from "lodash"; ... constructor(props) { super(props); this.matrix = []; for (let r = 0; r < this.props.rows; r++) { let row = []; for (let c = 0; c < this.props.columns; c++) { row.push(`${r}${c}`); } this.matrix.push(row); } let flatMatrix = _.flatten(this.matrix); this.activeCells = _.sampleSize(flatMatrix, this.props.activeCellsCount); this.state = { gameState: "ready" }; } ... |
Since our app depends on lodash now, we need to install it.:
Code Listing 100: iInstalling Llodash
memory-grid-game $ jspm install lodash |
The flatMatrix variable will now be:
Code Listing 101: flatMatrix
["00", "01", "02", "03", "04", "10", "11", "12", "13", "14", "20", "21", "22", "23", "24", "30", "31", "32", "33", "34", "40", "41", "42", "43", "44"] |
The activeCells variable would be an array of six random ids chosen from flatMatrix.
Once again, I opted not to put activeCells on the component state and just use an instance variable instead. You might be tempted to put it on the state given that these cells need to show up on the grid during the “memorize” state (and that sounds like a UI re-render). But if you think carefully about this, all we need to do is have the activeCells in memory once, then we’ll use the gameState to determine if they should show up or not. We compute the activeCells at the initialization of the component instance instead of updating the state with activeCells when we move from “ready” to “memorize” gameState.
Just like we passed the state object to the Footer component, we’ll pass it to the Cell components. We’ll also pass the activeCells array to Cell.
Code Listing 102: In lib/Game.js - —Mapping the Matrix to Rows and Cells
render() { return ( <div className="grid"> {this.matrix.map((row, ri) => ( <Row key={ri}> {row.map(cellId => <Cell key={cellId} id={cellId} activeCells={this.activeCells} {...this.state} />)} </Row> ))} <Footer {...this.state} /> </div> ); } |
The goal here is to have the Cell component completely in control of its different UI states, but through props coming from the parent. This might not be the most efficient approach, but I think it makes the code more readable.
To further simplify things in the Cell component, I’ll just use different CSS classes to represent different states of a Cell.
Here’s what I came up with for the Cell component:
Code Listing 103: lib/Cell.js - —The Cell Component
class Cell extends React.Component { active() { return this.props.activeCells.indexOf(this.props.id) >= 0; } render() { let className = "cell"; if (this.props.gameState === "memorize" && this.active()) { className += " active"; } return ( <div className={className}> </div> ); } } export default Cell; |
A cell is active if its id is part of the activeCells array, and we only want the active cells to show up on the grid during the “memorize” gameState.
Let's give the active cells a different color.:
Code Listing 104: In index.html style eElement – —The aActive cCell cColor
.active { background-color: #058BDA; } |
If we refresh the browser now, during the “memorize” state, we should see six random,ly highlighted cells on the grid.
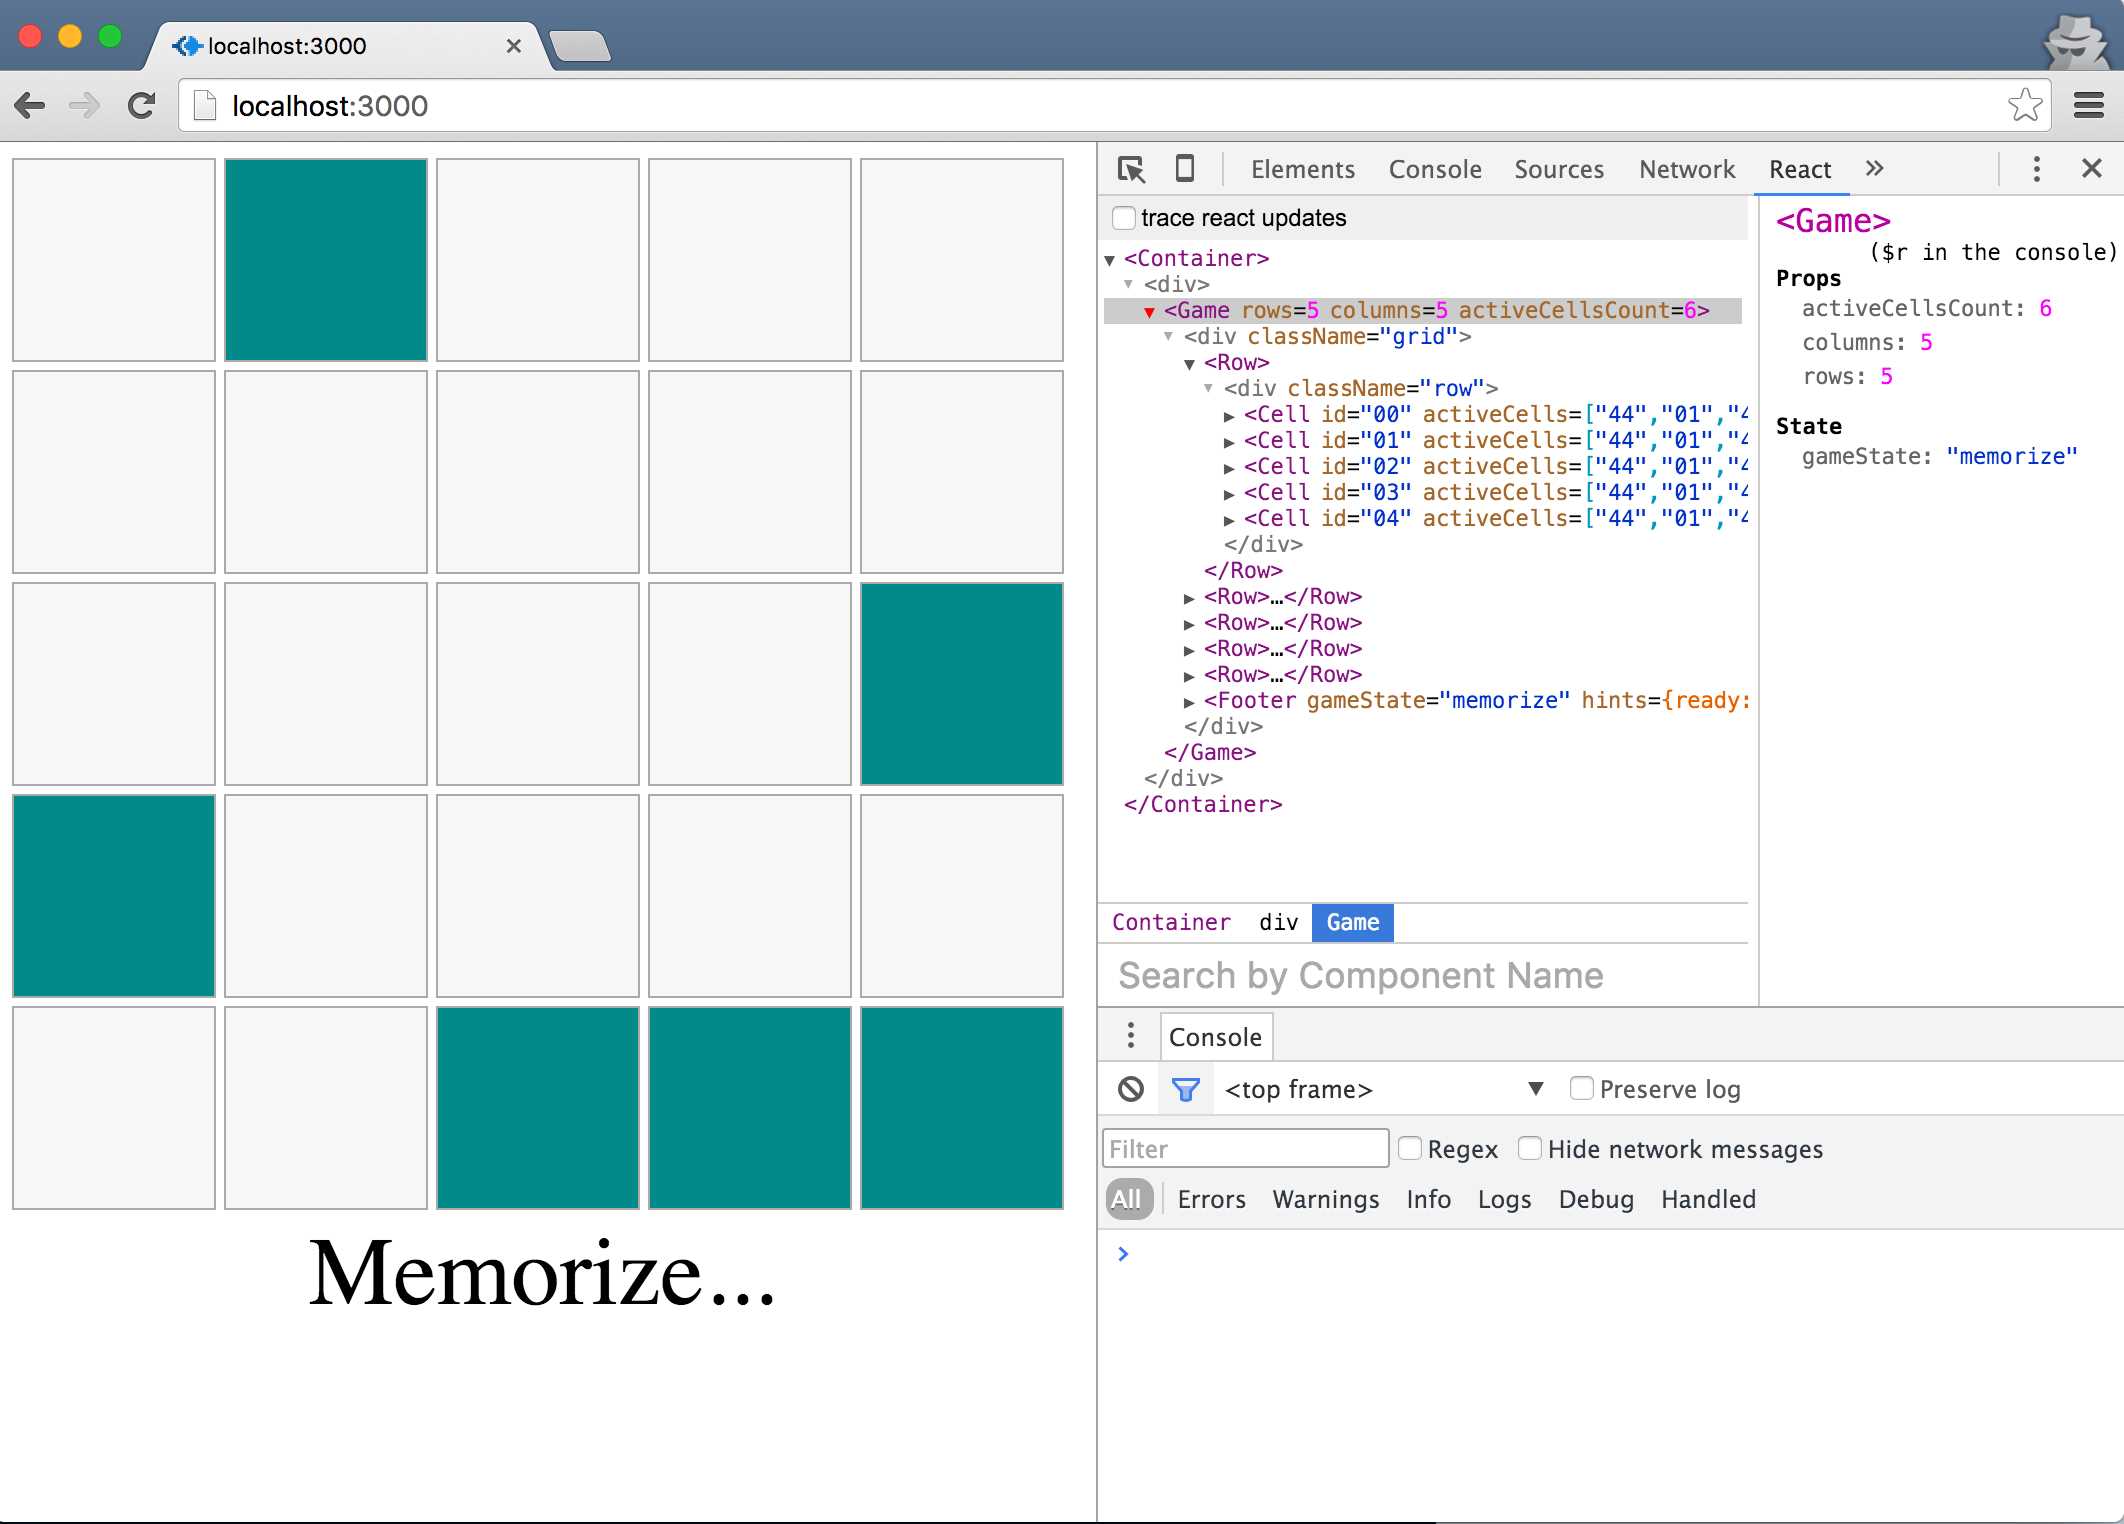
Figure 12: Active Cells on the Grid
Increment 7: Click a cell to guess during the recall state
Here’s the pre-analysis:
- A Cell component should accept a click event only during a “recall” gameState.
- The click handler in a Cell component can compute whether this click is a correct guess or not, since it has access to all the data it needs for thatto do so.
- We need the UI to change while guessing. Correct guesses should be marked green, and wrong ones red. This means something has to be stored in a state somewhere when we click.
- We want to keep the state on the Game component level, so the click handler in a Cell component would need to invoke a function on the Game component to mutate the state there.
What should go in the state? This is a challenging question, and the answer will greatly shape the rest of the code for this game. Keep in mind that we only put on the state the variables for which we want React to trigger a reload of the UI when they change.
We want the UI to getbe updated when there is a new correct guess, and when there is a new wrong guess. Let’s maintain both pieces of data with arrays on the state.
Code Listing 105: In lib/Game.js - —Initial Game State
... this.state = { gameState: "ready", wrongGuesses: [], correctGuesses: [] }; ... |
This way, we’ll know that if we push new values to either of the arrays, React will refresh the DOM in the browser.
Let’s now create a click handler in the Cell component. To invoke the handler, we add an onClick={this.handleClick.bind(this)} on the cell’s div and define handleClick to call a top-level function. Let’s name the top-level function recordGuess.
Code Listing 106: In lib/Cell.js - —handleClick
... handleClick() { if (this.props.gameState === "recall") { this.props.recordGuess({ cellId: this.props.id, userGuessIsCorrect: this.active() }); } } ... render() { ... return ( <div className={className} onClick={this.handleClick.bind(this)}> </div> ); } ... |
We want to record a guess only when the game is in the “recall” state. That’s why we have an if statement in handleClick.
The recordGuess function in the Game component needs access to the cells being clicked and whether the user’s guess is correct or not. From the point of view of a Cell component, the value returned from the active() function is what makes the guess correct or wrong.
recordGuess needs to be passed to <Cell /> as a prop. Add recordGuess={this.recordGuess.bind(this)} in the <Cell /> line in Game.js.
recordGuess will need to update the state and push the id of the guessed cell to either correctGuesses or wrongGuesses.
Code Listing 107: In lib/Game.js – —The recordGuess() fFunction
... recordGuess({ cellId, userGuessIsCorrect }) { let { wrongGuesses, correctGuesses } = this.state; if (userGuessIsCorrect) { correctGuesses.push(cellId); } else { wrongGuesses.push(cellId); } this.setState({ correctGuesses, wrongGuesses }); } ... |
This completes the recording of a guess, but we need to reflect those guesses in the UI.
In the Cell component, if the cell’s id is in the state’s correctGuesses or wrongGuesses, we want to give it different CSS classes so that we can mark it green or red.
Let’s create a function to return either true or false about whether the cell’s id is in correctGuesses or wrongGuesses.
Code Listing 108: In lib/Cell.js -— The State of Guess State
... guessState() { if (this.props.correctGuesses.indexOf(this.props.id) >= 0) { return true; } else if (this.props.wrongGuesses.indexOf(this.props.id) >= 0) { return false; } } ... |
Both correctGuesses and wrongGuesses are available to a <Cell /> instance as props since we spread out the full Game state keys as props on the cells and the footer.
So now all we need to do is add CSS classes to every cell based on its guessState().
The Cell.js render function would now would look like:
Code Listing 109: In lib/Cell.js – —The render() fFunction
... render() { let className = "cell"; if (this.props.gameState === "memorize" && this.active()) { className += " active"; } className += " guess-" + this.guessState(); return ( <div className={className} onClick={this.handleClick.bind(this)}> </div> ); } ... |
And we need the following CSS style to complete this feature:
Code Listing 110: In index.html style eElement – —Red and /Green CSS Styles
.guess-true { background-color: #00CC00; } .guess-false { background-color: #CC0000 } |
If you test now, during the “recall” state, you can click to guess. Correct ones guesses should be marked green, and wrong onesguesses should be marked red:
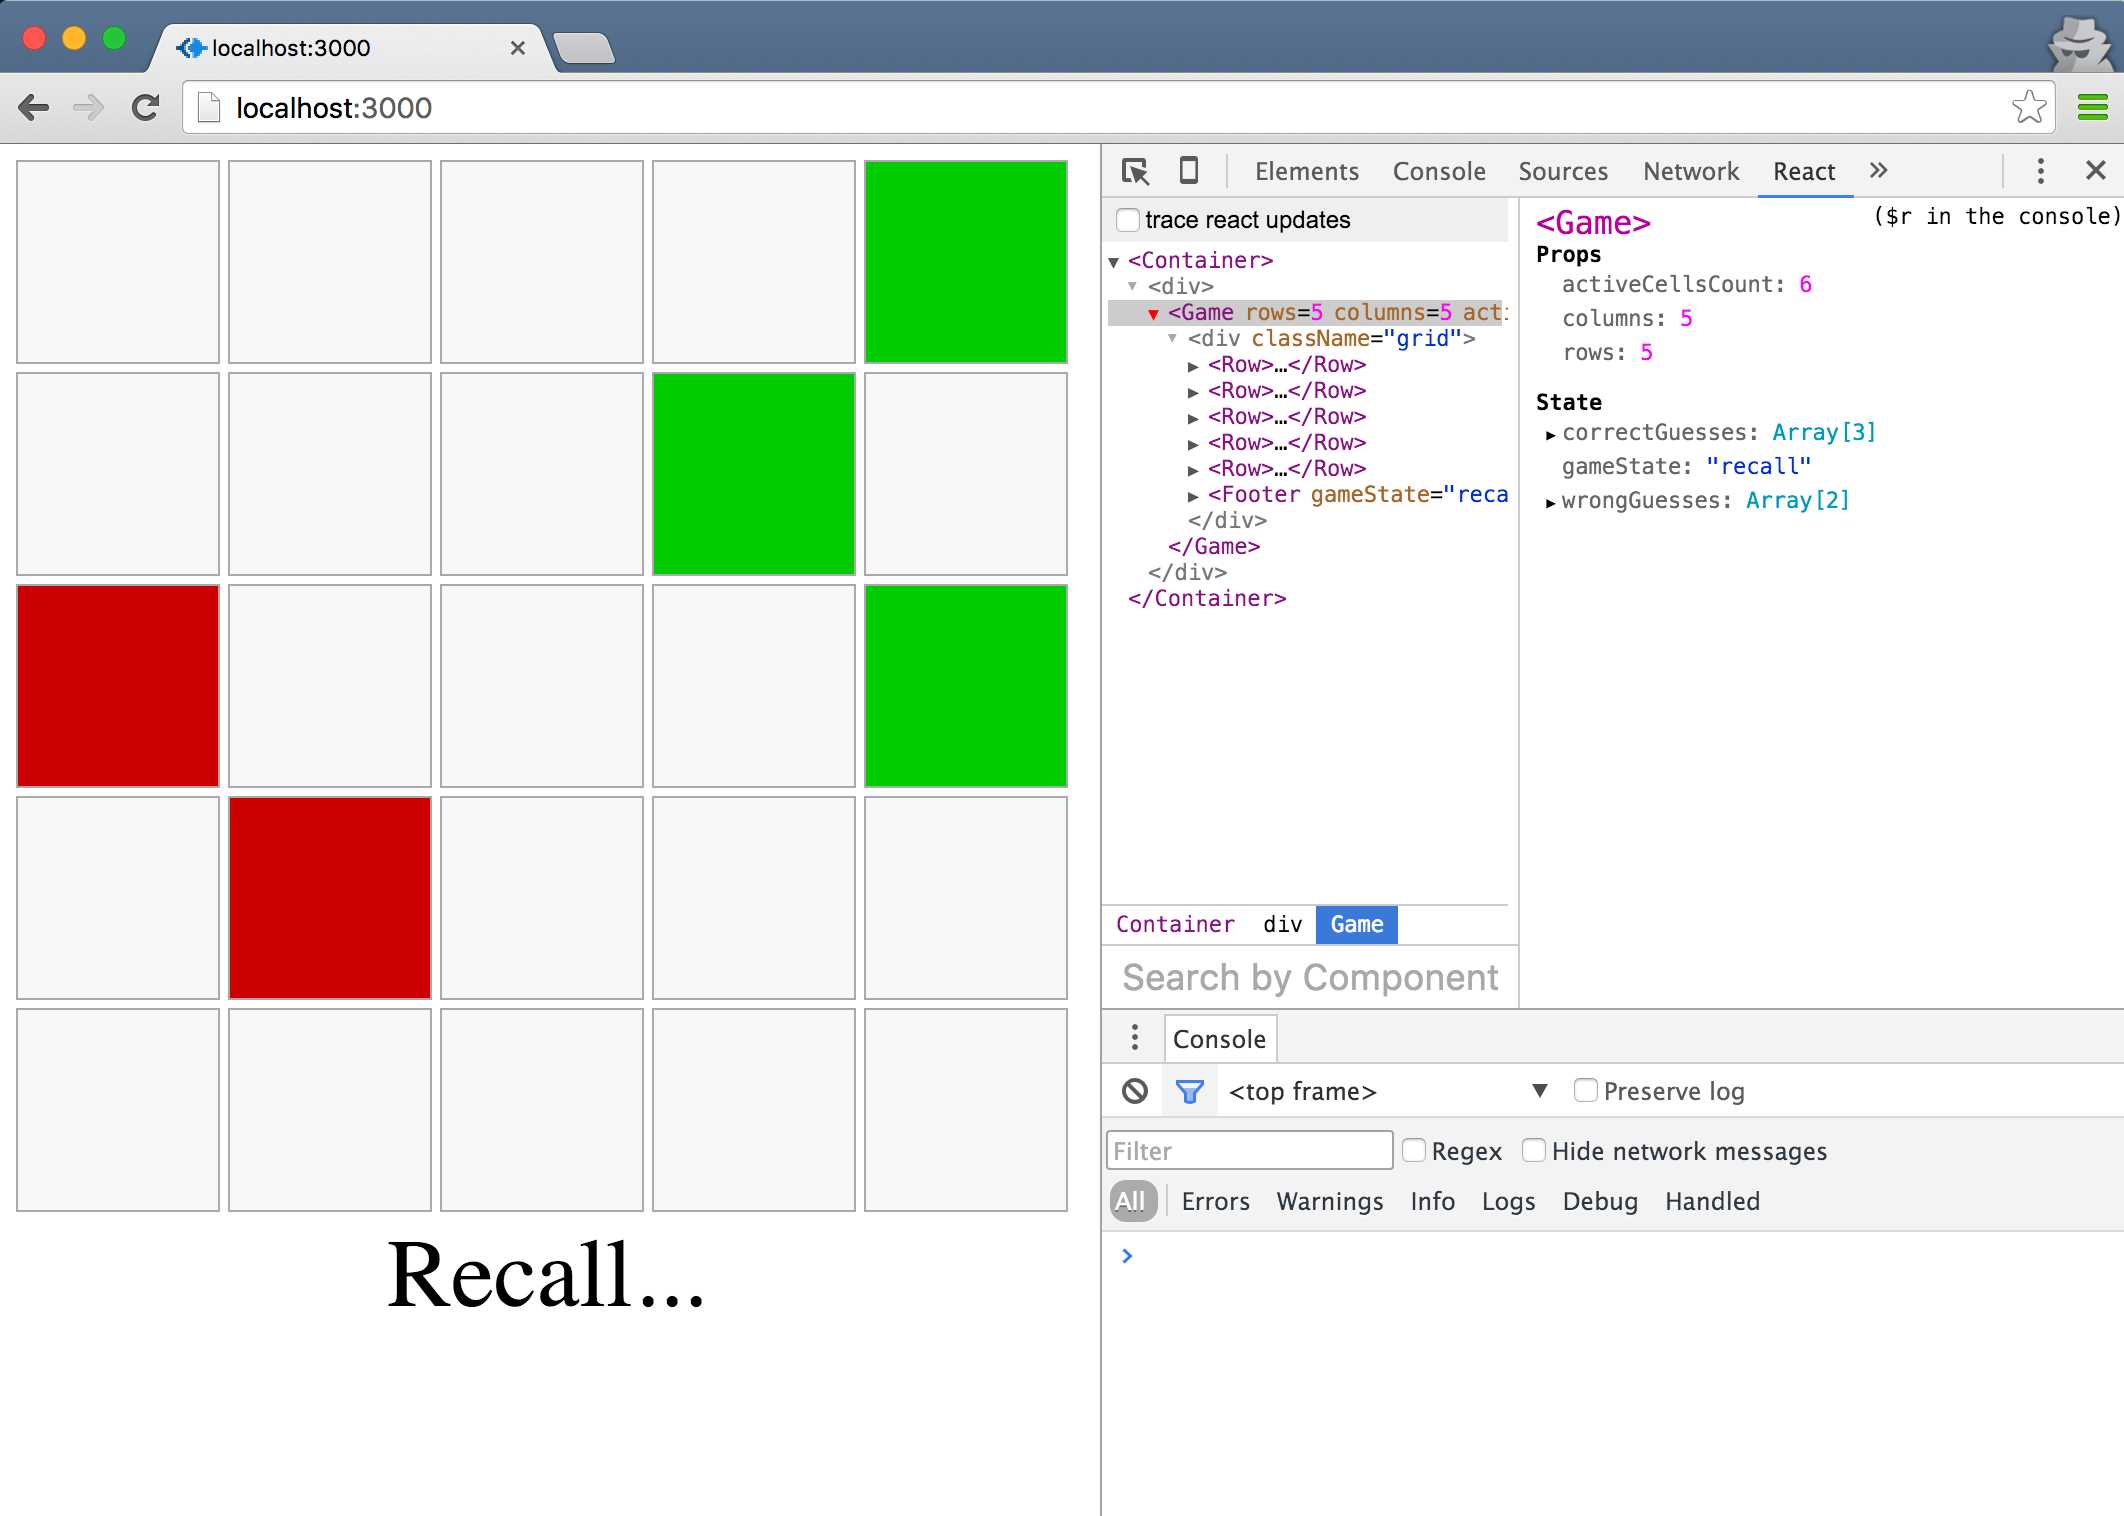
Figure 13: Guessing Correctly and Incorrectly
The code we have so far has a small bug. T—try to identify it.
What happens if you click on an already-guessed cell?
Our code will gladly push the same cell id one more time to the suitable array. This might sound harmless at first, but it will potentially introduce problems down the line.
The solution is simple: in the if statement of the handleClick function, don’t call recordGuess for a cell that returns any value (true or false) from its guessState() function.:
Code Listing 111: In lib/Cell.js - —Don’t gGuess an aAlready gGuessed cCell
... handleClick() { if (this.guessState() === undefined && this.props.gameState === "recall") { ... } |
Increment 8: Show the number of the remaining guesses needed to win the game
This one is easy; all we need to do is display the computed count. The Footer component already has access to the total number of current correctGuesses from the state, but it needs access to the activeCellsCount prop as well:.
Code Listing 112: In lib/Game.js —- Footer pProps
... <Footer {...this.state} activeCellsCount={this.props.activeCellsCount} /> ... |
In the component’s render function, we’ll display the result of a remainingCount() function. This function will return null (to display nothing) when the state of the game is not “recall,” and it will otherwise compute the number of correct guesses needed to finish the game.:
Code Listing 113: In lib/Footer.js - —remainingCount()
class Footer extends React.Component { remainingCount() { if (this.props.gameState !== "recall") { return null; } return ( <div className="remaining-count"> {this.props.activeCellsCount - this.props.correctGuesses.length} </div> ); } render() { return ( <div className="footer"> <div className="hint"> {this.props.hints[this.props.gameState]}... </div> {this.remainingCount()} </div> ); } } ... |
If you test now, guessing correctly will decrement the counter below the hint line.
Increment 9: Game over after three wrong guesses, or win after six correct guesses
We can compute the lost/won game state from the wrongGuesses and correctGuesses arrays:
- The Ggame is “won” if we have the original activeCellsCount in correctGuesses.
- The Ggame is “lost” if we have three items in wrongGuesses.
Should the won/lost variable be part of the Game’s component state— (just like we did with “read,” “memorize,” and “recall”)—, or should it be computed?
The won/lost variable can be computed. It does not need to go into the component state. However, since we have a gameState structure already in place, I’d argue that making the won/lost variable part of that structure will make the code simpler and more readable.
All we need to do in the footer is add the new state keys and their hint message.:
Code Listing 114: In lib/Footer.js - —Footer Hhints
... Footer.defaultProps = { hints: { ready: "Get Ready", memorize: "Memorize", recall: "Recall", won: "Well Played", lost: "Game Over" } }; ... |
To set gameState to either “won” or “lost,” we add this computing if statement in recordGuess:.
Code Listing 115: In lib/Game.js - —Updating the sState for a gGuess
... recordGuess({ cellId, userGuessIsCorrect }) { let { wrongGuesses, correctGuesses, gameState } = this.state; if (userGuessIsCorrect) { correctGuesses.push(cellId); if (correctGuesses.length === this.props.activeCellsCount) { gameState = "won"; } } else { wrongGuesses.push(cellId); if (wrongGuesses.length > this.props.allowedWrongAttempts) { gameState = "lost"; } } this.setState({ correctGuesses, wrongGuesses, gameState }); } ... |
Note how I used an allowedWrongAttempts prop on <Game /> instead of hardcoding a value of “2” in there. With this variable, we can later spin another game with a different allowedWrongAttempts value. Since we don’t plan on doing that yet, we can use React components’ defaultProps to use a default value for this prop.:
Code Listing 116: In lib/Game.js - —allowedWrongAttempts
... Game.defaultProps = { allowedWrongAttempts: 2 }; ... |
Go ahead and test this feature now. You should be able to win or lose the game.
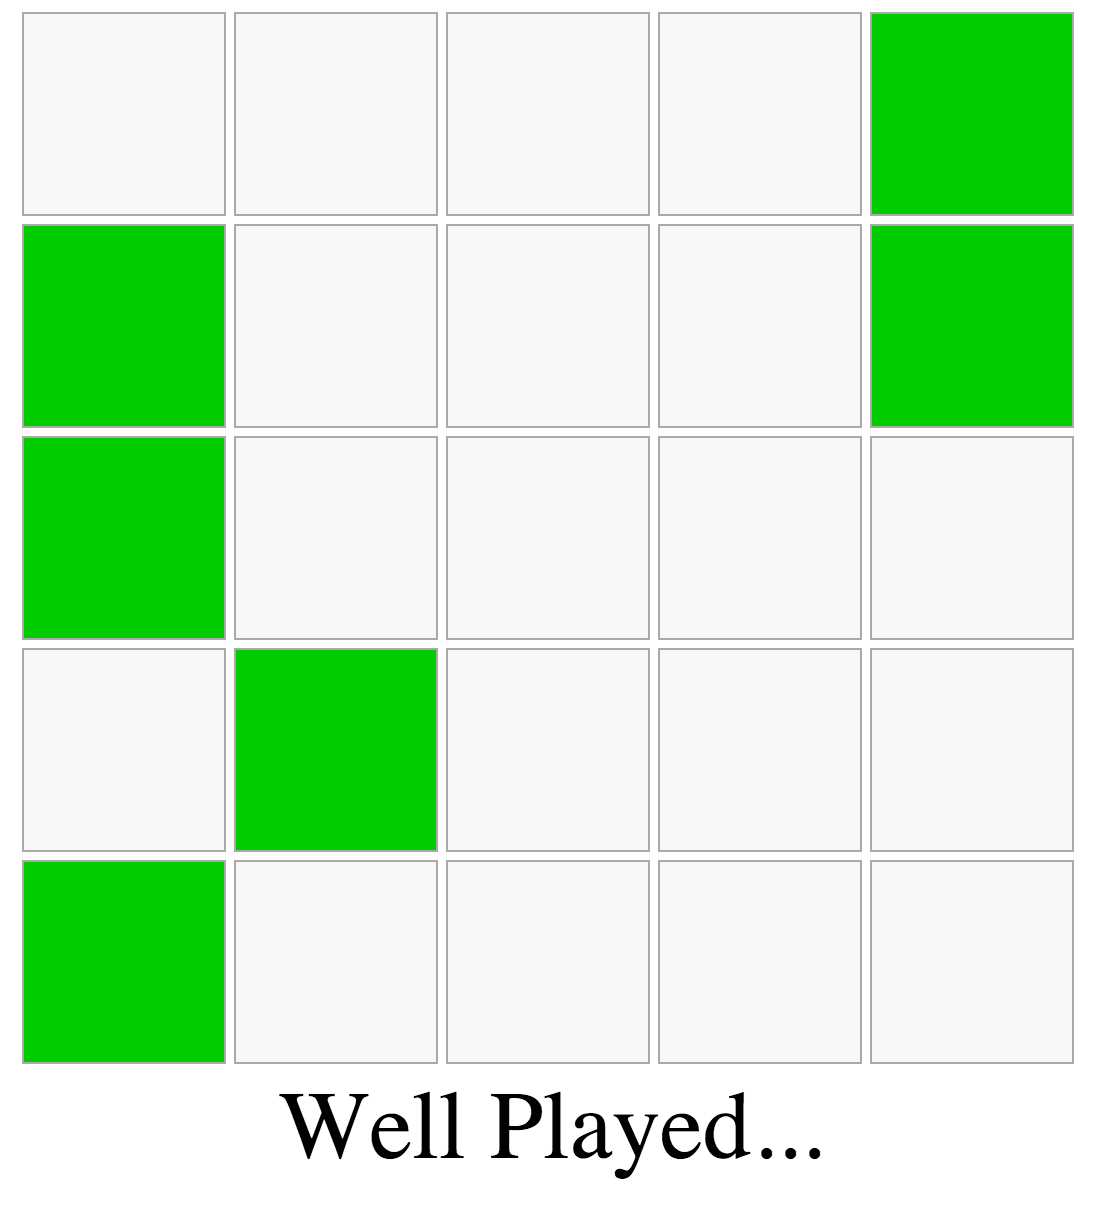
Figure 14: Game “Wwon” State
Increment 10: Show the original active cells when game is over
Looking at the if statement controlling whether an activeCell should be displayed or not, it checks if the gameState is “memorize” at this point. All other states will hide activeCells, which has made sense so far.
For this feature, we need to also show the activeCells if the gameState becomes “lost.” Instead of making a longer if statement, and for better readability, let’s extract the state-checking logic into its own method.:
Code Listing 117: In lib/Cell.js –— showActiveCells()
... showActiveCells() { return ["memorize", "lost"].indexOf(this.props.gameState) >= 0; } ... |
The if statement inside the render function now becomes:
Code Listing 118: In lib/Cell.js – —Inside the render() Ffunction
... if (this.showActiveCells() && this.active()) { className += " active"; } ... |
This is a lot much more readable. The feature will now work as requested.:
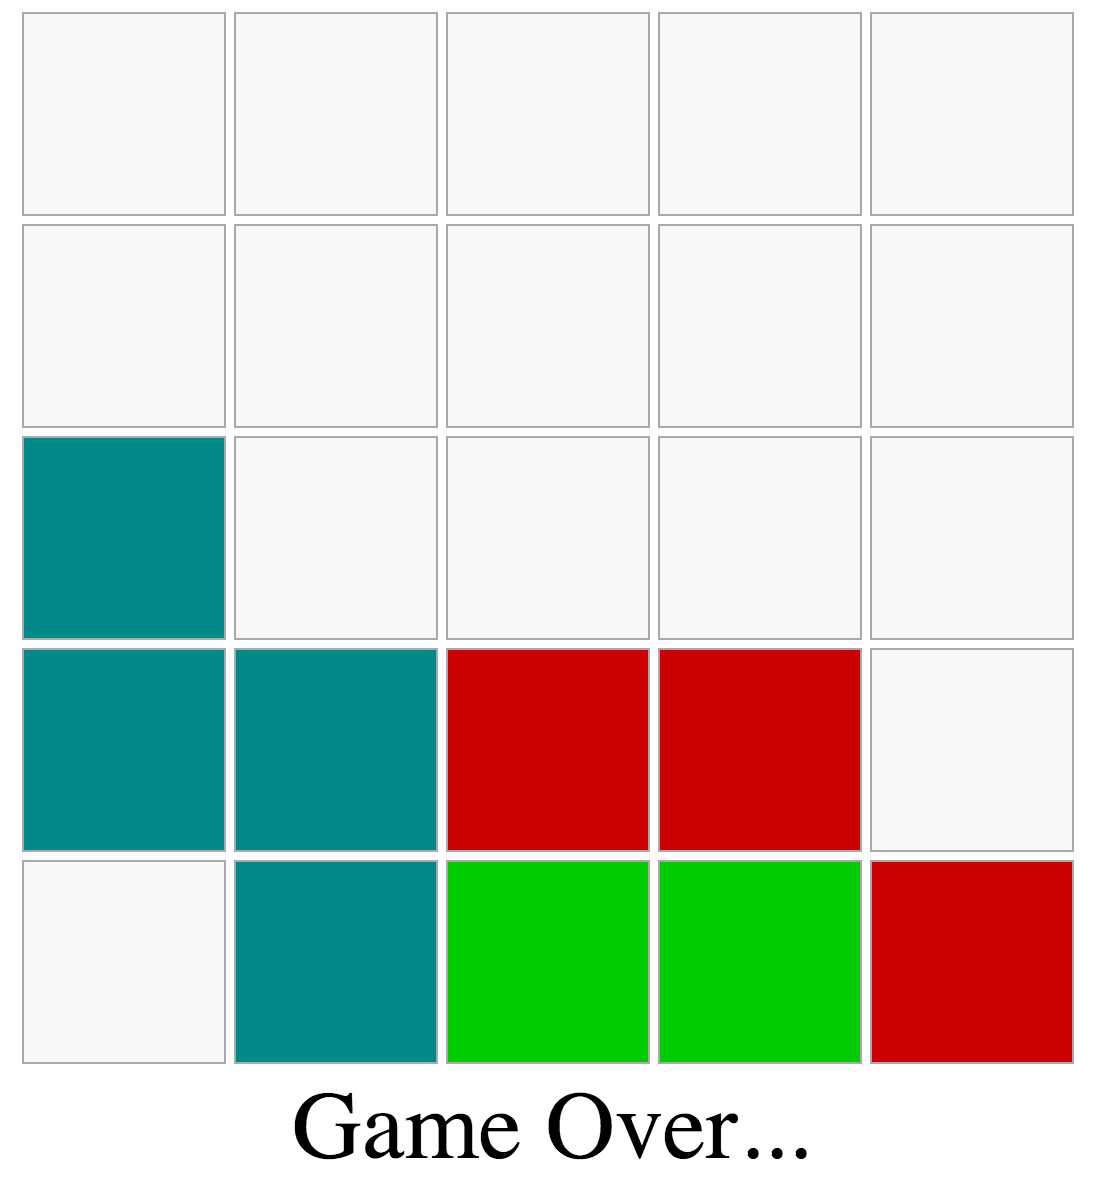
Figure 15: Game “Llost” State
Just because it works, though, does not mean we’re done.
Imagine yourself in a technical interview now, and I asked you out of nowhere: “What’s wrong with this showActiveCells code? Can we do better?”
If you can’t identify a problem, I’ll give you a hint. Put a console.log line inside showActiveCells and observe how many times it gets fired.
For our 5 × x5 grid example, on every gameState change, we call this function 25 times. More importantly, on every cell click, we call this function 25 times. Why?
Every time the Game state changes, React will re-compute its render function, which means re-computing the render function of 25 children cells, which means invoking showActiveCells 25 times. This is not a huge deal for the small codebase we’re working with here, but we can easily eliminate this problem.
When the state for our <Game /> instance changes, we need to compute the showActiveCells only once. This function has no dependency on the cell-specific data, so we don’t need this function to be on the Cell level. We can move it up to the Game level and pass it as a prop to all cells.
The Game render function becomes:
Code Listing 119: In lib/Game.js -— showActiveCells in Game’s render()
render() { let showActiveCells = ["memorize", "lost"].indexOf(this.state.gameState) >= 0; return ( <div className="grid"> {this.matrix.map((row, ri) => ( <Row key={ri}> {row.map(cellId => <Cell key={cellId} id={cellId} showActiveCells={showActiveCells} activeCells={this.activeCells} recordGuess={this.recordGuess.bind(this)} {...this.state} />)} </Row> ))} <Footer {...this.state} activeCellsCount={this.props.activeCellsCount} /> </div> ); } |
In the Cell render function, we now use this.props.showActiveCells instead of this.showActiveCells().
The indexOf() line is now called just once instead of 25 times per state change.
This was an easy problem to spot because we refactored our original if statement into a function and realized that the function does not depend on the Cell instances at all. Whenever you render a component multiple times in a loop, like our <Cell /> example here, be careful about any computation you make in it. Always ask the question, “does this computation need to go on that level or can we just pass it from the parent?”
With this increment, we have officially reached MVP status. We can proudly take the product to the client now and have them test it for feedback.
The moment of truth about the design of our code happens when the client comes back to us with enhancements or bugs. If we made good calls early on about the structure of our components and state, extending and maintaining the application will be easier.
Of course, coming up with good design decisions early on is purely a matter of experience. The more applications you build with React, the better you’ll get at making these decisions.
Let’s assume our client came back to us with two extra features that they want done before shipping this game.
Here’s what they requested:
- Give the players 10 seconds to play the game, and “game over” if they don’t finish in time.
- When a game is won or lost, show a “play again” button.
Go ahead and try to implement these two features on your own first, and then continue to see my solution in the next section once you’re done.
Increment 11: Give the players a 10-second window to play the game
First, let’s not use the number 10 directly in code, because most likely, this might need to change, and possibly different levels would require different timeout seconds.
Let’s put it as a default prop on the Game component for now.:
Code Listing 120: In lib/Game.js -— timeoutSeconds
... Game.defaultProps = { allowedWrongAttempts: 2, timeoutSeconds: 10 }; ... |
Two things are clear about this 10- seconds timeout feature:
- During the “recall” gameState, we need to decrement the seconds-remaining variable every second. We can do that with a setInterval function.
- When the seconds-remaining variable hits a 0 value, we need to update gameState to “lost.”
Did you implement this feature by adding a new variable to the game state?
You might be tempted to put a secondsRemaining variable on the state, but since the feature didn’t instruct us to show the remaining seconds in the game UI, we don’t really need to make this variable part of the game state. If we do, we’ll be introducing unnecessary renders.
The only UI update needed here is when secondsRemaining hits a 0 value. This update will happen anyway because the gameState variable will change at that point.
If you need to hold a variable that is specific to a component instance outside of its official React-supported state, you can use an instance variable: this.secondsRemaining.
If you suspect the client will come back and tell you to display the seconds remaining in the UI, you can go ahead and use a state variable. It’s important to understand the difference.
The current code starts the “recall” gameState using a timer, inside another timer, in componentDidMount.
Since we’re going to be adding more logic when switching the game to the “recall” state, let’s introduce a startRecallMode function and use that in the timer.:
Code Listing 121: In lib/Game.js - —Calling a startRecallMode() fFunction
... componentDidMount() { setTimeout(() => { this.setState({ gameState: 'memorize' }, () => { setTimeout(this.startRecallMode.bind(this), 2000); }); }, 2000); } ... |
startRecallMode will update gameState to “recall.” When that update is complete, it should initialize the secondsRemaining variable and kick off a timer to decrement it using setInterval. When this.secondsRemaining hits 0, it will update the gameState to “lost.”
Code Listing 122: In lib/Game.js - —The startRecallMode() fFunction
... startRecallMode() { this.setState({ gameState: 'recall' }, () => { this.secondsRemaining = this.props.timeoutSeconds; setInterval(() => { if (--this.secondsRemaining === 0) { this.setState({ gameState: "lost" }); } }, 1000); }); } ... |
This should work now. Start the game and wait 10 seconds during the “recall” state, and you should see the “Game Over” hint line.
Easy. Right?
There are at least three big problems with the code so far. Try to identify them.
Problem 1: The game will be lost after 10 seconds, even if you win it during those 10 seconds.
Solution: Stop the interval timer when the user wins the game. You should also stop it when the user loses the game via the three wrong attempts, as it’s also not needed after that.
Problem 2: If you let the game expire, that interval timer will continue running, and this.secondsRemaining will go negative. React will continue to re-render the Game instance every second because of the state update.
Solution: Stop the interval timer inside its if statement.
These two problems are easy.: wWe just need to put the interval timer id in an instance variable and use the clearInterval function on that when needed. Since we’re doing the same task in multiple places, it’s probably a good idea to do the clearInterval call in a function. Let’s call it finishGame:.
Code Listing 123: In lib/Game.js -— finishGame()
... finishGame(gameState) { clearInterval(this.playTimerId); return gameState; } ... |
playTimerId is what we’ll name the interval timer id. I also passed gameState to this function because I’ll be invoking the function for both “won” and “lost” if statements in recordGuess, and it makes the code cleaner.:
Code Listing 124: In lib/Game.js -— Using this.finishGame()
... recordGuess({ cellId, userGuessIsCorrect }) { let { wrongGuesses, correctGuesses, gameState } = this.state; if (userGuessIsCorrect) { correctGuesses.push(cellId); if (correctGuesses.length === this.props.activeCellsCount) { gameState = this.finishGame("won"); } } else { wrongGuesses.push(cellId); if (wrongGuesses.length > this.props.allowedWrongAttempts) { gameState = this.finishGame("lost"); } } this.setState({ correctGuesses, wrongGuesses, gameState }); } ... |
The timer code inside startRecallMode() becomes:
Code Listing 125: In lib/Game.js -— Using this.finishGame() in the iInterval cCode
... this.playTimerId = setInterval(() => { if (--this.secondsRemaining === 0) { this.setState({ gameState: this.finishGame("lost") }); } }, 1000); ... |
Problem 3: What happens if we unmount the Game component during the recall mode?
In fact, it’s time to uncover another hidden bug: wWhat happens now if we unmount the component during the “ready” state, and during the “memorize” state? Go ahead and try that.
To unmount our game component, in the dev -tools JavaScript console, invoke the unmountComponentAtNode function.:
Code Listing 126: Unmounting the Game
ReactDOM.unmountComponentAtNode(document.getElementById("react")); |
You will see something like this:
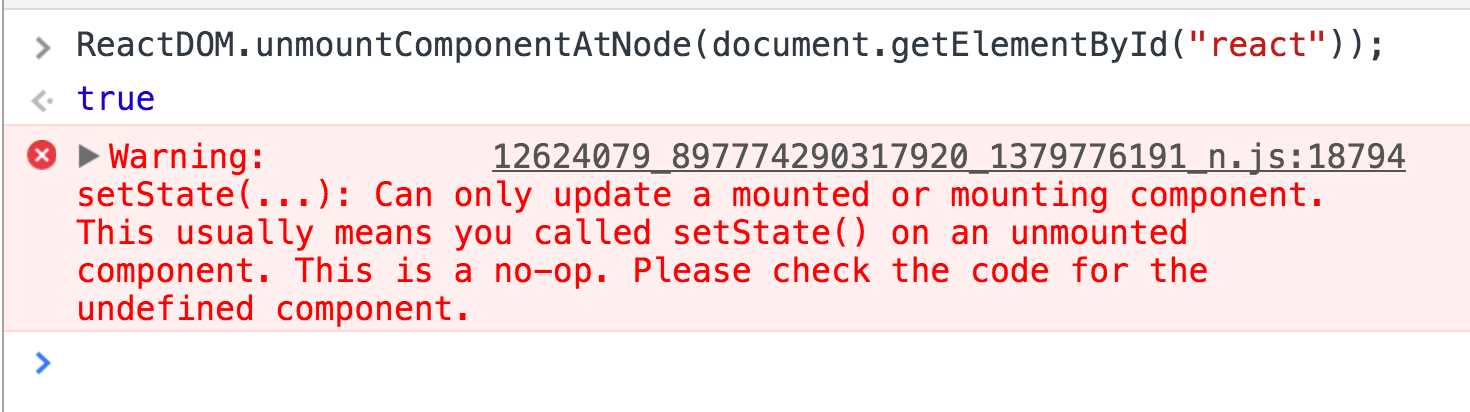
Figure 16: Updating State on Unmounted Components
Any idea why is this happening?
We used two timers in componentDidMount that each set the state, and now we’re adding a third timer that will set the state after 10 seconds. When you unmount the <Game /> instance before these timers get invoked, they’ll try to set the state on an unmounted component.
Solution: Every time you create a timer in a component, give it an id and clear that timer using the componentWillUnmount lifecycle hook.:
Code Listing 127: In lib/Game.js —- Clearing the tTimers
componentDidMount() { this.memorizeTimerId = setTimeout(() => { this.setState({ gameState: 'memorize' }, () => { this.recallTimerId = setTimeout( this.startRecallMode.bind(this), 2000 ); }); }, 2000); } componentWillUnmount() { clearTimeout(this.memorizeTimerId); clearTimeout(this.recallTimerId); this.finishGame(); } |
Try the previous unmount test now and make sure you’re no longer seeing the warning.
Increment 12: Add a “Play Again” button
The “Play Again” button will go in the Footer component, and we only want to display it when the gameState is either “won” or “lost.”
When there is a case like that, I usually create a function that returns the needed DOM only when the condition is met, and I use that function inside the render function.:
Code Listing 128: In lib/Footer.js – —The playAgainButton()
... playAgainButton() { if (["won", "lost"].indexOf(this.props.gameState) >= 0) { return ( <button className="play-again-button" onClick={this.props.playAgain}> Play Again </button> ); } } render() { return ( <div className="footer"> <div className="hint"> {this.props.hints[this.props.gameState]}... </div> {this.remainingCount()} {this.playAgainButton()} </div> ); } ... |
The action to “reset” the game will not be part of the Footer component, so we’ll pass that action to <Footer /> as a prop. This is why the “Play Again” button’s onClick value is using a prop.
Let’s think about the playAgain action. You can implement this feature in multiple ways. You might be tempted to reset the state of the Game component, something like:
Code Listing 129: resetGame()
resetGame() { this.setState({ gameState: "ready", wrongGuesses: [], correctGuesses: [] }, () => { // invoke the timers to change gameState }); } |
This is certainly a valid approach, but wouldn’t it be easier if we trashed the current <Game /> instance that we have in the DOM and mounted a new one in its place? This way, we don’t have to have the resetGame logic.
This latter approach, although it might sound like cheating, is actually very powerful. Imagine if the client came back to you with another feature where they wanted the “level” of the game to increase every time the user hits play again. Since the configurations for number of cells, allowed wrong attempts, and timeout seconds are all passed to <Game /> as props, if we renew the <Game /> instance rendered, we can just pass it a new set of props.
However, using a direct unmount command for the browser feels a bit imperative and does not fit well with the React way.
If you give a mounted component instance a key attribute (like the ones needed for looped -over components), React exclusively uses the value of key to “identify” the instance. This means that if the value of key changes, React sees a complete new instance there. We can leverage this concept to change our mounted <Game /> instance. All we need to do is give it a key and then change the value for that key to “play again.”
Of course, we can’t change the key of a mounted <Game /> instance from within that instance, so this action has to happen inside the container component.:
Code Listing 130: lib/Container.js -— Generating a nNew Game
import Game from "./Game"; class Container extends React.Component { constructor(props) { super(props); this.state = { gameId: 1 }; } createNewGame() { this.setState({ gameId: this.state.gameId + 1 }); } render() { return ( <div> <Game key={this.state.gameId} createNewGame={this.createNewGame.bind(this)} rows={5} columns={5} activeCellsCount={6} /> </div> ); } } export default Container; |
By putting a gameId on the state and using it as the key of the game, we can now declaratively update the gameId to create a new game.
Since we need this action to happen from the Footer component, we’ll pass it as a prop for <Game /> and make <Game /> pass it to <Footer />.
Code Listing 131: In lib/Game.js -— Footer’s Pprops
<Footer {...this.state} playAgain={this.props.createNewGame} activeCellsCount={this.props.activeCellsCount} /> |
When the user hits clicks the “Play Again” button now, here’s what happens:
- <Footer /> will tell <Game /> to invoke the function it has under its createNewGame prop.
- <Game /> will tell <Container /> to invoke the function it has under its createNewGame prop.
- <Container /> will invoke its createNewGame function, which will update the state of the component instance.
- React will re-render the <Container /> instance, and it’ll see a new key for <Game />.
- React will unmount the <Game /> it has in the DOM, and it will mount a new instance with the new key.
Challenges
You took this version to the client and they loved it, but of course they want more. Here are two major features that I’ll leave you with, as a personal challenge on this game:
- Track scores:
- A perfect score of 3 happens when the user guesses all correct cells without any wrong attempts. If they make one wrong attempt, the score is 2, and with two wrong attempts, the score is 1.
- Make the score time-aware. If the user finishes the game in the first five seconds, double their score.
- Display the total score in the UI somewhere.
- When the user plays the game again, add the new score to the total score.
- Make it harder:
- When the user hits clicks “Play Again,” make the grid bigger: 6 × x6, then 7 ×x 7, and so on.
- Increment the activeCells with each new game.
Have fun!
- 80+ high-performance, modular, and responsive React UI components.
- Popular components like Data Grid, Charts, and Scheduler.
- Lightweight and user-friendly.
- Stunning built-in themes.