
React Succinctly®

CHAPTER 5
Let’s Build a Game
In the previous chapter, we learned a few basic concepts about React components, including how to define them, make them receive props, render them in the browser, make them interactive, and make them reusable. However, we have been using abstract examples so far. Let’s build something a little bit more interesting (and fun).
I love memory games, so let’s build a simple one in this chapter. I picked a grid-based memory challenge game where the player is challenged to recall the locations of cells on a grid. Here’s what the UI will look like when we’re done:
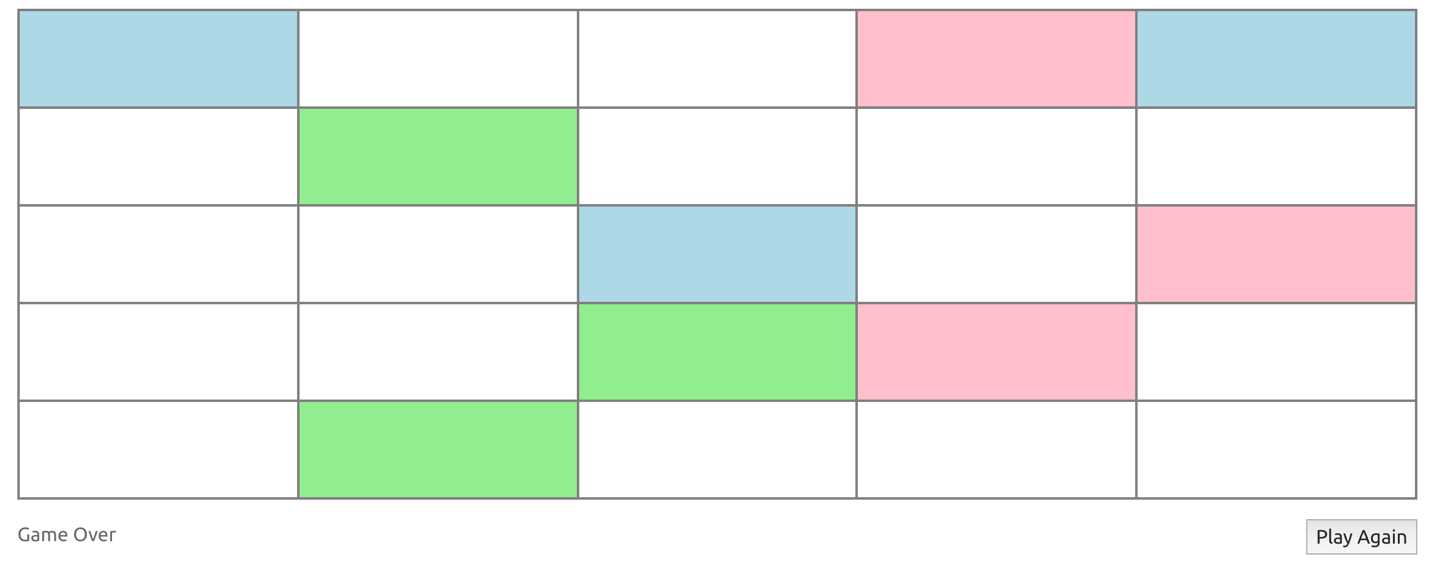
Figure 7: The memory challenge game
Here’s how this game works:
- The first UI will show an empty grid (no colors) and a Start Game button. Clicking that button starts the game. This means the game will have different statuses, and we need to manage them with a React state element (because we need the UI to change).
- When the game starts, a few cells on the grid will be highlighted with a light blue background for three seconds, and then the grid resets back to no colors. The player is then given 10 seconds to recall the locations of the blue cells to win. This will require the use of timers in the code and that’ll teach us about side-effect Hooks in React.
- During the 10-second playtime, the player can make up to two wrong picks. The game will be over at three wrong picks, or if the 10-second timer runs out. A wrong pick is shown in the UI with a pink background, while a correct one is shown with a light green background. We’ll need to figure out what minimum information we need to place on React’s state to satisfy all these UI changes.
- When the game is over (either with a win or lose status), a Play Again button shows up, and that button will reset everything and start a new game. This will teach us how to properly reset a stateful component that has side effects.
Note: Familiarize yourself with the mechanics of playing the game before you proceed. You can play the final version here.
Let’s go through this game one step at a time. The key strategy is to find small increments and focus on them, rather than getting overwhelmed with the whole picture. Don’t shoot for perfection from the first round. Have something that works and then iterate, improve, and optimize.
“Make it work. Make it right. Make it fast.”
—Kent Beck
Initial markup and style
I like to start a React app like this one with some initial markup and any styles that I can come up with for that markup. I do that using a single React component. That’s usually a good starting point that’ll make it easier to think about the structure of the app components and which elements will need to have a dynamic aspect to them.
The initial template for this game will render a simple empty grid of white cells, a message, and a button. Here’s the HTML and CSS that we’ll start with. This will render a 3 × 3 grid:
Code Listing 87: The HTML | jscomplete.com/playground/rs3.1
const Game = () => { return ( <div className="game"> <div className="grid"> <div className="cell" style={{ width: '33.3%' }} /> <div className="cell" style={{ width: '33.3%' }} /> <div className="cell" style={{ width: '33.3%' }} /> <div className="cell" style={{ width: '33.3%' }} /> <div className="cell" style={{ width: '33.3%' }} /> <div className="cell" style={{ width: '33.3%' }} /> <div className="cell" style={{ width: '33.3%' }} /> <div className="cell" style={{ width: '33.3%' }} /> <div className="cell" style={{ width: '33.3%' }} /> </div> <div className="message">Game Message Here...</div> <div className="button"> <button>Start Game</button> </div> </div> ); }; ReactDOM.render(<Game />, mountNode); |
Code Listing 88: The CSS | jscomplete.com/playground/rs3.1
*, *:before, *:after { box-sizing: border-box; } .game { max-width: 600px; margin: 5% auto; } .grid { border: thin solid gray; line-height: 0; } .cell { border: thin solid gray; display: inline-block; height: 80px; max-height: 15vh; } .message { float: left; color: #666; margin-top: 1rem; } .button { float: right; margin-top: 1rem; } |
A few things to note about this code:
- The template HTML was rendered with a single, top-level React component (which I named Game).
- I intentionally kept the list of cells flat to simplify the code. I used the power of styling to display the list of flat divs as a grid. The alternative is to use a list of lists and convert that into rows and columns, which would have complicated the code a bit. I love how CSS can sometimes greatly simplify UI logic. If something can be adequately done with CSS, you should consider that.
- I used React’s special style prop for the width of each cell. This width value will later be driven based on a dynamic size for the grid, and using React’s style object will make that change easier.
We’ll also need a few utility math functions for this game. To keep the focus on React code in this example, I’ll provide these utility functions for you here. Their implementation is not really important in the context of this React example, but it’s always fun to read their code and try to understand what they do (but let’s do that when we start using them).
Code Listing 89: The math science utility functions | jscomplete.com/playground/rs3.1
// Math science const utils = { /* Create an array based on a numeric size property. Example: createArray(5) => [0, 1, 2, 3, 4] */ createArray: size => Array.from({ length: size }, (_, i) => i), /* Pick random elements from origArray up to sampleSize And use them to form a new array. Example: sampleArray([9, 12, 4, 7, 5], 3) => [12, 7, 5] */ sampleArray: (origArray, sampleSize) => { const copy = origArray.slice(0); const sample = []; for (let i = 0; i < sampleSize && i < copy.length; i++) { const index = Math.floor(Math.random() * copy.length); sample.push(copy.splice(index, 1)[0]); } return sample; }, /* Given a srcArray and a crossArray, Count how many elements in srcArray exist or do not exist in crossArray. Returns an array with the two counts. Example: arrayCrossCounts([0, 1, 2, 3, 4], [1, 3, 5]) => [2, 3] */ arrayCrossCounts: (srcArray, crossArray) => { let includeCount = 0; let excludeCount = 0; srcLoop: for (let s = 0; s < srcArray.length; s++) { for (let c = 0; c < crossArray.length; c++) { if (crossArray[c] === srcArray[s]) { includeCount += 1; continue srcLoop; } } excludeCount += 1; } return [includeCount, excludeCount]; }, }; |
I’ll explain these utility functions as we use them.
Note: The code for all the HTML, CSS, and utility functions is available here.
Extracting components
Once we reach a good state for the initial markup and styles, thinking about components is the natural next step.
There are many reasons to extract a section of the code into a component. Here are a couple in the context of our game:
- We extract components to make part of the tree define data requirements or behavior on its own and take responsibility of it. In this game, all grid cells will be clickable to count toward a guess, and their click events should trigger a UI update. This is a good indicator that we should create a component to represent a single grid cell. I’ll name it Cell.
- We extract components to make the code more readable. A component with too much JSX is harder to reason with and maintain. To demonstrate an example of this, I’ll make the footer part (which holds the game message and a button) into a component. I’ll name it Footer.
We extract components for other reasons too. For example, when there is duplication of sub-trees, or when we need to make parts of the full tree reusable in general. This is a simple game with no shared sub-trees, so we don’t need to extract any components for these reasons.
There is another very important reason to extract a component, and that’s to split complex logic into smaller, related units. This is usually done once the code crosses the boundaries of the level of complexity that’s acceptable to you. At that point, it’ll be easier for you to decide what related units should be extracted on their own. We’ll see an example of that soon.
Extracting a component is simply taking part of the tree as is, making it the return value of the new component (for example, Cell), and then using the new component in the exact place where the extracted part used to be. To use the new Cell component, you would include a call to <Cell />.
Here’s the code we started with after I extracted Cell and Footer out of Game:
Code Listing 90: Code available at jscomplete.com/playground/rs3.2
const Cell = () => { return ( <div className="cell" style={{ width: '33.3%' }} /> ); } const Footer = () => { return ( <> <div className="message">Game Message Here...</div> <div className="button"> <button>Start Game</button> </div> </> ); }; const Game = () => { return ( <div className="game"> <div className="grid"> <Cell /> <Cell /> <Cell /> <Cell /> <Cell /> <Cell /> <Cell /> <Cell /> <Cell /> </div> <Footer /> </div> ); }; |
The represented DOM tree did not change—only its arrangement in React’s memory did. Note how I needed to use a React.Fragment (<></>) around the two divs in Footer because they’re now abstracted into a new sub-tree represented with a single React element. We didn’t need that before because they were part of the main tree.
In the new Cell component, we can now define the generic shared logic for both displaying a grid cell and for the behavior of each grid cell in this game.
You might want to extract more components, maybe a Row or GameMessage component. While adding components like these might enhance the readability of the code, I am going to keep the example simple and start with just these three components.
Tip: You might feel that this game is a bit challenging to think about all at once. It is! It has many states and many interactions, but don’t let that distract you. What you need is to focus your thinking into finding your next simple "increment." Find the tiniest possible change that you can validate, just like "extracting part of the initial markup into a component." That was a good, small increment that we just validated. We didn’t worry about anything else in the game while focusing on that extracting increment. Now you need to think about the next increment and focus on just that. The smaller the increments you choose, the better.
An increment could be anything. There is no right answer. You could focus on defining a click handler on Cell and make sure it fires correctly, or you could think about the first three-second timer that’ll start ticking when the Start Game button is clicked. However, some increments will depend on others. Try to identify the increments that you’re ready for. For example, a great next increment for us at this point is to get rid of the manually repeated Cell lines and drive that through a dynamic value.
Note: The playground session for the code so far can be found here.
Making the grid dynamic
Imagine needing to pass a prop value to each Cell element. Right now, we would need to do that in nine places. It’ll be a lot better if we generated this list of grid cells with a dynamic loop. This will enhance the readability and maintainability of the code.
In general, while you’re making progress in your code, you should keep an eye on values that can be made dynamic. For example, unless the requirement is to have a fixed grid that is always 3 × 3, we should introduce a gridSize property somewhere and use it to generate a gridSize * gridSize grid of Cell components. Don’t hard-code the number nine (or 16 or 25) into the loop code. Hard-coded values in your code are usually a "smell" (bad code). Even if you don’t need things to be dynamic, just slapping a label on a hard-coded number makes the code a bit more readable. This is especially important if you need to use the same number (or string, really) in many places.
Let’s test things out with a gridSize of 5. Instead of defining this as a variable in the Game component, I’ll make it into a "prop" that the top-level component receives. This just an option that’s available to you when you need it, but in our case it delivers an extra value! Besides not having the number 5 hard-coded (within the loop code), we can also render the Game component with a different grid size just by changing its props.
Code Listing 91
// In the ReactDOM.render call <Game gridSize={5} /> |
Tip: Note again how I used {5} and not "5" because the Game component should receive this prop as a number value, not as a string value.
Can you think of more primitive values that we should not hard-code in the code? How about the number of cells to highlight as challenge cells? The maximum wrong attempts allowed? The number of seconds to highlight the challenge cells? The number of seconds that’ll cause the game to time out? All of these should really be made into variables in the code. I’ll make them all as props to the Game component.
Code Listing 92
// In the ReactDOM.render call <Game gridSize={5} challengeSize={6} challengeSeconds={3} playSeconds={10} maxWrongAttempts={3} /> |
We can use a simple for loop to generate a list of Cell components based on the new gridSize prop and give every cell a unique ID based on the loop index. However, the declarative way to do this is to create an array of unique IDs first, and then map that into an array of Cell components.
The value of doing so is really beyond just being declarative. Having an array of all cell IDs will simplify any calculations that we need. For example, picking a list of random challenge cells becomes a matter of sampling this generated array.
We need an array with a length of gridSize * gridSize. There are many ways to do this in JavaScript, but my favorite is to use the Array.from method. This method can be used to initialize a generated array using a callback function. In the provided utils object, the createArray function uses this method to generate an array of any size and have its elements initialized as the index value for their positions.
We can use this utils.createArray function to create the grid cell IDs array. I will name that array cellIds. This is a fixed array for each game, which means we don’t need to make it part of the game state:
Code Listing 93
const Game = ({ gridSize }) => { const cellIds = utils.createArray(gridSize * gridSize); // ... }; |
Note: I’ll be using the comment // … to mean "omitted code."
Note how I destructured the gridSize prop and used it. We’ll need to destructure the other props as well, but we’ll do that when we need them.
With this array, we can now use the Array.map method to convert the array of numbers into an array of Cell elements.
Code Listing 94
const Game = ({ gridSize }) => { // ... <div className="grid"> {cellIds.map(cellId => <Cell key={cellId} /> )} </div> // ... }; |
Note: I used the values in the cellIds array as keys for Cell. This not the same as using the loop index as the key. These values are unique IDs in this context. We’re also not re-ordering or deleting any of these cells, so these sequential numbers are sufficient for their elements’ identities.
With all the changes up to this point, the app will render a grid of 5 × 5, but we are still using a fixed width of 33.3% for each cell. We need to compute the width we need for each grid size: 100/gridSize. We can pass that value as a prop to the Cell component.
We could do something like:
Code Listing 95
<Cell key={cellId} width={100/gridSize} /> |
However, this new width property has a small problem. Think about it. How can we do this in a better way?
The 100/gridSize computation, while fast, is still a fixed value for each rendered game. Instead of doing it 25 times (for a gridSize of 5), we can do it only once before rendering all the Cell elements and just pass the fixed value to all of them:
Code Listing 96
const Game = ({ gridSize }) => { // .. const cellWidth = 100 / gridSize; // ... <div className="grid"> {cellIds.map(cellId => <Cell key={cellId} width={cellWidth} /> )} // ... }; |
Tip: I don’t classify the cellWidth change here as a premature optimization. I classify it as an obvious one. It will probably not improve the performance of the code by much, but it is the type of change that we can make with 100 percent confidence that it’s better. I also think it makes the code more readable. One rule of thumb to follow here is to try and extract any computation done for a value passed to a prop into its own variable or function call.
We can now use the new width prop in the Cell component instead of the previously hard-coded 33.3%:
Code Listing 97
const Cell = ({ width }) => { return ( <div className="cell" style={{ width: `${width}%` }} /> ); }; |
All the changes we made so far are part of the core concept in React that the UI is a function of data and state. However, our UI functions so far have been using only fixed-value data elements (like gridSize). We have not placed anything on the state yet; we will do that shortly. We will also add more fixed-value data elements. Sometimes, it’s challenging to figure out if a data element you’re considering should be a state one or a fixed-value one. Let’s talk about that next.
Note: The playground session for the code so far can be found here.
What’s a good next increment now? Let’s think about what we need to place on the state of this game.
Designing data and state elements
When the user clicks the Start Game button, the game UI will move into a different status. A number of random cells will need to be marked as challenge cells. The UI will need to be updated to display these challenge cells differently. The game "status" is something that all three components need. The Cell component needs it as part of the logic to determine what color to use. The Footer component needs it to determine what message and button to show. The Game component needs it to determine what timers to start and stop, among a few other things.
This means we need to use a state element to represent this game status in the Game component itself, because it’s the common parent to the other two components. I’ll name this state element gameStatus, and it will have five different values. Let’s give each one a label:
- A game starts with a gameStatus of NEW, which is before the Start Game button is clicked.
- When the Start Game button is clicked, the gameStatus becomes CHALLENGE. This is when we highlight the blue challenge cells.
- After a delay of challengeSeconds, the gameStatus becomes PLAYING. This is when the player can actually recall the challenge cells (which should not be highlighted at that point).
- If the player wins the game, the gameStatus becomes WON. If the player loses the game, the gameStatus becomes LOST.
We can place this gameStatus variable on the Game component’s state with a useState call. The initial value is NEW:
Code Listing 98
const Game = ({ gridSize }) => { const [gameStatus, setGameStatus] = useState('NEW'); // ... } |
When the user clicks the Start Game button, we can use setGameStatus to change the gameStatus variable to CHALLENGE. However, since we moved the button into a new Footer component, and its behavior needs to change a state element on the Game component, we need to create a function in the Game component for this purpose and flow it down to the Footer component. I’ll just use an inline function:
Code Listing 99
const Game = ({ gridSize }) => { // ... <Footer startGame={() => setGameStatus('CHALLENGE')} /> // ... }; const Footer = ({ startGame }) => { // ... <div className="button" onClick={startGame} > <button>Start Game</button> </div> // ... }; |
At this point, we’ll need to highlight the challenge cells. However, before we do that, let’s think a little bit more about the gameStatus values we used.
Using ENUMs
Using strings as labels creates a small problem. If you make a typo in these strings somewhere in the code, that typo will go undetected until you realize that things are not working (in the UI probably) and try to find that typo manually. Many developers can tell countless stories of the time they wasted on a silly typo.
A better way of doing this is to introduce an ENUM holding the specific values for gameStatus. This way, if you use an invalid ENUM value, the problem will be a lot easier to find (especially if your editor uses a type checker like TypeScript).
Unfortunately, JavaScript does not have an ENUM data structure, but we can use a simple object to represent one:
Code Listing 100
const GameStatus = { NEW: 'NEW', CHALLENGE: 'CHALLENGE', PLAYING: 'PLAYING', WON: 'WON', LOST: 'LOST', }; // ... const Game = ({ gridSize }) => { const [gameStatus, setGameStatus] = useState(GameStatus.NEW); // ... <Footer startGame={() => setGameStatus(GameStatus.CHALLENGE)} /> // ... }; |
The values can be anything. You can use numbers or symbols, but simple strings there are okay too.
Similarly, we should introduce an ENUM for the different cell statuses. Let’s give each a label as well:
- A cell starts with a status of NORMAL. This is when it appears white.
- If the cell is a challenge cell and the game is in the CHALLENGE phase, the cell will have a status of HIGHLIGHT. This is when it’s highlighted in blue.
- When the player chooses a cell, its status will become either CORRECT or WRONG based on whether it’s a challenge cell or not. A CORRECT cell will be highlighted with a light-green color, and a WRONG one with pink.
Since these cell statuses directly drive the color values, I’ll make their ENUM value the colors themselves:
Code Listing 101
const CellStatus = { NORMAL: 'white', HIGHLIGHT: 'lightblue', CORRECT: 'lightgreen', WRONG: 'pink', }; |
This way, in the Cell component, given that we compute the cell status correctly, we can just use its value as the backgroundColor value:
Code Listing 102
const Cell = ({ width }) => { let cellStatus = CellStatus.NORMAL; // Compute the cell status here... // ... <div className="cell" style={{ width: `${width}%`, backgroundColor: cellStatus }} /> // ... }; |
The last ENUM we need for this game is for the game messages. Should these messages be placed on the state? Not really. These messages will be directly derived from the gameStatus value as well. We can actually include them in the GameStatus ENUM itself, but I’ll just give them their own ENUM for simplicity.
For each gameStatus value, let’s give the player a helpful hint or let them know if they won or lost:
Code Listing 103
const Messages = { NEW: 'You will have a few seconds to memorize the blue random cells', CHALLENGE: 'Remember these blue cells now', PLAYING: 'Which cells were blue?', WON: 'Victory!', LOST: 'Game Over', }; |
Now the content of the message div can simply be: Messages[gameStatus].
Because we moved the message div into the Footer component, we’ll need to flow the gameStatus variable from Game into Footer to be able to look up the game message in Footer. We could alternatively look up the game message in the Game component and flow that to the Footer component, but I think it’s cleaner to have that logic in the Footer component. Besides, the rendering of the Footer button will also depend on gameStatus.
Code Listing 104
const Footer = ({ gameStatus, startGame }) => { // ... <div className="message">{Messages[gameStatus]}</div> // .. }; const Game = ({ gridSize }) => { // .. <Footer gameStatus={gameStatus} startGame={() => setGameStatus(GameStatus.CHALLENGE)} /> // ... }; |
Note: Note that if the Messages ENUM needs to be fetched from an API (for example, to use a different language), then we need to place it on the state or delay the render process until we have it.
Identifying computed values
Let’s now think about how to highlight the challenge cells. When the game starts, we need to randomly pick challengeSize elements from the grid array that has all of the cells' IDs (cellIds). I’ll put these in a challengeCellIds array.
To compute this array, we can use the provided utils function sampleArray, which takes an origArray and a sampleSize, and returns a new array with sampleSize elements randomly picked from origArray.
The important question now is: should we place this challengeCellIds array on the state of the Game component? To answer this question, think about whether or not this challengeCellIds array will change during a game session.
It will not—it is another a fixed value that does not need to be part of the game state. Deciding on the optimal elements that need to be placed on a component state is one of the most important skills of a React developer.
The challengeCellIds array can be a variable in the Game component:
Code Listing 105
const Game = ({ gridSize, challengeSize }) => { const [gameStatus, setGameStatus] = useState(GameStatus.NEW); const cellIds = utils.createArray(gridSize * gridSize); const cellWidth = 100 / gridSize; const challengeCellIds = utils.sampleArray(cellIds, challengeSize); // ... }; |
Tip: Always place the state element first, and then introduce any "computed" ones after that.
The Game component is now aware of which cells it should highlight when the gameStatus becomes CHALLENGE.
However, since challengeCellIds (and cellIds) are computed from props and do not depend on the state of the Game component, co-locating them with the stateful elements in the Game component is a problem.
Note: Interview question: Explain the problem with co-locating the challengeCellIds array with the stateful elements in the Game component.
To see the problem I am talking about, log the value of challengeCellIds after the line that defines it:
Code Listing 106
const Game = ({ gridSize, challengeSize }) => { // ... const challengeCellIds = utils.sampleArray(cellIds, challengeSize); console.log(challengeCellIds); // ... |
Try to render the Game component a few times. On each render, we get a different set of challengeCellIds. That’s great—the sampleArray function is working as expected.
Now, render a game session and click Start Game. What’s your observation?
The challengeCellIds array was regenerated when we clicked that button.
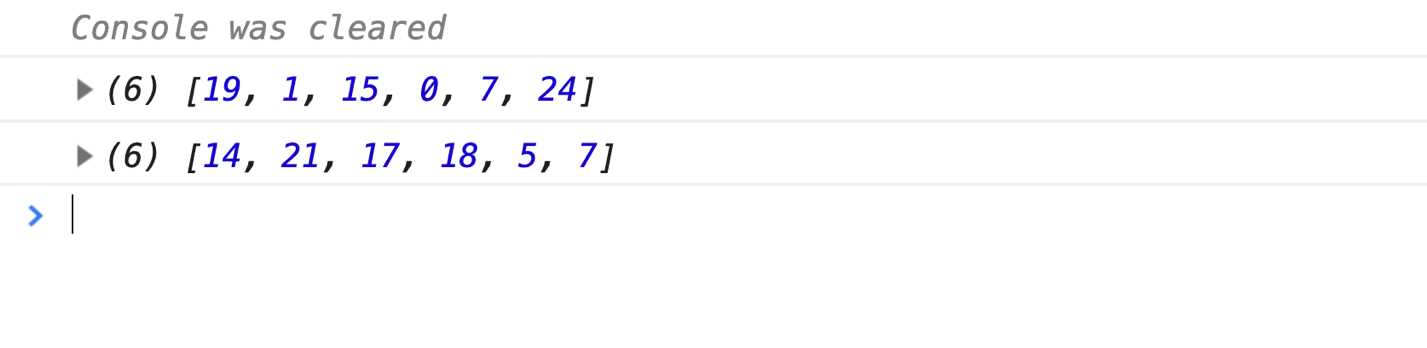
Figure 8: This should not happen
That’s not good: this challengeCellIds should be a fixed value during a single game session. Once it’s generated, it should not change. It should only be re-generated when we need a new game session (with the Play Again button).
Why is this happening? Didn’t we define challengeCellIds using the const keyword? How is it changing when we click the button?
Wrapping stateful components
Keep in mind that each time you invoke a useState updater function, which is what we’re doing in the onClick handler of the button using the setGameStatus updater function, React will re-render the whole component that asked for that state. In this case, it is the Game component.
Re-rendering means React will call the Game function again, discard all variables that were defined in the previous render, and create new variables for the new render. It’ll create a new challengeCellIds variable (and new cellIds and cellWidth variables).
These three variables should not be re-created. They should be "immutable" once a game "instance" is rendered. One way of doing that is to make them into global variables. However, that means when we’re ready to implement the Play Again button, all new games will use the exact same challenge cells. That’s not good either.
We want a game session’s fixed values (cellIds, challengeCellIds, and cellWidth) to be global to that session, but not to the whole app. This means we can’t have the Game component as a top-level one. We’ll need a "game generator" component that renders (and later re-renders) a game session. That new component can be responsible for the app-global variables that are needed for each top-level render.
Tip: We can also implement the challengeCellIds using a React.useRef Hook. This Hook gives us an element that’ll remember its value between component renders. However, wrapping the stateful component with another one is a much simpler way.
The problem starts with the fact that I am mixing many responsibilities in the one component that I named Game. Naming matters here—a lot! What exactly did I mean by Game? Is it referring to the game in general, the app that renders many game sessions, or the single playable game session?
The solution starts with better names. This app should have a GameSession component and a GameGenerator component that’s responsible for generating and rendering a game session. When the GameGenerator component is rendered, it can compute the global values needed to run a GameSession. The GameSession component needs to manage its state independently of the state of the GameGenerator component.
Go ahead and try that on your own first. Rename Game to GameSession and keep the console.log line in there for testing. Create a GameGenerator component and move the computing of all three fixed values into it. Then pass them as props to the GameSession component. Test that the challengeCellIds array does not change when you click the Start Game button.
Here are the changes we need to make:
Code Listing 107
const GameSession = ({ cellIds, challengeCellIds, cellWidth, challengeSize, challengeSeconds, playSeconds, maxWrongAttempts, }) => { // ... // Remove lines for cellIds, cellWidth, and challengeCellIds console.log(challengeCellIds); // ... }; const GameGenerator = () => { const gridSize = 5; const challengeSize = 6; const cellIds = utils.createArray(gridSize * gridSize); const cellWidth = 100 / gridSize; const challengeCellIds = utils.sampleArray(cellIds, challengeSize); return ( <GameSession cellIds={cellIds} challengeCellIds={challengeCellIds} cellWidth={cellWidth} challengeSize={challengeSize} challengeSeconds={3} playSeconds={10} maxWrongAttempts={3} /> ); }; ReactDOM.render(<GameGenerator />, mountNode); |
Note a few things about these changes:
- I moved the fixed values of gridSize and challengeSize into the GameGenerator component (instead of having them as props for GameSession). This was just to simplify the new code, but it’ll also be a first step for you to implement some of the bonus challenges at the end of the chapter.
- The three variables we moved out of the GameSession component and into the GameGenerator component are now passed to GameSession as props using the same names. Nothing else needs to change in the GameSession component’s render logic.
- The GameGenerator component has no state of its own (yet). You don’t need to place the state of your app on the top-level component. In this particular case, keeping the state in the GameSession component (which is now a sub-tree) allowed us to "cache" the app-global variables in the parent tree.
- Since the gridSize is no longer needed in the GameSession component, we don’t need to keep it as a prop on it. All the other props I kept are needed; we’re just not using them all yet. For example, the challengeSize is needed to determine a GameStatus.WON state, and the maxWrongAttempts is needed to determine a GameStatus.LOST state. The "seconds" variables are needed to manage the timers. I destructured all these props in the GameSession component.
Now when you click the Start Game button, the challengeCellIds array will be exactly the same because it’s just a prop that was not changed. React re-renders the GameSession component with its exact same props when its state changes.

Figure 9: Re-rendering Game is now okay
Note: The playground session for the code so far can be found here.
Determining what to make stateful
To be able to compute a cell status, we need to design the structure to identify a cell as a correct or wrong pick. Should we have correctCellIds and wrongCellIds arrays managed on the state of the GameSession component?
We could, but a good practice here is to minimize the elements you make stateful in a component. If something can be computed, don’t place it on the state. Take a moment and think about what structure can be the minimum here to enable us to compute a correct or wrong pick.
These statuses will appear when the player starts clicking on cells to pick them. With each pick, something has to change on the state to make React re-render the chosen cell and enable us to recompute its status, which will be either CellStatus.CORRECT or CellStatus.WRONG.
However, we don’t need to manage a structure for correct and wrong picks because both of them can be computed from challengeCellIds. Just knowing that a cell was picked allows us to determine if that pick was correct or wrong. All we need to place on the state is the fact that the cell was picked!
Let’s use an array to keep track of pickedCellIds on the state of the GameSession component. This array starts as empty:
Code Listing 108
const GameSession = ({ gridSize, challengeSize }) => { const [gameStatus, setGameStatus] = useState(GameStatus.NEW); const [pickedCellIds, setPickedCellIds] = useState([]); // ... }; |
We will later design the click behavior on each cell so that it adds the clicked cell’s ID to this pickedCellIds array.
What about winning or losing the game? Do we need to place anything else on the state to make the UI render differently for these states? The answer is no.
Both of these cases are also computable. With a challengeSize of 6 and a maxWrongAttempts of 3, if we have six correctly guessed cells after every guess, the game is won. If we have three wrong attempts, the game is lost. We actually do not even need to change the gameStatus to WON or LOST because these two statuses are computable. However, computing these statuses requires some array math, and placing them on the state is a form of simply caching this computation.
Tip: Ideally, caching the won/lost gameStatus computation is better done with a React ref object (using the React.useRef Hook). However, that’s a bit of an advanced optimization. I will store these values on the gameStatus state for simplicity and consistency. Having part of gameStatus on the state and the other part on a ref object might be confusing.
What about the game timers? Do we need to place anything on the state for them? The answer depends on what we want to display in the UI. If all we need is a timer ticking in the background that drives nothing in the UI to be changed (on every tick), then we do not need to place anything on the state.
However, if we’d like to show a "countdown" value in the UI as the timer is ticking, then that timer needs to update a state element. Let’s do that for the playSeconds timer. Let’s show the countdown from playSeconds to 0 in the UI. We’ll need a state element to hold these countdown values. I’ll name it countdown. Its initial value is the playSeconds prop:
Code Listing 109
const GameSession = ({ cellIds, challengeCellIds, cellWidth, challengeSize, challengeSeconds, playSeconds, maxWrongAttempts, }) => { const [gameStatus, setGameStatus] = useState(GameStatus.NEW); const [pickedCellIds, setPickedCellIds] = useState([]); const [countdown, setCountdown] = useState(playSeconds); // ... }; |
I think we have all the data and states we need for a game session. This is the easy part though—the next few steps are where the real power of React comes in handy. We can complete the design of our UIs as functions of data and state, and then only worry about changing the state afterwards, eliminating the need to do any manual DOM operations.
Note: The playground session for the code so far can be found here.
Completing the UI as a function of state
Now that we have identified and designed all the static and dynamic data elements this game needs, we can continue the task of implementing the UI as a function of these elements. Everything rendered in the UI is a direct map of a certain snapshot of the data and state elements we designed.
This step requires implementing a few computed properties. For example, we need to compute each cell status based on the gameStatus value, the challengeCellIds value, and the pickedCellIds value. Each cell status depends on all three variables.
Practically adopting the minimum props concept
To keep the code simple, I’ll compute each cell status in the Cell component itself. Does this mean we need to flow gameStatus, challengeCellIds, and pickedCellIds from the GameSession component to the Cell component?
Code Listing 110
// In the GameSession component {cellIds.map(id => ( <Cell key={id} width={cellWidth} gameStatus={gameStatus} challengeCellIds={challengeCellIds} pickedCellIds={pickedCellIds} /> ))} |
No. Don’t do that.
The Cell component does not need to know about all challengeCellIds or all pickedCellIds. It only needs to know whether it is a challenge cell or a picked cell. What we need are flags like isPicked and isChallenge, and we can use a simple Array.includes to compute them:
Code Listing 111
// In the GameSession component {cellIds.map(id => ( <Cell key={id} width={cellWidth} gameStatus={gameStatus} isChallenge={challengeCellIds.includes(id)} isPicked={pickedCellIds.includes(id)} /> ))} |
I’ll refer to this pattern as props minimization. It is mostly a readability pattern, but it is also tied to the responsibility and maintainability of each component. For example, if we later decided to use a different data structure to hold challengeCellIds, ideally the code inside the Cell component should not be affected.
Another way to think about this pattern is to ask yourself this question about each prop you pass to a component: Does this component need to be re-rendered when the value of this prop changes?
For example, think about the pickedCellIds prop we first considered passing to each Cell. This array will be changed on each click of a cell. Since we’re re-rendering a gird of cells (25 cells, for example), the props-minimization question becomes: do all 25 grid cells need to be re-rendered every time we click on a cell?
The answer is no, only one cell needs to be re-rendered: the one cell that will change its isPicked value from false to true.
With every prop you pass to a child component comes great responsibility!
Tip: React will re-render all components in a sub-tree when the parent component re-renders. So, although we minimized the information by using isPicked instead of pickedCellIds, React will still re-render all 25 cells on each click (and each timer tick later on). However, the props minimization allows us to optimize the frequency with which that component re-renders itself by "memoizing" it. We can wrap a component with a React.memo call to memoize it. Memoizing comes with a small penalty because it requires comparing the props each time a component re-renders, but that penalty is usually less of an issue than actually re-rendering a component that didn’t need to be re-rendered, especially when there are some significant computations in these components.
What about gameStatus? Is that a minimum prop? Not really. When that value changes from NEW to CHALLENGE, we only need to re-render a few cells (to highlight them); we don’t need to re-render all cells.
We could make this better by not passing the gameStatus to Cell, and instead passing something like shouldBeHighlighted. However, I think it’s cleaner to just pass the gameStatus itself down to the Cell component. It’s really a core primitive value in each cell computation, and using it directly will make the code more readable. Besides, if we go the other way, more computational logic will need to exist in the GameSession component. I think all the logic about computing the status of a cell should be inside the Cell component. This is just my preference.
The practice I can get behind here is to try to only flow the minimum props that a component needs to re-render itself, but don’t sacrifice readability and responsibility management to be 100 percent exact about that.
I think that’s a good starting point. Let’s now compute the cellStatus value based on these three values.
Computing values before rendering
We have the three variables that are directly responsible for the value of each cell status. We can come up with a rough description of the conditions around these variables that are responsible for what status a cell should have. It often helps to start with the pseudocode natural description of the computation we’re about to make. Here’s what I came up with based on the three points we analyzed when we came up with the cellStatus ENUM.
Code Listing 112
The cell-status starts as NORMAL If the game-status is NEW: Do nothing. All cells should be normal if the game-status is not NEW: if the cell is picked The cell-status should be either CORRECT or WRONG based on whether it is a challenge cell or not if the cell is not picked If it's a challenge cell and the game-status is CHALLENGE: The cell-status is HIGHLIGHT |
Technically, the "if the cell is picked" condition should also account for what game status we want the correct or wrong cell statuses to appear for. Do we want the green/pink highlights to stay when the game is won or lost? I think so. It is nice to have the players see the original challenge cells that they failed to guess. This is why I did not include a condition about game status in the is-picked branch. The only other game status value there is CHALLENGE, and we know for a fact that when the game has that status, no cell has been picked yet.
Here’s one way to translate the pseudocode in the Cell component:
Code Listing 113
const Cell = ({ width, gameStatus, isChallenge, isPicked }) => { let cellStatus = CellStatus.NORMAL; if (gameStatus !== GameStatus.NEW) { if (isPicked) { cellStatus = isChallenge ? CellStatus.CORRECT : CellStatus.WRONG; } else if ( isChallenge && (gameStatus === GameStatus.CHALLENGE || gameStatus === GameStatus.LOST) ) { cellStatus = CellStatus.HIGHLIGHT; } } return ( <div className="cell" style={{ width: ${width}%, backgroundColor: cellStatus }} /> ); }; |
Note how I added the LOST gameStatus case to show the cell as highlighted. There is no need to add the WON status there because all cells will be correctly picked in that case.
We can partially test this change by clicking the Start Game button. That click changes gameStatus to CHALLENGE, and the UI will show the six random blue cells. Render the UI a few times and click the Start Game button to verify that the random blue cells are different on each game render.
How can we test the rest of this logic? We have not implemented the "pick-cell" UI behavior yet. We don’t have a way to win or lose the game yet. We can use mock state values.
Using mock state values
The state usually starts with empty values (like the empty pickedCellIds array). It is hard to design the UI without testing using actual values. Mock values come to the rescue.
For example, we can start the pickedCellIds with some mock values and start the gameStatus with a value of GameStatus.PLAYING:
Code Listing 114: Using mock state values
// In the Game component const [gameStatus, setGameStatus] = useState(GameStatus.PLAYING); const [pickedCellIds, setPickedCellIds] = useState([0, 1, 2, 22, 23, 24]); |
With these temporary changes in the initial values, and based on the randomly assigned challenge cells, the grid should show the first and last three cells as either pink or green. Print the challengeCellIds array to make sure the right cells are displayed green or pink:
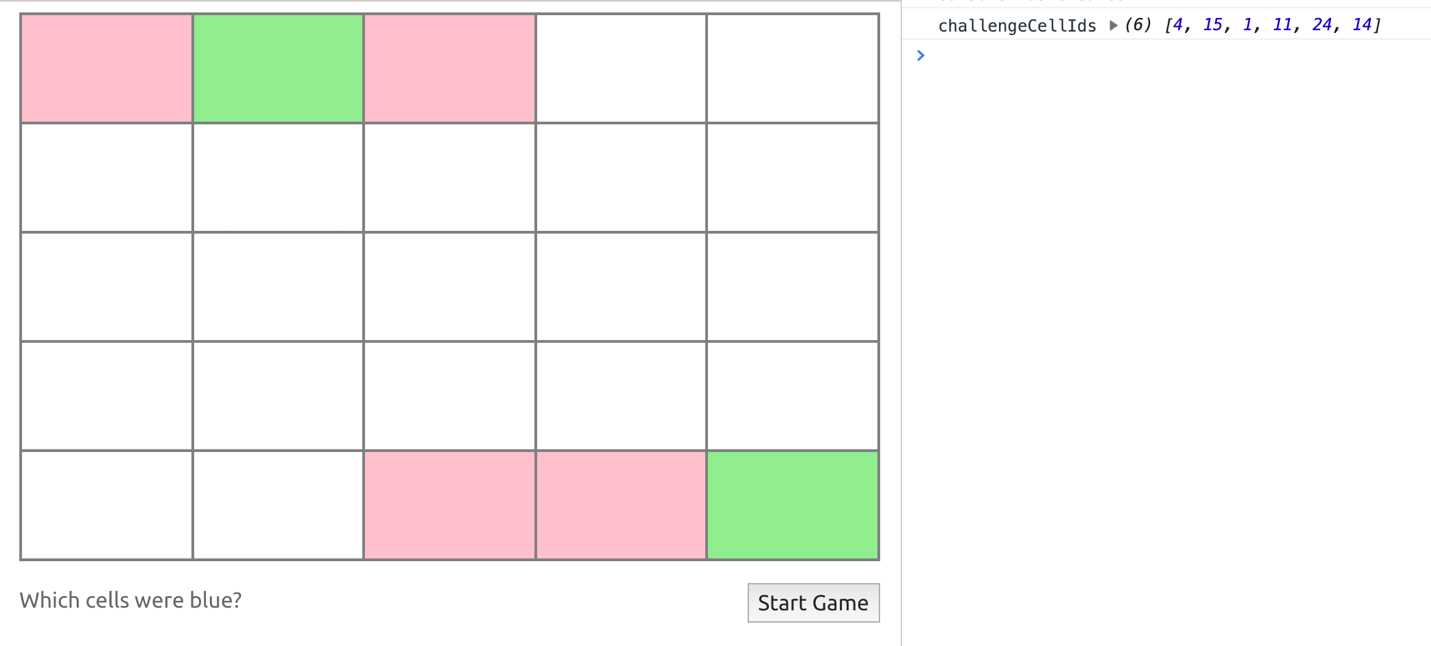
Figure 19: Testing with mock initial values in the state
Note how cells #1 and #24 were green because they happened to be part of both the pickedCellIds and challengeCellIds when I took the screenshot. The other picked cells were pink because they were wrong picks for this mock state.
Tip: Change the gameStatus mock value to WON/LOST to verify that all the logic we have for cellStatus is working as expected.
Using this strategy, we do not have to worry about behavior and user interactions (yet). We can focus on just having the UI designed as functions of data and (mock) state.
For example, another thing that needs to change in the UI based on the different states is the appearance of the button in the Footer component. The Start Game button should only show up when gameStatus is NEW. When the player wins or loses the game, a Play Again button should show up instead. While the player is playing the game, let’s just show the countdown value in the button area. A few if statements in the Footer component will do the trick:
Code Listing 115: The UI for the button area
const Footer = ({ gameStatus, countdown, startGame }) => { const buttonAreaContent = () => { if (gameStatus === GameStatus.NEW) { return <button onClick={startGame}>Start Game</button>; } if ( gameStatus === GameStatus.CHALLENGE || gameStatus === GameStatus.PLAYING ) { return countdown; } return <button onClick={() => {/* TODO */}}>Play Again</button>; }; return ( <> <div className="message">{Messages[gameStatus]}</div> <div className="button">{buttonAreaContent()}</div> </> ); }; // Then in GameSession, pass the newly-used countdown value <Footer gameStatus={gameStatus} countdown={countdown} startGame={() => setGameStatus(GameStatus.CHALLENGE)} /> |
Note a few things about what I did:
- I used a function to compute the content of the button area. This approach has a few advantages over just inlining the code in the component function itself (like what we did for cellStatus in the Cell component). This is really a style preference, but the use of early returns and the isolation of that logic into a single unit (that, for example, is testable on its own) are among the reasons I like this approach better. You could also extract that part itself into its own component. A component is just a function, after all.
- I rendered the Play Again button, but we have not implemented its behavior yet. I left a TODO comment in there instead. If you need to inline comments in JSX, that’s how you do it.
- I omitted the conditions to render the Play Again button because they’re all that’s remaining (after the first two checks that cover three statuses). However, this means if another GameStatus value is introduced, this code will stop behaving right for all the cases. Shall we fix that?
I think compromises like these are okay for prototyping, but you should get in the habit of trying to cover all the cases and think a tiny bit forward about the extendability of your code. I think I’d like the buttonAreaContent function better with a switch statement that does that:
Code Listing 116
const Footer = ({ gameStatus, countdown, startGame }) => { const buttonAreaContent = () => { switch(gameStatus) { case GameStatus.NEW: return <button onClick={startGame}>Start Game</button>; case GameStatus.CHALLENGE: // fall-through case GameStatus.PLAYING: return countdown; case GameStatus.WON: // fall-through case GameStatus.LOST: return <button onClick={() => {/* TODO */}}>Play Again</button>; } }; // ... }; |
You can test this new UI logic by just changing the initial value of gameStatus in the GameSession component.
Now all we need to do is implement the user interactions and have them change the state—then we’ll be done! React will always reflect the current values in data/state in the UI using the functions we already defined.
Note: The playground session for the code so far can be found here.
Implementing behaviors to change the state
Using a timeout side effect
We implemented the first step of the Start Game button already: it changes the gameStatus value into CHALLENGE. What we need now is to change that value into PLAYING after three seconds (or whatever challengeSeconds value we end up using).
This is where we can use a timer object. The source of the behaviors that change the state is not always directly from the user (click or other events). Sometimes the behavior comes from a timer in the background.
We can start this timer in the same function that’s invoked when the Start Game button is clicked, the one where we inlined the call to setGameStatus. However, React has a different place for this logic. We can use a side-effect Hook (through the React.useEffect function).
Starting the timer is a side effect for changing the gameStatus value to CHALLENGE. Every time the gameStatus value changes to CHALLENGE, we need to start that timer. Every time the gameStatus is no longer CHALLENGE, we need to clear that timer if it’s still running.
The React.useEffect Hook function is designed to implement that exact logic. It takes a callback function and a list of dependencies:
Code Listing 117: The useEffect Hook
useEffect(() => { // do something when dep1 or dep2 changes }, [dep1, dep2]) |
During any rendering of the component, if the values of the dependencies are different from the last time useEffect was invoked, it’ll invoke its callback function. We can start the timer inside a side-effect Hook if we can determine that the gameStatus has changed to CHALLENGE. To do that, we can make gameStatus a dependency for our timer side-effect Hook.
Furthermore, if the component is re-rendered or removed from the DOM, a side effect can invoke a cleanup function. That cleanup function can be returned from the useEffect callback function. We should clean any timers we start in a side effect’s callback function in that side effect’s cleanup function.
Here’s what we need to change the gameStatus into PLAYING after three seconds using a side-effect Hook:
Code Listing 118: Using a timer in a side-effect Hook
// In the GameSession component useEffect(() => { let timerId; if (gameStatus === GameStatus.CHALLENGE) { timerId = setTimeout( () => setGameStatus(GameStatus.PLAYING), 1000 * challengeSeconds ); } return () => clearTimeout(timerId); }, [gameStatus, challengeSeconds]); |
Because gameStatus is a dependency, this useEffect Hook will invoke its callback function every time that value changes. When it changes into CHALLENGE, the if statement will become true and we’ll start a timer. In the cleanup function, we clear the timer.
For the sake of completeness, I also included the challengeSeconds as a dependency, although that value will not change during a single game. You should always include all the variables a side-effect Hook is using in its list of dependencies. You can even automate that in your editor using React ESLint tools like the eslint-plugin-react-hooks package.
Now the game will go into PLAYING mode three seconds after clicking the Start Game button, and the highlighting of challenge cells should go away. Test that.
When gameStatus changes into PLAYING, we need to start another timer. This time we need a timer that ticks 10 times repeatedly and modifies the countdown state element. This is where we can use a setInterval call. We’ll need to put this new logic in a side-effect Hook as well.
Because it’ll also depend on gameStatus, we can use the same Hook for both timers. They just have different branches that we can do through different if statements. Don’t forget that we need an exit condition for this new branch; we can check the countdown value to determine if the interval is to be stopped:
Here’s a way to do that:
Code Listing 119: Using an interval timer in a side-effect Hook
useEffect(() => { let timerId; // ... if (gameStatus === GameStatus.PLAYING) { timerId = setInterval(() => { if (countdown === 1) { clearTimeout(timerId); setGameStatus(GameStatus.LOST); } setCountdown(countdown - 1); }, 1000); } return () => clearTimeout(timerId); }, [gameStatus, challengeSeconds]); |
This will not work—the interval timer will continue to run. Test it and try to figure out why.
Because the code depended on the value of countdown and we have not included it as a dependency, the callback function will have a "stale" closure when the countdown value changes. That’s why you should always include all the dependencies. Adding countdown to the list of dependencies will solve the problem, but it’s not ideal.
By adding the countdown as a dependency, the Hook callback function (and its cleanup one) will be invoked every time the countdown value changes. That means every second, we will clear the interval timer and start a new one. We don’t even need an interval; we can replace setInterval with setTimeout and things will still work because of the recursive nature of repeated updates. A setTimeout changes the countdown value, React re-renders, the Hook’s callback function is invoked again, a setTimeout changes the countdown value, and so on.
The question is: How can we use a setInterval that updates the state then?
You’ll need the state-update logic to not depend on the current value of the state. We needed the countdown dependency in the first place because we’re decrementing the current value of that state element. However, all React state updater functions support their own callback form. You can pass a function to any updater function (like setCountdown), and that function will be called with the current value of the state as its argument. Whatever that function returns becomes the new value for that state element.
For this example, we just need to move the logic that depends on countdown into the setCountdown callback function, and we can keep the setInterval use that way:
Code Listing 120: Using a callback function in a state updater function
useEffect(() => { let timerId; // ... if (gameStatus === GameStatus.PLAYING) { timerId = setInterval(() => { setCountdown(countdown => { if (countdown === 1) { clearTimeout(timerId); setGameStatus(GameStatus.LOST); } return countdown - 1; }); }, 1000); } return () => clearTimeout(timerId); }, [challengeSeconds, gameStatus]); |
This version does not depend on the value of countdown at all. React will make the current value of countdown available to setCountdown when it invokes it. This will work fine.
This callback version of React state updater functions is much better because it allows you to optimize any code that updates the state. I’d go as far as saying you should always use the callback version if your state-update logic depends on the current value of the state (like the decrement logic we had).
Tip: Whenever you create a timeout or interval timers in a React component, do not forget to clear them when they’re no longer needed (for example, when the component gets removed from the DOM). You can use the useEffect cleanup function or the componentWillUnmount lifecycle method in class components.
Note: The playground session for the code so far can be found here.
Implementing computations that depend on a state update
The core user interaction in this game, and the one that’ll be responsible for the remaining computations we need to make, is the pick-cell behavior.
When a player clicks a cell two things are affected:
- We will always need to change the pickedCellIds array and add the clicked cell to it.
- We might need to change the gameStatus value (when maxWrongAttempts is reached).
Because these states are managed in the GameSession component, we need to place the pick-cell behavior on that level.
Let’s start by defining an empty pickCell function in GameSession and pass that function to Cell so that we can make the Cell component click handler. We’ll wire it to receive the ID of the cell being clicked:
Code Listing 121
// In the GameSession component: const pickCell = cellId => { }; // ... <Cell key={cellId} width={cellWidth} gameStatus={gameStatus} isChallenge={challengeCellIds.includes(cellId)} isPicked={pickedCellIds.includes(cellId)} onClick={() => pickCell(cellId)} /> // Then in the Cell component: const Cell = ({ width, gameStatus, isChallenge, isPicked, onClick, }) => { // ... return ( <div className="cell" style={{ width: ${width}%, backgroundColor: cellStatus }} onClick={onClick} /> ); }, [challengeSeconds, gameStatus]); |
The first change this new function is going to make is straightforward. We can use array destructuring to append the new clicked cellId to the pickedCellIds array:
Code Listing 122
// In the GameSession component: const pickCell = cellId => { if (gameStatus === GameStatus.PLAYING) { setPickedCellIds(pickedCellIds => { if (pickedCellIds.includes(cellId)) { return pickedCellIds; } return [...pickedCellIds, cellId]; }); } }; |
Note a few things about this code:
- I made it check the gameStatus first. A player can only pick a cell when the game mode is PLAYING.
- I used the callback version of the setPickedCellIds function, although I did not need to. Because I am using the current value of pickedCellIds (to append to it), it’s always a good practice to use the callback version rather than relying on the pickedCellIds value exposed through function closures.
- I added a check to make sure we do not pick a cell twice. This is important for the logic to determine if a game is WON or LOST.
With this code, you can now partially play the game. You can pick cells and see them change to green or pink, but you cannot win or lose the game through picking (the game will be over after 10 seconds through the timer code).
Where can we implement the win/lose game status logic? We can put it in the pickCell function itself! After all, we need to check if the game is WON or LOST after each pick. There is a problem though: this logic will depend on the new value for pickedCellIds after each pick. We need to do it after the setPickedCellIds call. All React state updater functions are asynchronous. We can’t do anything after them directly.
We could work around this problem by using the new pickedCellIds array before we use it with setPickedCellIds. Here’s a version of the code to do that:
Code Listing 123: Using the "state to be" in computations
// In the GameSession component: const pickCell = cellId => { if (gameStatus === GameStatus.PLAYING) { setPickedCellIds(pickedCellIds => { if (pickedCellIds.includes(cellId)) { return pickedCellIds; } const newPickedCellIds = [...pickedCellIds, cellId]; const [correctPicks, wrongPicks] = utils.arrayCrossCounts( newPickedCellIds, challengeCellIds ); if (correctPicks === challengeSize) { setGameStatus(GameStatus.WON); } if (wrongPicks === maxWrongAttempts) { setGameStatus(GameStatus.LOST); } return newPickedCellIds; }); } }; |
The math logic to compute the new gameStatus values is not really important, but I am basically using the utils.arrayCrossCounts array to count how many correctPicks and wrongPicks the player has made so far (including the current pick), and then compare these numbers with challengeSize/maxWrongAttempts to determine the new gameStatus value.
By inserting this logic right before the return value, I get to use the value of "the state to be." Go ahead and try to play now—you can win and lose the game.
What’s wrong with this code though? Nothing, right? Let’s ship it!
Using side effects to separate concerns
While the code in Code Listing 123 works just fine, putting the logic to update gameStatus in pickCell itself makes the function less readable and harder to reason with. The pickCell function should just pick a cell!
Where are we supposed to put the win/lose logic then?
The fact that we need to invoke the win/lose logic is a side effect to updating the pickedCellIds array. Every time we update the pickedCellIds array, we need to invoke this side effect. Although it is really "internal" to React and has nothing to do with anything external to it, we can still use a side-effect Hook just to separate these two different concerns.
Revert pickCell to its first version and move the win/lose logic to its own new useEffect Hook:
Code Listing 124: Using a side-effect Hook to compute a new state
// In the GameSession component: React.useEffect(() => { const [correctPicks, wrongPicks] = utils.arrayCrossCounts( pickedCellIds, challengeCellIds ); if (correctPicks === challengeSize) { setGameStatus(GameStatus.WON); } if (wrongPicks === maxWrongAttempts) { setGameStatus(GameStatus.LOST); } }, [pickedCellIds]); |
This is a bit cleaner. There is no mix of concerns or confusing new versus old picked cells concepts. Each time the pickedCellIds array is different, the useEffect callback function will be invoked because we wired pickedCellIds as a dependency for it. There is no need to do any cleanup for this side-effect Hook because it isn’t really a full side effect that depends on something external to React. It is only used to manage internal concerns.
Note: The playground session for the code so far can be found here.
Resetting a React component
The final behavior we need to implement for this game is the Play Again button. To reset a game session, we can simply re-initialize the state elements with their first initial values. For example, we could have a resetGame function like this:
Code Listing 125: Resetting a component state
// In the GameSession component: const resetGame = () => { setGameStatus(GameStatus.NEW); setPickedCellIds([]); setCountdown(playSeconds); }; // .. <Footer gameStatus={gameStatus} countdown={countdown} startGame={() => setGameStatus(GameStatus.CHALLENGE)} resetGame={resetGame} /> // In the Footer component: const Footer = ({ gameStatus, countdown, startGame, resetGame }) => { const buttonAreaContent = () => { switch(gameStatus) { // ... case GameStatus.WON: // fall-through case GameStatus.LOST: return <button onClick={resetGame}>Play Again</button>; } }; // ... }; |
This method will partially work. It’ll even reset the timers because they are cleared in the useEffect cleanup function that gets invoked before the new game is rendered. However, this method has two problems. Can you identify them?
The first problem is a small one. This method introduces a bit of a code duplication problem. If we’re to add more elements to the state of this component (for example, to display the number of current wrong attempts), then we’ll have to remember to reset this new state element in resetGame. This is probably not a big deal for a small app like this one.
The second problem is a bigger one. I saved this solution here for you to test it. Play a few times and try to identify the problem.
Between game resets, the challenge cells remain the same. We’re only resetting the state of the GameSession component. We’re not resetting anything in the GameGenerator component which is responsible for the static data elements that the GameSession component uses. In addition to resetting the state of the GameSession component, we need the GameGenerator to re-render itself, compute a new set of random challenge cells, and render a fresh version of the GameSession component.
Changing a component’s identity
React offers a trick to combine both actions needed to reset a game session. We can re-render the GameGenerator component (by changing its state) and use a different identity value for the GameSession component through the special "key" prop. That’ll make React render a brand new GameSession instance (using initial state values).
When we use the key attribute for a component, React uses it as the unique identity of that component. Say we rendered a component with key="X", and then later re-rendered the exact same component (same props and state) but with key="Y". React will assume that these two are different elements. It’ll completely remove the X component from the DOM (which is known as "unmounting"), and then it’ll mount a new version of it as Y, although nothing else has changed in X besides its key.
This can be used to reset any stateful component. We just give each game instance a key and change that key to reset it. We’ll need to do that in the GameGenerator component and since we need that component to re-render, we can use a stateful element for the value of this new key prop.
To make this change, remove the resetGame function from the GameSession component and instead make it receive a prop named resetGame. The GameGenerator component will now be in charge of resetting a game:
Code Listing 126
const Game = ({ cellIds, challengeCellIds, cellWidth, challengeSize, challengeSeconds, playSeconds, maxWrongAttempts, autoStart, resetGame, }) => { // Remove the resetGame function }; |
Next, make the following changes to the GameGenerator component:
- Define a gameId state variable and pass it as the key for React to identify a GameSession instance.
- Pass resetGame to the GameSession component as a function that’ll change the gameId state variable.
Code Listing 127: Changing a component identity
const GameGenerator = () => { const [gameId, setGameId] = useState(1); // .. return ( <GameSession key={gameId} cellIds={cellIds} challengeCellIds={challengeCellIds} cellWidth={cellWidth} challengeSize={challengeSize} challengeSeconds={3} playSeconds={10} maxWrongAttempts={3} resetGame={() => setGameId(gameId => gameId + 1)} /> ); }; |
That’s it—now the game will reset properly. All computed data elements in GameGenerator will be re-computed with the gameId state change. All props passed to the GameSession component will have a new value. The state of the GameSession component will be re-initialized because it’s now a brand-new element in the main tree (because of the new key value).
It would be nice, however, to auto-start the second game session (and all sessions after that) instead of having the player click the Start Game button again after clicking Play Again.
Try to do that on your own first.
Controlling state initial value with a prop
The GameGenerator component is the one that knows if a game was the first one, or if it was generated through a resetGame action. In fact, that condition is simply gameId > 1. However, the GameSession component is the one responsible for starting the game (through its gameStatus value). One way to solve this issue is by passing an autoStart prop to GameSession and using it to initialize the gameStatus variable as either NEW or CHALLENGE right away:
Code Listing 128: Controlling state initial value with a prop
const Game = ({ cellIds, challengeCellIds, cellWidth, challengeSize, challengeSeconds, playSeconds, maxWrongAttempts, autoStart, resetGame, }) => { const [gameStatus, setGameStatus] = useState( autoStart ? GameStatus.CHALLENGE : GameStatus.NEW ); // ... }; const GameGenerator = () => { const [gameId, setGameId] = useState(1); // .. return ( <Game key={gameId} cellIds={cellIds} challengeCellIds={challengeCellIds} cellWidth={cellWidth} challengeSize={challengeSize} challengeSeconds={3} playSeconds={10} maxWrongAttempts={3} autoStart={gameId > 1} resetGame={() => setGameId(gameId => gameId + 1)} /> ); }; |
The "Play Again" action will now render a brand-new game, and it will directly be in its CHALLENGE mode.
This game is now feature-complete. However, before we conclude, there is one more trick that I’d like you to be aware of. One of the best things about React Hooks is that we can extract related logic into a custom function. Let’s do that.
Note: The playground session for the code so far can be found here.
Using custom Hooks
The logic to have a gameId that starts with 1, an autoStart game flag, and a resetGame function that increments gameId is all related. Right now, it’s within the GameGenerator component mixed with the other logic about cellIds and challengeCellIds.
If we decide later to change the values of gameId to be string-based instead of an incrementing number, we’ll have to modify the GameGenerator component. Ideally, this logic should be extracted into its own unit, and the GameGenerator can just use that unit. This is exactly like extracting a piece of code into a function and invoking that function, but this particular piece of code is stateful. The useState call Hooks into React internals to associate a component with a state element.
Luckily, React supports extracting stateful code into a function. You can extract any Hook calls including useState and useEffect into a function (which is known as a custom Hook) and React will continue to associate the Hook calls with the component that invoked the custom Hook function.
Name your custom Hook function useXYZ. This way, linting tools can treat it as yet another React Hook and provide helpful hints and warnings about it. This is not a regular function—it’s a function that contains stateful logic for a component.
I’ll name this new custom Hook function useGameId. You can make it receive any arguments you want, and make it return any data in any shape or form. It does not have to be similar to useState (or other React Hooks), and we don’t need to pass any argument to it in this case. I’ll also make it return the three elements related to the game ID concept: the ID itself, a way to tell if this is the first ID, and a way to generate a new ID:
Code Listing 129: Using a custom Hook function
const useGameId = () => { const [gameId, setGameId] = useState(1); return { gameId, isNewGame: gameId === 1, renewGame: () => setGameId(gameId => gameId + 1), }; }; const GameGenerator = () => { const { gameId, isNewGame, renewGame } = useGameId(); // ... return ( <Game key={gameId} cellIds={cellIds} challengeCellIds={challengeCellIds} cellWidth={cellWidth} challengeSize={challengeSize} challengeSeconds={3} playSeconds={10} maxWrongAttempts={3} autoStart={!isNewGame} resetGame={renewGame} /> ); }; |
Note how I opted to use different names for elements of the custom Hook. This custom Hook can be reusable across components. Different game apps like this one can use the same useGameId custom Hook function to provide identity for their components, offer a way to do something for a new or subsequent game, and provide a method to renew the gameId identity.
Tip: Identify other areas in the code where a custom Hook can improve the separation of concerns in the code. Create and use a custom Hook and make sure things still work after you do.
Note: The playground session for the final code can be found here.
Bonus challenges
Let’s say you took this version to the client and they loved it, but of course they want more. Here are two major features that I’ll leave you with as a bonus challenge on this game:
- Track scores: A perfect score of 3 happens when the player guesses all correct cells without any wrong attempts. If they make one wrong attempt the score is 2, and with two wrong attempts, the score is 1. Make the score time-aware. If the player finishes the game in the first five seconds, double their score. Display the total score in the UI somewhere. When the player wins the game again, add the new score to the total score.
- Make it harder: When the player clicks the Play Again button, make the grid bigger: 6 × 6, then 7 × 7, and so on. Also, increment the challenge size with each new game.
- 80+ high-performance, modular, and responsive React UI components.
- Popular components like Data Grid, Charts, and Scheduler.
- Lightweight and user-friendly.
- Stunning built-in themes.