Infinite scrolling is about visualizing huge amounts of data in a single window that doesn’t end. Usually in infinite scrolling, data is fetched on demand when the scroll head reaches the bottom of the window.
Infinite scrolling in DataGrid works in a similar way. Initially, a part of the data is displayed in the grid, and when a user scrolls down to the bottom of it, an additional query is made, and the fetched data is appended. So, we can load a huge amount of data without degrading the DataGrid performance. Infinite scrolling is an alternative to paging, where the newly queried data is displayed in new pages.
Some of the most common examples of infinite scrolling are:
- Scrolling through Twitter tweets
- Scrolling through Facebook posts
- Google Image search
In this blog post, we will show you how easily you can visualize huge amounts of data in a single grid view using the infinite scrolling feature in our Angular Data Grid.
Why we use infinite scrolling
Infinite scrolling provides a great user experience, it efficiently queries only the data necessary, and it reduces the number of data reads from the server back and forth.

What is special about infinite scrolling in EJ2 DataGrid?
All modern browsers have a hard limit on the amount of memory allocated to a particular webpage and browsers are not designed to handle millions of elements.
Due to this browser limitation, when continuously appending data to a grid component, the browser will go unresponsive. This is due to the gradual increase in the DOM weightage and browser memory.
To overcome this problem, our DataGrid is provided with a cache mode option. When enabling this feature, DataGrid will maintain row elements based on the maxBlocks count value of the infiniteScrollSettings. Once this limit is reached, DataGrid will remove row elements only from DOM and maintain the data on the grid instance.
Steps to implement infinite scrolling with frozen grid in Angular environment
Step 1: Set up Angular environment
Use Angular CLI to set up your Angular applications. To install Angular CLI, use the following command.
npm install -g @angular/cli |
Step 2: Create an Angular application
Start a new Angular application using the following Angular CLI command.
ng new my-app |
Step 3: Add the Syncfusion Grid package
All the Essential JS 2 NuGet packages are published in the npmjs.com registry.
To install the Data Grid component, use the following command.
npm install @syncfusion/ej2-angular-grids --save |
The —save will instruct NPM to include the grid package inside of the dependencies section of the package.json.
Step 4: Registering Grid module
Import the Grid module into the Angular application (app.module.ts) from the package @syncfusion/ej2-angular-grids [src/app/app.module.ts].
import { NgModule } from '@angular/core';
import { BrowserModule } from '@angular/platform-browser';
// import the GridModule for the Grid component
import { GridModule } from '@syncfusion/ej2-angular-grids';
import { AppComponent }  from './app.component';

@NgModule({
  //declaration of ej2-angular-grids module into NgModule
  imports:      [ BrowserModule, GridModule ],
  declarations: [ AppComponent ],
  bootstrap:    [ AppComponent ]
})
export class AppModule { }
Step 5: Adding CSS reference
The following CSS files are available in the ../node_modules/@syncfusion package folder. Add reference to these CSS files in styles.css[src/styles.css] using the following code.
@import '../node_modules/@syncfusion/ej2-base/styles/material.css';
@import '../node_modules/@syncfusion/ej2-buttons/styles/material.css';
@import '../node_modules/@syncfusion/ej2-calendars/styles/material.css';
@import '../node_modules/@syncfusion/ej2-dropdowns/styles/material.css';
@import '../node_modules/@syncfusion/ej2-inputs/styles/material.css';
@import '../node_modules/@syncfusion/ej2-navigations/styles/material.css';
@import '../node_modules/@syncfusion/ej2-popups/styles/material.css';
@import '../node_modules/@syncfusion/ej2-splitbuttons/styles/material.css';
@import '../node_modules/@syncfusion/ej2-angular-grids/styles/material.css';
Step 6: Add the Data Grid component
Modify the template in the [src/app/app.component.ts] file to render the grid component. Add the Angular Data Grid by using the <ejs-grid> selector in the template section of the app.component.ts file.
import { Component, OnInit } from '@angular/core';

@Component({
  selector: 'app-root',
  // specifies the template string for the Grid component
  template: `<ejs-grid> </ejs-grid>`
})
export class AppComponent implements OnInit {

    ngOnInit(): void {
    }
}
Step 7: Defining dataSource and columns
Bind the data to the Data Grid component by using dataSource property. It either accepts an array of JavaScript objects or a DataManager instance. Then define columns based on the properties of the dataSource.
import { Component, OnInit } from '@angular/core';
import { getData } from './datasource';

@Component({
  selector: 'app-root',
  template: `<ejs-grid [dataSource]='data'>
                <e-columns>
                    <e-column field='TaskID' headerText='Task ID' textAlign='Right' width=90></e-column>
                    <e-column field='Engineer' headerText='Engineer' width=120></e-column>
                    <e-column field='Designation' headerText='Designation'width=120></e-column>
                    <e-column field='Estimation' headerText='Estimation' textAlign='Right' width=120></e-column>
                    <e-column field='Status' headerText='Status'width=120></e-column>
                </e-columns>
                </ejs-grid>`
})

export class AppComponent implements OnInit {

  public data: object[];

  ngOnInit(): void {
    this.data = getData(10000);
  }
}
Step 8: Module injection
To create a grid with additional features, inject the required modules. The following modules are used to extend the grid’s basic functionality:
- InfiniteScrollService: Inject this provider to use the infinite scrolling feature.
- FreezeService: Inject this provider to use the frozen rows and columns feature.
These modules should be injected into the provider’s section of the root NgModule or component class.
Step 9: Enable infinite scrolling
The infinite scrolling feature can be enabled by setting the enableInfiniteScrolling property to true. Also, we have to inject the InfiniteScrollService module in the provider section.
Step 10: Set frozen columns
Frozen columns can be defined using the frozenColumns property. Also, inject the FreezeService module in the provider section.
import { Component, OnInit } from '@angular/core';
import { getData } from './datasource';

@Component({
  selector: 'app-root',
  template: `<ejs-grid [dataSource]='data' height=300 [enableInfiniteScrolling]='true' [frozenColumns]='2'>
                <e-columns>
                    <e-column field='TaskID' headerText='Task ID' textAlign='Right' width=90></e-column>
                    <e-column field='Engineer' headerText='Engineer' width=120></e-column>
                    <e-column field='Designation' headerText='Designation'width=120></e-column>
                    <e-column field='Estimation' headerText='Estimation' textAlign='Right' width=120></e-column>
                    <e-column field='Status' headerText='Status'width=120></e-column>
                </e-columns>
                </ejs-grid>`
})

export class AppComponent implements OnInit {

  public data: object[];

  ngOnInit(): void {
    this.data = getData(10000);
  }
}
Step 11: Run the application
Use the following command to run the application in the browser.
ng serve --open |
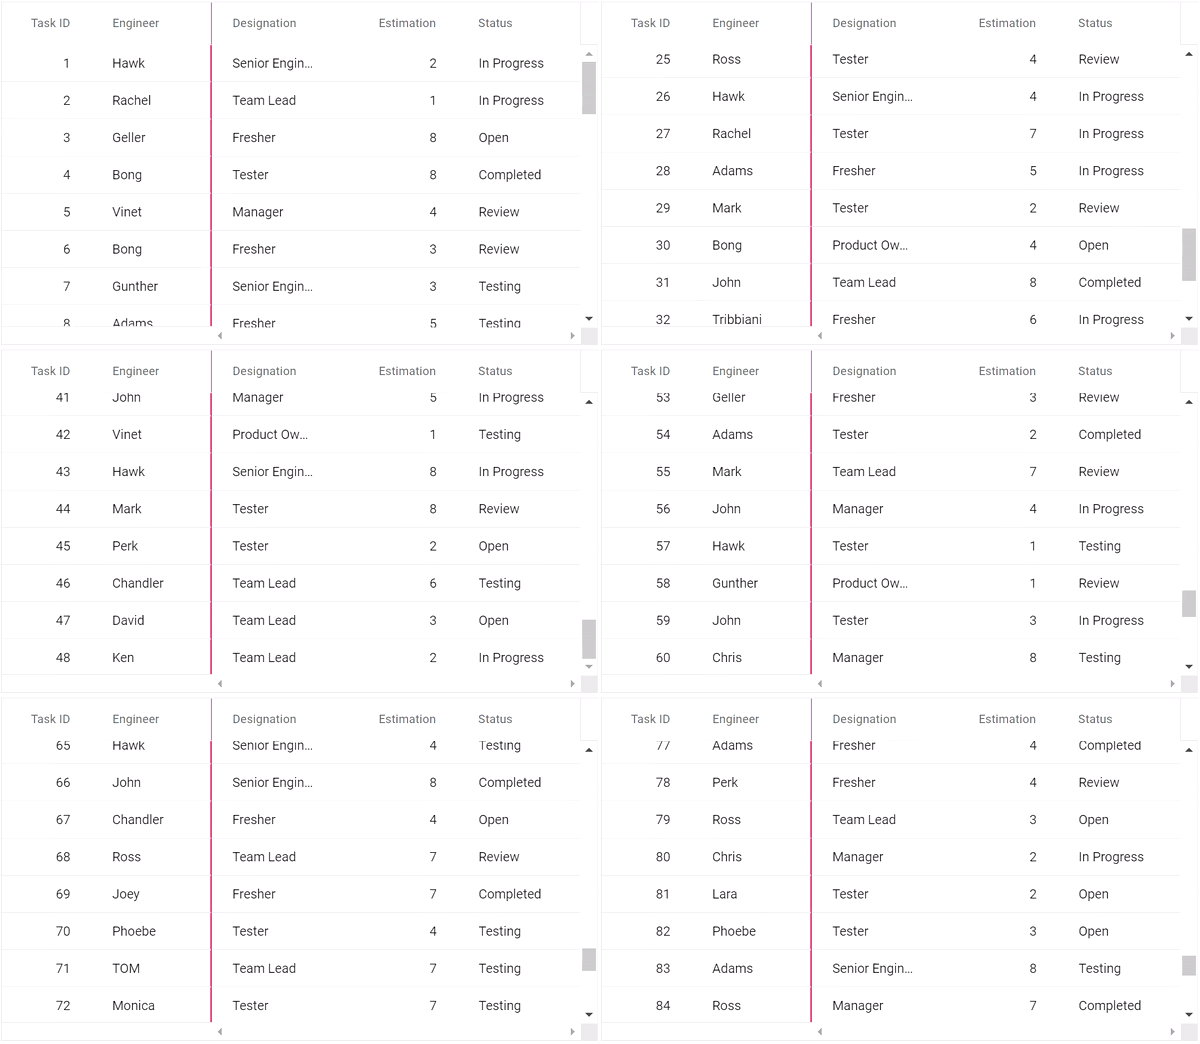
The output will appear as shown in the following screenshot.

Resource
You can download this application from this GitHub location.
Conclusion
I hope you now have a clear idea about the infinite scrolling feature and how to use it in the Syncfusion EJ2 DataGrid. This feature is available from the 2020 Volume 2 release.
If you are already a customer, you can download our Angular package from the License and Downloads page. If you are not yet a customer, you can try our 30-day free trial to check out all our Angular components have to offer. You can also explore samples in our GitHub repository.
If you have any questions about this blog, please let us know in the comments section below. You can also contact us through our support forum, Direct-Trac, or feedback portal. We are always happy to assist you!

Comments (2)
Great article with very useful information. Is it only for Angular or does the Blazor SFGrid gets it too ?
Hi Ben,
Currently, the infinite scrolling feature is available in all the other platforms except Blazor. We will consider this feature request in our Volume 4, 2020 release roadmap.