

Selecting multiple items and deleting them all is an easy job compared to deleting individual items separately. The former saves a lot of time and effort.
The Syncfusion Essential JS 2 Scheduler control has built-in support to select multiple items. This blog serves as a guide to implement this support easily in your application.
In this blog, I am going to demonstrate the implementation of multiple item selection using a mouse device and deleting them all in a single action.
Initializing Scheduler control
For the first step, we need to initialize the EJ 2 Scheduler control with some local data. You’ll find the data I use in the following code example.
ej.base.enableRipple(true);
 var date = new Date();
 var curDate = date.getDate();
 var curMonth = date.getMonth();
 var curYear = date.getFullYear();
    var data = [{
                Id: 1,
                Subject: '1',
                StartTime: new Date(curYear, curMonth, curDate, 11, 30),
                EndTime: new Date(curYear, curMonth, curDate, 13, 0),
                ProjectId: 1,
                TaskId: 1

            }, {
                Id: 2,
                Subject: '2',
                StartTime: new Date(curYear, curMonth, curDate, 12, 0),
                EndTime: new Date(curYear, curMonth, curDate, 14, 0),
                ProjectId: 1,
                TaskId: 2
            },
            {
                Id: 3,
                Subject: '3',
                StartTime: new Date(curYear, curMonth, curDate, 13, 30),
                EndTime: new Date(curYear, curMonth, curDate, 15, 0),
                ProjectId: 1,
                TaskId: 1
            },
            {
                Id: 4,
                Subject: '4',
                StartTime: new Date(curYear, curMonth, curDate, 13, 30),
                EndTime: new Date(curYear, curMonth, curDate, 15, 0),
                ProjectId: 2,
                TaskId: 3
            },
            {
                Id: 5,
                Subject: '5',
                StartTime: new Date(curYear, curMonth, curDate, 12, 30),
                EndTime: new Date(curYear, curMonth, curDate, 17, 0),
                ProjectId: 2,
                TaskId: 4
            },
            {
                Id: 6,
                Subject: '6',
                StartTime: new Date(curYear, curMonth, curDate, 11, 30),
                EndTime: new Date(curYear, curMonth, curDate, 14, 0),
                ProjectId: 2,
                TaskId: 5
            }];
Now, initiate the control with the local data. Here, I have initialized a dialog to display the selected items and added a button to delete the selected items.
var scheduleObj = new ej.schedule.Schedule({
                width: '100%', height: '550px',
                selectedDate: new Date(curYear, curMonth, curDate),
                views: ['TimelineDay', 'TimelineWeek', 'TimelineWorkWeek', 'TimelineMonth', 'Agenda'],
                currentView: 'TimelineWeek',
                group: {
                    resources: ['Projects', 'Categories']
                },
                resources: [
                    {
                        field: 'ProjectId', title: 'Choose Project', name: 'Projects',
                        dataSource: [
                            { text: 'PROJECT 1', id: 1, color: '#cb6bb2' },
                            { text: 'PROJECT 2', id: 2, color: '#56ca85' }
                        ],
                        textField: 'text', idField: 'id', colorField: 'color'
                    }, {
                        field: 'TaskId', title: 'Category',
                        name: 'Categories', allowMultiple: true,
                        dataSource: [
                            { text: 'Nancy', id: 1, groupId: 1, color: '#df5286' },
                            { text: 'Steven', id: 2, groupId: 1, color: '#7fa900' },
                            { text: 'Robert', id: 3, groupId: 2, color: '#ea7a57' },
                            { text: 'Smith', id: 4, groupId: 2, color: '#5978ee' },
                            { text: 'Micheal', id: 5, groupId: 2, color: '#df5286' }
                        ],
                        textField: 'text', idField: 'id', groupIDField: 'groupId', colorField: 'color'
                    }
                ],
                eventSettings: {
                    dataSource: data
                }
            });
            scheduleObj.appendTo('#Schedule');
         var dialogObj = new ej.popups.Dialog({
                header: 'Selected Items list',
                target: document.body,
                isModal: true,
                animationSettings: { effect: 'None' },
                showCloseIcon: true,
                width: '500px'
            });
            dialogObj.appendTo('#dialog');
            dialogObj.hide();

            var button = new ej.buttons.Button();
            button.appendTo('#deleteBtn');
The following is the HTML code example, for your reference.
<html>
<head>
    <script src="https://ej2.syncfusion.com/javascript/demos/schedule/timeline-resource-grouping/datasource.js" type="text/javascript"></script>
    <script src="https://cdn.syncfusion.com/ej2/dist/ej2.min.js" type="text/javascript"></script>
    <link href="https://cdn.syncfusion.com/ej2/material.css" rel="stylesheet">
    <link href="https://maxcdn.bootstrapcdn.com/bootstrap/3.3.7/css/bootstrap.min.css" rel="stylesheet">
<style>
            .e-schedule:not(.e-device) .e-agenda-view .e-content-wrap table td:first-child {
                width: 90px;
            }
            .e-schedule .e-agenda-view .e-resource-column {
                width: 100px;
            }
           .multiSelectHelper {
                position: absolute;
                z-index: 100000;
                background-color: transparent;
                border: 1px solid transparent;
            }

                .multiSelectHelper.inAction {
                    background-color: lightgray;
                    border: 1px dashed black;
                    opacity: 0.5;
                }

                .multiSelectHelper.hidden {
                    display: none;
                }
        </style>
</head>
<body>
    <div class="stackblitz-container material">
        <div class="col-lg-12 control-section">
            <div class="content-wrapper">
                <div id="Schedule"> </div>
                <div id="dialog">
                    <div id="content"></div>
                    <button id="deleteBtn">Delete All</button>
                </div>
            </div>
        </div>
    </div>
</body>
</html>
For more details about getting started with the EJ 2 Scheduler control, check out our documentation.
Implementing mouse selection
Now we need to implement the mouse selection by using document mouse events such as mouse up, down, and move. I have added multiSelectHelper in the HTML from the previous segment to implement this.
var clicked = false, clickedPoint, movedPoint, finalCollection = [];

            document.onmousedown = function (evt) {
                if (evt.target.classList.contains("e-work-cells") && evt.target.closest("#Schedule")) {
                    clicked = true;
                    clickedPoint = { x: evt.clientX, y: evt.clientY };
                    addMultiSelectHelper();
                }
            };

            document.onmouseup = function (evt) {
                if (clicked) {
                    clicked = false;
                    var helper = document.getElementById("multiSelectHelper");
                    helper.classList.add("hidden");

                    finalCollection = [];
                    var left = parseFloat(helper.style.left);
                    var top = parseFloat(helper.style.top);
                    var right = parseFloat(helper.style.left) + parseFloat(helper.style.width);
                    var bottom = parseFloat(helper.style.top) + parseFloat(helper.style.height);
                    var startCell = scheduleObj.getCellDetails(document.elementFromPoint(left, top));
                    if (startCell)
                        var startRes = scheduleObj.resourceBase.lastResourceLevel[startCell.groupIndex];
                    var endCell = scheduleObj.getCellDetails(document.elementFromPoint(right, bottom));
                    if (endCell)
                        var endRes = scheduleObj.resourceBase.lastResourceLevel[endCell.groupIndex];
                    if (startRes && endRes) {
                        var rangeCollection = scheduleObj.getEvents(startCell.startTime, endCell.endTime);
                        var resCollection = scheduleObj.resourceBase.lastResourceLevel.slice(startRes.groupIndex, (endRes.groupIndex + 1));
                        var content = document.getElementById("content"), child;
                        content.innerHTML = "";
                        for (var i = 0; i < resCollection.length; i++) {
                            var eventCollection = scheduleObj.eventBase.filterEventsByResource(scheduleObj.resourceBase.lastResourceLevel[resCollection[i].groupIndex], rangeCollection);
                            if (eventCollection.length > 0) {
                                for (var index = 0; index < eventCollection.length; index++) {
                                    finalCollection.push(eventCollection[index]);
                                    child = document.createElement("p");
                                    child.innerHTML = eventCollection[index].Subject;
                                    content.appendChild(child);
                                }
                            }
                        }
                        var footer = document.createElement("p");
                        footer.innerHTML = finalCollection.length + " item(s) selected";
                        content.appendChild(footer);
                        if (selectStarted)
                            dialogObj.show();
                    }
                }
                selectStarted = false;
            };

            document.onmousemove = function (evt) {
                if (clicked) {
                    selectStarted = true;
                    movedPoint = { x: evt.clientX, y: evt.clientY };
                    updateMultiSelectHelper();
                }
            };
            //Selection helper
            addMultiSelectHelper = function () {
                var multiHelper = document.getElementById("multiSelectHelper");
                if (!multiHelper) {
                    multiHelper = document.createElement("div");
                    multiHelper.id = "multiSelectHelper";
                    multiHelper.classList.add("multiSelectHelper");
                    document.body.appendChild(multiHelper);
                }
                multiHelper.classList.add("inAction");
                return multiHelper;
            };
            updateMultiSelectHelper = function () {
                var multiHelper = document.getElementById("multiSelectHelper");
                if (multiHelper) {
                    var bounds = getRectBoundsFromPoints(clickedPoint, movedPoint);
                    multiHelper.style.left = bounds.x;
                    multiHelper.style.top = bounds.y;
                    multiHelper.style.width = bounds.width;
                    multiHelper.style.height = bounds.height;
                    multiHelper.classList.remove("hidden");
                }
            };
            getRectBoundsFromPoints = function (startPoint, endPoint) {
                var bounds = { "x": 0, "y": 0, "width": 0, "height": 0 };
                bounds.width = Math.abs(startPoint.x - endPoint.x);
                bounds.height = Math.abs(startPoint.y - endPoint.y);
                if (startPoint.x <= endPoint.x && startPoint.y <= endPoint.y) {
                    bounds.x = startPoint.x;
                    bounds.y = startPoint.y;
                }
                else if (startPoint.x <= endPoint.x && startPoint.y >= endPoint.y) {
                    bounds.x = startPoint.x;
                    bounds.y = startPoint.y - bounds.height;
                }
                else if (startPoint.x >= endPoint.x && startPoint.y <= endPoint.y) {
                    bounds.x = startPoint.x - bounds.width;
                    bounds.y = startPoint.y;
                }
                else if (startPoint.x >= endPoint.x && startPoint.y >= endPoint.y) {
                    bounds.x = startPoint.x - bounds.width;
                    bounds.y = startPoint.y - bounds.height;
                }
                return bounds;
            };
In the previous listing, I add a multiselect helper (div element) on the mouse down action and store the clicked x and y positions. On mouse move, I update the helper’s position and size with respect to the mouse pointer.
Finally, when the user releases the mouse button, I hide the helper and pass the range to the Scheduler API to select all the items within that range. We need to find the start and end cells and their indexes to select them. The output of multiselection using the mouse is shown in the following screenshot.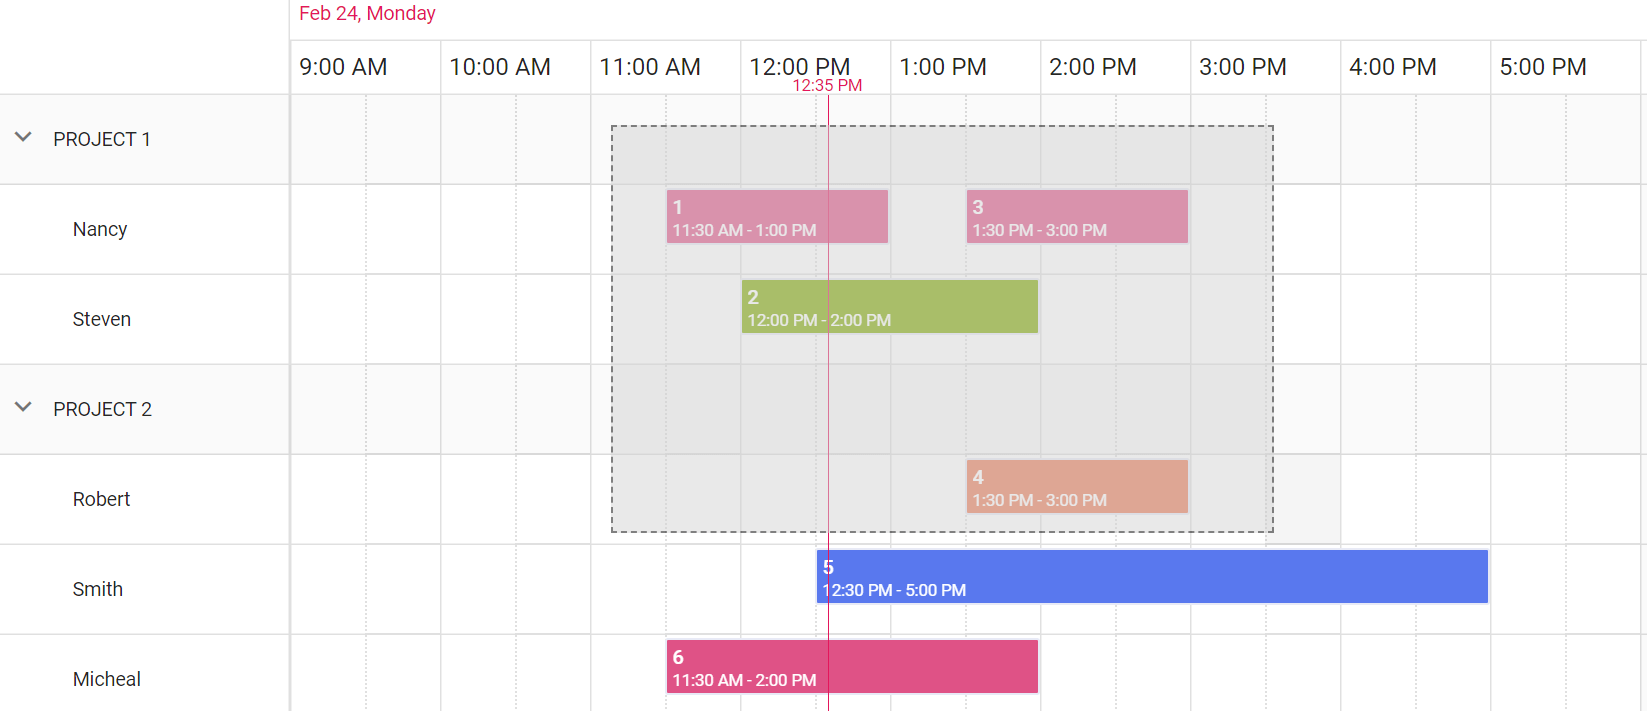
Display and delete selected items
Once we have the selected items, we’ll display all of them in a dialog with a Delete All button. On mouse up, append the list of items into the dialog content. Then, if the user clicks the Delete All button, remove the selected items from the data and reassign the updated data to the Scheduler control.
The following code example illustrates this.
button.element.onclick = function () {
                var data = scheduleObj.eventSettings.dataSource, updatedCollection = [], elementFound;
                for (var i = 0; i < data.length; i++) {
                    elementFound = false;
                    for (var j = 0; j < finalCollection.length; j++) {
                        if (finalCollection[j].Id == data[i].Id) {
                            elementFound = true;
                            break;
                        }
                    }
                    if (!elementFound)
                        updatedCollection.push(data[i]);
                }
                scheduleObj.eventSettings.dataSource = updatedCollection;
                scheduleObj.dataBind();
                dialogObj.hide();
            }
Here is the output of the dialog with the selected items.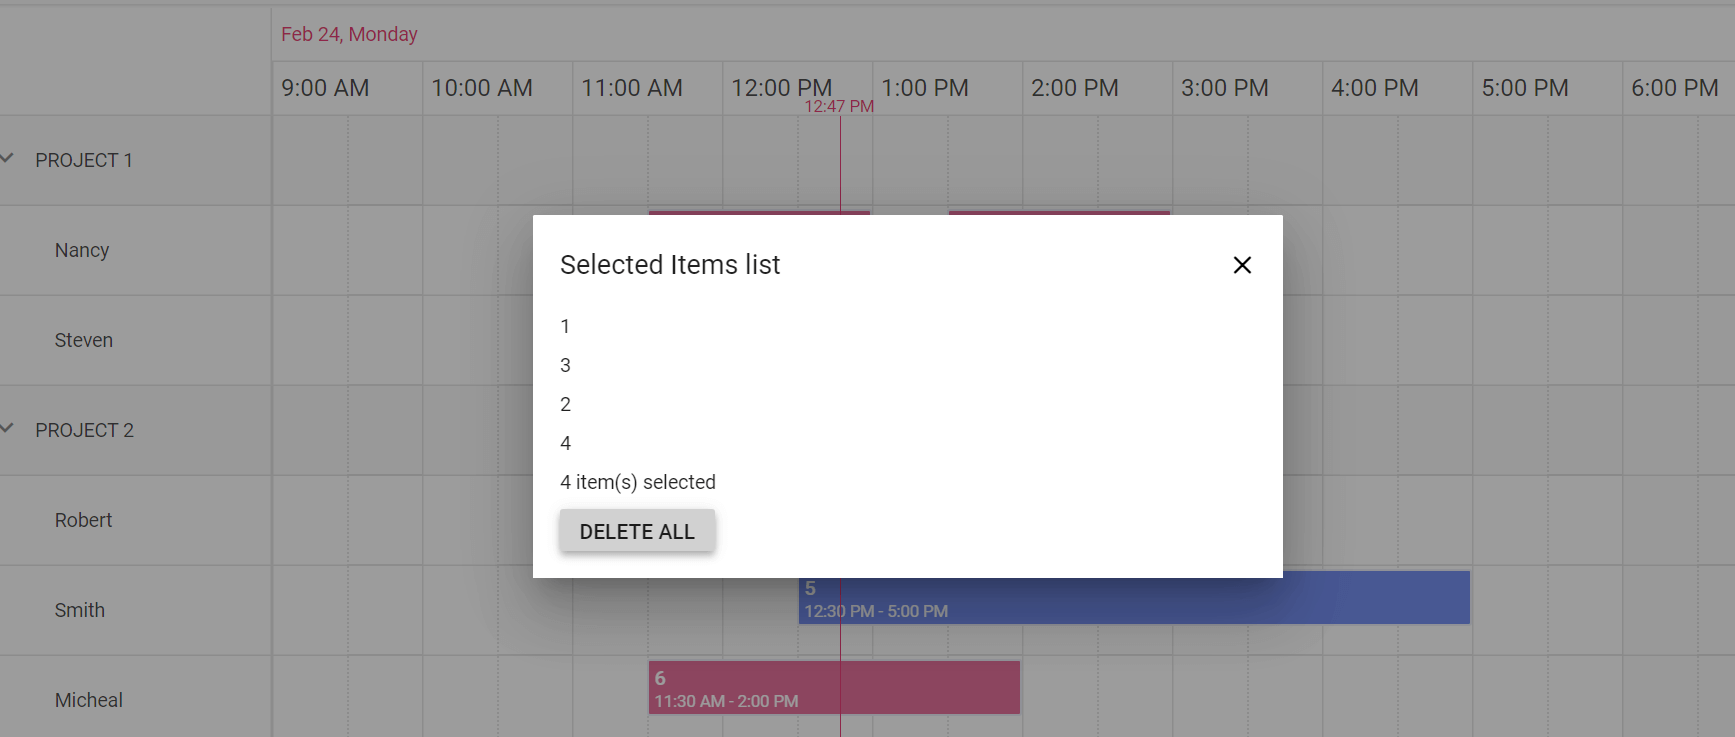
It is pretty easy to achieve multiple selection in our EJ 2 Scheduler control using a mouse. From here, we can apply styles and update properties for multiple items.
Conclusion
I hope you now have a clear idea about implementing multiselection in the Essential JS 2 Scheduler control. The HTML file created in the blog is available in this location for your reference. You can always download our free evaluation to see all our controls in action.
If you have any questions or require clarification about these features, please let us know in the comments below. You can also contact us through our support forum, Direct-Trac, or feedback portal. We are happy to assist you!
 No spam, just valuable updates.