
TL;DR: Learn how to add and customize Excel slicers programmatically using C# and Syncfusion XlsIO. This guide walks you through building dynamic filters for Excel tables, perfect for enterprise dashboards and automated reports.
When working with large datasets in Excel, especially in enterprise reporting scenarios, being able to filter data quickly and intuitively is crucial. Traditional filters get the job done, but they often lack the visual appeal and user-friendliness that modern dashboards demand.
That’s where Excel Slicers come in. Slicers offer a clean, button-based interface that lets users dynamically filter data with ease. In this blog, we’ll walk through how to create and customize slicers for Excel tables programmatically using C# and the Syncfusion XlsIO Library.
The Syncfusion .NET Excel Library, also known as Essential XlsIO, is a powerful tool for creating, reading, and editing Excel files using C#, without requiring Microsoft Office to be installed. Whether you’re building automated reports or interactive dashboards, this approach helps developers deliver polished, user-friendly Excel documents for enterprise use.
Why use Excel Slicers?
Slicers are a visual filtering tool introduced in Excel that:
- Provide a more intuitive way to filter data.
- Allow multi-select filtering.
- Enhance dashboards with interactive controls.
- Work seamlessly with tables and pivot tables.
They’re especially useful in automated reporting and dashboard generation, where user experience matters.
Prerequisites
To follow along, you’ll need:
Setting up your .NET Core project
- Create a new .NET Core console application in Visual Studio.
- Install the Syncfusion.XlsIO.Net.Core NuGet package from NuGet.org.
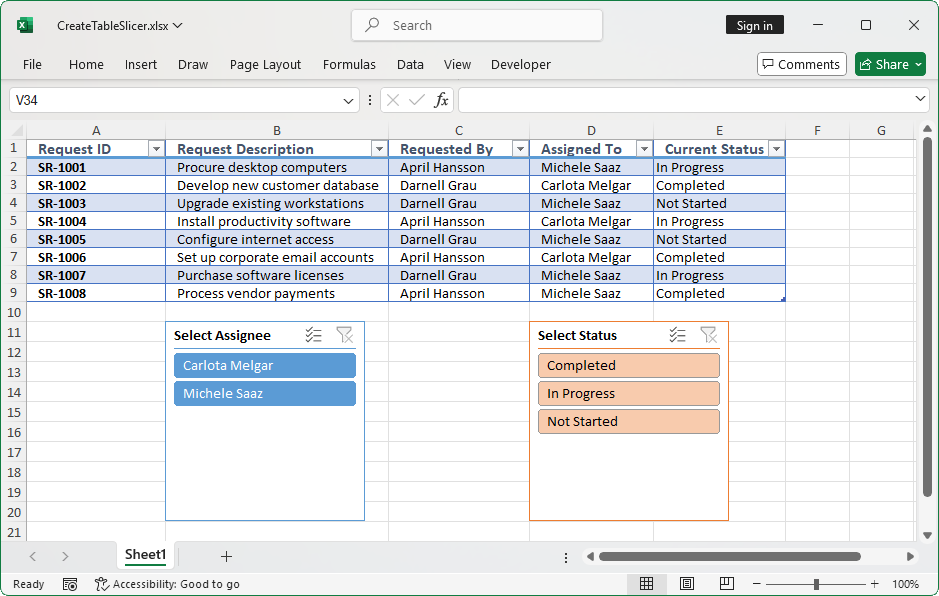
- Create an Excel file (CreateTableSlicer.xlsx) with a table containing columns like Requester and Status.
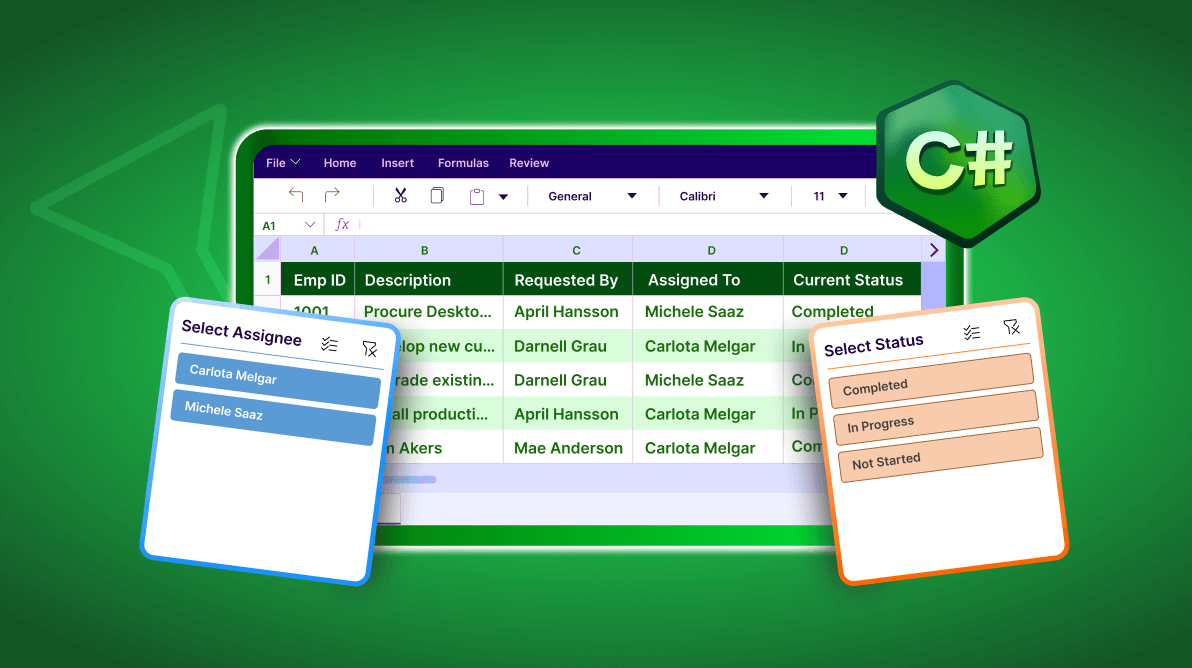
Add Slicers to your Excel document
The following code example demonstrates how to use slicers in an Excel document that contains a service request log, allowing users to filter records by requester and status for faster and more efficient issue tracking.
using System.IO;
using Syncfusion.XlsIO;

namespace CreateTableSlicer
{
    class Program
    {
        static void Main(string[] args)
        {
            // Initialize ExcelEngine
            using (ExcelEngine excelEngine = new ExcelEngine())
            {
                // Set the default application version as Xlsx
                IApplication application = excelEngine.Excel;
                application.DefaultVersion = ExcelVersion.Xlsx;

                // Open existing workbook with data
                IWorkbook workbook = application.Workbooks.Open(
                    Path.GetFullPath(@"Data/InputTemplate.xlsx"),
                    ExcelOpenType.Automatic);

                // Access first worksheet from the workbook
                IWorksheet sheet = workbook.Worksheets[0];

                // Access the table
                IListObject table = sheet.ListObjects[0];

                // Add Slicer to the Requester column (4th column) from the table at 11th row and 2nd column
                sheet.Slicers.Add(table, 4, 11, 2);

                // Modify Slicer properties
                ISlicer slicer = sheet.Slicers[0];

                // Set Slicer caption, name, and size
                slicer.Caption     = "Select Assignee";
                slicer.Name        = "Assignees";
                slicer.Height      = 200;
                slicer.Width       = 200;

                // Apply built-in style for requester slicer
                slicer.SlicerStyle = ExcelSlicerStyle.SlicerStyleDark1;

                // Add Slicer to the Status column (5th column) from the table at 11th row and 4th column
                sheet.Slicers.Add(table, 5, 11, 4);

                // Modify Slicer properties
                slicer             = sheet.Slicers[1];
                slicer.Caption     = "Select Status";
                slicer.Name        = "Status";
                slicer.Height      = 200;
                slicer.Width       = 200;

                // Apply built-in style for status slicer
                slicer.SlicerStyle = ExcelSlicerStyle.SlicerStyleLight2;

                // Save the workbook
                workbook.SaveAs(Path.GetFullPath("Output/CreateTableSlicer.xlsx"));
            }
        }
    }
}
How it works
- The code opens an existing Excel file and accesses the first worksheet.
- It retrieves the table and adds slicers to the Requester and Status columns.
- Each slicer is customized with a caption, name, size, and style.
- The final Excel file is saved with slicers applied, enabling dynamic filtering.
Now, users can select a value in the slicer to filter the table data dynamically. For example, choosing In Progress in the Status slicer filters the table to show only matching entries, no need to manually apply filters in the column headers.
Note: Follow the official documentation to create an Excel Slicer in C#.
Other use cases for Excel Slicers
Here are some additional scenarios where dynamic Excel slicers can be effectively used:
- Project management: View tasks by assignee, priority, or completion status.
- HR leave reports: Analyze leave data by employee, leave type, or approval status.
- Sales dashboards: Slice performance by region, product, or quarter.
- Inventory management: Track stock by supplier, category, or stock level.
- Financial reports: Filter expenses by department, month, or cost category.
Reference
You can download the complete samples from the GitHub repository.
Conclusion
Thanks for reading! We’ve explored how the Syncfusion Excel Library (XlsIO) can easily create slicers for tables in an Excel document using C#.
You can explore the official documentation for more advanced features and customization options, each supported with clear code examples to help you easily implement them. Using the library, you can also export or write Excel data to PDF, images, data tables, HTML, CSV, TSV, collections of objects, ODS, and JSON.
Already a Syncfusion user? You can download the product setup here. Not yet a user? Try a 30-day trial here.
If you have any questions or require clarification about these features, please let us know in the comments below. You can also contact us through our support forum, support portal, or feedback portal. We are happy to assist you!

 No spam, just valuable updates.