

Visual Studio extensions are add-ons that allow you to customize and enhance your project by adding new features or integrating existing tools into it. They increase your productivity. Visual Studio extensions can customize an existing or new project by adding files, new dialog, menus, commands, and so on.
Read more details about the extensions here.
This post explains the creation of Visual Studio extensions in Visual Studio 2019, that can be configured to,
- Create a new project dialog
- Extensions menu
Prerequisites
Create Visual Studio project template
The Visual Studio project template, when applied to an existing or a new project, adds basic code and modifies the structure of the project, expanding on the predefined project template.
You can create a project template for any project type. Here, I am going to create a new WPF project for demonstration purposes.
Create a WPF project and add the code, assembly references, folder structure, and other details that you expect to be added in a new project.
Export the project as a template using the Export Template option in the Project menu.
Select the Project template option, choose the project that you want to export as a template, and click Next.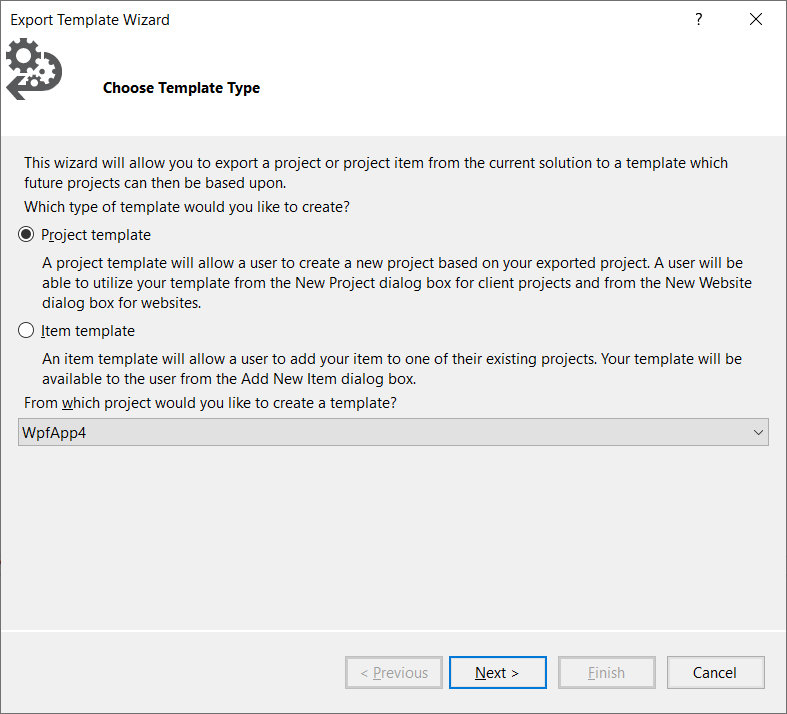
Fill in the template name and description, then click Finish.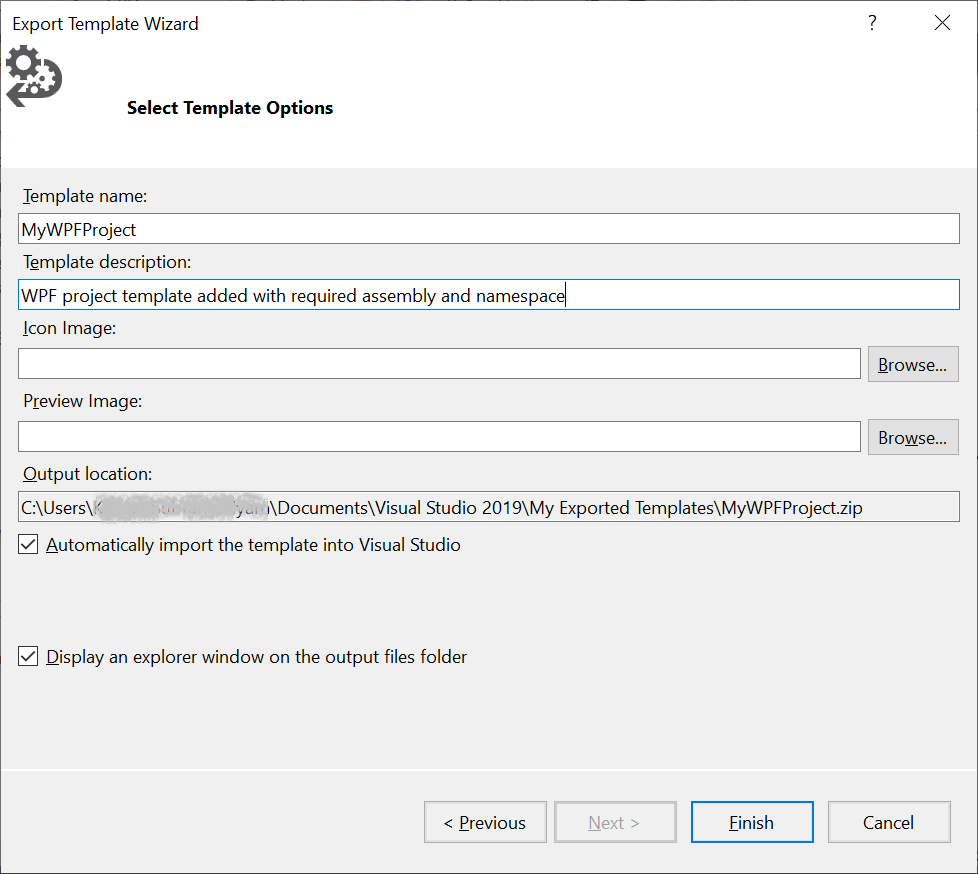
By default, the template files are saved in %userprofile%\Documents\Visual Studio 2019\My Exported Templates\{Template name}.zip.
I have named my Template MyWPFProject.
Add filter tags in vstemplate
Extract the template .zip file (MyWPFProject.zip) and open the MyTemplate.vstemplate file. Add the following tags under the TemplateData tag to display the template in the Create new project dialog of Visual Studio 2019.
<LanguageTag>C#</LanguageTag>
<PlatformTag>windows</PlatformTag>
<ProjectTypeTag>desktop</ProjectTypeTag>
<TemplateID>MyWPFTemplateApplication</TemplateID>
Note: You can add duplicate tags to enable other languages like Visual Basic in another LanguageTag. The value of the TemplateID tag will be used in the Create new project dialog.
Zip all the files again with the same name (MyWPFProject.zip).
Create VSIX project
Create a new VSIX project in Visual Studio 2019 through File->New->Project. Search for VSIX Project and click Next.
Set the project name to SampleExtension and click Create.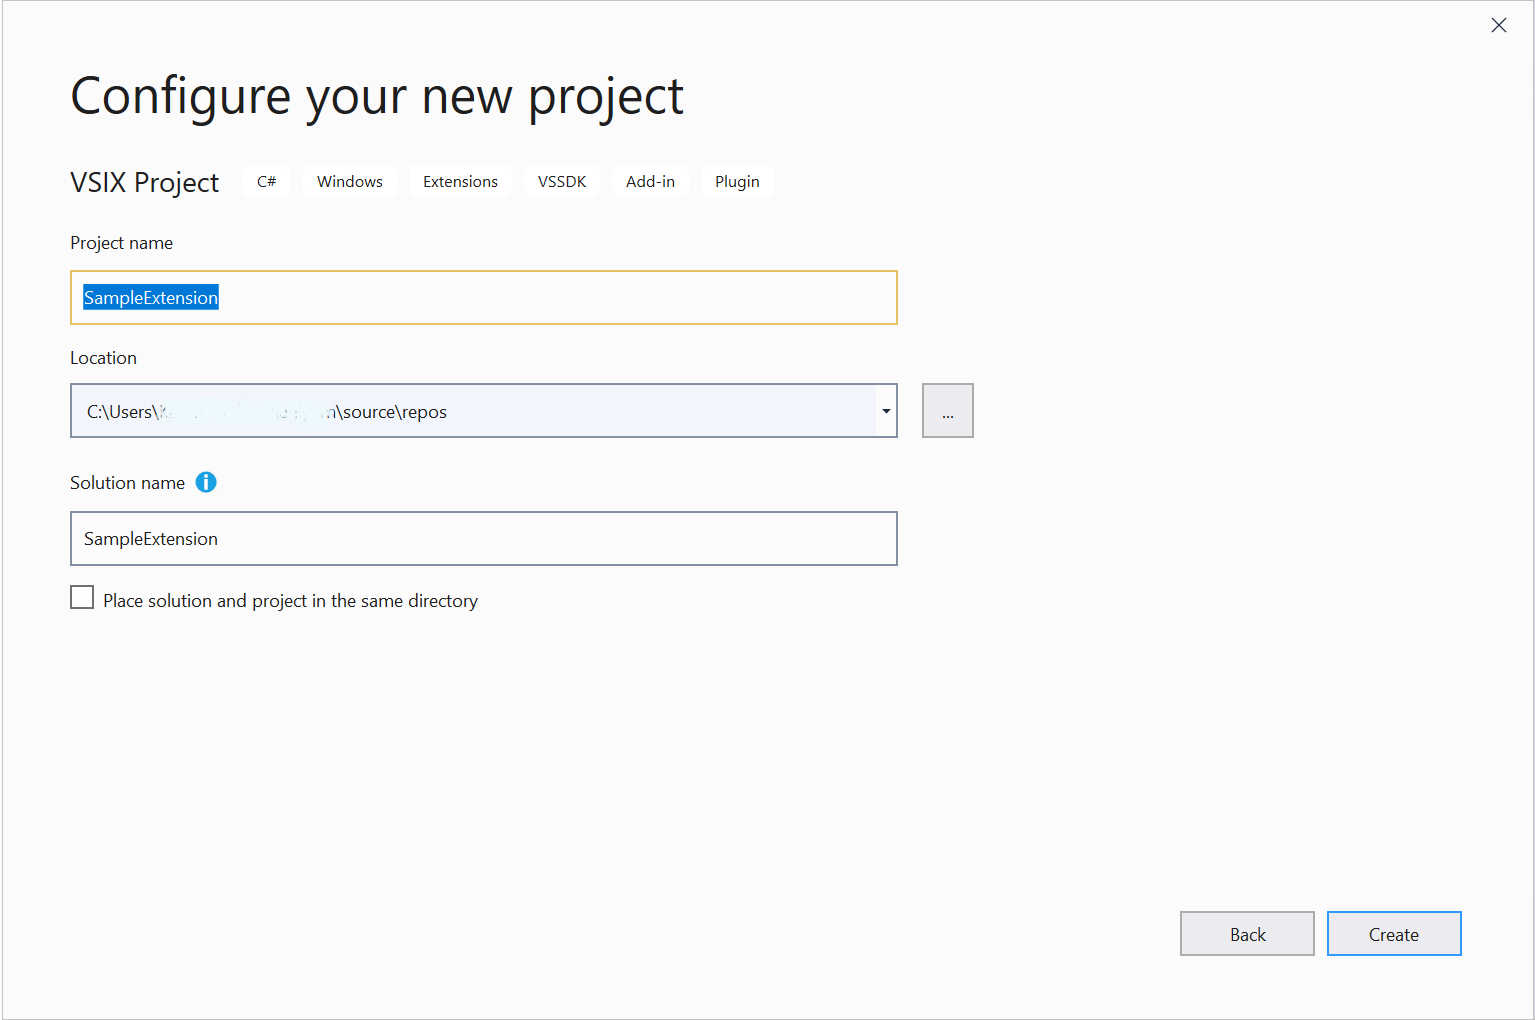
The new VSIX project is now created with asynchronous service.
Update the extension details
The source.extension.vsixmanifest has the extension name, description, author, license, and other details. Open the vsixmanifest file to edit the extension details.
Add Visual Studio project template to VSIX project
Add the Visual Studio project template (MyWPFProject) to your VSIX project to list the template in the Create a new project dialog of Visual Studio.
To add the Visual Studio project template, open the source.extension.vsmanifest file, then select Assets, and click New. The Add New Asset dialog will appear. Provide the template details as illustrated in the following screenshot.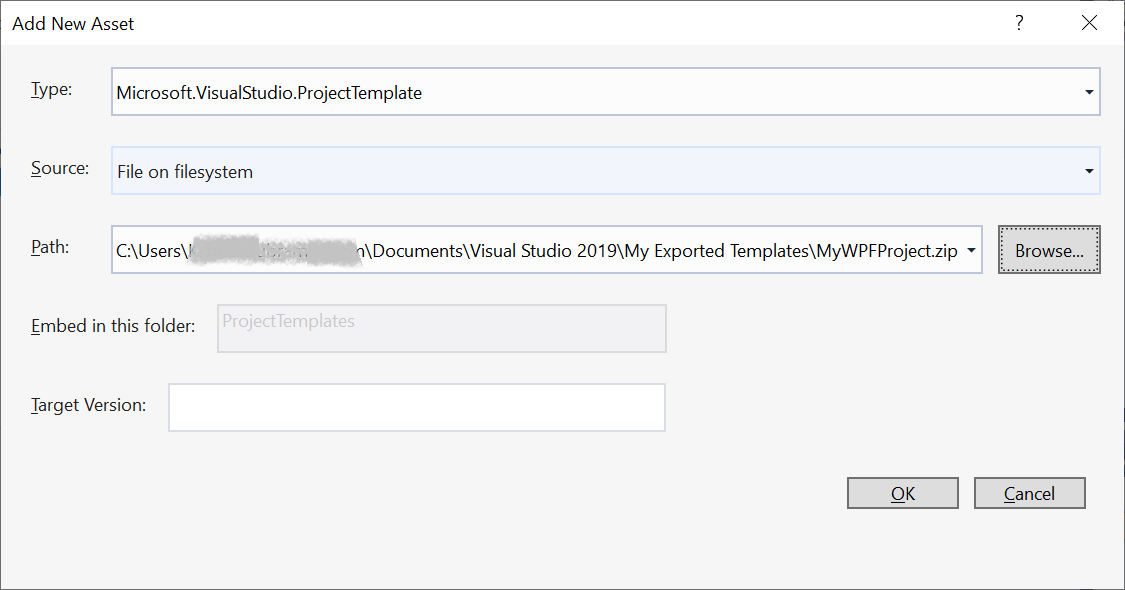
Click OK to add the Visual Studio project template to the VSIX project.
Creating a custom project from menu
Creating a custom project from the Create new project dialog is one way to do it. The other way is to create one using the menu option in Visual Studio.
Create a menu in Visual Studio IDE
To create a menu, add a command file from the Solution Explorer, right-click the project, and select Add > New Item.
In the Add New Item dialog, go to Visual C# / Extensibility and select Command (or Custom Command).
Name the file Command and click Add. The Command.cs, Command.png under the Resource folder, and SampleExtensionPackage.vsct files will be created and added to the project.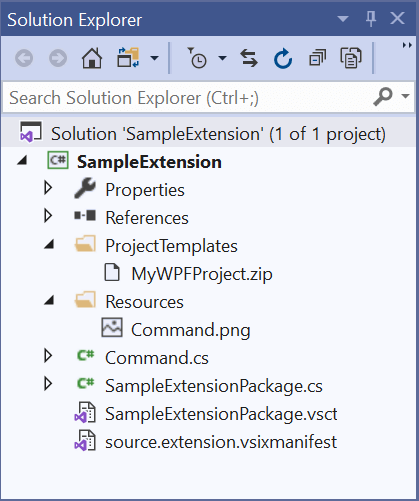
Open the SampleExtensionPackage.vsct and add the following menu code inside the Commands node.
<Menus>
      <Menu guid="guidSampleExtensionPackageCmdSet" id="TopLevelMenu" priority="0x700" type="Menu">
        <Parent guid="guidSHLMainMenu" id="IDG_VS_MM_FILEEDITVIEW" />
        <Strings>
          <ButtonText>Create MyWPFProject</ButtonText>
          <CommandName>C&reate MyWPFProject</CommandName>
        </Strings>
      </Menu>
</Menus>
Note: Menu guid—guidSampleExtensionPackageCmdSet
Menu id—TopLevelMenu
Update the guid and id of the parent node inside the group node with the same values of guid and id as in the menu node.
<Groups>
   <Group guid="guidSampleExtensionPackageCmdSet" id="MyMenuGroup" priority="0x0600">
       <Parent guid="guidSampleExtensionPackageCmdSet" id="TopLevelMenu"/>
   </Group>
</Groups>
Update the inner text of ButtonText tag as Create My WPF Project under the Button’s String tag.
<Button guid="guidSampleExtensionPackageCmdSet" id="CommandId" priority="0x0100" type="Button">
        <Parent guid="guidSampleExtensionPackageCmdSet" id="MyMenuGroup" />
        <Icon guid="guidImages" id="bmpPic1" />
        <Strings>
          <ButtonText>Create MyWPFProject</ButtonText>
        </Strings>
</Button>
Add the menu IDSymbol (TopLevelMenu) inside the GuidSymbol node with the name guidSampleExtensionPackageCmdSet.
<GuidSymbol name="guidSampleExtensionPackageCmdSet" value="{bd0977d5-b805-4fbb-9e31-fbcc5d3cb437}">
      <IDSymbol name="MyMenuGroup" value="0x1020" />
      <IDSymbol name="CommandId" value="0x0100" />
      <IDSymbol name="TopLevelMenu" value="0x1021"/>
</GuidSymbol>
Call the customized project from menu
When clicking the menu (Create MyWPFProject), call the MyWPFProject (customized) Visual Studio project template to create a new project.
In the Execute method in the Command.cs class, remove existing code to show the message box and add the following code to call the Create New Project dialog.
private void Execute(object sender, EventArgs e)
{
    ThreadHelper.ThrowIfNotOnUIThread();
    IVsSolution vsSolution = Package.GetGlobalService(typeof(IVsSolution)) as IVsSolution;
    vsSolution.CreateNewProjectViaDlg("MyWPFTemplateApplication", "MyWPFProject", 0);
}
The MyWPFTemplateApplication is the TemplateID and MyWPFProject is the template name, which is updated in the vstemplate file at the time of exporting the project template.
Run the extension
Press F5 to run the sample extension in the Visual Studio 2019 instance. This will open the new Visual Studio experimental instance. Choose Continue without code to open the Visual Studio IDE.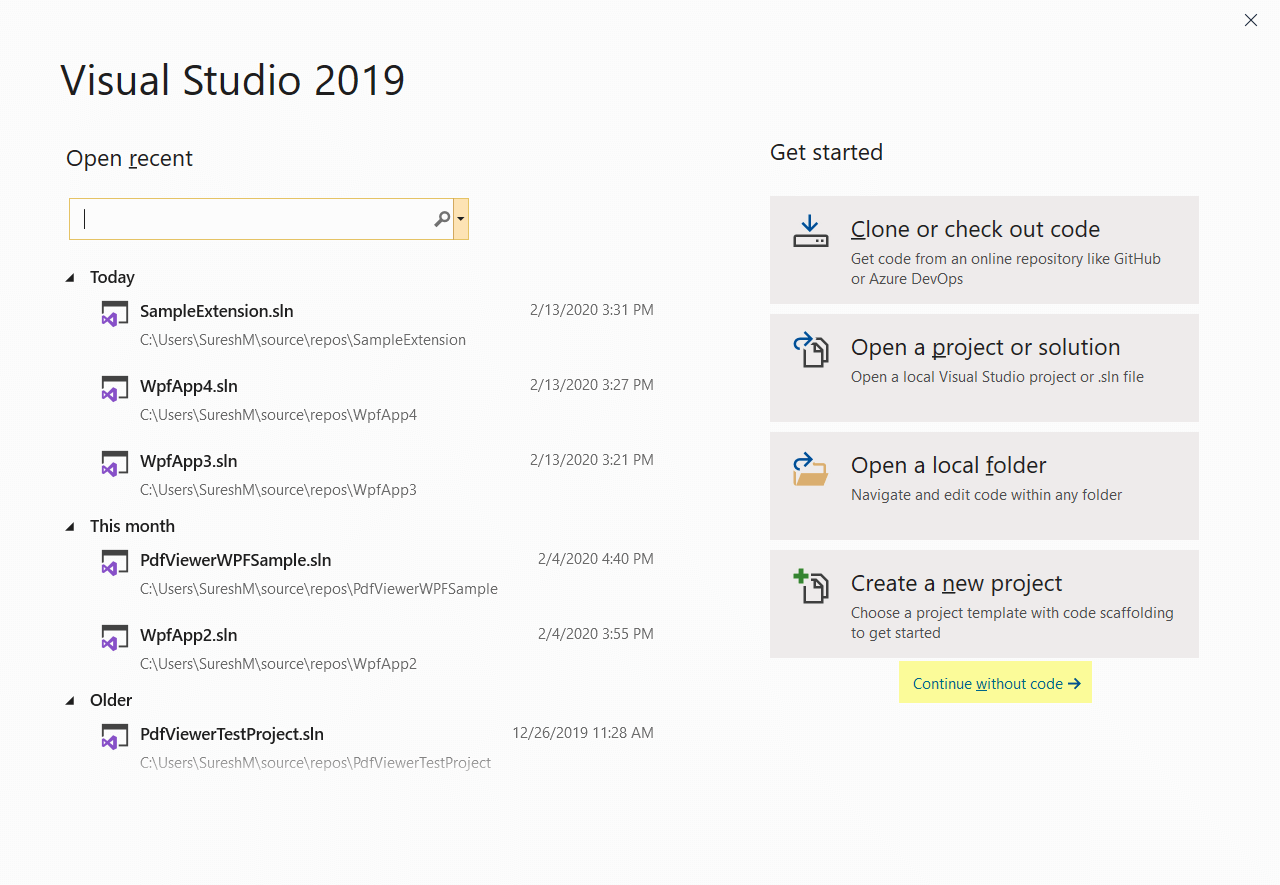
Now you can see the Create MyWPFProject under Extensions -> Sample Extension Menu.
When selecting the Create MyWPFProject, the Configure your new project dialog will appear as shown in the following screenshot.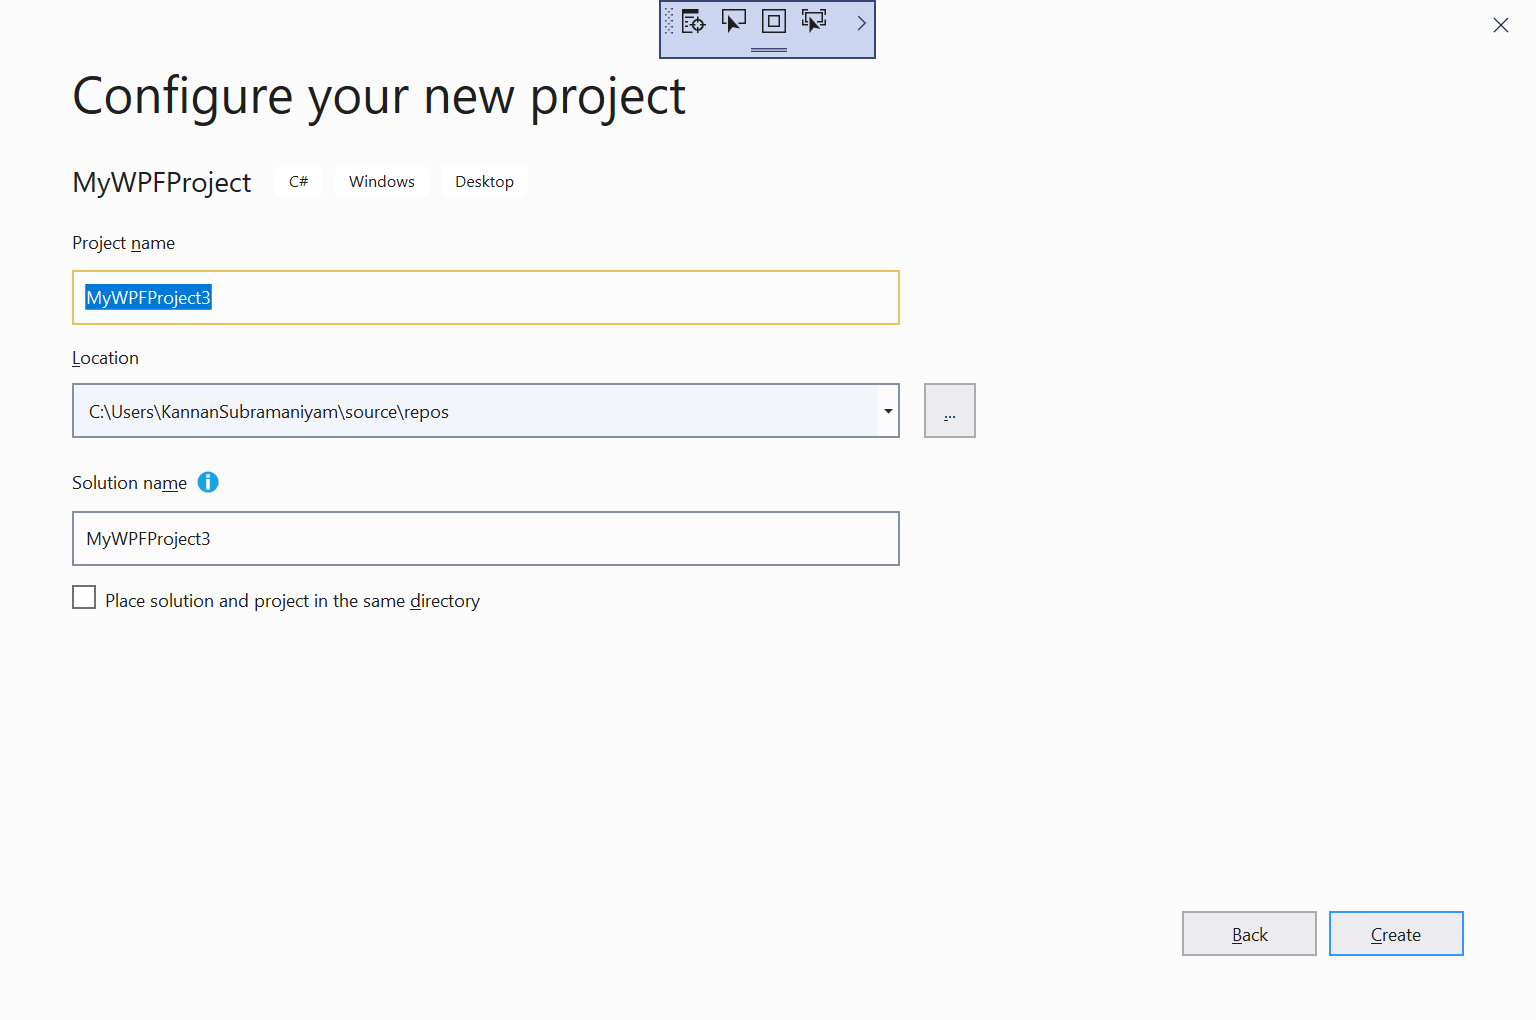
Click Create to create the project with the changes exported to the Visual Studio template.
Install the extension
You can find the extension in the output location with the extension *.vsix.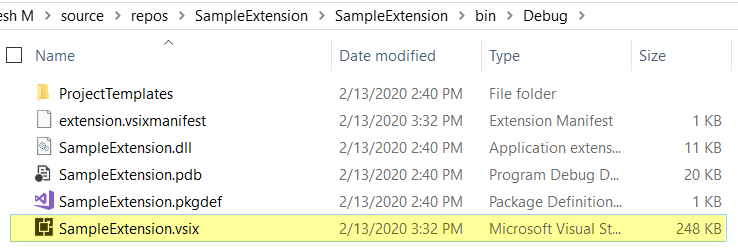
Install this extension on other machines by running the .vsix file. The VSIX installer dialog will open to install this extension.
Publish the extension to Visual Studio Marketplace
The Visual Studio extension can be published in the Visual Studio Marketplace to share this extension with the public.
Refer to this documentation to publish the extension in the Visual Studio Marketplace.
Source of this sample extension
Download the complete source of this sample extension on Direct-Trac.
Conclusion
I hope this article was useful in showing you every step in creating a Visual Studio project template and publishing and using an extension in a Visual Studio project.
Syncfusion has about 1,000 components and frameworks for WinForms, WPF, ASP.NET (Web Forms, MVC, Core), UWP, Xamarin, Flutter, JavaScript, Angular, Blazor, Vue, and React. Use them to boost your application development speed.
If you have any questions, please let us know in the comments section. You can also contact us through our support forum, Direct, or feedback portal. As always, we are happy to assist you!


 No spam, just valuable updates.
Comments (3)
Great content! Super high-quality! Keep it up! 🙂
I receive an error in VS holding the project (not the instance running the code) :
Microsoft.VisualStudio.Services.WebApi.pdb not loaded
System.NullReferenceException
HResult=0x80004003
Message=Object reference not set to an instance of an object.
Source=Microsoft.VisualStudio.Services.WebApi
StackTrace:
at Microsoft.VisualStudio.Services.Profile.Client.ProfileHttpClientBase.ExtractRevisionFromEtagInResponseHeader(HttpResponseMessage response)
can you advice ?
tkx,
Domi.
Hi Hugo,
Could you please provide the below details to check the issue further from our side?
1. When you are facing this issue? Could you please explain more on this?
2. What are the steps you have followed from your side?
3. What Visual Studio 2019 version you are using?
You can also create Direct-Trac incident (https://www.syncfusion.com/support/directtrac/) with these details for better resolution on this bug.
Regards,
Ganesan Rengasamy.