
TL;DR: Developers often need a reliable way to generate structured, interactive PDF forms on the server to support workflows like registrations, onboarding, compliance, and data capture. Server-side PDF form creation is a common requirement in enterprise applications where accuracy, security, and automation are essential. This blog explores the challenges developers face when working with fillable PDF forms in .NET and provides a practical approach to handling them effectively.
Struggling to manage form data inside the browser? Need a secure way to store and process that data for analytics or business workflows? Many developers run into the same problem.
A reliable solution is to generate and fill PDF forms on the server. This approach lets you:
- Store form data in a structured, reusable format.
- Automate processes for registrations, agreements, and surveys.
- Keep sensitive information on the server, not in the browser.
The Syncfusion® .NET PDF Library helps you do this with ease. It supports creating and filling interactive PDF forms (AcroForms) entirely on the server. You can generate form fields, prefill them with default or user‑submitted values, and return secure, fillable PDFs, without exposing any sensitive data to the client.
In this blog, we’ll walk through the workflow for creating and filling PDF forms on the server using an ASP.NET Core application. Let’s get started.
Why server-side PDF form creation is critical
Applications that collect large volumes of form data must prioritize security, consistency, and performance. When all processing happens in the browser, complex forms can slow down the UI, reduce responsiveness, and in some cases freeze the page. Server‑side generation avoids these issues by keeping the workload off the client.
Here are the key reasons why server-side form creation is the better approach:
- Keep sensitive data secure: All processing stays on the server, reducing exposure and minimizing the risk of leaks.
- Centralized logic and control: Gives you a single point of control, making it easier to maintain, update, and enforce business rules.
- Offload heavy PDF generation: PDF creation is resource‑intensive; performing it server‑side keeps client devices fast and responsive.
- Scalable and automated: Server‑side processing can efficiently generate thousands of interactive forms and supports automation across large business processes.
Create an ASP.NET Core app and design an HTML form
To build a workflow for creating and filling PDF forms on the server, start by setting up a simple project. This application will collect user details through an HTML form and use the Syncfusion PDF Library to generate a PDF with form fields on the server.
Step 1: Create an ASP.NET Core application
Open the terminal in Visual Studio Code and run the following command to create your ASP.NET Core application:
dotnet new mvc -n FormFieldsSample
cd FormFieldsSample
Step 2: Add Syncfusion PDF Library package
To work with PDF documents and create fillable PDF forms, you need to add the Syncfusion PDF Library to your project. This library provides APIs for creating, editing, and filling PDF form fields on the server.
dotnet add package Syncfusion.Pdf.Net.CoreStep 3: Create a model class for form fields
Next, create a model class that defines fields like Name, Email, and Address. It binds the HTML form input to the controller for processing and PDF generation.
Here’s how you can do it in code:
namespace FormFieldsSample.Models
{
    public class UserRegisterationModel
    {
        public string Name { get; set; } = string.Empty;
        public string EmailID { get; set; } = string.Empty;
        public string PhoneNumber { get; set; } = string.Empty;
        public DateTime DateOfBirth { get; set; } = DateTime.Today;
        public string Gender { get; set; } = string.Empty;
        public string MaritalStatus { get; set; } = string.Empty;
        public string Occupation { get; set; } = string.Empty;
        public string Address { get; set; } = string.Empty;
        public bool ReceiveNotifications { get; set; }

        public SelectList GenderList { get; set; } = new SelectList(new[] { "Male", "Female", "Other" });
        public SelectList MaritalStatusList { get; set; } = new SelectList(new[] { "Single", "Married", "Other" });
        public SelectList OccupationList { get; set; } = new SelectList(new[] { "Doctor", "Teacher", "Software Engineer", "Student", "Entrepreneur", "Other" });
    }
}
Step 4: Design the HTML form and initialize default values
Once your model is ready, the next step is to build the HTML form in Index.cshtml. This is where users enter their details, and each field is tied directly to the model properties you just created.
To make the demo easier to test, you can also load the form with default values from the controller. This way, when the page opens, you don’t have to type everything from scratch, you can immediately see how the fields bind, submit the form, and verify that those values show up correctly in the generated PDF.
<div class="control-section" style="max-width:900px;margin:auto;">
    <h2 style="margin-bottom:18px">Survey and Research Registration Form</h2>
    <h4 style="color:#666;margin-top:0;margin-bottom:18px;">Registration Details</h4>
    @using (Html.BeginForm("CreateForm", "Home", FormMethod.Post))
    {
        <div class="form-group">
            <label style="font-size:20px;margin-bottom:14px;">Full Name</label>
            @Html.TextBoxFor(m => m.Name, new { @class = "form-control" })

            <label style="font-size:20px;margin-bottom:14px">Email Address</label>
            @Html.TextBoxFor(m => m.EmailID, new { @class = "form-control", @type = "email" })

            <label style="font-size:20px;margin-bottom:14px">Phone Number</label>
            @Html.TextBoxFor(m => m.PhoneNumber, new { @class = "form-control", @type = "tel" })

            <label style="font-size:20px;margin-bottom:14px">Date of Birth</label>
            @Html.TextBoxFor(m => m.DateOfBirth, "{0:yyyy-MM-dd}", new { @class = "form-control", @type = "date" })

            <label style="font-size:20px;margin-bottom:14px">Gender</label>
            @Html.DropDownListFor(m => m.Gender, Model.GenderList, new { @class = "custom-select" })

            <label style="font-size:20px;margin-bottom:14px">Marital Status</label>
            @Html.DropDownListFor(m => m.MaritalStatus, Model.MaritalStatusList, new { @class = "custom-select" })

            <label style="font-size:20px;margin-bottom:14px">Occupation</label>
            @Html.DropDownListFor(m => m.Occupation, Model.OccupationList, new { @class = "custom-select" })

            <label style="font-size:20px;margin-bottom:14px">Address</label>
            @Html.TextBoxFor(m => m.Address, new { @class = "form-control" })

            <div class="form-check" style="margin-top:10px;">
                @Html.CheckBoxFor(m => m.ReceiveNotifications, new { @class = "form-check-input" })
                <label class="form-check-label">Would you like to get notifications from us?</label>
            </div>
        </div>

        <div style="margin-top:16px;">
            <input type="submit" class="btn btn-primary" value="Create Form" style="width:150px;" />
        </div>
    }
</div>
Initialize default values in HomeController
In the HomeController, the Index action fills in sample data such as name, email, phone number, date of birth, and all the dropdown lists. When the view loads, the form is already populated with sample values, so you can immediately submit it and test the PDF output.
public IActionResult Index()
{
    var model = new UserRegisterationModel
    {
        Name = "John Doe",
        EmailID = "[email protected]",
        PhoneNumber = "011-54893-232",
        DateOfBirth = new DateTime(1995, 5, 12),
        Gender = "Male",
        MaritalStatus = "Single",
        Occupation = "Software Engineer",
        Address = "123 Main Street, Chennai",
        ReceiveNotifications = true,
        GenderList = new SelectList(new[] { "Male", "Female", "Other" }),
        MaritalStatusList = new SelectList(new[] { "Single", "Married", "Other" }),
        OccupationList = new SelectList(new[] { "Doctor", "Teacher", "Software Engineer", "Student", "Entrepreneur", "Other" })
    };
    return View(model);
}
Step 5: Launch the application in the browser
Once the form and default values are set up, the next step is to build and run the application using the following commands:
dotnet build
dotnet runGenerate business-ready PDFs, extract text and images, fill forms, add tables and barcodes, and automate document operations like merging, splitting, and compression directly in your .NET applications.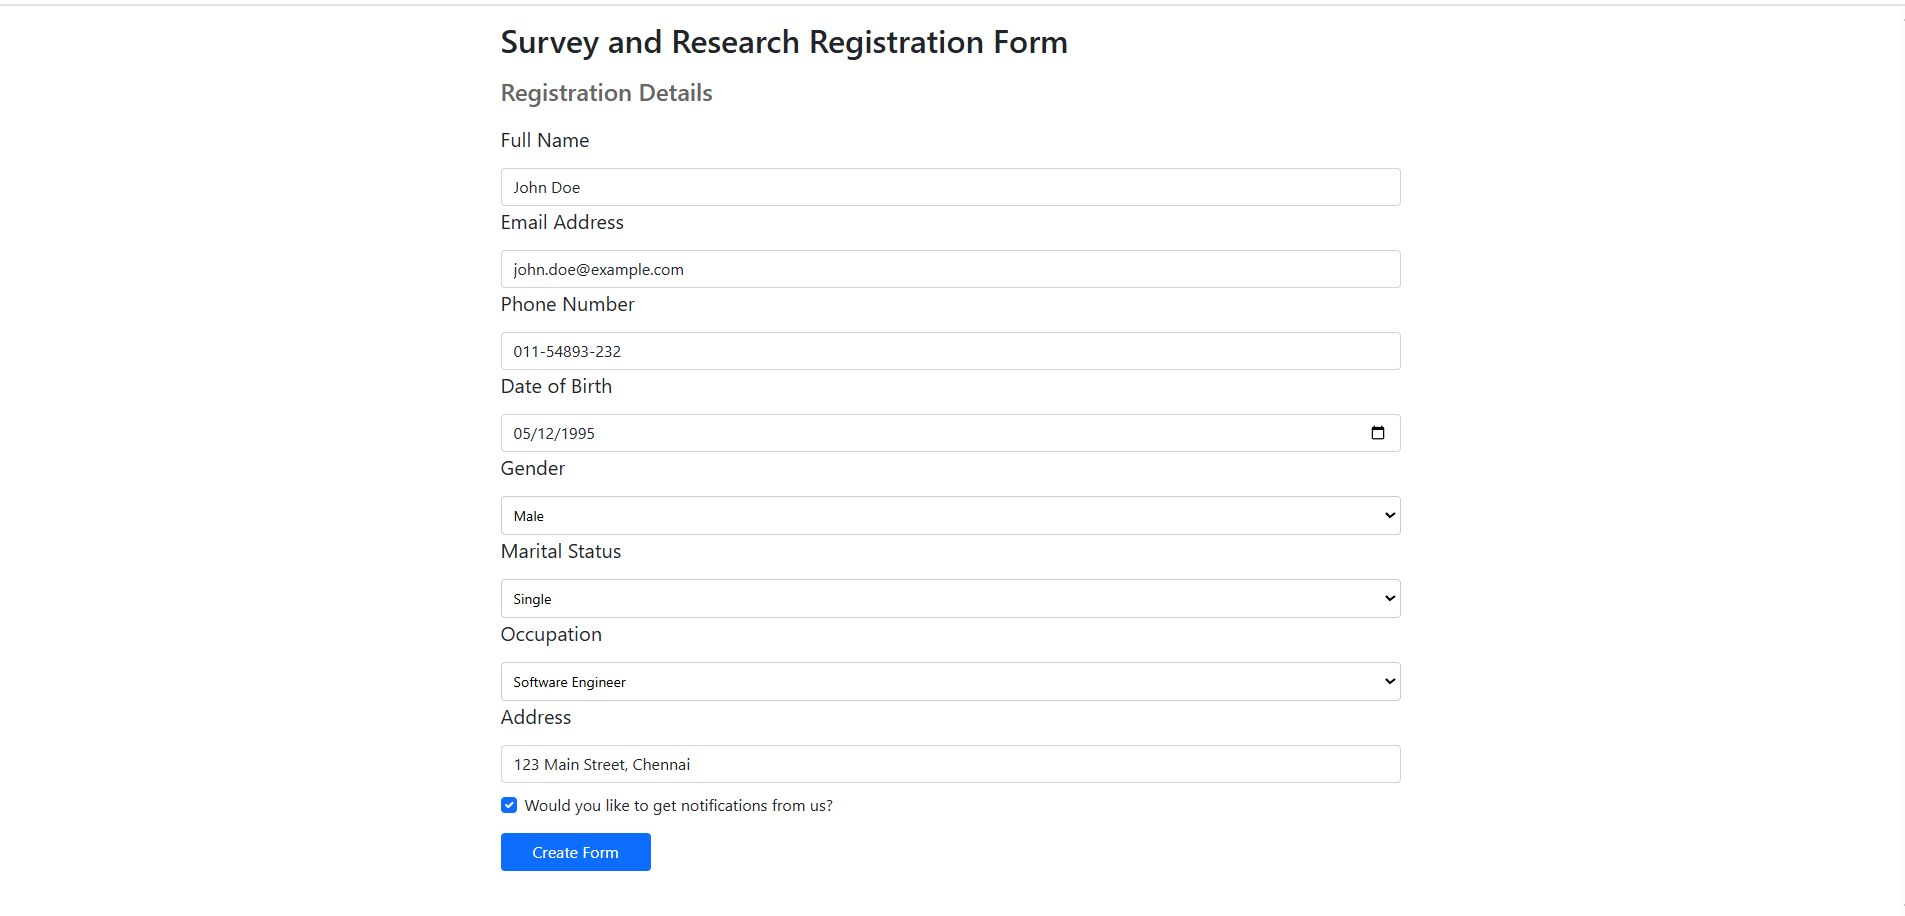
Convert the HTML form to interactive PDF forms on the server
Once your HTML form loads with default values, the next step is to generate a PDF document with interactive form fields. The Syncfusion .NET PDF Library handles this by letting you programmatically add fields such as text boxes, radio buttons, combo boxes, checkboxes, list boxes, and more, directly into a PDF document.
Let’s see how to convert the HTML Forms to Interactive PDF Forms:
- First, create a new PDF document using the PdfDocument class.
- Add a blank page using the PdfPage class.
- Add text box fields for name, email address, and phone number using the PdfTextBoxField class.
- Then, add the radio button group for gender selection and marital status using the PdfRadioButtonListField class, and add the list of items using the PdfRadioButtonListItem class.
- Add a combo box field for occupation using the PdfComboBoxField class, and add the list of items using the PdfListFieldItem class.
- Add a checkbox field for notifications using the PdfCheckBoxField class.
- Finally, assign values to each field as you create it.
The code below shows the full implementation used to generate the interactive PDF on the server:
public IActionResult CreateForm(UserRegisterationModel model)
{
// Create a new PDF document
using (PdfDocument pdfDocument = new PdfDocument())
{
// Add a new page to the PDF document
PdfPage pdfPage = pdfDocument.Pages.Add();
// Get graphics object to draw text and labels on the page
PdfGraphics pdfGraphics = pdfPage.Graphics;
//Set the standard font.
PdfFont titleFont = new PdfStandardFont(PdfFontFamily.Helvetica, 18, PdfFontStyle.Bold);
PdfFont subtitleFont = new PdfStandardFont(PdfFontFamily.Helvetica, 12, PdfFontStyle.Bold);
PdfFont labelFont = new PdfStandardFont(PdfFontFamily.Helvetica, 11);
PdfFont fieldFont = new PdfStandardFont(PdfFontFamily.Helvetica, 11);
// Layout settings for positioning labels and field
float labelX = 40f; // Label column
float fieldX = 220f; // Field column
float rowHeight = 30f; // Vertical spacing
float fieldWidth = 300f; // Field width
float fieldHeight = 22f; // Field height
float currentY = 40f; // Start position
// Title and subtitle
pdfGraphics.DrawString("Survey and Research Registration Form", titleFont, PdfBrushes.Black, new PointF(labelX, currentY));
currentY += 28f;
pdfGraphics.DrawString("Registration Details", subtitleFont, PdfBrushes.Black, new PointF(labelX, currentY));
currentY += 28f;
// Helper method for text fields
void AddTextField(string fieldName, string labelText, string value)
{
// Draw label text
pdfGraphics.DrawString(labelText, labelFont, PdfBrushes.Black, new PointF(labelX, currentY));
// Create a text box field and set its properties
var textField = new PdfTextBoxField(pdfPage, fieldName)
{
Bounds = new RectangleF(fieldX, currentY - 4, fieldWidth, fieldHeight),
Font = fieldFont,
ToolTip = labelText,
Text = value ?? string.Empty
};
// Add the text field to the PDF form
pdfDocument.Form.Fields.Add(textField);
// Move to the next row
currentY += rowHeight;
}
// Add text fields
AddTextField("FullName", "Full Name:", model.Name);
AddTextField("Email", "Email Address:", model.EmailID);
AddTextField("Phone", "Phone Number:", model.PhoneNumber);
AddTextField("DateOfBirth", "Date of Birth:", model.DateOfBirth.ToString("yyyy-MM-dd"));
// Add Gender selection using radio buttons
pdfGraphics.DrawString("Gender:", labelFont, PdfBrushes.Black, new PointF(labelX, currentY));
var genderField = new PdfRadioButtonListField(pdfPage, "Gender");
pdfDocument.Form.Fields.Add(genderField);
float radioY = currentY - 4;
float radioSpacing = 110f;
// Create radio button options for Gender
var maleOption = new PdfRadioButtonListItem("Male") { Bounds = new RectangleF(fieldX, radioY, 12, 12) };
var femaleOption = new PdfRadioButtonListItem("Female") { Bounds = new RectangleF(fieldX + radioSpacing, radioY, 12, 12) };
var otherOption = new PdfRadioButtonListItem("Other") { Bounds = new RectangleF(fieldX + radioSpacing * 2, radioY, 12, 12) };
genderField.Items.Add(maleOption);
genderField.Items.Add(femaleOption);
genderField.Items.Add(otherOption);
// Draw labels next to radio button
pdfGraphics.DrawString("Male", labelFont, PdfBrushes.Black, new PointF(maleOption.Bounds.Right + 8, maleOption.Bounds.Top + (maleOption.Bounds.Height - labelFont.Size) / 2));
pdfGraphics.DrawString("Female", labelFont, PdfBrushes.Black, new PointF(femaleOption.Bounds.Right + 8, femaleOption.Bounds.Top + (femaleOption.Bounds.Height - labelFont.Size) / 2));
pdfGraphics.DrawString("Other", labelFont, PdfBrushes.Black, new PointF(otherOption.Bounds.Right + 8, otherOption.Bounds.Top + (otherOption.Bounds.Height - labelFont.Size) / 2));
genderField.SelectedIndex = model.Gender == "Male" ? 0 : model.Gender == "Female" ? 1 : 2;
currentY += rowHeight;
// Add Marital Status selection using radio buttons
pdfGraphics.DrawString("Marital Status:", labelFont, PdfBrushes.Black, new PointF(labelX, currentY));
var maritalField = new PdfRadioButtonListField(pdfPage, "MaritalStatus");
pdfDocument.Form.Fields.Add(maritalField);
// Create radio button options for Marital Status
var singleOption = new PdfRadioButtonListItem("Single") { Bounds = new RectangleF(fieldX, currentY - 4, 12, 12) };
var marriedOption = new PdfRadioButtonListItem("Married") { Bounds = new RectangleF(fieldX + radioSpacing, currentY - 4, 12, 12) };
var otherMaritalOption = new PdfRadioButtonListItem("Other") { Bounds = new RectangleF(fieldX + radioSpacing * 2, currentY - 4, 12, 12) };
maritalField.Items.Add(singleOption);
maritalField.Items.Add(marriedOption);
maritalField.Items.Add(otherMaritalOption);
pdfGraphics.DrawString("Single", labelFont, PdfBrushes.Black, new PointF(singleOption.Bounds.Right + 8, singleOption.Bounds.Top + (singleOption.Bounds.Height - labelFont.Size) / 2));
pdfGraphics.DrawString("Married", labelFont, PdfBrushes.Black, new PointF(marriedOption.Bounds.Right + 8, marriedOption.Bounds.Top + (marriedOption.Bounds.Height - labelFont.Size) / 2));
pdfGraphics.DrawString("Other", labelFont, PdfBrushes.Black, new PointF(otherMaritalOption.Bounds.Right + 8, otherMaritalOption.Bounds.Top + (otherMaritalOption.Bounds.Height - labelFont.Size) / 2));
maritalField.SelectedIndex = model.MaritalStatus == "Single" ? 0 : model.MaritalStatus == "Married" ? 1 : 2;
currentY += rowHeight;
// Add combo box fields (Occupation)
pdfGraphics.DrawString("Occupation:", labelFont, PdfBrushes.Black, new PointF(labelX, currentY));
var occupationField = new PdfComboBoxField(pdfPage, "Occupation")
{
Bounds = new RectangleF(fieldX, currentY - 4, fieldWidth, fieldHeight),
Font = fieldFont,
ToolTip = "Occupation"
};
occupationField.Items.Add(new PdfListFieldItem("Doctor", "Doctor"));
occupationField.Items.Add(new PdfListFieldItem("Teacher", "Teacher"));
occupationField.Items.Add(new PdfListFieldItem("Software Engineer", "Software Engineer"));
occupationField.Items.Add(new PdfListFieldItem("Student", "Student"));
occupationField.Items.Add(new PdfListFieldItem("Entrepreneur", "Entrepreneur"));
occupationField.Items.Add(new PdfListFieldItem("Other", "Other"));
occupationField.SelectedIndex = model.Occupation == "Doctor" ? 0 :
model.Occupation == "Teacher" ? 1 :
model.Occupation == "Software Engineer" ? 2 :
model.Occupation == "Student" ? 3 :
model.Occupation == "Entrepreneur" ? 4 : 5;
pdfDocument.Form.Fields.Add(occupationField);
currentY += rowHeight;
// Add Address field
AddTextField("Address", "Address:", model.Address);
// Add Notifications checkbox
pdfGraphics.DrawString("Notifications:", labelFont, PdfBrushes.Black, new PointF(labelX, currentY));
var notifyField = new PdfCheckBoxField(pdfPage, "ReceiveNotifications")
{
Bounds = new RectangleF(fieldX, currentY - 4, 12, 12),
ToolTip = "Receive Notifications",
Checked = model.ReceiveNotifications
};
pdfDocument.Form.Fields.Add(notifyField);
}
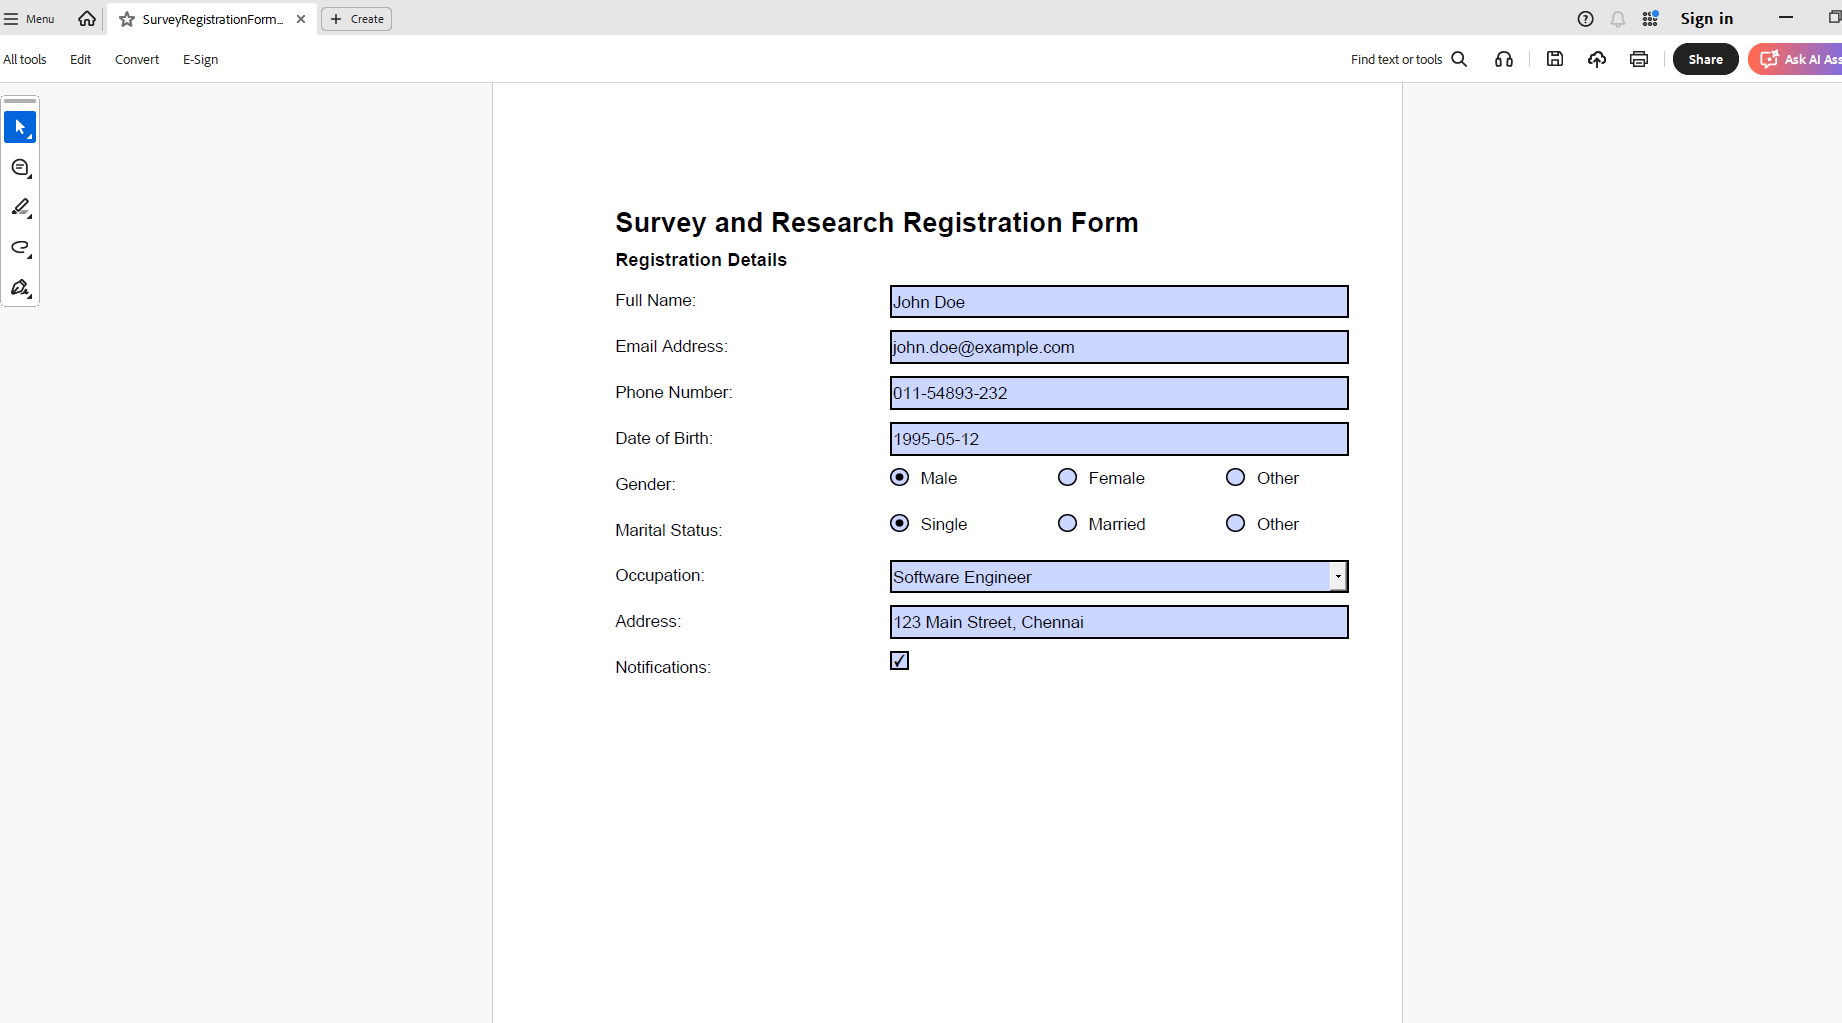
}Running this code example will generate a PDF that closely resembles the image displayed below.
Download and save the generated PDF form
After creating the PDF form fields, the final step is to make the document downloadable. Syncfusion’s .NET PDF Library lets you save the form to a stream and return it as a file, allowing you to deliver fillable PDFs to users with just a few lines of code.
Below is the code you need:
//Create a new memory stream
MemoryStream stream = new MemoryStream();
pdfDocument.Save(stream);
//If the position is not set to '0' then the PDF will be empty.
stream.Position = 0;

FileStreamResult fileStreamResult = new FileStreamResult(stream, "application/pdf");
fileStreamResult.FileDownloadName = "SurveyRegistrationForm.pdf";

return fileStreamResult;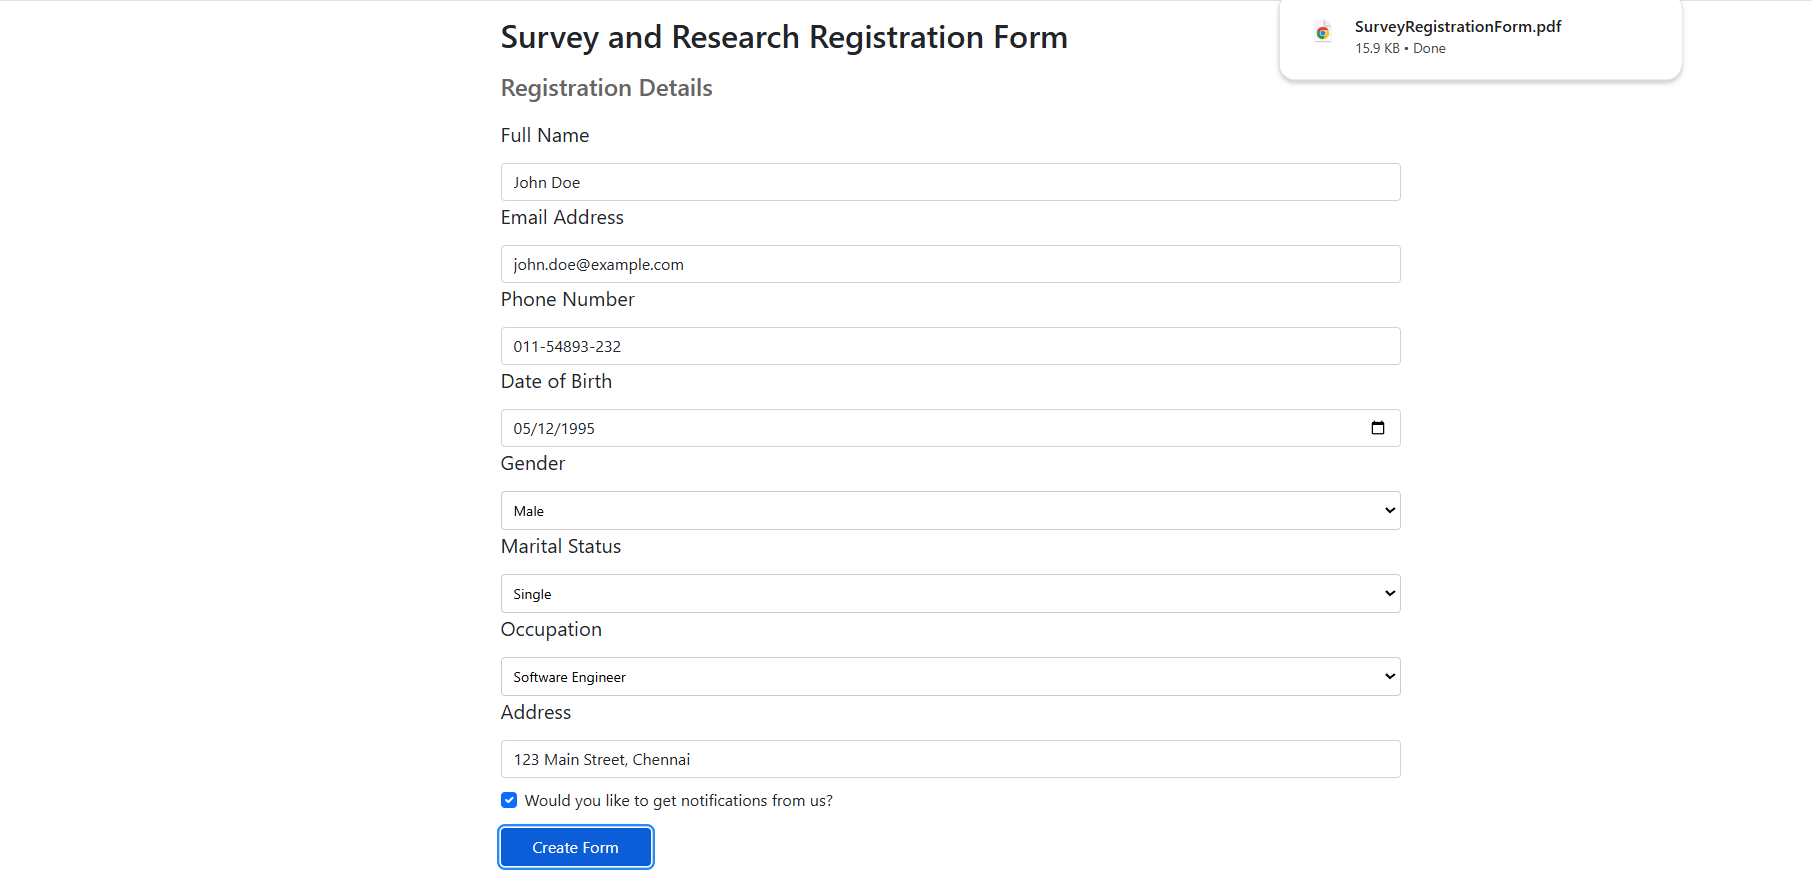
GitHub references
Want to explore the full sample? Check out the demo on GitHub to learn how to create and fill PDF forms on the server using the Syncfusion PDF Library.
Frequently Asked Questions
Yes, you can assign values using properties like Text, Selected Index, or Checked for the respective fields.Can I set default values for form fields while creating them?
Yes, start with a new Pdf document and add interactive fields programmatically.Is it possible to create fillable PDF forms from scratch?
Yes, load the PDF using Can I modify or add fields to an existing PDF on the server?
PdfLoadedDocument, and add or edit fields as needed.
Flatten the form fields using the library’s flattening feature before saving.How do I make the form non-editable after filling?
Yes, perform validation in your server logic before generating the PDF.Can I validate PDF form fields on the server before saving?
Conclusion
Thank you for reading! In this blog, we explored how to convert HTML forms into interactive PDF form fields using the Syncfusion .NET PDF Library on the server. The library also lets you edit existing form fields, add signatures for secure approvals, and flatten forms to make them non‑editable. You can also import form data from external sources or export it for integration with other systems, making it easier to manage your digital workflows.
For a detailed explanation with code examples on creating, filling, editing, and flattening PDF forms, check out this blog: Create, Fill, and Edit PDF Forms Using C#.
Want to see it in action? Check out our Live Demo Page.
If you’re a Syncfusion user, you can download the setup from the license and downloads page. Otherwise, you can download a free 30-day trial.
You can also contact us through our support forum, support portal, or feedback portal for queries. We are always happy to assist you!


 No spam, just valuable updates.