

In this blog, you will learn the steps to configure Twilio with the Syncfusion Xamarin Chat control, which can be used to send and receive messages between Twilio and the user.
What is Twilio Chat?
Twilio Chat is a framework that helps you send and receive text and multi-media messages among users grouped into channels. Each channel is like a chat room—any message posted to this channel can be seen by all channel members.
Channels can be public or private.
Public channels: Visible to all the users on the service instance. Users can join and leave at will. Joining a channel makes that the user a member of the channel. Users can be members of many channels at once, one channel, or none at all.
Private channels: Visible only to the user who created the channel and others who have been invited to join it.
Required NuGet packages
To get the reference for Twilio Chat, install the following NuGet packages:
 To add Syncfusion’s Xamarin SfChat control to your project, install the following package:
Other prerequisite
- Visual Studio 2019 (with Xamarin)
With these prerequisites installed, we’re ready to start building our application. Before we do that, we need to get our Twilio account.
Don’t have a Twilio account yet?
Twilio’s trial accounts are free, so if you don’t have one, go to the Twilio website and sign up.
How to access Twilio account
To access the Twilio account, we need to create an access token. Access tokens are short-lived tokens that can be used to authenticate Twilio Client SDKs like voice, chat, and video.
You should create one on your server to verify a client’s identity and grant access to the client API features. This token holds information about your Twilio account and API keys.
Generate an access token
To create an access token, you should create a secret API key in your Twilio account. When creating an access token for programmable chat, you need the following information:
- Twilio account Sid: This is the account SID (string identifier) of your Twilio account and must be the account in which you have created your programmable chat service.
- Programmable chat service SID: This is the chat service SID where your users, channels, messages, and other chat-related data resides. This is the chat service to which you have granted the SDK client access.
- Twilio API key SID: This is the SID of an API created for your Twilio account, which is used to sign the access token cryptographically.
- Twilio API secret: This is the secret part of the API key.
- Identity: This is the identity of your user. For example, [email protected].
The following code example demonstrates how to create an access token using Twilio credentials.
public static async Task<string> GetTokenAsync()
{
    var deviceId = CrossDeviceInfo.Current.Id;
    const string twilioAccountSid = accountSid;
    const string twilioApiKey = apiKeySid;
    const string twilioApiSecret = apiKeySecret;

    var identity = "Syncfusion";
    var applicationName = "AndroidChatApplication";
    var device = deviceId;

    var endpointId = string.Format("{0}:{1}:{2}", applicationName, identity, device);

    // Create a Chat grant for this token
    var grant = new ChatGrant
    {
        EndpointId = endpointId,
        ServiceSid = chatServiceSid
    };

    var grants = new HashSet<IGrant>
    {
        { grant }
    };

    // Create an Access Token generator
    var token = new Token(
          twilioAccountSid,
          twilioApiKey,
          twilioApiSecret,
          identity,
          grants: grants);

     return token.ToJwt();
}
Chat client initialization
In the next step, we have to initialize the chat client.
This is an important step to ensure that our Twilio account is ready to be used by the user. With the help of the generated access token, we can initialize the chat client by following these steps.
- Use the following code example to initialize the chat client. The Android Chat SDK provides a Listener Interface which user must implement to check the init status and completion of the SDK client.
//Get token to access the Twilio account. var token = await TwilioHelper.GetTokenAsync(); // Initialization of chat client. ChatClient.Create(Android.App.Application.Context, token, (new ChatClient.ClientProperties.Builder()).CreateProperties(), new ChatClientCallBackListener(this)); - Create a class named ChatClientCallBackListener by inheriting it from the abstract class CallbackListener<ChatClient> to get access to the chat client in the OnSuccess method.
public class ChatClientCallBackListener : CallbackListener<ChatClient> { private TwilioMessenger twilioMessenger; public ChatClientCallBackListener(TwilioMessenger twilioMessenger) { this.twilioMessenger = twilioMessenger; } public override void OnSuccess(ChatClient result) { //To create channel from chatClient. twilioMessenger.CreateChatChannel(result); } } - With the help of the extracted chat client, we can create a new channel, or we can get the list of existing public channels. Create a channel from the chat client using the following code.
public void CreateChatChannel(ChatClient result) { chatClient = result; MainActivity.GeneralChatClient = result; var friendlyName = "GeneralChannel"; var channelType = Channel.ChannelType.Public; // Create channels with channel type and friendly name. chatClient.Channels.CreateChannel(friendlyName, channelType, new CreateChannelCallBackListener<Channel>(this)); } - Next, we have to get the channel descriptors, from which we can get the channels list. Get the existing public channel descriptors list using the following code.
public class ChatClientCallBackListener : CallbackListener<ChatClient> { private TwilioMessenger twilioMessenger; public ChatClientCallBackListener(TwilioMessenger twilioMessenger) { this.twilioMessenger = twilioMessenger; } public override void OnSuccess(ChatClient result) { //Get public channels list. result.Channels.GetPublicChannelsList(new ChannelDescriptorCallBackListener<Paginator<ChannelDescriptor>>(twilioMessenger)); } } - After retrieving the list of channel descriptors, get the list of public channels using the following code.
public class ChannelDescriptorCallBackListener<T> : CallbackListener<Paginator<ChannelDescriptor>> { private TwilioMessenger twilioMessenger; public ChannelDescriptorCallBackListener(TwilioMessenger twilioMessenger) { this.twilioMessenger = twilioMessenger; } public override void OnSuccess(Paginator<ChannelDescriptor> result) { MainActivity.GeneralChannelDescriptor = result.Items; foreach (var channel in result.Items) { channel.GetChannel(new CreateChannelCallBackListener<Channel>(twilioMessenger)); } } } - With the help of the channel, fetch the most recent messages of that channel with the following code. Not that this can be done only when the user is already a member of that channel.
public class CreateChannelCallBackListener<T> : CallbackListener<Channel>
{
    private TwilioMessenger twilioMessenger;

    public CreateChannelCallBackListener(TwilioMessenger twilioMessenger)
    {
        this.twilioMessenger = twilioMessenger;
        MainActivity.PublicChannelsList = new   ObservableCollection<Channel>();
    }

    public override void OnSuccess(Channel result)
    {
         if (result != null)
         {
              MainActivity.GeneralChannel = result;
              MainActivity.PublicChannelsList.Add(result);
              if (result.Members != null && result.Members.MembersList.Any(a => a.Identity == MainActivity.GeneralChatClient.MyIdentity))
              {
                  this.twilioMessenger.GetChannelMessagesList(result);
              }
              else
              {
                  this.twilioMessenger.JoinChannel(result);
              }
         }
     }
}
If the user is not a member of that channel, the user can join that channel with the following code example.
public void JoinChannel(Channel result)
{
    chatChannel = result;
    MainActivity.GeneralChannel = result;
    chatChannel.Join(new ChatStatusListener(chatChannel));
 }
The messages in the channel are accessible only to the members of the channel.
- You can also customize the number of messages to be retrieved. To do so, refer to the following code example.
public class ChatStatusListener : StatusListener
{
    private Channel channel;
    public ChatStatusListener(Channel channel)
    {
        this.channel = channel;
    }
    public override void OnSuccess()
    {
        channel.Messages.GetLastMessages(50,
            new MessagesListCallBackListener<List<Message>>());
    }
}
With this, Twilio is now ready to be configured with our Xamarin Chat control.
- Next, we have to work with Xamarin.Forms. Create a RecentChat page to show the list of channels with their friendly names, the last message in that channel, and the date and time of the last message.The following code demonstrates the creation of the RecentChat page view.The following code is the header of the Recent Chat page, which shows the image with a rounded border and the RecentChat page title.
<StackLayout
    x:Name="ProfileView"
    HorizontalOptions="FillAndExpand"
    IsVisible="True"
    Orientation="Horizontal"
    Spacing="0"
    VerticalOptions="FillAndExpand">

    <!--  Rounded profile image  -->
    <border:SfBorder BackgroundColor="{DynamicResource Gray-200}" Style="{StaticResource ProfileBorderStyle}">
        <Image
            HeightRequest="32"
            WidthRequest="32" Source="name.png">
            <Image.GestureRecognizers>
                <TapGestureRecognizer Command="{Binding ProfileImageCommand}" CommandParameter="{Binding .}" />
            </Image.GestureRecognizers>
        </Image>
    </border:SfBorder>

    <!--  RecentChat page title  -->
    <Label
        Margin="16,0"
        FontFamily="{StaticResource Montserrat-SemiBold}"
        FontSize="20"
        HorizontalOptions="Start"
        LineHeight="1.25"
        Text="Chat"
        TextColor="{DynamicResource Gray-900}"
        VerticalOptions="Center"
        VerticalTextAlignment="Center" />

</StackLayout>
The following code is for the search entry for the recent chats with a rounded border and a search button.
<StackLayout
    x:Name="SearchBox"
    HorizontalOptions="EndAndExpand"
    IsVisible="False"
    Orientation="Horizontal"
    Spacing="0">

    <buttons:SfButton
        x:Name="BackButton"
        Clicked="BackButton_Clicked"
        Style="{StaticResource NavigationBarButtonStyle}"
        Text="{StaticResource Back}" />

        <!--  Rounded search entry  -->
        <border:SfBorder Style="{DynamicResource SfBorderStyle}">

        <controls:BorderlessEntry
            x:Name="SearchEntry"
            BindingContext="{x:Reference ListView}"
            HorizontalOptions="FillAndExpand"
            Placeholder="Search here"
            Style="{StaticResource ChatSearchEntryStyle}"
            Text="{Binding SearchText, Mode=TwoWay}" />

        </border:SfBorder>
    </StackLayout>

    <!--  Search button  -->
    <buttons:SfButton
        x:Name="SearchButton"
        BindingContext="{x:Reference ProfileView}"
        Clicked="SearchButton_Clicked"
        IsVisible="{Binding Path=IsVisible}"
        Style="{StaticResource NavigationBarButtonStyle}"
        Text="{StaticResource Search}" />
The following code uses the searchable list view to search the list items, based on search text.
<!--  Searchable list view  -->
<controls:SearchableChatList
    x:Name="ListView"
    AllowSwiping="True"
    AutoFitMode="Height"
    FocusBorderThickness="0"
    ItemsSource="{Binding ChatItems}"
    SearchText="{Binding SearchText}"
    TapCommand="{Binding ItemSelectedCommand}"
    SelectionGesture="Tap"
    SelectionMode="Single"
    SwipeOffset="156"
    VerticalOptions="FillAndExpand">

</controls:SearchableChatList>
The following code demonstrates the item template for searchable list view.
Recent sender profile image
<!--  Recent sender profile image  -->
 <badge:SfBadgeView x:Name="BadgeView" Grid.RowSpan="2">
   <badge:SfBadgeView.Content>
    <border:SfBorder
       BackgroundColor="{DynamicResource Gray-200}"
       BorderColor="{DynamicResource Gray-White}"
       Style="{StaticResource ProfileBorderStyle}">
       <Image
             HeightRequest="40"
             WidthRequest="40"
             Source="name.png">
       </Image>
     </border:SfBorder>
   </badge:SfBadgeView.Content>
 <badge:SfBadgeView.BadgeSettings>
   <badge:BadgeSetting
                  BackgroundColor="{DynamicResource Green}"
                  BadgeAlignment="End"
                  BadgeIcon="{Binding AvailableStatus, Converter={StaticResource BadgeConverter}}"
                  BadgePosition="BottomRight"
                  BadgeType="None"
                  Stroke="{DynamicResource Gray-White}"
                  StrokeWidth="1" />
    </badge:SfBadgeView.BadgeSettings>
  </badge:SfBadgeView>
Recent sender profile name
<Label
      Grid.Column="1"
      FontFamily="{StaticResource Montserrat-SemiBold}"
      FontSize="16"
      HorizontalOptions="Start"
      LineBreakMode="NoWrap"
      LineHeight="{OnPlatform Default=1.5,
                                         iOS=-1}"
      Text="{Binding SenderName}"
      TextColor="{DynamicResource Gray-900}" />
Recent message
<Label
           x:Name="MessageLabel"
           Style="{StaticResource MessageTextStyle}"
           Text="{Binding MessageType, Converter={StaticResource TextConverter}, ConverterParameter={x:Reference MessageLabel}}" />
Recent message time
<Label
           Grid.Column="2"
           Style="{StaticResource TimeTextStyle}"
           Text="{Binding Time}" />
Recent message notification
<Label x:Name="NotificationLabel" Grid.Row="1" Grid.Column="2" Style="{StaticResource NotificationIconStyle}" Text="{Binding NotificationType, Converter={StaticResource GlyphConverter}, ConverterParameter={x:Reference NotificationLabel}}"> </Label> - Add the collections of the public channels list in the RecentChat page channel’s collection.The following code demonstrates how to get the whole public channels list with their friendly names, last messages, and the times of the last messages.
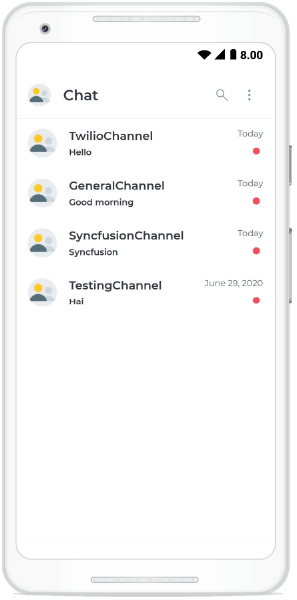
public bool GetAllPublicChannels()
{
    var success = false;
    App.ChannelDetails = new ObservableCollection<ChatDetail>();
    channelLists = new List<Channel>();
    var channels = MainActivity.PublicChannelsList;
    var channelMessages = MainActivity.ChannelMessages;
    var selectedChannel = channelMessages.Select(a => a.Select(b => b.Channel).First()).ToList();
    if (channelMessages == null || channelMessages.Count == 0)
    {
        foreach(var channel in channels)
        {
            channelLists.Add(channel);
            App.ChannelDetails.Add(new ChatDetail
            {
                SenderName = channel.FriendlyName,
                MessageType = "Text",
                Message = "",
                Time = "",
                NotificationType = "New"
                });
            success = true;
        }
    }
    else
    {
        foreach (var channelMessage in channelMessages)
        {
            foreach (var channel in channels)
            {
                var messageCount = channelMessage.Count;
                var createdTime = Convert.ToDateTime(channelMessage[messageCount - 1].DateCreated);
                var messageTime = DateTimeToStringConverter(createdTime);
                if (channelMessage[0].Channel == channel)
                {
                    channelLists.Add(channel);
                    App.ChannelDetails.Add(new ChatDetail
                    {
                        SenderName = channel.FriendlyName,
                        MessageType = "Text",
                        Message = channelMessage[messageCount - 1].MessageBody,
                        Time = messageTime,
                        NotificationType = "New"
                    });
                    success = true;
                }
                else if (!channelLists.Contains(channel) && !selectedChannel.Contains(channel))
                {
                    channelLists.Add(channel);
                    App.ChannelDetails.Add(new ChatDetail
                    {
                        SenderName = channel.FriendlyName,
                        MessageType = "Text",
                        Message = "",
                        Time = "",
                        NotificationType = "Viewed"
                    });
                    success = true;
                }
            }
        }
    }
    return success;
}
After executing these code examples, we will get an output like in the following screenshot.
On choosing a channel from the list, the following GetChatMessages method is called to get the chat history of that channel.
public bool GetChatMessages()
{
    var success = false;
    App.ChatMessages = new ObservableCollection<ChatMessage>();
    var channels = MainActivity.PublicChannelsList;
    var channelMessages = MainActivity.ChannelMessages;
    foreach(var channel in channels)
    {
        if(channel.FriendlyName == App.FriendlyName)
        {
            MainActivity.GeneralChannel = channel;
            if (channelMessages.Count > 0)
            {
                foreach (var channelMessage in channelMessages)
                {
                    foreach (var message in channelMessage)
                    {
                        if (message.Channel.FriendlyName == App.FriendlyName)
                        {
                            success = true;
                            App.ChatMessages.Add(new ChatMessage
                            {
                                Message = message.MessageBody,
                                Time = Convert.ToDateTime(message.DateCreated),
                                IsReceived = message.Author != MainActivity.GeneralChatClient.MyIdentity,
                                Identity = message.Author
                            });
                        }
                        success = true;
                    }
                }
            }
            else
            {
                success = true;
            }
        }
    }
}
Setting up a Syncfusion Chat control
Follow these steps to set up the Syncfusion Chat control in your application:
- Create an instance of the Syncfusion Chat control and set up all the basic features like message collection, current user for conversation, typing indicator and time break for messages.The following code example demonstrates the basic setup of an SfChat instance.
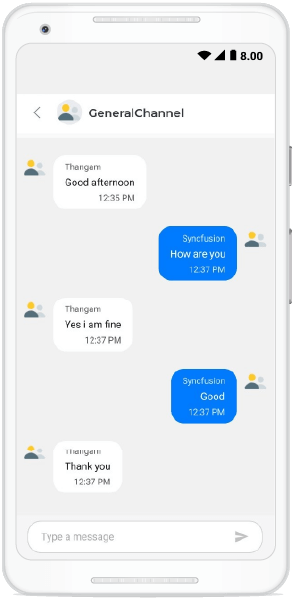
<sfChat:SfChat x:Name="sfChat" Grid.Row="1" Messages="{Binding Messages}" CurrentUser="{Binding CurrentUser}" TypingIndicator="{Binding TypingIndicator}" ShowTypingIndicator="{Binding ShowTypingIndicator}" ShowTimeBreak="True" ShowIncomingMessageTimestamp="True" ShowOutgoingMessageTimestamp="True" IncomingMessageTimestampFormat="hh:mm tt" OutgoingMessageTimestampFormat="hh:mm tt" ShowOutgoingMessageAvatar="True" StickyTimeBreak="False" MessageShape="RoundedRectangle" SendMessageCommand="{Binding SendMessageCommand}"> </sfChat:SfChat> - Use the following code to bind the messages from the particular channel chat history in the chat control based on time break.The user must need the following items to bind, 1. Author Name – the user can get it from the identity used to create the access token, 2. Message – the user can get it from the channel’s chat history, 3. Message Time – the user can get channel’s chat message time.
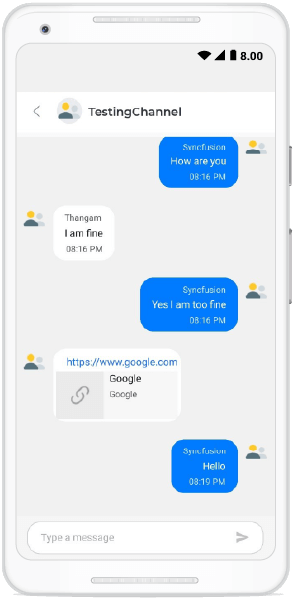
private void GenerateMessages()
{
    ProfileName = App.FriendlyName;
    if (App.ChatMessages != null && App.ChatMessages.Count > 0)
    {
        foreach (var message in App.ChatMessages)
        {
            if (IsValidURL(message.Message))
            {
                this.Messages.Add(new HyperlinkMessage()
                {
                    Author = message.IsReceived ? new Author() { Avatar = "name.png", Name = message.Identity } : CurrentUser,
                    Url = message.Message,
                    DateTime = message.Time,
                });
            }
            else
            {
                this.Messages.Add(new TextMessage()
                {
                    Author = message.IsReceived ? new Author() { Avatar = "name.png", Name = message.Identity } : CurrentUser,
                    Text = message.Message,
                    DateTime = message.Time,
                });
            }
        }
    }
    if(Messages.Count > 0)
    {
        var messageIndex = Messages.Count - 1;
        App.LastMessage = Messages[messageIndex];
    }
}
After executing the previous code example, we will get output like the following screenshot.
Note: In Chat, there is a property called MessageShape, with which one can set four different types of message shapes: RoundedRectangle, Rectangle, DualTearDrop, TearDrop.
Send and receive messages between user and Twilio
To send a message to Twilio, use the send message command. When the Send button in the chat control is selected, it will call the send message command, get the message from the object, and send it to Twilio using the SendMessage method.
this.SendMessageCommand = new Command(this.SendButtonClicked);
private void SendButtonClicked(object selectedItem)
{
    var message = selectedItem.GetType().GetProperty("Message").GetValue(selectedItem, null);
    var newMessage = message.GetType().GetProperty("Text").GetValue(message, null).ToString();
    twilioMessenger.SendMessage(newMessage, Messages, CurrentUser);
}
The following code demonstrates how to send a message from an Android user to Twilio.
public void SendMessage(string text)
{
    chatChannel = MainActivity.GeneralChannel;
    MessageOptions = Message.InvokeOptions().WithBody(text);
    chatChannel.Messages.SendMessage(MessageOptions, new MessageCallBackListener<Message>());
}
Note: When a message is sent from a user to Twilio, the OnMessageAdd method in the channel listener is called and the sent message will be received there. This will happen only when we add a channel listener to that channel.
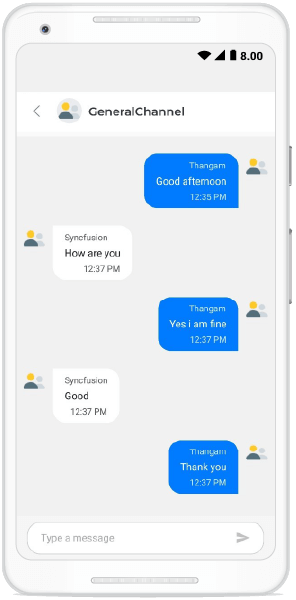
In the OnMessageAdded method, the received message is added to the messages collection to show the channel’s last message in the Recent Chat page. Refer to the following code.
public void OnMessageAdded(Message message)
{
    App.IsMessageAdded = false;

    if (MainActivity.GeneralChannel == message.Channel)
    {
        MessagingCenter.Send(this, "NewMessage", message);
        foreach (var channelMessage in MainActivity.ChannelMessages)
        {
            foreach (var messages in channelMessage)
            {
                if (messages.Channel == message.Channel)
                {
                    channelMessage.Add(message);
                    return;
                }
            }
        }
    }
    else
    {
        foreach (var channelMessage in MainActivity.ChannelMessages)
        {
           foreach (var messages in channelMessage)
           {
                if (messages.Channel == message.Channel)
                {
                    channelMessage.Add(message);
                    return;
                }
             }
         }
     }
}
Now, the received message is sent to the viewmodel of that message page to display the last message and Chat will scroll to the last message when a new message is added.
Refer to the following screenshot.
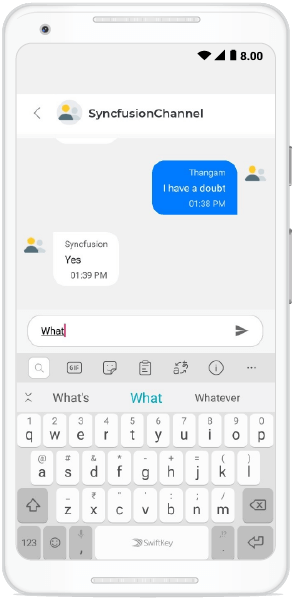
User typing indication
The typing indication is shown when the user responds in a channel. The following code demonstrates how to get the typing indication feature in your application.
TypingIndicator="{Binding TypingIndicator}"
ShowTypingIndicator="{Binding ShowTypingIndicator}"
if (!string.IsNullOrEmpty(App.TypingMessage))
{
this.TypingIndicator = new ChatTypingIndicator();
this.TypingIndicator.Authors.Add(new Author() {
Name = App.ChatMessages.Count > 0 ?
App.ChatMessages[0].Identity : "", Avatar = "name.png" });
this.TypingIndicator.AvatarViewType = AvatarViewType.Image;
this.TypingIndicator.Text = App.TypingMessage;
this.ShowTypingIndicator = true;
}
else
{
this.ShowTypingIndicator = false;
}Refer to the following screenshot.

These are the steps to initialize the chat client and integrate Twilio with the Syncfusion Xamarin Chat control in your application. Now, you can easily send and receive messages between a user and Twilio.
Resource
We have shared this complete project for your reference in this GitHub repository.
Conclusion
In this blog, we have learned how to create an access token, initialize a chat client, and integrate Twilio and the Syncfusion Xamarin Chat control. On doing so, you can easily send and receive messages between a user and Twilio. I hope the entire blog is interesting and useful.
If you aren’t a Syncfusion customer yet, you can try our 30-day free trial to check out our versatile features.
If you wish to send us feedback or would like to submit any questions, please feel free to contact us through our support forum, Direct-Trac, or feedback portal. We are always happy to assist you!
 No spam, just valuable updates.
Comments (8)
Do you have any examples of sending an image or video with SyncFusion Chat and Twilio?
Currently we do not have any code examples for sending images or videos using Twilio and Syncfusion Chat control. We will update you once it is done.
Do yo have any examples iOS implementation?
We do not have any examples for iOS implementation.
Please do refer the following links for chat with Twilio in iOS
1. https://www.twilio.com/docs/chat/ios
2. https://www.twilio.com/docs/chat/tutorials/chat-application-ios-obj-c
3. https://www.twilio.com/docs/chat/tutorials/chat-application-ios-swift
I’m trying to implement this but using Xamarin.iOS instead. Do you have any example on how to do it?
We do not have code examples for iOS implementation using Twilio and SfChat control.
Please refer the below link for iOS implementation using Twilio and Xamarin and add the SfChat control as same as android for UI and interface it with Twilio.
https://www.twilio.com/blog/2016/05/how-to-build-ios-chat-apps-using-xamarin-and-twilio.html
How to create one to one chat ?
For one to one chat in Twilio, first the user have to create and join the channel and then have to invite a friend / other user to join and chat in that channel! It doesn’t matter if the channel is public or private. If the user create the public channel, anyone without an invite can see and join the conversation. Additionally, the public channel, along with its members and messages will be visible to every client endpoint. But conversation in a private channel cannot be seen or joined by anyone without an invite. Here, members of private channel can add anyone into the conversation.