

TL;DR: This blog guides you on how to manage and edit Word documents in a React application using Azure Blob Storage and ASP.NET Core Web API. It covers configuring the storage, setting up the backend, and integrating Syncfusion’s Document Editor in the frontend to enable document editing and auto-saving to the cloud.
Managing and editing Word documents within a React application has never been more efficient! In this blog, we’ll walk you through the entire process of integrating Azure Blob Storage, configuring an ASP.NET Core Web API backend, and developing a React frontend to enable smooth document editing and storage.
With Syncfusion’s React Document Editor, you can effortlessly open, edit, and auto-save Word documents within your application. We’ll explore how to build a feature-rich document editing experience with key functionalities such as:
- Auto-save for seamless document preservation
- Application-level file management using Azure Blob Storage
- A customizable toolbar to enhance the document editing workflow
The Syncfusion FileManager component enhances the experience by enabling users to interactively open and save documents directly to and from Azure storage. This integration provides a structured and intuitive way to manage documents within a React application, ensuring scalability, security, and efficiency.

Setting up Azure Blob Storage
Azure Blob Storage is a scalable and secure cloud-based object storage solution from Microsoft, ideal for web applications, backups, and content delivery.
Setting up Azure Blob Storage involves a few key steps, including creating a storage account, configuring a container, and managing access. Here’s a step-by-step guide:
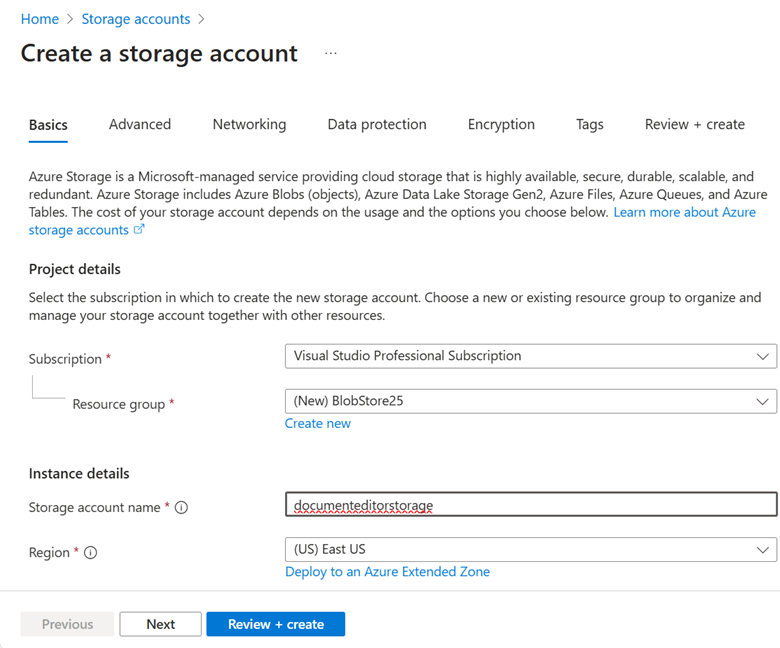
Step 1: Create a storage account
Sign in to the Azure portal, navigate to Storage Accounts, and create a new storage account.
Step 2: Create a blob container
Open the Storage Account, go to Containers under Data Storage, and create a Blob Container to store your files (e.g., documents).

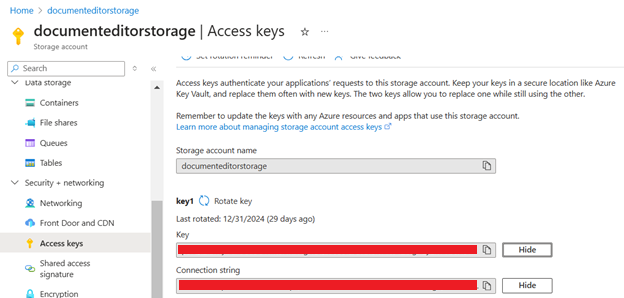
Step 3: Retrieve storage account details
To access and integrate Blob Storage with the backend, you’ll need the Access Key and Connection String, which can be found under the Access Keys section in the Storage Account settings.
Setting up ASP.NET Core backend (Server-Side)
Step 1: Create a new ASP.NET Core Web API project
Create an ASP.NET Core Web API project using Visual Studio or the .NET CLI. Then, install Azure.Storage.Blobs NuGet package to interact with Azure Blob Storage, enabling file uploads, downloads, and storage management.
Step 2: Add a configuration entry in appsettings.json
Add the Azure Storage Account details to the appsettings.json file. Include the Account Name, Account Key, Connection String, and Container Name as shown below:
appsettings.json
{
  "Logging": {
    "LogLevel": {
      "Default": "Warning"
    }
  },
  "AllowedHosts": "*",
  "accountName": "<YOUR STORAGE ACCOUNT NAME>",
  "accountKey": "<YOUR ACCOUNT KEY>",
  "connectionString": "<YOUR CONNECTION STRING>",
  "containerName": "<YOUR CONTAINER NAME>"
}
Step 3: Implement Blob Storage Service
Create a service class (AzureDocumentStorageService.cs) to handle file operations. This service includes two key methods:
- FetchDocumentAsync – Retrieves a Word document from Azure Blob Storage.
- UploadDocumentAsync – Saves and uploads a document file to Azure Blob Storage.
Note: The service class also contains additional methods for the file manager operations. You can explore these in the GitHub project.
AzureDocumentStorageService.cs
/// <summary>

/// Service for handling Azure storage operations using Syncfusion components

/// </summary>
public class AzureDocumentStorageService : IAzureDocumentStorageService
{
    private readonly string _storageConnectionString;
    private readonly string _accountName;
    private readonly string _accountKey;
    private readonly string _containerName;
    private readonly ILogger<AzureDocumentStorageService> _logger;
    private readonly AzureDocumentManager _fileProvider;

    /// <summary>

    /// Initializes Azure storage configuration and file provider

    /// </summary>

    /// <param name="configuration">Application configuration settings</param>

    /// <param name="logger">Logger instance for error tracking</param>
    public AzureDocumentStorageService(
        IConfiguration configuration,
        ILogger<AzureDocumentStorageService> logger)
    {
        // Retrieve necessary configuration values for connecting to Azure storage.
        _storageConnectionString = configuration["connectionString"];
        _accountName = configuration["accountName"];
        _accountKey = configuration["accountKey"];
        _containerName = configuration["containerName"];
        _logger = logger;

        // Initialize Syncfusion Azure File Provider instance.
        _fileProvider = new AzureDocumentManager();

        // Define the base path and file path for the blob storage.
        var basePath = $"https://documenteditorstorage.blob.core.windows.net/{_containerName}";
        var filePath = $"{basePath}/Files";

        // Set the base blob container path for the file provider.
        _fileProvider.SetBlobContainer(basePath, filePath);

        // Register the Azure storage credentials and container name.
        _fileProvider.RegisterAzure(_accountName, _accountKey, _containerName);
    }

    /// <summary>

    /// Retrieves a Word document from Azure and converts it to JSON format

    /// </summary>

    /// <param name="jsonObject">Contains document name for lookup</param>

    /// <returns>Word document content in JSON format</returns>
    public async Task<IActionResult> FetchDocumentAsync(Dictionary<string, string> jsonObject)
    {
        MemoryStream stream = new MemoryStream();
        try
        {
            // Extract the document name from the provided JSON object.
            var documentName = jsonObject["documentName"];

            // Build the blob path for the document.
            var blobPath = GenerateDocumentBlobPath(documentName);

            // Get a reference to the blob client for the specified document.
            var blobClient = CreateBlobClient(blobPath);

            // Check if the blob exists in the container.
            if (await blobClient.ExistsAsync())
            {
                // Download the blob content into the memory stream.
                await blobClient.DownloadToAsync(stream);
                stream.Position = 0;

                // Load the WordDocument from the stream.
                WordDocument document = WordDocument.Load(stream, FormatType.Docx);

                // Serialize the document to JSON using Newtonsoft.Json.
                string json = JsonConvert.SerializeObject(document);

                // Dispose of the document after serialization.
                document.Dispose();

                // Return the JSON content with an OK (200) status.
                return new OkObjectResult(json);
            }

            // If the blob doesn't exist, return a 404 Not Found response.
            return new NotFoundResult();
        }
        catch (Exception ex)
        {
            // Log any exceptions and return a 500 Internal Server Error.
            _logger.LogError(ex, "Document retrieval failed");
            return new StatusCodeResult(500);
        }
        finally
        {
            stream.Dispose();
        }
    }

    /// <summary>

   /// Saves and uploads a document file to Azure storage

   /// </summary>

   /// <param name="data">Form data containing the file to save</param>

   /// <exception cref="Exception">Thrown for save failures</exception>
    public async Task UploadDocumentAsync(IFormCollection data)
    {
        try
        {
            // Retrieve the first file from the form data.
            var file = data.Files[0];

            // Get the document name from the form collection.
            var documentName = ExtractFormValue(data, "documentName");

            // Construct the blob path based on the document name.
            var blobPath = GenerateDocumentBlobPath(documentName);

            // Check if the blob already exists.
            var blobClient = CreateBlobClient(blobPath);
            if (blobClient.Exists())
            {
                // Upload the file content to the existing blob.
                using var stream = new MemoryStream();
                await file.CopyToAsync(stream);
                stream.Position = 0;
                await blobClient.UploadAsync(stream);
            }
            else
            {
                // If the blob does not exist, uploading an empty stream
                using var stream = new MemoryStream();
                await blobClient.UploadAsync(stream);
            }

        }
        catch (Exception ex)
        {
            // Log errors during file upload and rethrow the exception.
            _logger.LogError(ex, "File upload failed");
            throw;
        }
    }
}
Step 4: Create API endpoints in a controller
Create an API controller (Controllers/AzureDocumentStorageController.cs) to handle file operations. This controller includes two key methods, which internally invoke the corresponding service methods:
- FetchDocument – Calls the service method to retrieve a Word document from Azure Blob Storage.
- UploadDocument – Calls the service method to save and upload a document file to Azure Blob Storage.
Note: This controller also contains additional methods for file operations. Please explore the GitHub example project for more details.
AzureDocumentStorageController.cs
/// <summary>

/// Controller for handling Azure file operations and document management

/// </summary>
[Route("api/[controller]")]
[EnableCors("AllowAllOrigins")]
public class AzureDocumentStorageController : ControllerBase
{
    private readonly IAzureDocumentStorageService _documentStorageService;

    /// <summary>

    /// Constructor injecting the file provider service dependency.

    /// </summary>

    /// <param name="documentStorageService">Service for performing file operations</param>
    public AzureDocumentStorageController(IAzureDocumentStorageService documentStorageService)
    {
        _documentStorageService = documentStorageService;
    }

    /// <summary>

    /// Retrieves a document from Azure storage in JSON format

    /// </summary>

   /// <param name="jsonObject">Contains document name and metadata</param>

   /// <returns>Document content as JSON or error response</returns>
    [HttpPost("FetchDocument")]
    public async Task<IActionResult> FetchDocument([FromBody] Dictionary<string, string> jsonObject)
    {
        return await _documentStorageService.FetchDocumentAsync(jsonObject);
    }

    /// <summary>

    /// Downloads selected files or folders from the Azure file manager

    /// </summary>

    /// <param name="downloadInput">JSON string containing download parameters</param>

    /// <returns>File content stream or error response</returns>
    [HttpPost("DownloadDocument")]
    public object DownloadDocument(string downloadInput)
    {
        if (downloadInput != null)
        {
            // Set serializer options to use camelCase naming policy.
            var options = new JsonSerializerOptions
            {
                PropertyNamingPolicy = JsonNamingPolicy.CamelCase,
            };

            // Deserialize the JSON string to a FileManagerDirectoryContent object
            FileManagerDirectoryContent args = JsonSerializer.Deserialize<FileManagerDirectoryContent>(downloadInput, options);
            return _documentStorageService.DownloadDocument(args);
        }

        // Return null if input is not provided
        return null;
    }

    /// <summary>

    /// Saves and uploads a document to Azure storage

    /// </summary>

    /// <param name="data">Form data containing file and document name</param>
    [HttpPost("UploadDocument")]
    public async Task UploadDocument(IFormCollection data)
    {
        await _documentStorageService.UploadDocumentAsync(data);
    }
}
Setting up React frontend (Client-Side)
Step 1: Create a React app and add dependencies
Create a React app and integrate the Syncfusion components, Word Document Editor, and File Manager , to interact with Azure Blob Storage. This integration enables file uploads, downloads, and storage management within your application.
- Word Document Editor is used to open, edit, and auto-save documents.
- File Manager is used to browse and manage files stored in Azure Blob Storage interactively.
Step 2: Implement File Manager operations
Create a new TypeScript JSX file (AzureFileManager.tsx) to implement the File Manager, which allows users to display, browse, and manage the files stored in Azure Blob Storage.
AzureFileManager.tsx
import * as React from 'react';
import { FileManagerComponent, Inject, NavigationPane, DetailsView, Toolbar } from '@syncfusion/ej2-react-filemanager';
import { DialogComponent } from '@syncfusion/ej2-react-popups';

interface AzureProps {

    // Callback function triggered when a file is selected in the file manager
    onFileSelect: (filePath: string, fileType: string, fileName: string) => void;
}

// AzureFileManager Component - Provides a file management interface for Azure storage
const AzureFileManager: React.FC<AzureProps> = ({ onFileSelect }) => {

    // Base URL for backend API handling Azure file operations
    const hostUrl: string = "http://localhost:62869/";

    // State management for file manager dialog visibility
    const [showFileManager, setShowFileManager] = React.useState(true);

    // Reference to access the FileManager component methods
    let fileManagerRef = React.useRef<FileManagerComponent>(null);

    // Shows the file manager when the open button is clicked and clears the previous selection item
    const handleOpenButtonClick = () => {

        // Clear the previous selection
        if (fileManagerRef.current) {
            fileManagerRef.current.clearSelection();
        }
        setShowFileManager(true);
    };

    // Handles file open event from file manager
    const handleFileOpen = (args: any) => {
        if (args.fileDetails.isFile) {
            const selectedPath = args.fileDetails.path || args.fileDetails.filterPath + args.fileDetails.name;
            const fileType = args.fileDetails.type;
            const fileName = args.fileDetails.name;

            onFileSelect(selectedPath, fileType, fileName); // Pass the file path and file type to load in the Document Editor
            setShowFileManager(false); // Close the File Manager Dialog
        }
    };

    return (
        <div>
            <button id="openAzureFileManager" onClick={handleOpenButtonClick}>
                Open the Azure file manager
            </button>

            {/* File Manager Dialog */}
            <DialogComponent
                id="dialog-component-sample"
                header="File Manager"
                visible={showFileManager}
                width="80%"
                height="80%"
                showCloseIcon={true}
                closeOnEscape={true}
                target="body"
                beforeClose={() => setShowFileManager(false)}
                onClose={() => setShowFileManager(false)} // Close the dialog when closed
            >
                <FileManagerComponent
                    id="azure-file"
                    ref={fileManagerRef}
                    ajaxSettings={{
                        url: hostUrl + 'api/ AzureDocumentStorage/ ManageDocument',
                        downloadUrl: hostUrl + 'api/ AzureDocumentStorage/ DownloadDocument'
                    }}
                    toolbarSettings={{
                        items: ['SortBy', 'Copy', 'Paste', 'Delete', 'Refresh', 'Download', 'Selection', 'View', 'Details']
                    }}
                    contextMenuSettings={{
                        file: ['Open', 'Copy', '|', 'Delete', 'Download',  '|', 'Details'],
                        layout: ['SortBy', 'View', 'Refresh', '|', 'Paste', '|',  '|', 'Details', '|', 'SelectAll'],
                        visible: true
                    }}
                    fileOpen={handleFileOpen} // Attach the fileOpen event
                >
                    <Inject services={[NavigationPane, DetailsView, Toolbar]} />
                </FileManagerComponent>
            </DialogComponent>
        </div>
    );
};

export default AzureFileManager;
Step 3: Implement Document Editor operations
Create a new TypeScript JSX file (DocumentEditor.tsx) to implement the Word Document Editor functionalities, including creating, opening, editing, and saving documents.
1. Custom toolbar options: Import the necessary dependencies and add the following custom toolbar items:
- New – Creates a new document.
- Open – Displays the File Manager to load a selected document.
- Download – Downloads the current document locally.
Refer to the following code example.
import React, { useRef, useState } from 'react';
import {
    DocumentEditorContainerComponent, Toolbar, CustomToolbarItemModel
} from '@syncfusion/ej2-react-documenteditor';
import AzureFileManager from './AzureFileManager.tsx';
import { ClickEventArgs } from '@syncfusion/ej2-navigations/src/toolbar/toolbar';
import { DialogUtility } from '@syncfusion/ej2-react-popups';

// Inject Document Editor toolbar dependencies
DocumentEditorContainerComponent.Inject(Toolbar);

function DocumentEditor() {

    // Backend API host URL for document operations
    const hostUrl: string = "http://localhost:62869/";

    // Reference to document editor container component
    const containerRef = useRef<DocumentEditorContainerComponent>(null);

    // Reference for the dialog component
    let dialogObj: any;

    // State to hold the current document name
    const [currentDocName, setCurrentDocName] = useState<string>('None');

    // Track document modifications for auto-save functionality
    const contentChanged = React.useRef(false);

    // Custom toolbar button configuration for "New" document
    const newToolItem: CustomToolbarItemModel = {
        prefixIcon: "e-de-ctnr-new",
        tooltipText: "New",
        text: "New",
        id: "CreateNewDoc"
    };

    // Custom toolbar button configuration for opening the Azure file manager
    const openToolItem: CustomToolbarItemModel = {
        prefixIcon: "e-de-ctnr-open",
        tooltipText: "Open Azure file manager",
        text: "Open",
        id: "OpenAzureFileManager"
    };

    // Custom toolbar button configuration for downloading the document
    const downloadToolItem: CustomToolbarItemModel = {
        prefixIcon: "e-de-ctnr-download",
        tooltipText: "Download",
        text: "Download",
        id: "DownloadToLocal"
    };

    // Customize the SystemClipboard API name
    let settings = { systemClipboard: 'ProcessClipboardContent' }

    // Combined toolbar items including custom buttons and built-in features
    const toolbarItems = [
        newToolItem, openToolItem, downloadToolItem, 'Separator', 'Undo', 'Redo', 'Separator', 'Image', 'Table',
        'Hyperlink', 'Bookmark', 'TableOfContents', 'Separator', 'Header', 'Footer', 'PageSetup', 'PageNumber',
        'Break', 'InsertFootnote', 'InsertEndnote', 'Separator', 'Find', 'Separator', 'Comments', 'TrackChanges',
        'Separator', 'LocalClipboard', 'RestrictEditing', 'Separator', 'FormFields', 'UpdateFields', 'ContentControl'
    ];

    return (
        <div>
            <div>
                <AzureFileManager onFileSelect={loadFileFromFileManager} />
            </div>
            <div id="document-editor-div" style={{ display: "block" }}>
                <div id="document-header">
                    {currentDocName || 'None'}
                </div>
                <DocumentEditorContainerComponent
                    ref={containerRef}
                    id="container"
                    height={'650px'}
                    serviceUrl={hostUrl + 'api/ AzureDocumentStorage/'}
                    enableToolbar={true}
                    toolbarItems={toolbarItems}
                    toolbarClick={handleToolbarItemClick}
                    contentChange={handleContentChange} // Listen to content changes
                    serverActionSettings={settings}
                />
            </div>
        </div>
    );
}

export default DocumentEditor;
2. Open a document from the File Manager (Azure Blob Storage):
Refer to the following code example.
    // Callback function to load the file selected in the file manager
    const loadFileFromFileManager = (filePath: string, fileType: string, fileName: string): void => {
        if (!containerRef.current) {
            console.error('Document Editor is not loaded yet.');
            return;
        }
        containerRef.current.documentEditor.documentName = fileName;

        // Update state with the current document name
        setCurrentDocName(fileName);

        if (fileType === '.docx' || fileType === '.doc' || fileType === '.txt' || fileType === '.rtf') {

            // Handle document files
            fetch(hostUrl + 'api/AzureDocumentStorage/FetchDocument', {
                method: 'POST',
                headers: { 'Content-Type': 'application/json;charset=UTF-8' },
                body: JSON.stringify({ documentName: fileName })
            })
                .then(response => {
                    if (response.status === 200 || response.status === 304) {
                        return response.json();
                    }
                    else {
                        throw new Error('Error loading document');
                    }
                })
                .then(json => {
                    const documentEditorDiv = document.getElementById("document-editor-div");
                    if (documentEditorDiv) {
                        documentEditorDiv.style.display = "block";
                    }

                    // Open the document using the JSON data received
                    containerRef.current.documentEditor.open(JSON.stringify(json));
                })
                .catch(error => {
                    console.error('Error loading document:', error);
                });
        }
        else {
            alert('The selected file type is not supported for the document editor.');
        }
    };
3. Automatically save the document to Azure Blob Storage: The edited document will be automatically saved every 1000 milliseconds.
Refer to the following code example.
// Automatically saves document to Azure storage
const autoSaveDocument = (): void => {
    if (!containerRef.current) return;

    // Save as Blob using Docx format
    containerRef.current.documentEditor.saveAsBlob('Docx').then((blob: Blob) => {
        let exportedDocument = blob;
        let formData: FormData = new FormData();
        formData.append('documentName', containerRef.current.documentEditor.documentName);
        formData.append('data', exportedDocument);
        let req = new XMLHttpRequest();

        // Send document to backend API for Azure storage
        req.open(
            'POST',
            hostUrl + 'api/ AzureDocumentStorage/ UploadDocument',
            true
        );
        req.onreadystatechange = () => {
            if (req.readyState === 4 && (req.status === 200 || req.status === 304)) {

                 // Auto save completed

               // Success handler can be added here if needed
            }
        };
        req.send(formData);
    });
};

// Runs auto-save every second when content changes are detected
React.useEffect(() => {
    const intervalId = setInterval(() => {
        if (contentChanged.current) {
            autoSaveDocument();
            contentChanged.current = false;
        }
    }, 1000);
    return () => clearInterval(intervalId);
});

// Handles document content change detection
const handleContentChange = (): void => {
    contentChanged.current = true; // Set the ref's current value
};
4. Download a copy of the document to local storage: When the Download button in the toolbar is clicked, a copy of the document currently open in the editor will be downloaded or saved to the local storage.
Refer to the following code example.
// Handles document editor toolbar button click events
const handleToolbarItemClick = (args: ClickEventArgs): void => {

    // Get a reference to the file manager open button
    const openButton = document.getElementById('openAzureFileManager');

    // Get the current document name from the editor
    let documentName = containerRef.current.documentEditor.documentName;

    // Remove any extension from the document name using regex
    const baseDocName = documentName.replace(/\.[^/.]+$/, '');

    // Always check if containerRef.current exists before using it
    if (!containerRef.current) return;

    switch (args.item.id) {
        case 'OpenAzureFileManager':

            // Programmatically trigger Azure file manager
            if (openButton) {

                // save the changes before opening a new document
                autoSaveDocument();
                openButton.click();

                // Sets the focus to the document editor within the current container reference
                containerRef.current.documentEditor.focusIn();
            }
            break;

        case 'DownloadToLocal':

            // Initiate client-side download
            containerRef.current.documentEditor.save(baseDocName, 'Docx');

            // Sets the focus to the document editor within the current container reference
            containerRef.current.documentEditor.focusIn();
            break;

        case 'CreateNewDoc':

            // Create new document workflow
            showFileNamePrompt();
            break;

        default:
            break;
    }
};
5. Create and upload a new document: When the New toolbar item is clicked, a prompt dialog will appear requesting the document name. Once confirmed, the document will open in the Word Document Editor and automatically be saved and uploaded to Azure Blob Storage within a second.
Refer to the following code example.
// Prompt dialog for entering a new document filename
const showFileNamePrompt = (errorMessage?: string) => {
    const randomDefaultName = getRandomDefaultName();
    dialogObj = DialogUtility.confirm({
        title: 'New Document',
        width: '350px',
        content: `
            <p>Enter document name:</p>
            <div id="errorContainer" style="color: red; margin-top: 4px;">
            ${errorMessage ? errorMessage : ''}
            </div>
            <input id="inputEle" type="text" class="e-input" value="${randomDefaultName}"/>
        `,
        okButton: { click: handleFileNamePromptOk },
        cancelButton: { click: handleFileNamePromptCancel },
    });

    // After the dialog is rendered, focus and select the input text.
    setTimeout(() => {
        const input = document.getElementById("inputEle") as HTMLInputElement;
        if (input) {
            input.focus();
            input.select();
        }
    }, 100);
};

// Handler for the OK button in the file name prompt dialog with file existence check and save

// The new file will be automatically saved to Azure Storage by the auto-save functionality, which is managed within the setInterval method.
const handleFileNamePromptOk = async () => {
    const inputElement = document.getElementById("inputEle") as HTMLInputElement;
    let userFilename = inputElement?.value.trim() || "Untitled";
    const baseFilename = `${userFilename}.docx`;

    // Check if the document already exists on the backend
    const exists = await validateFileExistence(baseFilename);
    if (exists) {

        // If the document exists, display an error message in the dialog
        const errorContainer = document.getElementById("errorContainer");
        if (errorContainer) {
            errorContainer.innerHTML = 'Document already exists. Please choose a different name.';
        }

        // Re-focus the input for correction
        if (inputElement) {
            inputElement.focus();
            inputElement.select();
        }
        return;
    }

    // Proceed with a new document
    if (dialogObj) dialogObj.hide();
    containerRef.current.documentEditor.documentName = baseFilename;
    setCurrentDocName(baseFilename);
    containerRef.current.documentEditor.openBlank();
};

// Handler for the Cancel button in the file name prompt dialog
const handleFileNamePromptCancel = () => {
    if (dialogObj) {
        dialogObj.hide();
    }
};
Running the projects
First, start the server-side (ASP.NET Core API), then run the client-side (React) application to test its functionalities. The output for file operations on the client side will be displayed, as shown in the image below.
GitHub reference
Conclusion
Thanks for reading! In this blog, we’ve explored how to open, edit, and auto-save Word documents efficiently in Azure Blob Storage using Syncfusion’s Document Editor. By following these steps, you can build a scalable and secure document management system, enabling users to create, open, edit, and store files in the cloud.
Additionally, this approach can be adapted to integrate with other cloud storage solutions, providing flexibility based on your application’s needs. Try implementing these features in your project and enhance document handling with Azure’s powerful storage capabilities!
If you are an existing customer, you can download the new version of Essential Studio on the License and Downloads page. If you are not a Syncfusion customer, try our 30-day free trial to check out our incredible features.
You can also contact us through our support forums, support portal, or feedback portal. We are always happy to assist you!


 No spam, just valuable updates.