
TL;DR: Large datasets can quickly slow down applications when the browser handles heavy data operations. In this guide, you’ll learn how to implement React Pivot Table server-side processing using Docker, move expensive filtering and aggregation to the backend, and build faster, scalable React applications with better performance.
When you start working with large datasets in a Pivot Table, things can slow down quickly. What works fine with a few thousand rows can become frustrating with hundreds of thousands.
The main problem?
Too much processing is happening in the browser.
That’s where a server-side pivot engine comes in; it shifts heavy operations like aggregation, filtering, and sorting to the backend.
In this guide, we’ll walk through how to:
- Set up a Syncfusion® React Pivot Table server-side pivot engine
- Containerize it using Docker
- Connect it to a React application
By the end, you’ll have a setup that’s portable, scalable, and much easier to maintain.
Why would you actually need this?
Before diving into setup, let’s make this real.
You’ll need a server-side Pivot Table when building things like:
- A sales dashboard with hundreds of thousands of records
- A finance reporting tool with complex aggregations
- A business intelligence UI where users slice and dice large datasets
In scenarios like these:
- Browser memory gets stressed
- UI becomes sluggish
- Data processing becomes unreliable
Moving that workload to the server solves all of that cleanly.
Why Docker makes this easier
Setting up a backend service manually can be messy, with different machines, missing dependencies, and version mismatches.
Docker simplifies this by packaging everything your app needs into a container.
Think of it like this:
- Docker Image → blueprint
- Container → running instance
Once your app is containerized:
- It behaves the same everywhere
- You avoid “works on my machine” issues
- Deployment becomes predictable
To explore Docker further and start using it on your system, visit the official Docker documentation.
Prerequisites
Before getting started, make sure you have the following installed:
- Visual Studio 2022 with ASP.NET workload
- Docker Desktop (installed and running)
- Node.js LTS
Phase 1: Get the server-side engine ready
Let’s start with the backend.
Instead of building everything from scratch, you can use a ready-made ASP.NET Core GitHub sample that already includes the pivot engine.
Once you download it:
- Open the project in Visual Studio
- Build it
That’s it, the required dependencies will be restored automatically.
At this point, you already have a backend capable of:
- Processing pivot data
- Handling API requests
- Working with large datasets efficiently
For more details about the server-side Pivot Engine and how it works, you can refer to our React Pivot Table official documentation.
Phase 2: Containerize the backend using Docker
Now let’s package this backend so it can run anywhere.
Option 1 (simplest): Use Visual Studio
If you’re using Visual Studio, this is almost effortless:
- Right-click the project
- Select Add → Docker Support
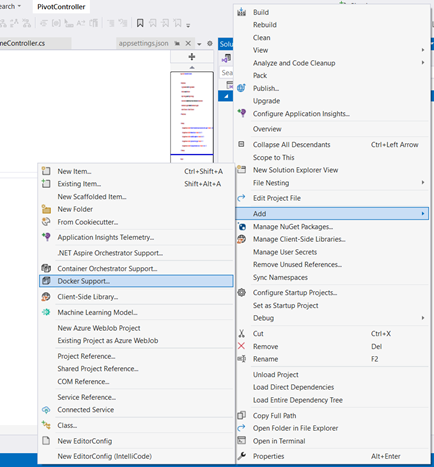
Adding Docker Support in Visual Studio - Choose Linux
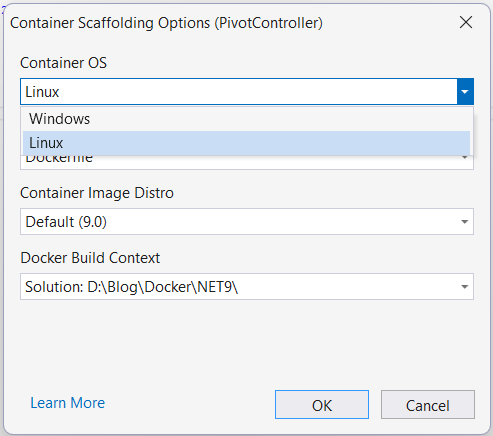
Choosing Target OS for Docker
Visual Studio automatically generates:
- A Dockerfile
- A
.dockerignorefile
You don’t need to manually configure anything.
Option 2: Use a Dockerfile manually
If you prefer more control, you can add a Dockerfile yourself.
Sample configuration
# This stage is used when running from VS in fast mode (Default for Debug configuration)

FROM mcr.microsoft.com/dotnet/aspnet:9.0 AS base
USER $APP_UID
WORKDIR /app
EXPOSE 8080
EXPOSE 8081

# This stage is used to build the service project

FROM mcr.microsoft.com/dotnet/sdk:9.0 AS build
ARG BUILD_CONFIGURATION=Release
WORKDIR /src
COPY ["PivotController.csproj", "."]
RUN dotnet restore "./PivotController.csproj"
COPY . .
WORKDIR "/src/."
RUN dotnet build "./PivotController.csproj" -c $BUILD_CONFIGURATION -o /app/build


# This stage is used to publish the service project to be copied to the final stage

FROM build AS publish
ARG BUILD_CONFIGURATION=Release
RUN dotnet publish "./PivotController.csproj" -c $BUILD_CONFIGURATION -o /app/publish /p:UseAppHost=false

# This stage is used in production or when running from VS in regular mode (Default when not using the Debug configuration)
FROM base AS final
WORKDIR /app
COPY --from=publish /app/publish .
ENTRYPOINT ["dotnet", "PivotController.dll"]
Note: If your application uses a different version of .NET (for example, .NET 8.0 or .NET 7.0), make sure to update the version numbers in the FROM lines accordingly.
At a high level, the Dockerfile:
- FROM: Sets the base image (usually a .NET SDK image).
- WORKDIR: Defines the working directory inside the container.
- COPY: Copies your project files into the container.
- RUN: Runs commands like dotnet build or dotnet publish.
- EXPOSE: Tells Docker which port the container will use.
- ENTRYPOINT: Specifies the command to run when the container starts.
Even if you’ve never worked with Dockerfiles before, you don’t need to memorize every instruction; the structure is consistent across most .NET apps.
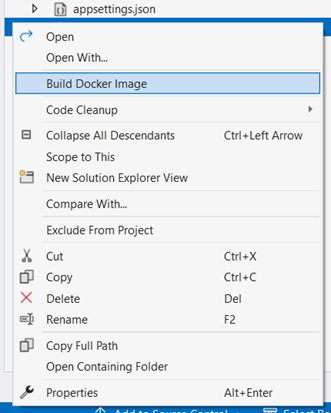
Build the Docker image
Once the Dockerfile is ready, build the image.
Option 1: Using Visual Studio
Just right-click the Dockerfile and build; it handles everything.
Option 2: Using terminal
Run:
docker build -t pivotcontroller .That single command creates your container image.
Note: Make sure to include the dot (.) at the end; it tells Docker to use the current directory.
Verify the Image in Docker Desktop
- Open Docker Desktop.
- Go to the Images tab.
- You’ll see your newly created image listed with the name and tag you used.

Verifying Docker Image in Docker Desktop
Phase 3: Run and connect everything
Now we’ll bring the system to life.
Run the container
Option 1: Using Docker Desktop
- Select the image
- Click Run
- Configure the container:
- Set a container name (optional)
- Map ports (example: 5000 → 8080)
- Click Run to start the container

Running Docker Container in Docker Desktop
Option 2: Using the command line (optional)
Start your container:
docker run -d -p 5000:8080 --name pivot-container pivotcontrollerThis maps your local port (5000) to the container.
Once running, your API will be available at:
http://localhost:5000

Connect the React Pivot Table
Now comes the important part: linking your frontend to this backend.
In your React app, configure the Pivot Table:
Code example:
import { PivotViewComponent } from '@syncfusion/ej2-react-pivotview';
import { DataSourceSettingsModel } from '@syncfusion/ej2-pivotview';

function App() {
    let dataSourceSettings = {
        url: 'http://localhost:5000/api/pivot/post',
        mode: 'Server',
    };

    return (
        <PivotViewComponent
            id='PivotView'
            dataSourceSettings={dataSourceSettings}
        />
    );
}

export default App;
Define the Pivot Table report
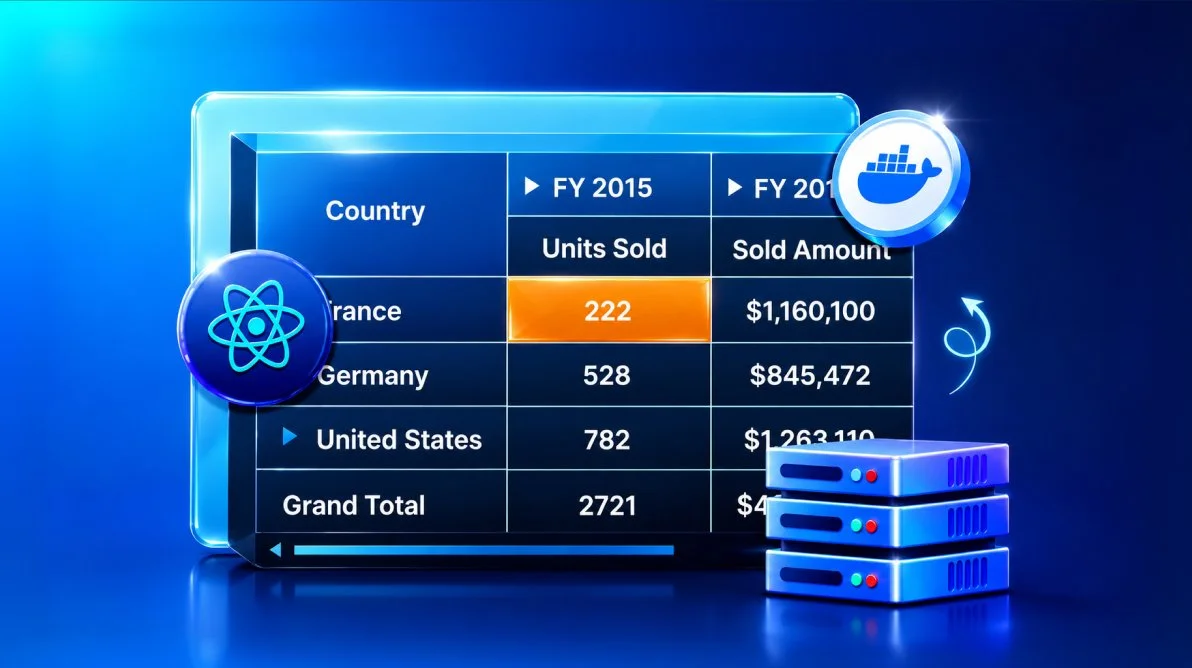
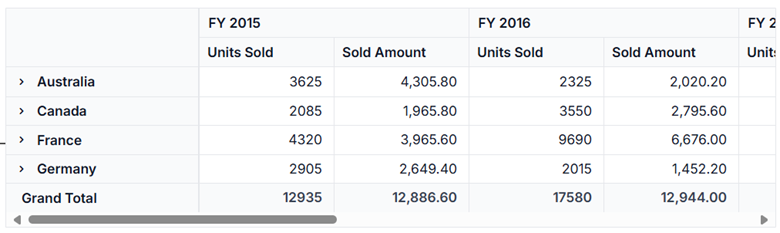
You can now configure rows, columns, and values based on your dataset (such as sales.csv or sales-analysis.json) using dataSourceSettings:
Code example:
let dataSourceSettings = {
    url: 'http://localhost:5000/api/pivot/post',
    mode: 'Server',
    expandAll: false,
    enableSorting: true,
    columns: [
        { name: 'Year', caption: 'Production Year' }
    ],
    values: [
        { name: 'Sold', caption: 'Units Sold' },
        { name: 'Price', caption: 'Sold Amount' },
    ],
    rows: [
        { name: 'Country' },
        { name: 'Product' }
    ],
    formatSettings: [
        { name: 'Price', format: 'N' }
    ],
};
Once your app runs:
- The UI sends requests to the API
- The server processes data
- Results are returned and rendered
Everything heavy stays off the browser.
What you’ve achieved
At this point, you have:
- A server-side pivot engine handling large datasets
- A Dockerized backend that runs anywhere
- A React frontend connected cleanly via API
And most importantly, you’ve removed performance bottlenecks.
GitHub reference
To see the complete Docker implementation, check out the sample project on GitHub.
Frequently Asked Questions
To deploy the server-side engine, you typically build a Docker image using the docker build command and run it as a container using docker run. These steps package the backend service and make it accessible for the React application.What Docker commands are used to build and run the Pivot Table server-side engine?
The Docker container exposes a specific port (commonly 5000 or a configured port) that allows the React application to communicate with the server-side engine via API calls.Which port is exposed by the Docker container running the server-side Pivot Engine?
The React Pivot Table connects to the server-side engine by specifying the API endpoint URL (for example, http://localhost:<port>/api/pivot). This endpoint must match the one exposed by the Docker container.How do you configure the API endpoint in the React Pivot Table to connect to Docker?
Common issues include incorrect port mapping, API endpoint mismatch, CORS restrictions, or the container not running properly. These can be resolved by verifying Docker container status and configuration settings.What are common issues when connecting a React app to the Dockerized backend?
Docker packages the application and its dependencies into a container, ensuring the server-side engine behaves consistently across development, testing, and production environments.How does Docker ensure consistency when deploying the server-side engine?

Conclusion
If your React Pivot Table is starting to struggle with large datasets, moving processing to the server isn’t just an optimization; it’s a necessity.
By combining a server-side engine with Docker, you get:
- Predictable performance
- Cleaner architecture
- Zero environment setup headaches
Once this setup is in place, you can reuse it across projects with minimal effort.
For those building data-heavy React applications, adopting this pattern early will save you from performance issues later.
If you’re a Syncfusion user, you can download the setup from the license and downloads page. Otherwise, you can download a free 30-day trial.
You can also contact us through our support forums, support portal, or feedback portal for queries. We are always happy to assist you!

 No spam, just valuable updates.