
TL;DR: React Suspense for data fetching allows components to render automatically as soon as their data is ready without manually wiring useEffect(), useState(), loading states, or re‑render logic. With React 19’s new use() API and Suspense boundaries, you can run nested or parallel data loading, handle failures with error boundaries, keep interactions responsive using useTransition(), and even stream server-rendered content progressively.
Users don’t care how your app fetches data; they care that the UI feels fast and stable. React 18 took the first step toward this with Suspense and lazy loading, allowing React apps to defer non‑critical code and avoid blocking the main UI thread.
React 19 builds on that foundation by turning Suspense into a more capable async rendering system. With the new use() API and transitions, React can coordinate loading, fallbacks, and server‑streamed content in a much more predictable way.
This guide explores what’s new in React 19 Suspense, where it fits in modern rendering, and how it changes traditional data‑fetching patterns.

Why Suspense exists (and where it fits in rendering)
React’s push toward better performance started with a simple idea used heavily at Meta: load as little as possible, as early as possible. To give users a fast UI, we want small bundles that render quickly, but we also want data and code available the moment the user needs them.
Techniques like tree‑shaking, code‑splitting, preloading, and predictive loading helped reduce bundle size and load assets earlier, but something was still missing. React needed a way to coordinate what’s being fetched and what’s being rendered.
That gap is exactly where Suspense fits. It sits between your loading code and your UI, deciding what to show while data, components, or scripts are still on the way. Modern apps often struggle to render quickly because of:
- Slow server responses.
- Data dependencies (one request needs another).
- Third-party scripts blocking rendering.
- Components that can’t render until data exists.
Suspense provides a structured way to handle all of these:
- If something is still loading, React can show a fallback.
- When it’s ready, React renders the UI.
- If it fails, React throws the error (you handle it with an error boundary).
This makes Suspense a core part of the “load early, render progressively” approach. With React 19’s new use() and useTransition() hooks, Suspense evolves from a simple fallback mechanism into a full async rendering tool.
React 18 recap: Suspense for code-splitting
Route‑level lazy loading is one of the simplest and most effective uses of Suspense. It splits your bundle and shows a fallback while the route chunk loads, no manual loading state needed.
Implementation example:
import React, { Suspense, lazy } from 'react';
import { BrowserRouter, Routes, Route } from 'react-router-dom';

// Lazy load different pages
const Home = lazy(() => import('./pages/Home'));
const Dashboard = lazy(() => import('./pages/Dashboard'));
const Settings = lazy(() => import('./pages/Settings'));

// Custom loading component
const LoadingSpinner = () => (
  <div style={{ textAlign: 'center', padding: '50px' }}>
    <div>Loading...</div>
  </div>
);

function App() {
  return (
    <BrowserRouter>
      <Suspense fallback={<LoadingSpinner />}>
        <Routes>
          <Route path="/" element={<Home />} />
          <Route path="/dashboard" element={<Dashboard />} />
          <Route path="/settings" element={<Settings />} />
        </Routes>
      </Suspense>
    </BrowserRouter>
  );
}

export default App;
Before diving into how Suspense speeds up loading, let’s revisit how React traditionally fetched and rendered data.
Traditional data-fetching and why it feels clunky
Most React apps use one of two familiar patterns for fetching and rendering data. They work, but both require extra state management and force React to render the UI more than once.
Fetch on render
In this approach, the component mounts first. Only after the initial render does it start fetching data. While the request is in progress, you show a loading state; once the data arrives, the component renders again with real content.
Here’s how you can do it in code:
import { useState, useEffect } from "react";

const PostDetails = () => {
  const [postDetails, setPostDetails] = useState(null);

  useEffect(() => {
    fetch("https://jsonplaceholder.typicode.com/posts/1/")
      .then((response) => response.json())
      .then((data) => setPostDetails(data));
  }, []);

  if (!postDetails) return <p>Loading post...</p>;

  return (
    <div>
      <h1>{postDetails.title}</h1>
      <p>{postDetails.body}</p>
    </div>
  );
};
Fetch then render
Here, data is requested immediately, but the component still can’t render meaningful UI until the fetch completes. You still end up managing loading states and triggering a second render when the data arrives.
Try this in your code:
const fetchPostDetails = () => {
  return fetch("https://jsonplaceholder.typicode.com/posts/1/").then(
    (response) => response.json()
  );
};

const Example = () => {
  const [postDetails, setPostDetails] = useState(null);

  useEffect(() => {
    fetchPostDetails().then((data) => setPostDetails(data));
  }, []);

  if (!postDetails) return <p>Loading post...</p>;

  return (
    <div>
      <PostDetails post={postDetails} />
    </div>
  );
};

const PostDetails = ({ post }) => (
  <div>
    <h1>{post.title}</h1>
    <p>{post.body}</p>
  </div>
);
Both approaches rely on two different hooks:
useEffect()to trigger the fetch.useState()to store the result, plus loading and error states.
Because the component must render first and then fetch, React ends up rendering twice, once for the placeholder UI, then again for the real content. As your app grows, managing these states across multiple components becomes repetitive and error‑prone.
What if we can streamline everything, removing the need for the useEffect() and useState() hooks altogether, while still being able to efficiently handle the loading and error state?
That is what Suspense is here for.
React Suspense for data fetching
How does Suspense work?
When React is rendering the component, and it discovers the Suspense in its DOM tree, it checks:
- If any child of Suspense is waiting for asynchronous operations like promises, to complete.
- React suspends the rendering of the children and shows the fallback UI.
- When the async work completes, then React renders the UI.
- If the async work fails, then Suspense will throw errors, and it has to be handled through an error boundary or explicitly.
This gives the user the most optimal experience, and you can separate or club different components in their own Suspense as you wish.
Basic Suspense with data fetching
You can pass a promise (async task) directly to the use() hook within a component and wrap the component inside the Suspense with a fallback UI.
The component renders only after the promise inside the use() hook has resolved. Below is the code you need:
import React, { Suspense, use } from "react";

// Simulated API calls that return promises
function fetchUser(id) {
  return new Promise((resolve) => {
    setTimeout(() => {
      resolve({ id, name: `User ${id}`, email: `user${id}@example.com` });
    }, 2000);
  });
}

function fetchPosts(userId) {
  return new Promise((resolve) => {
    setTimeout(() => {
      resolve([
        { id: 1, title: "First Post", content: "Content 1" },
        { id: 2, title: "Second Post", content: "Content 2" },
      ]);
    }, 1500);
  });
}

// Component using React 19's `use` hook
function UserProfile({ userId }) {
  const user = use(fetchUser(userId));

  return (
    <div>
      <h3>{user.name}</h3>
      <p>{user.email}</p>
    </div>
  );
}

function UserPosts({ userId }) {
  const posts = use(fetchPosts(userId));

  return (
    <div>
      {posts.map((post) => (
        <div key={post.id}>
          <h4>{post.title}</h4>
          <p>{post.content}</p>
        </div>
      ))}
    </div>
  );
}
React 19 treats the use() hook as a first‑class, framework‑agnostic primitive for reading asynchronous values. You can pass a plain promise directly to use(), and React will automatically suspend the component until that promise resolves. Suspense handles the waiting logic, so you don’t need effects, state variables, or manual loading flags.
The use() hook works in both client and server components, but server components should prefer async/await instead of use() for two reasons:
- Async by default: React 19 supports fully asynchronous server components. Because the server waits for the data before sending HTML to the client, there’s no need for a Suspense fallback.
- No boundary required: Passing a promise to
use()triggers Suspense and requires a boundary in the component tree. With async/await on the server, you can wait for the data directly without introducing a Suspense wrapper.
Since use() always activates a Suspense boundary, it must only be called within a Suspense‑wrapped subtree. Calling use() outside a boundary causes React to throw because there’s nowhere to display the fallback.
Nested Suspense
You can nest Suspense boundaries when different parts of the UI depend on separate asynchronous operations. In a nested setup, the parent component must finish rendering before the child begins its own data‑fetching logic. Each boundary controls its own loading state and resolves independently.
Implementation example:
function NestedSuspenseExample() {
  const [userId] = useState(1);

  return (
    <div>
      <h2>Nested Suspense</h2>

      {/* Outer Suspense for user profile */}
      <Suspense fallback={<LoadingSkeleton text="Loading profile..." />}>
        <UserProfile userId={userId} />

        {/* Inner Suspense for posts - loads independently */}
        <Suspense fallback={<LoadingSkeleton text="Loading posts..." />}>
          <UserPosts userId={userId} />
        </Suspense>
      </Suspense>
    </div>
  );
}
Nested boundaries are useful when parts of the UI depend on each other, but you still want the child sections to load independently once the parent has completed its async work.
Parallel data-fetching in Suspense
If the UI sections do not depend on each other, you can place separate Suspense boundaries side by side. Each boundary begins loading as soon as its component renders, allowing React to fetch multiple async resources in parallel.
Here’s how you can do it in code:
function ParallelSuspenseExample() {
  const [userId] = useState(1);

  return (
    <div>
      <h2>Parallel Suspense</h2>

      {/* First Suspense for user profile */}
      <Suspense fallback={<LoadingSkeleton text="Loading profile..." />}>
        <UserProfile userId={userId} />
      </Suspense>

      {/* Second Suspense for posts - loads independently */}
      <Suspense fallback={<LoadingSkeleton text="Loading posts..." />}>
        <UserPosts userId={userId} />
      </Suspense>
    </div>
  );
}
Multiple parallel async calls inside a single boundary
Sometimes you need multiple async operations, such as fetching both a user and their posts, to run at the same time. With the use() hook, you can initiate them together inside one component, and Suspense will wait until all async work has completed before rendering the UI.
Implementation example:
function MultipleAsyncCallsExample({ userId }) {
  const user = use(fetchUser(userId));
  const posts = use(fetchPosts(userId));

  return (
    <div>
      <UserPosts posts={posts} />
      <UserProfile user={user} />
    </div>
  );
}

function Example(){
  return (
    <div>
      <h2>Multiple parallel async calls within suspense</h2>

      {/* Outer Suspense for user profile */}
      <Suspense fallback={<LoadingSkeleton text="Loading data..." />}>
        <MultipleAsyncCallsExample userId={1} />
      </Suspense>
    </div>
  );
}
Both requests run in parallel, and the fallback remains visible until every async task resolves. This eliminates the boilerplate useEffect() and useState() patterns and lets React handle async coordination automatically.
Coordinated reveal with SuspenseList (experimental)
For more control over how multiple Suspense boundaries appear on the screen, React provides SuspenseList. It lets you specify reveal order, useful when rendering long lists or progressively loaded sections that should appear top‑to‑bottom.
Here’s how you can do it in code:
function SuspenseListExample() {
  return (
    <SuspenseList revealOrder="forwards">
      {/* First Suspense for user profile */}
      <Suspense fallback={<LoadingSkeleton text="Loading profile..." />}>
        <UserProfile userId={userId} />
      </Suspense>

      {/* Second Suspense for posts - loads independently */}
      <Suspense fallback={<LoadingSkeleton text="Loading posts..." />}>
        <UserPosts userId={userId} />
      </Suspense>
    </SuspenseList>
  );
}
This approach works well when you have a large list, and you want to do the step-by-step reveal with the reading flow.
Note: SuspenseList is still experimental; avoid using it in production or use it with care until stabilized.
State refreshing
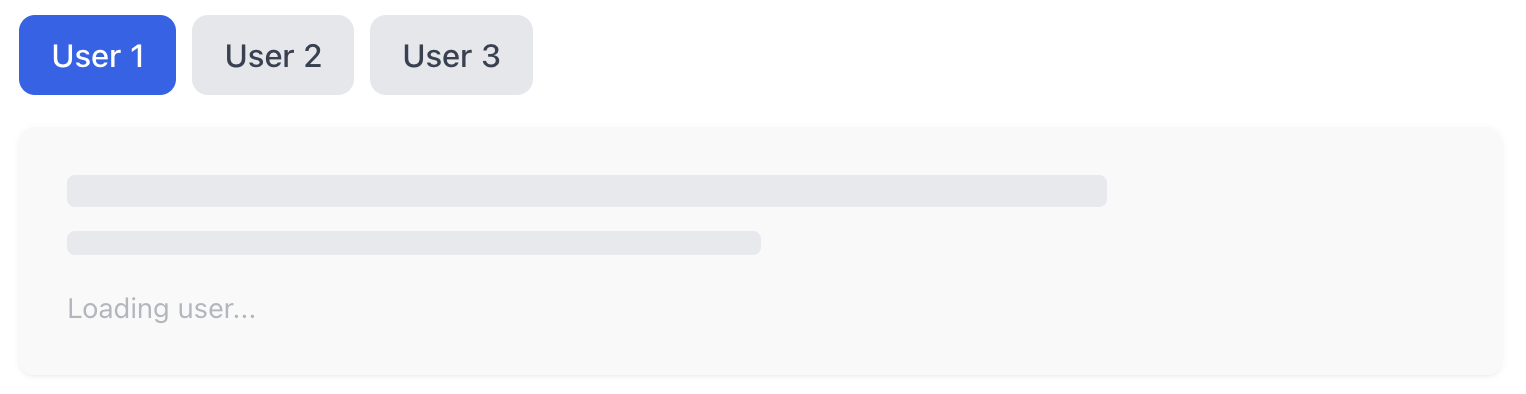
React’s useTransition() hook lets you mark certain state updates as non‑urgent, keeping the UI responsive while new data loads. When you wrap an update with startTransition(), React delays the visual update, triggers the async work, and Suspense handles the loading fallback, all without blocking the current UI.
Below is the code you need:
function TransitionExample() {
  const [userId, setUserId] = useState(1);
  const [isPending, startTransition] = useTransition();

  const switchUser = (newId) => {
    startTransition(() => {
      setUserId(newId);
    });
  };

  return (
    <div>
      <h2>Suspense with Transitions</h2>

      <div>
        {[1, 2, 3].map((id) => (
          <button
            key={id}
            onClick={() => switchUser(id)}
            disabled={isPending}
            className={`${
              userId === id
                ? "bg-blue-600 text-white"
                : "bg-gray-200 text-gray-700 hover:bg-gray-300"
            } ${isPending ? "opacity-50 cursor-not-allowed" : ""}`}>
            User {id}
          </button>
        ))}
      </div>

      {isPending && <div>Transitioning...</div>}

      <Suspense fallback={<LoadingSkeleton text="Loading user..." />}>
        <UserProfile userId={userId} />
      </Suspense>
    </div>
  );
}
Transitions ensure the UI stays interactive. The current screen remains visible while React fetches the next user, and Suspense swaps in the fallback only for the sections that need new data.
Handling error
Suspense manages loading, but it doesn’t catch async errors. For that, React relies on Error Boundaries. By wrapping Suspense inside an error boundary, you can show a clear error message and provide a retry mechanism when async work fails.
Here’s how you can do it in code:
class ErrorBoundary extends React.Component {
  constructor(props) {
    super(props);
    this.state = { hasError: false, error: null };
  }

  static getDerivedStateFromError(error) {
    return { hasError: true, error };
  }

  componentDidCatch(error, errorInfo) {
    console.error("Error caught:", error, errorInfo);
  }

  render() {
    if (this.state.hasError) {
      return (
        <div className="bg-red-50 border border-red-200 rounded-lg p-4">
          <h3 className="text-red-800 font-semibold mb-2">Error Occurred</h3>
          <p className="text-red-600 text-sm">{this.state.error?.message}</p>
          <button
            onClick={() => this.setState({ hasError: false, error: null })}
            className="mt-3 px-4 py-2 bg-red-600 text-white rounded hover:bg-red-700">
            Retry
          </button>
        </div>
      );
    }

    return this.props.children;
  }
}

function fetchWithError(shouldFail) {
  return new Promise((resolve, reject) => {
    setTimeout(() => {
      if (shouldFail) {
        reject(new Error("Failed to fetch data"));
      } else {
        resolve({ data: "Success!" });
      }
    }, 1000);
  });
}

function DataWithError({ shouldFail }) {
  const result = use(fetchWithError(shouldFail));
  return <div className="text-green-600 font-medium">{result.data}</div>;
}

function ErrorBoundaryExample() {
  const [shouldFail, setShouldFail] = useState(false);
  const [key, setKey] = useState(0);

  return (
    <div className="space-y-4">
      <h2 className="text-2xl font-bold text-gray-800">
        Suspense with Error Boundaries
      </h2>

      <div className="flex gap-2">
        <button
          onClick={() => {
            setShouldFail(false);
            setKey((k) => k + 1);
          }}
          className="px-4 py-2 bg-green-600 text-white rounded-lg hover:bg-green-700">
          Fetch Success
        </button>
        <button
          onClick={() => {
            setShouldFail(true);
            setKey((k) => k + 1);
          }}
          className="px-4 py-2 bg-red-600 text-white rounded-lg hover:bg-red-700">
          Fetch Error
        </button>
      </div>

      <ErrorBoundary key={key}>
        <Suspense fallback={<LoadingSkeleton text="Fetching data..." />}>
          <DataWithError shouldFail={shouldFail} />
        </Suspense>
      </ErrorBoundary>
    </div>
  );
}
The retry simply forces a re-render, re‑executing the async work inside Suspense.
You can wrap individual Suspense boundaries, nested boundaries, or entire SuspenseLists inside an error boundary, React handles each boundary independently.
Streaming server-side rendered content
With Suspense, we can highly optimize the rendering of the server-side content. The server can stream the partial content, and the browser will render it in parts.
This is how it works:
- React starts constructing the content on the server.
- Once it encounters the Suspense, it streams the constructed content to the browser.
- The browser starts rendering the received content.
- Once the async operation is completed, React sends the remaining content.
This works properly because the fallback UI is added to the main bundle, which helps React to render it on the browser while waiting for the server to stream the remaining content.
Implementation example:
import { renderToPipeableStream } from "react-dom/server";

const App = () => (
  <Suspense fallback={<p>Loading...</p>}>
    <MainComponent />
  </Suspense>
);

// Server-side rendering logic
const { pipe } = renderToPipeableStream(<App />);
This is really helpful as:
- The server starts streaming partial content, and browsers start rendering it, resulting in faster first paint.
- User sees progressive rendering over a blank screen.
To make the most out of Suspense, rather than using traditional loading, you can use skeleton loading to minimize the layout shifting.
<Suspense fallback={<LoadingSkeleton text="Loading posts..." />}>
    <UserPosts userId={userId} />
</Suspense>
Conclusion
Thank you for reading! Suspense is a great addition in React 19 that really solves some of the core rendering problems on the browser, providing the best optimal experience. But make sure you are not overdoing it by wrapping the components that do not require fallbacks.
Having an audit check could be helpful:
- UI fallbacks should match the layout of the component to minimize layout jumps.
- Only necessary components should be isolated with their suspense boundary.
- Are the crucial components of error handled properly?
- Test everything on a throttled, slower network before shipping.
Your perspective can help others, leave a comment with what worked or what you’re still exploring.


 No spam, just valuable updates.