

TL;DR: Learn how to build a real-world task management app using React 19’s useOptimistic and useFormState hooks with Next.js and Syncfusion Data Grid. This guide demonstrates how to implement optimistic UI, handle client–server synchronization, and manage data efficiently for responsive web applications.
Modern users expect instant feedback when interacting with web applications. Waiting for server responses before updating the UI leads to poor user experience, especially in data-driven apps. React 19 addresses this challenge with built-in support for optimistic UI through the useOptimistic hook, making it easier to update the interface immediately while server actions run in the background.
In this blog, we explore how to integrate React 19’s new capabilities with Syncfusion® Data Grid and Next.js to build a task management app that feels fast and responsive. You’ll see how optimistic updates, server actions, and structured data grids work together to create a smooth, production-ready user experience.

Why build an optimistic UI task management app with React 19 and Next.js?
- Optimistic UI improves perceived performance by reflecting changes instantly.
- React 19 simplifies optimistic updates with first-class hooks.
- Next.js enables clean client–server separation using Server and Client Components.
- Syncfusion Data Grid handles structured data, selection, and updates reliably at scale.
Together, this stack is ideal for building modern, enterprise-ready React applications.
Why integrate React 19 with Syncfusion Grid?
- React 19: Introduce’s
useOptimisticfor instant UI updates anduseFormStatefor streamlined form handling. - Syncfusion Data Grid: Offers advanced features like data binding, row selection, sorting, and filtering for tabular data.
- Next.js: Facilitates client-server communication with
"use client"and"use server"directives, enabling scalable applications. - Optimistic updates: Enhance user experience by reflecting changes immediately, even before server confirmation.
We will create an application that enables users to add, update, and view tasks in a Syncfusion Data Grid, utilizing optimistic updates for a seamless experience and server-side logic for data persistence.
Application overview
The app includes:
- A client-side form with Syncfusion
TextBoxComponentandButtonComponentfor task input. - A
GridComponentto display tasks, supporting row selection for editing - Server-side logic to process form submissions and ensure unique task IDs.
- React 19’s
useOptimisticfor instant UI updates anduseFormStatefor state management. - Next.js for handling client-server communication.
Prerequisites
To build a Next.js application with React 19, you need:
- Node.js 18.17.0 or above
- npm, pnpm, or yarn
- React 19 (stable) and react-dom 19
- Next.js 15.1 or later
- A text editor (e.g., VS Code)
Setting up a Next.js application with Syncfusion
Once your environment is ready, you can begin setting up your task management application.
Step 1: Initialize the project
Create a new Next.js application by running the following command in your terminal:
npx create-next-app@latest my-next-appDuring setup, select options such as TypeScript and App Router.
Step 2: Navigate to the Project Directory
Next, move into the newly created project folder.
cd my-next-appStep 3: Understand project structure
Familiarizing yourself with the project structure will help you work more effectively:
app/orpages/: Manages application routing.public/: Stores static assets such as images and fonts.styles/: Contains global and component-level CSS.package.json: Manages project dependencies and scripts.next.config.js: Used for Next.js configuration and customization.
Step 4: Install Syncfusion packages:
Install the required Syncfusion React component using npm:
npm install @syncfusion/ej2-react-grids \
@syncfusion/ej2-react-buttons \
@syncfusion/ej2-react-inputs
These packages provide advanced UI components, such as data grids, buttons, and input controls.
Step 5: Add Syncfusion Styles
To apply Syncfusion’s Material theme, add the following imports to your global stylesheet (styles/global.css):
@import "@syncfusion/ej2-react-grids/styles/material.css";
@import "@syncfusion/ej2-react-buttons/styles/material.css";
@import "@syncfusion/ej2-react-inputs/styles/material.css";
Step 6: Start the development server
Run the development server with the command below:
npm run devOpen your browser and navigate to http://localhost:3000.
Your Next.js application should now be running successfully with Syncfusion components ready for development.
Server component implementation
The Next.js server component defined in page.tsx acts as the entry point for the application. It handles the root route (/) and is responsible for fetching the initial task data on the server before the page is rendered.
This approach ensures that task data is securely loaded and made available to the client without exposing server-side logic
Here’s the code implementation in page.tsx.
import TodoAppComponent from './components/TodoAppComponent';
import {getTasks} from './actions';

export default async function Home() {
    const initialTasks = await getTasks();
    return (
        <main className="min-h-screen bg-gray-100 flex items-center justify-center">
            <TodoAppComponent tasks={initialTasks} />
        </main>
    );
}
Key features
- Server component: Runs exclusively on the server, enabling secure and efficient data fetching in Next.js.
- Task type consistency: Uses the Task type implicitly through
getTasks, aligning with client-side data structures. - Server-side data loading: Initializes task data by calling
getTaskson the server and passes the fetched data to the client-sideTodoAppClientfor rendering in the Syncfusion Grid.
This setup ensures that initial data is loaded before the page is rendered, providing a smoother user experience and a clear separation between server-side data handling and client-side UI rendering.
Client-side Implementation
The client-side logic is defined in TodoAppComponent.tsx and marked with the "use client" directive. This component handles user interaction, optimistic updates, and Syncfusion Grid integration.
"use client";
import React, { useOptimistic, useState, useActionState } from "react";
import { submitTask } from "../actions";
import { GridComponent, ColumnsDirective, ColumnDirective } from "@syncfusion/ej2-react-grids";
import { TextBoxComponent } from "@syncfusion/ej2-react-inputs";
import { ButtonComponent } from "@syncfusion/ej2-react-buttons";

export type Task = {
    id: number | string;
    task: string; status?: string;
};

interface TodoAppClientProps {
    tasks: Task[];
}

export default function TodoAppComponent({ tasks }: TodoAppClientProps) {
    const [taskID, setTaskID] = useState("");
    const [taskName, setTaskName] = useState("");
    const [isSubmitting, setIsSubmitting] = useState(false);
    const [state, formAction] = useActionState(submitTask, tasks);

    const [optimisticState, addOptimistic] = useOptimistic<Task[], Task>(
        state,
        (prevState, newTask) => {
            const existingTaskIndex = prevState.findIndex(task => task.id === newTask.id);
            if (existingTaskIndex !== -1) {
                return prevState.map(task =>
                    task.id === newTask.id ? { ...task, ...newTask } : task
                );
            } else {
                return [...prevState, newTask];
            }
        }
    );

    function rowSelected(args: any) {
        const row = args.data as Task;
        if (row) {
            setTaskID(String(row.id));
            setTaskName(row.task);
        } else {
            setTaskID("");
            setTaskName("");
        }
    }

    async function handleSubmit(formData: FormData) {
        if (isSubmitting) return;
        setIsSubmitting(true);
        const idField = formData.get("id") as string;
        const id = idField ? Number(idField) : "";
        const optimisticTask: Task = { id,
              task: "Saving...",
              status: ""
        };
        addOptimistic(optimisticTask);
        await formAction(formData);
        setTaskID("");
        setTaskName("");
        setIsSubmitting(false);
    }

    return (
        <form action={handleSubmit} style={{ padding: 24, marginTop: 80 }}>
            <input type="hidden" name="id" value={taskID} />

            <table className="border w-full mb-6">
                <tbody>
                    <tr>
                        <td className="px-4 py-2">Enter Task</td>
                        <td className="px-4 py-2">
                            <TextBoxComponent value={taskName} name="task" placeholder="Enter Task"/>
                        </td>
                    </tr>
                    <tr>
                        <td className="px-4 py-2">Enter Status</td>
                        <td className="px-4 py-2">
                            <TextBoxComponent name="status" placeholder="Enter Status" />
                        </td>
                    </tr>
                    <tr>
                        <td />
                        <td className="px-4 py-2">
                            <ButtonComponent disabled={isSubmitting}>{taskID ? "Save" : "Add"}</ButtonComponent>
                        </td>
                    </tr>
                </tbody>
            </table>

            <GridComponent className="e-custom-control" dataSource={optimisticState} rowSelected={rowSelected}>
                <ColumnsDirective>
                    <ColumnDirective field="id" headerText="Task ID" width="120" isPrimaryKey />
                    <ColumnDirective field="task" headerText="Task Name" width="150" />
                    <ColumnDirective field="status" headerText="Status" width="120" />
                </ColumnsDirective>
            </GridComponent>
        </form>
    );
}Client-side features
Here are the essential client-side features that power the application:
- Optimistic UI with React 19:
useOptimisticinstantly updates the grid with temporary data while the server action completes. - Reliable form handling:
useFormStateintegrates seamlessly with server actions for predictable updates. - Rich data interaction: Syncfusion Data Grid supports row selection, inline updates, and structured rendering.
- User-friendly UX: Users can add or edit tasks without waiting for server confirmation.
const [optimisticState, addOptimistic] = useOptimistic<Task[], Task>(
    state,
    (prevState, newTask) => {
        const existingTaskIndex = prevState.findIndex(task => task.id === newTask.id);
        if (existingTaskIndex !== -1) {
            return prevState.map(task =>
                task.id === newTask.id
                    ? { ...task, ...newTask }
                    : task
                );
        } else {
            return [...prevState, newTask];
        }
    }
);
Server-side implementation
The server-side logic, marked with the "use server" directive, handles form submissions, task updates, and data retrieval. It powers optimistic UI on the client by returning the updated task list after each mutation.
action.ts
'use server';
import { Task } from "./components/TodoAppComponent";

let tasks: Task[] = [
    { id: 1, task: "Scrum Meeting", status: "Pending" },
    { id: 2, task: "Sprint Planning", status: "Pending" },
    { id: 3, task: "ES Portal Review", status: "Pending" }
];

export async function getTasks(): Promise<Task[]> {
    await new Promise(resolve => setTimeout(resolve, 500));
    return tasks;
}

export async function submitTask(prev: Task[], formData: FormData): Promise<Task[]> {
    await new Promise((r) => setTimeout(r, 2000));

    const rawTaskId = formData.get("id");
    const task = formData.get("task") as string;
    const status = formData.get("status") as string;
    const taskId = rawTaskId ? Number(rawTaskId) : null;

    if (rawTaskId !== '') {
        return prev.map(taskItem =>
            taskItem.id === taskId
            ? { ...taskItem, task, status }
            : taskItem
        );
    } else {
        const newTask: Task = {
              id: (Number(prev[prev.length - 1].id) + 1) as number, task, status,
        };
        const updatedData = prev.filter(task => task.id !== newTask.id);
        return [...updatedData, newTask];
    }
}
Note: The condition if (rawTaskId && rawTaskId !== "") explicitly checks for a provided ID. This is a bit clearer than relying only on taskId truthiness and avoids treating 0 (if ever used) as falsy.
Key server-side features
The server-side layer is responsible for data orchestration, consistency, and reliability. It works in tandem with the client’s optimistic UI to provide instant feedback while maintaining authoritative state control.
"use server"directive: Guarantees that all data-processing logic runs exclusively on the server. This aligns with Next.js best practices and ensures secure, scalable execution.- Shared task type: Imports the Task type directly from the client to enforce type consistency across boundaries, minimizing mismatches and preventing runtime errors.
- Server-side data initialization: Task data is initialized and fetched on the server, then injected into the client-rendered Syncfusion Data Grid for immediate display.
- Task updates: When a task ID is provided, the submitTask() action updates the corresponding task’s name and status fields in a predictable, immutable manner.
- Task creation with reliable IDs: New tasks receive a deterministic, incremental ID by incrementing the last task’s ID. A precautionary filter removes any potential duplicates before insertion, ensuring data integrity.
- Improved ID strategy: Unlike random ID generation, which risks collisions, incremental IDs offer reliability, predictability, and easier debugging.
Why use a Data Grid for optimistic UI workflows?
Optimistic UI becomes more complex as applications grow. Using a structured Data Grid helps manage that complexity effectively.
- Handles frequent state updates without UI glitches.
- Maintains consistency between optimistic and server-confirmed data.
- Supports editing, selection, and real-time updates out of the box.
- Scales better than manual table implementations.
This makes Data Grid components especially valuable for business and enterprise applications.
Integration workflow
On the front end:
- Users submit a task, triggering an optimistic update.
- The grid updates instantly with a temporary “Saving…” entry.
- Server logic processes the update asynchronously.
- The UI syncs automatically once the server responds.
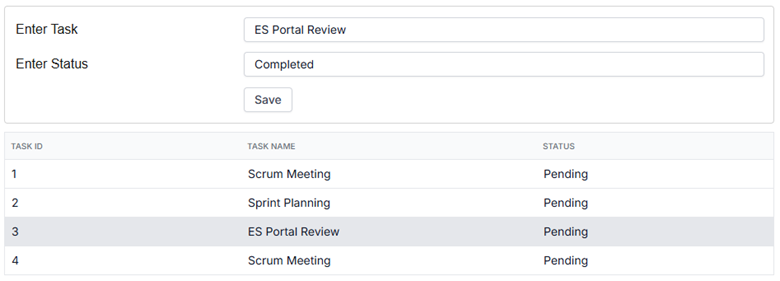
This pattern ensures fast feedback without sacrificing data integrity. Here’s the feature demonstrated visually:

GitHub reference
You can download the complete application from the GitHub repository.
Conclusion
Thank you for reading! React 19’s optimistic UI support makes it easier than ever to build fast, responsive applications that feel instant to users. By combining useOptimistic, useFormState, Next.js server actions, and Syncfusion React Data Grid, you can create scalable task-based applications with seamless client–server synchronization.
If you’re building modern React applications that require real-time feedback and structured data handling, this approach provides a strong foundation.
If you’re a Syncfusion user, you can download the setup from the license and downloads page. Otherwise, you can try a free 30-day trial.
For questions, reach out through our support forum, support portal, or feedback portal. We are always happy to assist you!


 No spam, just valuable updates.