
Xamarin.Forms Succinctly®

CHAPTER 1
Getting Started with Xamarin.Forms
Before you start writing mobile apps with Xamarin.Forms, you first need to understand the state of mobile app development today and how Xamarin fits into it. Also, you need to set up your development environment to be able to build, test, debug, and deploy your apps to Android, iOS, and Windows devices. This chapter introduces Xamarin as a set of tools and services, introduces Xamarin.Forms as the platform you will use, and then presents the tools and hardware you need for real-world development.
Introducing Xamarin and Xamarin.Forms
Xamarin is the name of a company that Microsoft acquired in 2016 and, at the same time, the name of a set of development tools and services that developers can use to build native apps for iOS, Android, and Windows in C#. Xamarin’s main goal is to make it easier for .NET developers to build native apps for Android, iOS, and Windows reusing their existing skills. The reason behind this goal is simple: building apps for Android requires you to know Java and Android Studio or Eclipse; building apps for iOS requires you to know Objective-C or Swift and Xcode; and building apps for Windows requires you to know C# and Visual Studio. As an existing .NET developer—whether you are experienced or a beginner—getting to know all the possible platforms, languages, and development environments is extremely difficult, and costs are extremely high.
Xamarin allows you to build native apps with C#, based on a cross-platform, open-source porting of the .NET Framework called Mono. From a development point of view, Xamarin offers a number of flavors: Xamarin.iOS and Xamarin.Mac, libraries that wrap native Apple APIs you can use to build apps for iOS and macOS using C# and Visual Studio; Xamarin.Android, a library that wraps native Java and Google APIs you can use to build apps for Android using C# and Visual Studio; and Xamarin.Forms, an open-source library that allows you to share code across platforms and build apps that run on Android, iOS, and Windows from a single C# codebase.
The biggest benefit of Xamarin.Forms is that you write code once, and it will run on all the supported platforms at no additional cost. As you’ll learn throughout this ebook, Xamarin.Forms consists of a layer that wraps objects common to all the supported platforms into C# objects. Accessing native, platform-specific objects and APIs is possible in several ways (all discussed in the next chapters), but it requires some extra work. Additionally, Xamarin integrates with the Visual Studio IDE on Windows and is part of Visual Studio for Mac, so you can not only create cross-platform solutions, but also write code on different systems. If you look at Code Listing 1, you can see an example of XAML code that defines a page, and associated C# code that can define the behavior of the page.
Code Listing 1
<?xml version="1.0" encoding="UTF-8"?> <ContentPage xmlns="http://xamarin.com/schemas/2014/forms" xmlns:x="http://schemas.microsoft.com/winfx/2009/xaml" x:Class="HelloWorld.HomePage"> </ContentPage>
using Xamarin.Forms; namespace HelloWorld { public partial class HomePage : ContentPage { public HomePage () { InitializeComponent (); } } } |
The companion environment for Xamarin is the Microsoft App Center, a complete cloud solution for the app-management lifecycle that includes everything you need for build automation, internal distribution, analytics with diagnostics, and automated tests on more than 400 device configurations.
This book focuses on Xamarin.Forms and targets Visual Studio 2019 on Windows 10, but all the technical concepts apply to Visual Studio for Mac as well. However, if you prefer working on a Mac, I recommend that you read my book Xamarin.Forms for macOS Succinctly. I’ve also recorded a video series for Syncfusion that provides an overview of what Xamarin offers, and of Xamarin.iOS, Xamarin.Android, and Xamarin.Forms.
Supported platforms
Out of the box, Xamarin.Forms allows creating apps for Android, iOS, and the Universal Windows Platform from a single C# codebase. Recently, the range of supported platforms has been expanded to include Tizen (an operating system by Samsung for proprietary devices). Additionally, Microsoft is working on supporting macOS, WPF, and GTK#. As you can imagine, this opens incredible opportunities in the market of cross-platform development because you can target both mobile and desktop systems. In this book, I will target the most popular operating systems (Android, iOS, and Windows 10) because support for other platforms is not yet released (apart from Tizen). You can read the official documentation about targeting macOS, Tizen, WPF, and GTK# in your Xamarin.Forms projects, with the assumption that your shared code will not change.
Setting up the development environment
In order to build native mobile apps with Xamarin.Forms, you need Windows 10 as your operating system, and Microsoft Visual Studio 2019 as your development environment. You can download and install the Visual Studio 2019 Community edition for free and get all the necessary tools for Xamarin development. I will discuss the latest stable release of Xamarin.Forms, version 4.8, in this book, so make sure you install version 16.7.2 or later of Visual Studio 2019.
When you start the installation, you will need to select the Mobile development with .NET workload in the Visual Studio Installer (see Figure 1).
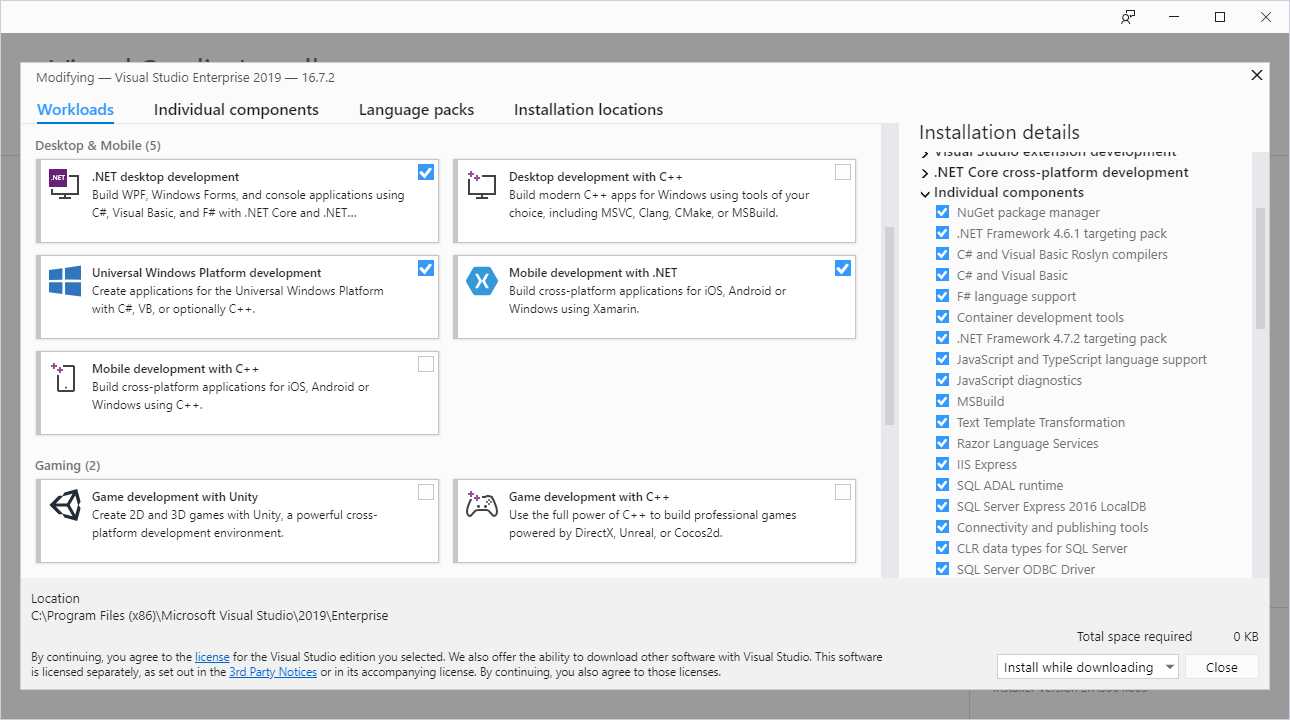
Figure 1: Installing Xamarin development tools
When you select this workload, the Visual Studio Installer will download and install all the necessary tools to build apps for Android, iOS, and Windows. iOS requires additional configuration, described in the next section.
For Windows 10 development, you need additional tools and SDKs, which you can get by also selecting the Universal Windows Platform development workload. If you select the Individual components tab, you will have an option to check if Android and Windows emulators have been selected or to make a choice manually (see Figure 2).
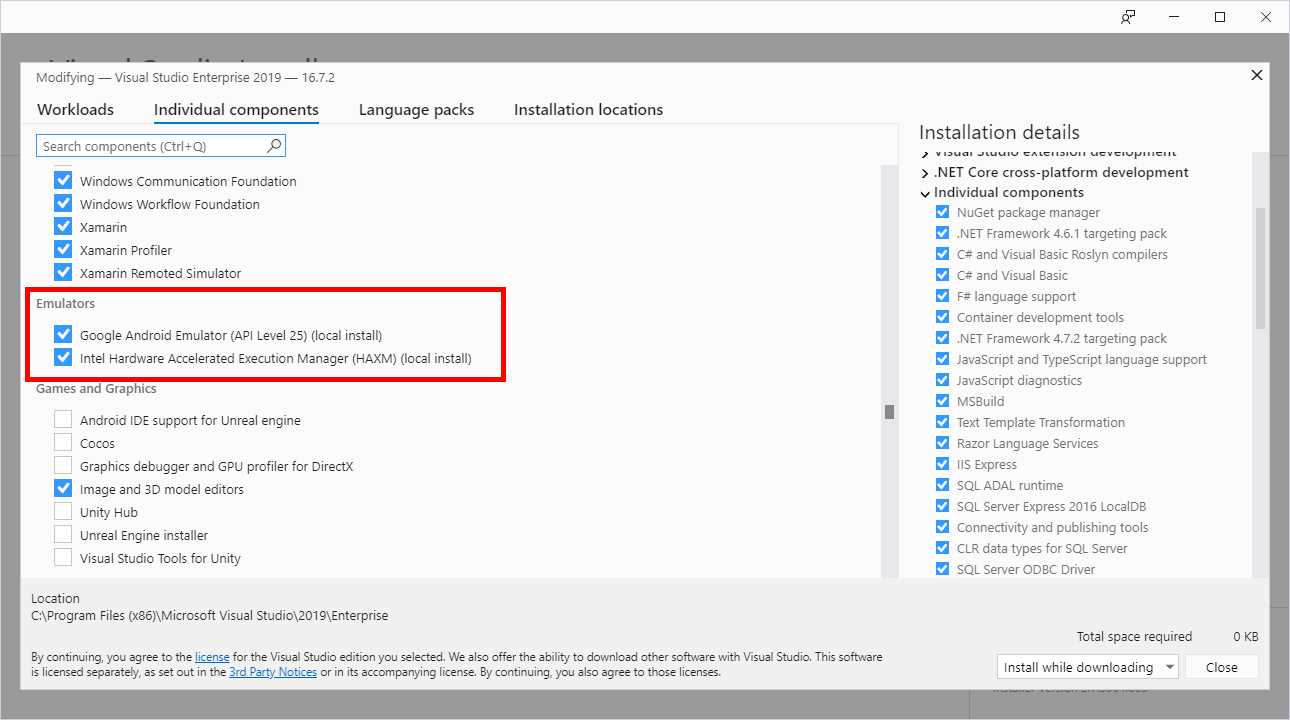
Figure 2: Selecting emulators
Whether you will use Visual Studio 2019, Visual Studio for Mac, or both, I suggest you install the Google emulator, which has an identical appearance and behavior on both systems.
For the Windows 10 emulator, my suggestion is to download the oldest version if you plan to target older versions of Windows 10; otherwise, the most recent is always a good option. Go ahead with the installation and wait for it to complete.
Configuring a Mac
Apple’s policies establish that a Mac computer is required to build an app. This is because only the Xcode development environment and the Apple SDKs are allowed to run the build process. A Mac computer is also needed for code signing, setting up profiles, and publishing an app to the App Store. You can use a local Mac in your network, which also allows you to debug and test apps on a physical device, or a remote Mac. In both cases, macOS must be configured with the following software requirements:
- macOS “High Sierra” (10.13) or higher.
- Xcode and Apple SDKs, which you get from the App Store for free.
- Xamarin.iOS engine. The easiest way to get Xamarin properly configured on a Mac is by installing Visual Studio Community for Mac.
Visual Studio will connect to the Mac to launch the Xcode compiler and SDKs; remote connections must be enabled for the latter. The official Xamarin documentation has a specific page that will help you configure a Mac. I recommend you read it carefully, especially because it explains how to configure profiles and certificates, and how to use Xcode to perform preliminary configurations. The documentation is actually about Xamarin.iOS, but the same steps apply to Xamarin.Forms.
Tip: Visual Studio 2019 includes integrated tools that simplify the Mac configuration from within the IDE, and without the need to work on the Mac directly. These improvements are discussed in the Xamarin.iOS project section later in this chapter.
Creating Xamarin.Forms solutions
Assuming that you have installed and configured your development environment, the next step is opening Visual Studio to see how you create Xamarin.Forms solutions, and what these solutions consist of.
In the Start window, click Create new project. When the Create a new project dialog appears, apply the following filters under the search box: C#, All Platforms, and Mobile. This will restrict the list of project templates to Xamarin only. For Xamarin.Forms, the project templates of interest are Mobile App (Xamarin.Forms), which is the first in the list (see Figure 3), and Xamarin.UITest Cross-Platform Test Project, which is the last one in the list, and that you will see by scrolling to the bottom.

Figure 3: Project templates for Xamarin.Forms
The Mobile App (Xamarin.Forms) template is the one you use to build mobile apps. The Xamarin.UITest Cross-Platform Test Project template is used to create automated UI tests, but this will not be discussed in this book. Additionally, Visual Studio 2019 offers the Class Library (.NET Standard) project template, which can be used to create reusable class libraries that a Xamarin.Forms app can consume. More information on .NET Standard will come in Chapter 2.
Select the Mobile App (Xamarin.Forms) template and click Next. In the next screen, Visual Studio will ask you to specify a project name and a location. Provide a name of your choice or leave the default name and click Create.
At this point, Visual Studio will ask you to select from the Flyout, Tabbed, and Blank templates (see Figure 4). The Flyout template generates a basic user interface based on a common infrastructure called Shell (see Chapter 6), pages and visual elements that will be discussed later, with some sample data. The Tabbed template generates a basic user interface based on tabs to navigate among child pages. Neither Flyout nor Tabbed are a good starting point (unless you already have experience with Xamarin); moreover, both templates rely on the Shell component, which is not available on Universal Windows Platform for now, so select the Blank template.

Figure 4: Selecting the template, UI technology, and code sharing strategy for a new project
In the I plan to develop for: group, select all the platforms you want to target. The default is Android and iOS, but you can also select Windows (UWP) with the Blank template.
In Solution Explorer, you will see that the solution is made up of four projects, as demonstrated in Figure 5.
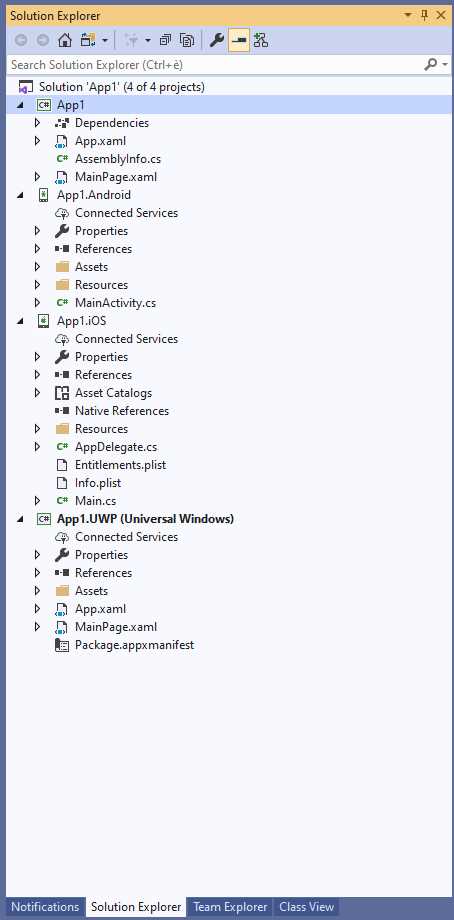
Figure 5: The structure of a Xamarin.Forms solution
The first project is a .NET Standard library. This project contains all the code that can be shared across platforms, and its implementation will be discussed in the next chapter. For now, what you need to know is that this project is the place where you will write all the user interface of your app, and all the code that does not require interacting with native APIs.
The second project, whose suffix is Android, is a Xamarin.Android native project. It has a reference to the shared code and to Xamarin.Forms, and it implements the required infrastructure for your app to run on Android devices.
The third project, whose suffix is iOS, is a Xamarin.iOS native project. This one also has a reference to the shared code and to Xamarin.Forms, and it implements the required infrastructure for your app to run on the iPhone and iPad.
The fourth and last project is a native Universal Windows project (UWP) that has a reference to shared code and implements the infrastructure for your app to run on Windows 10 devices, for both the desktop and mobile devices. I will now provide more details on each platform project, so that you have a basic knowledge of their properties. This is very important, because you will need to fine-tune project properties every time you create a new Xamarin.Forms solution.
The Xamarin.Forms library
Technically speaking, Xamarin.Forms is a .NET library that exposes all the objects discussed in this book through a root namespace called Xamarin.Forms. It has been recently open sourced, and it ships as a NuGet package that Visual Studio automatically installs in all projects when you create a new solution. The NuGet Package Manager in Visual Studio will then notify you of available updates. Because creating Xamarin.Forms solutions should be allowed even if your PC is offline, Visual Studio installs the version of the NuGet package in the local cache, which isn’t typically the latest version available. For this reason, it is recommended that you upgrade the Xamarin.Forms and other Xamarin packages in the solution to the latest version, and that you only upgrade to stable releases. Though alpha and beta intermediate releases are often available, their only intended use is for experimenting with new features still in development. As of this writing, version 5.0.0.1931 is the latest stable release, and is required to successfully complete all the exercises and code examples provided in the next chapters.
The Xamarin.Android project
Xamarin.Android makes it possible for your Xamarin.Forms solution to run on Android devices. The MainActivity.cs file represents the startup activity for the Android app that Xamarin generates. In Android, an activity can be thought of as a single screen with a user interface, and every app has at least one. In this file, Visual Studio adds startup code that you should not change, especially the initialization code for Xamarin.Forms you see in the last two lines of code. In this project, you can add code that requires accessing native APIs and platform-specific features, as you will learn in Chapter 9.
The Resources folder is also very important, because it contains subfolders where you can add icons and images for different screen resolutions. The name of such folders starts with drawable, and each represents a particular screen resolution. The Xamarin documentation explains thoroughly how to provide icons and images for different resolutions on Android. The Properties element in Solution Explorer allows you to access the project properties, as you would do with any C# solution. In the case of Xamarin, in the Application tab (see Figure 6) you can specify the version of the Android SDK that Visual Studio should use to build the app package.

Figure 6: Selecting the version of the Android SDK for compilation
Visual Studio automatically selects the latest version available and provides a drop-down list where you can select a different version of the SDK. Notice that Visual Studio marks an SDK version with an * symbol if it is not installed on the development machine. You can download the SDK using the Android SDK Manager tool, or you can enable automatic download via Tools > Options > Xamarin > Android Settings > Auto Install Android SDKs. The SDK selection here does not affect the minimum version of Android you want to target; instead, it is related to the version of the build tools that Visual Studio will use. My recommendation is to leave the default selection unchanged.
Tip: You can manage installed SDK versions using the Android SDK Manager, a tool that you can launch from both the Windows Programs menu and from Visual Studio by selecting Tools > Android > Android SDK Manager.
The Android Manifest tab is even more important. Here you specify your app’s metadata, such as name, version number, icon, and permissions the user must grant to the application. Figure 7 shows an example.

Figure 7: The Android manifest
The information you supply in the Android Manifest tab is also important for publication to Google Play. For example, the package name uniquely identifies your app package in the Google Play store; by convention, it is in the following form: com.companyname.appname, which is self-explanatory (com. is a conventional prefix). The version name is your app version, whereas the version number is a single-digit string that represents updates. For instance, you might have version name 1.0 and version number 1, version name 1.1 and version number 2, version name 1.2 and version number 3, and so on.
The Install location option allows you to specify whether your app should be installed only in the internal storage or if memory cards are allowed, but remember that starting from Android 6.0, apps can no longer be installed onto a removable storage device. In the Minimum Android version drop-down list, you can select the minimum Android version you want to target.
It is important that you pay particular attention to the Required permissions list. Here you must specify all the permissions that your app must be granted in order to access resources such as the internet, the camera, other hardware devices, sensors, and more. Remember that, starting from Android 6.0, the operating system will ask the user for confirmation before accessing a resource that requires one of the permissions you marked in the manifest, and the app will fail if it attempts to access a sensitive resource, but the related permission was not selected in the manifest.
In the Android Options tab, you will be able to manage debugging and build options. However, I will not walk through all the available options here. It is worth highlighting the Use Fast Deployment option though, which is enabled by default. When enabled, deploying the app to a physical or emulated device will only replace changed files. This can often cause the app to not work properly or not start at all, so my suggestion is you disable this option. The other tabs are the same as for other .NET projects.
The Xamarin.iOS project
Similar to the Xamarin.Android project, the Xamarin.iOS project makes it possible for your Xamarin.Forms solutions to run on the iPhone and iPad. Supposing you have a configured Mac, Visual Studio will need to know its address in the network. Visual Studio normally asks this after creating a new Xamarin.Forms solution or opening an existing one, but you can manually enter the Mac address by choosing Tools > iOS > Pair to Mac. In the Pair to Mac dialog window, Visual Studio should be able to list any detected Mac computers in the network. However, it is strongly recommended that you re-add a Mac by providing its IP address rather than its name. For example, Figure 8 shows the Pair to Mac dialog window displaying my MacBook Pro machine with both its name and its IP address, but Visual Studio establishes a connection based on the IP, not the name.

Figure 8: Connecting Visual Studio to a Mac
If a Mac is not detected, click Add Mac and enter its IP address first. Then, when requested, enter the same credentials you use to log in to the Mac. If the connection succeeds, Visual Studio will show a success message in the status bar.
For the Xamarin.iOS project, the AppDelegate.cs file contains the Xamarin.Forms initialization code and should not be changed. You can add all the code that requires accessing native APIs and platform-specific features in this project, as you will learn in Chapter 9. In the Info.plist (property list) file (see Figure 9) and, through each tab, you can configure your app metadata, the minimum target version, supported devices and orientations, capabilities (such as Game Center and Maps integration), visual assets (such as launch images and icons), and other advanced features.

Figure 9: The Info.plist file
The Info.plist file represents the app manifest in iOS, and therefore is not related to only Xamarin.iOS. In fact, if you have experience with Xcode and native iOS development, you already know this file. Unlike Android, the iOS operating system includes restriction policies that are automatically applied to most sensitive resources, especially those involving security and privacy. Also, there are differences among iOS 8.x, 9.x, 10.x, and 11.x in how the OS handles these options.
The Info.plist reference will help you understand how to properly configure any exceptions. Among the project properties, the most important is, without a doubt, the iOS Bundle Signing. You use the iOS Bundle Signing properties to specify the identity that the Apple tools must use to sign the app package, and to specify the provisioning profile that is used to associate a team of developers to an app identifier. Configuring signing identities and profiles is particularly important when preparing an app for publishing. Figure 10 shows the iOS Bundle Signing properties.

Figure 10: The iOS Bundle Signing options
With the Automatic Provisioning option, you will just need to enter the Apple ID associated to an active Apple Developer account and Visual Studio will generate all the provisioning profiles for you. The next section discusses this in more detail. With the Manual Provisioning option, you will be able to adjust your settings manually.
As you can imagine, Visual Studio can detect available signing identities and provisioning profiles only when connected to a Mac, because this information is generated via Xcode. Further details about configuring a Xamarin.iOS project are offered through the documentation.
Automatic iOS provisioning
Whether you use native Xamarin.iOS or Xamarin.Forms, creating apps for iOS requires some preliminary steps that can be really complicated and frustrating. In fact, apart from enrolling in Apple’s Developer Program, which is required to enable your Apple developer account to sign and publish apps to the App Store, you need to provision your iOS device. iOS provisioning will enable you to deploy and test your apps on physical devices.
iOS provisioning is usually done via Xcode on the Mac and requires you to:
- Create a development team: This includes specifying the list of Apple developer accounts in the development team, and enabling them to sign and publish an app.
- Set up provisioning profiles: A provisioning profile is bundled into the compiled app package and contains three types of information: a unique app identifier (App ID), one or more development certificates required to test an app on physical devices, and a Unique Device Identifiers (UDI) list that enumerates devices allowed to run an app.
- Create signing certificates: All apps must be signed before they can run on an iOS device, even for development, so a signing certificate is required. Different kinds of certificates are available to each developer account (such as development and publishing), depending on the level of subscription.
Even though the documentation nicely explains how to get started with iOS provisioning, the reality is that complexity is the biggest barrier for developers wanting to build apps for iOS. Fortunately, Visual Studio 2019 includes support for automatic iOS provisioning. You simply provide your Apple developer account, and Visual Studio 2019 will set up all the necessary artifacts on your behalf through a connection to a Mac machine.
To accomplish this, you must first associate your Apple ID with Visual Studio by selecting Tools > Options > Xamarin > Apple Accounts. In the Options dialog box, you’ll be able to associate one or more Apple IDs by clicking Add, after which Visual Studio 2019 shows the list of associated teams and the user role for each team (see Figure 11).

Figure 11: Associating development teams with Visual Studio
Once you click OK, you can go to the iOS Bundle Signing tab of the Xamarin.iOS project properties and select the Automatic Provisioning option (see Figure 10). You’ll simply need to select the team you wish to use for development from the Team drop-down menu, and Visual Studio will generate the necessary provisioning profiles and signing certificates required to test apps on a physical device (which must be connected to the Mac machine).
Remote Xamarin.iOS update
One important thing that you must keep in mind when building iOS apps with Xamarin is that the same version of the SDK must be installed on both the PC and the Mac. In the past, you had to update the Xamarin.iOS SDK manually on both systems. Visual Studio 2019 has an integrated feature that will help you update the Xamarin.iOS version remotely, without the need to access the physical, remote Mac. When connecting to the Mac, if Visual Studio 2019 detects a version mismatch, it will show a warning message and provide an Install button that will launch the update process on the remote Mac.
Figure 12 shows the warning message and the Install button (you can click Cancel if you do not want to go through the update process).

Figure 12: Remote update of Xamarin.iOS
The Universal Windows Platform project
The Universal Windows Platform project in a Xamarin.Forms solution is a normal UWP project with a reference to the shared code and to the Xamarin.Forms package.
In the App.xaml.cs file, you can see initialization code, which you must not change. What you will need to configure, instead, is the application manifest, which you can edit by double-clicking the Package.appxmanifest file in Solution Explorer.
Visual Studio has a nice editor for UWP manifests, and you will at least configure app metadata (see Figure 13), visual assets such as icons and logos, and capabilities (see Figure 14). These include permissions you need to specify before testing and distributing your apps, and Windows 10 will ask the user for confirmation before accessing resources that require a permission.
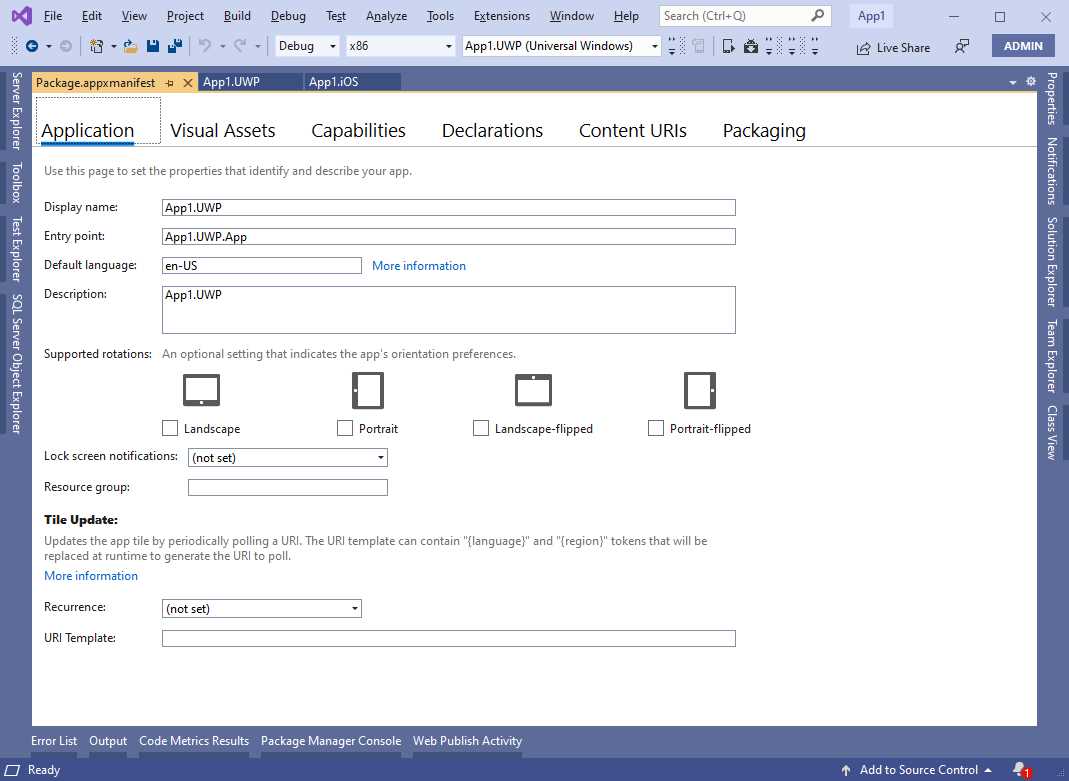
Figure 13: Editing metadata in UWP projects
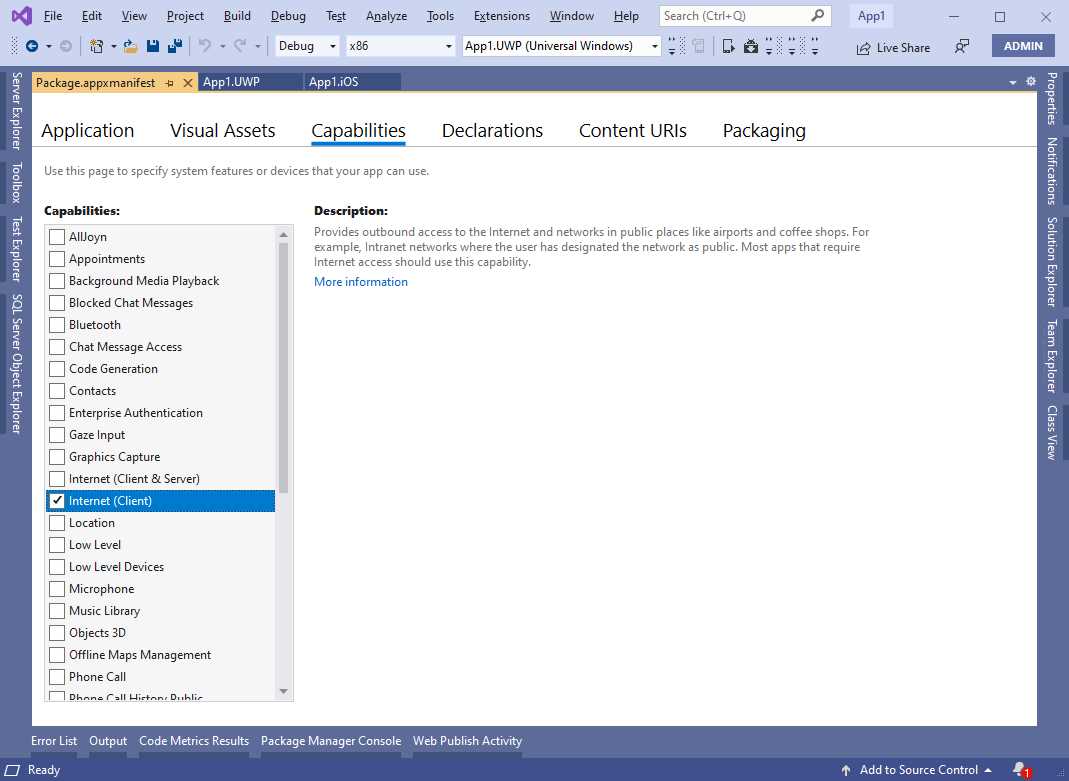
Figure 14: Specifying capabilities in UWP projects
The official documentation explains how to configure other options. However, remember that you need a paid subscription to the Windows Store in order to fill in the Packaging settings that you provide when preparing for publishing.
Debugging and testing applications locally
Starting apps built with Xamarin.Forms for debugging and testing is easy. You simply select one of the platform projects in Solution Explorer as the startup project, then you select the target device and press F5. Do not forget to rebuild your solution before debugging for the first time. When you start an app for debugging, Visual Studio will build your solution and deploy the app package to the selected physical device or emulator. The result of the build process is an .apk file for Android, an .ipa file for iOS, and an .appx file for Windows 10.
When the app starts either on a physical device or on an emulator, Visual Studio attaches an instance of the debugger, and you will be able to use all the well-known, powerful debugging tools of the IDE, including (but not limited to) breakpoints, data tips, tool windows, watch windows, and more. The easiest way to select the target platform and configuration is by using the standard toolbar, which you can see in Figure 15 (notice that the list of emulators may vary, depending on your choices at installation time or on custom emulator images).

Figure 15: Selecting target platform and devices for debugging
The Debug configuration is the appropriate choice during development. You will select Ad-Hoc when preparing for distribution on iOS and Android, or Release for Windows 10. The target architecture is normally Any CPU for Android and Windows, whereas it is iPhoneSimulator for debugging an iOS app in the iOS Simulator, or iPhone for debugging an app on a physical iPhone or iPad. (Remember that a physical Apple device must be associated to your Mac via Xcode and connected to the Mac, not the PC.) You can also quickly select the startup project and specify the target device. For example, in Figure 13 you can see a list of Android emulator configurations.
Note: In this book, I will provide figures that show all the supported platforms in action when it is relevant to do so. In other cases, I will show just one platform in action, meaning that the same behavior is expected on all platforms.
Figure 16 shows the previously created blank app running on iOS and Android platforms within the respective emulators. Notice how in the background, Visual Studio shows the Output window where you receive messages from the debugger; you will be able to use all the other debugging tools similarly.

Figure 16: An app built with Xamarin.Forms running on Android and iOS
As you can imagine, in order to build the iOS app, Visual Studio connected to the Mac and launched the Apple SDKs. In Figure 16, you see an example of the iOS Simulator, which deserves some more consideration.
Setting up the iOS Simulator
Unlike Android and Windows, with which emulators run locally on your Windows development machine, the iOS Simulator runs on your Mac. However, if you have Visual Studio 2019, you can also download and install the Remoted iOS Simulator for Windows. When this is installed, the simulator will run on your Windows machine instead of running on the Mac.
The iOS Simulator on Windows is not enabled by default, so you need to open Tools > Options > Xamarin > iOS Settings and select the Remote Simulator to Windows option. An example of the iOS Simulator is available in Figure 14, but you will see others in the next chapters.
Running apps on physical devices
Visual Studio can easily deploy an app package to physical Windows and Android devices connected to a Windows PC. For Android, you first need to enable the developer mode, which you accomplish with the following steps:
- Open the Settings app.
- Select the About item.
- In the list that appears, locate the OS build number and tap this item seven times.
At this point, you can simply plug your device into the USB port of your PC, and Visual Studio will immediately recognize it. It will be visible in the list of available devices that you can see in Figure 15. For Windows, you first need to enable both your machine and your devices for development, and the official documentation provides guidance about this. Then you will be able to plug your devices into the USB port of your PC, and Visual Studio will recognize them as available target devices. For Apple mobile devices, you need to connect your iPhone or iPad to your Mac computer, making sure you make them discoverable through Xcode. Then, when you start debugging from Visual Studio, your app will be deployed to the iPhone or iPad through the Mac.
Analyzing and profiling applications
The Xamarin toolbox has been recently enriched with two amazing tools: Xamarin Inspector and Xamarin Profiler. The Xamarin Inspector allows you to nicely inspect the visual tree of your Xamarin apps and make changes to the UI in real time (see the documentation).
The Xamarin Profiler is a complete suite of analysis tools in one program that you can use to profile your mobile apps and analyze performance, memory usage, CPU consumption, and more.
In Visual Studio, you can select Tools > Xamarin Profiler, and launch any platform version of your app for profiling, instead of pressing F5. After the app has been deployed to the selected device, and before starting up, the Profiler will ask you what kind of analysis you want to execute against the application. Figure 17 shows an example based on the selection of all the available instrumenting tools.
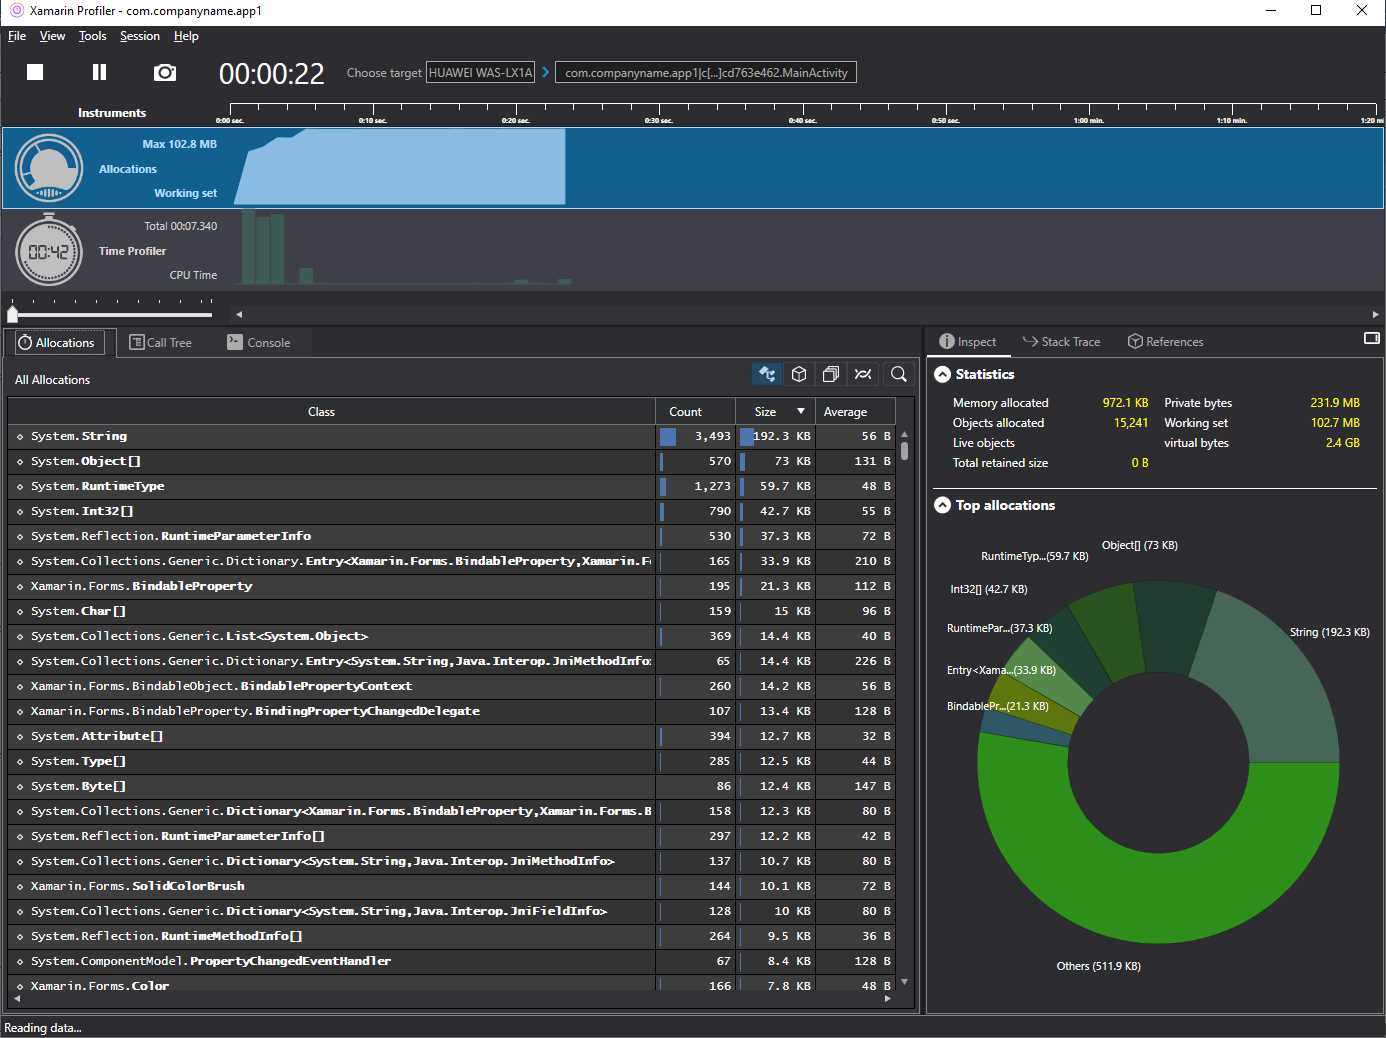
Figure 17: Analyzing app performance with Xamarin Profiler
You can also take and compare snapshots of the memory in different moments to see if memory allocation can cause potential problems. This is an excellent performance analysis tool, and the documentation will provide all the details you need to improve your app performance.
Chapter summary
This chapter introduced the Xamarin.Forms platform and its goals, describing the required development tools and offering an overview of a Xamarin.Forms solution, passing through the platform projects and their most important settings. You have also seen how to start an app for debugging using emulators, and how to profile an app to improve performance. Now that you have an overview of Xamarin.Forms and the development tools, the next step is understanding what is at its core: sharing code across platforms.
- 155+ high-performance Xamarin controls, including DataGrid, Charts, and ListView.
- Elegant XAML layouts for common scenarios.
- Layouts optimized for mobile and desktop.