
Xamarin Community Toolkit Succinctly®

CHAPTER 7
Localization Made Easy
Localizing applications is a very hot topic, not only in the mobile world. There are many techniques and approaches to implement localization and string translations, and this absolutely depends on your architecture. However, especially if you do not need to add or update translations after your app has been published, it is possible to consider a shared approach.
This is the path drawn by the Xamarin Community Toolkit, which simplifies the way translations are displayed, leveraging new classes and the XAML data-binding feature. This chapter describes the classes offered by the library to make your life easier when you need to bring your app to multiple countries.
Getting started
The Xamarin Community Toolkit makes it easier to localize your mobile applications by exposing objects that point to translated strings, and that are capable of dynamically updating the user interface at runtime. Such objects are discussed in detail in the next section. For now, for a better understanding of the results you can get, focus on the sample app.
When the sample app is running, tap Settings at the upper-right corner of the screen. As you can see in Figure 46, you will get sample settings in English, and you will have an option to switch to a different language (Spanish in the example). As soon as you change the language and tap Save, the user interface will display strings in Spanish. In the sample app, this happens only in the Settings page, but with the objects provided by the Toolkit, this can happen across the whole app at the same time.
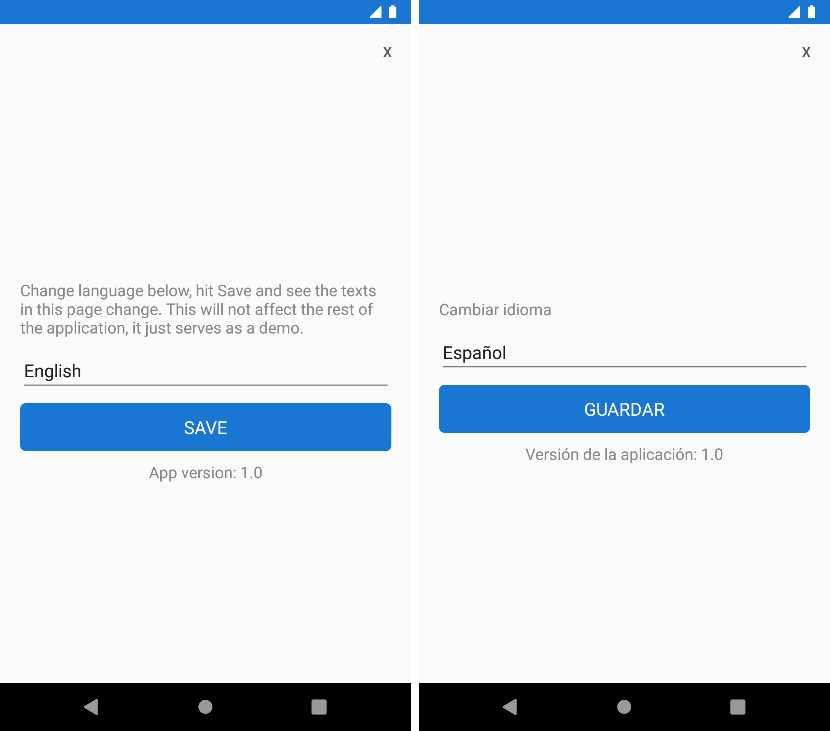
Figure 46: String translation at runtime
The goal of the Xamarin Community Toolkit is twofold: first, it makes it easier to implement localization; second, it makes it possible to quickly update the user interface with new strings at runtime. While the second goal might be optional in your app, since you might want to start with a localized version already instead of asking the user to choose a language, the first goal is certainly common to every app that needs to be translated.
In the next section, you will learn how this happens. The files of the sample project you might want to keep open are the SettingPage.xaml, located under Pages, and the SettingViewModel.cs, located under ViewModels.
Understanding the sample project’s structure
As I mentioned in the introduction of this chapter, the way you store and retrieve translated strings in your apps totally depends on your architecture. In more complex architectures, this might involve storing strings in a database and providing an API that returns translations to the callers. In simpler architectures, you can add translated strings to resource (.resx) files, and then you can leverage the Xamarin Community Toolkit to bind them to the user interface.
If you expand the Resx folder in the sample project, you will see a file called AppResources.resx. This contains the master strings, which in this case are in English. If you expand this file, you will see two more files: AppResources.en.resx and AppResources.es.resx. These, respectively, contain the English and Spanish strings. Figure 47 shows an example based on the English strings.

Figure 47: Resource file for English translations
Note: The reason why there are two files with English strings is that one is the master; the second one needs to be there because there should always be a file for each language so that files are independent from the master.
Each language is represented with a read-only struct called Language, which is declared as follows.
public readonly struct Language
{
public Language(string name, string ci)
{
Name = name;
CI = ci;
}
public string Name { get; }
public string CI { get; }
}
If you want to use a similar translation approach in your apps, you can consider reusing this structure, which simply stores the language name and the shortened ISO code of the culture information for that language. This structure is then used in the SettingViewModel class, where a list is created to populate the Picker view that allows for choosing a language in the Settings page that you have seen previously in action.
The list of languages and the currently selected language are represented by the following properties, together with their backing fields.
IList<Language> supportedLanguages = Enumerable.Empty<Language>().ToList();
Language selectedLanguage = new Language(AppResources.English, "en");
public Language SelectedLanguage
{
get => selectedLanguage;
set => SetProperty(ref selectedLanguage, value);
}
public IList<Language> SupportedLanguages
{
get => supportedLanguages;
private set => SetProperty(ref supportedLanguages, value);
}
The way these properties are populated is discussed in the next section about the LocalizationResourceManager class. For now, let’s see how they are bound to the user interface. In the SettingsPage.xaml file, there is the declaration of the Picker view, which looks like the following.
<Picker ItemsSource="{Binding SupportedLanguages}"
ItemDisplayBinding="{Binding Name}"
SelectedItem="{Binding SelectedLanguage}"/>
The SupportedLanguages property populates the list in the Picker, and the SelectedLanguage property is bound to the SelectedItem property of the view. The Picker will show the name of the language via the ItemDisplayBinding, represented by the Name property of each individual instance of the Language class in the SupportedLanguages list.
The next step is understanding how the user interface can handle translated strings and display them as you change the language. This is a relevant topic and of interest outside of the sample app, so it is discussed in the next, dedicated section.
Introducing the LocalizationResourceManager
The LocalizationResourceManager is a class that allows the user interface to automatically update the string it shows at runtime, when changing the culture information, and when selecting a different language. It can be considered a bridge between the translation resources and the user interface, constantly listening to changes in the localization. It is a singleton class, so it exposes a property called Current that represents the only instance possible. Before this class is used, it must be set up and initialized in the constructor of the App class (App.xaml.cs file) as follows.
LocalizationResourceManager.Current.PropertyChanged += (sender, e) =>
AppResources.Culture = LocalizationResourceManager.Current.CurrentCulture;
LocalizationResourceManager.Current.Init(AppResources.ResourceManager);
LocalizationResourceManager.Current.CurrentCulture = new CultureInfo("en");
AppResources is a class that Visual Studio generated starting from the name of the resource file added to the project (AppResources.resx in this case). It represents a reference to the resource container that stores the translated strings. The first line of the code in the previous snippet makes sure the culture information of the app resources and the current culture are synchronized, which is important when the user interface needs to automatically update.
The second line of code initializes the class with the resources provided, and the final line assigns a default culture, in this case English. Once the LocalizationResourceManager has been initialized, it can be used to manage multiple languages across the app. In the sample project, this is done in the SettingsViewModel.cs file that you started to study previously. If you look back at this file, you will find the LoadLanguages method, which is implemented as follows.
void LoadLanguages()
{
SupportedLanguages = new List<Language>()
{
{ new Language(AppResources.English, "en") },
{ new Language(AppResources.Spanish, "es") }
};
SelectedLanguage = SupportedLanguages.
FirstOrDefault(pro => pro.CI == LocalizationResourceManager.
Current.CurrentCulture.TwoLetterISOLanguageName);
}
This method assigns to the SelectedLanguage property the first language in the list that matches the current culture in the LocalizationResourceManager. It is invoked in the ViewModel’s constructor as follows.
public SettingViewModel()
{
LoadLanguages();
ChangeLanguageCommand = CommandFactory.Create(() =>
{
LocalizationResourceManager.Current.CurrentCulture =
CultureInfo.GetCultureInfo(SelectedLanguage.CI);
LoadLanguages();
});
}
The code also creates an instance of a command called ChangeLanguageCommand, which is bound to the Picker view you saw previously. It changes the current culture in the LocalizationResourceManager based on the user selection, then reloads the list of languages.
Note: The CommandFactory class is discussed in the next chapter.
The command is simply declared as follows.
public ICommand ChangeLanguageCommand { get; }
The ViewModel also defines a property called AppVersion, of type LocalizedString. This type deserves a more thorough explanation, which is given in the next section.
Working with LocalizedString and the Translate extension
The Xamarin Community Toolkit exposes the LocalizedString, which basically allows for storing strings and sending a change notification when the value changes. Code Listing 11 shows the definition of the class. (Notice that it is not supported on projects based on .NET Standard 1.0.)
Code Listing 11
using System; using Xamarin.CommunityToolkit.ObjectModel; using Xamarin.Forms.Internals; namespace Xamarin.CommunityToolkit.Helpers { #if !NETSTANDARD1_0 public class LocalizedString : ObservableObject { readonly Func<string> generator; public LocalizedString(Func<string> generator) : this(LocalizationResourceManager.Current, generator) { } public LocalizedString(LocalizationResourceManager localizationManager, Func<string> generator) { this.generator = generator; // This instance will be unsubscribed and GCed // if no one references it // since LocalizationResourceManager // uses WeekEventManager localizationManager.PropertyChanged += (sender, e) => OnPropertyChanged(null); } [Preserve(Conditional = true)] public string Localized => generator(); [Preserve(Conditional = true)] public static implicit operator LocalizedString(Func<string> func) => new LocalizedString(func); } #endif } |
Other than the property change notification, the other relevant part of the class is the Localized property, which returns the localized version of the resource based on the current culture. This is a very important property, as you will shortly see in the views. In the ViewModel, the LocalizedString class is used as follows.
public LocalizedString AppVersion { get; } = new LocalizedString(() =>
string.Format(AppResources.Version, AppInfo.VersionString));
The AppVersion property concatenates a localized string from the app resources, representing the translation of the version word, and the app version number retrieved via the AppInfo class, offered by the Xamarin Essentials library. Using a property of type LocalizedString, instead of a regular string, will cause the bound view to be able to update automatically when the language changes.
Tip: An important benefit of the LocalizedString class is also making it possible to translate strings at runtime without using a backing .resx resource file. This is demonstrated in the following code snippets.
The LocalizedString class usually works in combination with a new markup extension called Translate, which is actually used to display localized strings in the user interface. You find the following two examples in the SettingsPage.xaml file.
<Label Text="{xct:Translate ChangeLanguage}"/>
...
<Button Text="{xct:Translate Save}"
Command="{Binding ChangeLanguageCommand, Mode=OneTime}"/>
<Label HorizontalTextAlignment="Center"
Text="{Binding AppVersion.Localized}"/>
Behind the scenes, the Translate markup points to the instance of the LocalizationResourceManager class from which it retrieves the active instance of the .resx file that contains the translations. In the previous code snippet, you can see how the Label and the Button have their Text properties bound to the strings defined in the app resources via the Translate extension. In this way, when the user changes the language at runtime, the Text property is automatically updated with the new string, without any additional efforts.
For strings that are not defined inside a resource file, it is possible to bind the Text property to the Localized property of the LocalizedString instance, as is happening in the last Label of the previous code snippet. This will also cause the view to auto-update when the string value changes based on a different culture.
If you now run the sample app again, following the steps described in the “Getting started” section of this chapter, it will be completely clear how the translation process works, and why the user interface can auto-update at runtime without any further efforts on the development side once the user changes the language.
Chapter summary
Localizing applications is a crucial part of development when you build apps for multiple markets. There are certainly several techniques available, and the final choice depends on your architecture. The Xamarin Community Toolkit offers one that works on the front-end side.
With the LocalizationResourceManager, you can quickly retrieve translated strings from .resx resource files and with the LocalizedString class. With the Translate markup extension, you can use data binding to assign strings to views that support text and that will auto-refresh when the user selects a different language at runtime. This approach requires a new app update every time you want to add a new language, but on the other hand, it is extremely simple and effective.
- 155+ high-performance Xamarin controls, including DataGrid, Charts, and ListView.
- Elegant XAML layouts for common scenarios.
- Layouts optimized for mobile and desktop.