left-icon

Writing Native Mobile Apps in a Functional Language Succinctly®
by Vassili Kaplan

Previous
Chapter

of
A
A
A

CHAPTER 4

Creating Custom Widgets

Creating Custom Widgets


“It is supposed to be automatic, but actually, you have to push this button.”

John Brunner

Adding a custom combo box

Unfortunately, not all mobile operating systems have all common widgets. Among others, iOS is missing a combo box (also known as a drop-down menu), and Android is missing a stepper. In this section we are going to see how to add a combo box to iOS, and you can see how it’s done on Android in accompanying source code.

There are two ways of adding a custom widget. The first one is to derive it from the UIVariable class and then register it separately with the parser. We will see how to do this in the next chapter with Syncfusion® controls. This method is good if you need to quickly detach the widget class from the build.

Another way to create a custom widget is to make it a first-class citizen, registering it in the core iOSVariable.GetWidget() method, as shown in Code Listing 13. See Code Listing 16 for details.

Code Listing 16: A fragment of the iOSVariable.GetWidget() to add a custom Widget

public virtual iOSVariable GetWidget(string widgetType, string widgetName,                                       string initArg, CGRect rect)
{
  //...

  switch (widgetType) {

    //...

    case "Combobox":
      type = UIVariable.UIType.COMBOBOX;
      widgetFunc = new iOSVariable(type, widgetName, widget);
      widgetFunc.CreateCombobox(rect, initArg);
      break;

    // Other widgets ...
  }

}

The advantage of registering a custom widget in the iOSVariable.GetWidget() method is to have a uniform CSCS code for Android and iOS, considering that the standard Android combo box has been added to the DroidVariable.GetWidget() method.

The iOS custom combo box architecture is the following: it will be implemented as a UIButton containing some text and an image on its right, showing an arrow. This is before the user selects an item. As soon as the user clicks on the button to select an item, the combo box will be converted to a UIPicker at the bottom of the screen. This UIPicker will have a smaller button on top, and when it’s clicked, the UIPicker option will be selected. This is very similar to what you get if you see a drop-down menu on a web page with the Safari browser on an iPhone. See the implementation details in Code Listing 17.

Code Listing 17: Implementation of the iOSVariable.CreateCombobox() Method

public void CreateCombobox(CGRect rect, string argument)
{
  UIView parent = GetParentView();

  UIView mainView  = AppDelegate.GetCurrentView();
  int mainHeight   = (int)mainView.Frame.Size.Height;
  int mainWidth    = (int)mainView.Frame.Size.Width;

  int pickerHeight = Math.Min(mainHeight / 3MIN_HEIGHT);
  int pickerWidth  = Math.Min(mainWidth, MIN_WIDTH);
  int pickerY      = mainHeight - pickerHeight + 20;

  m_picker         = new UIPickerView();
  m_button         = new UIButton();
  m_button2        = new UIButton();

  m_button.Frame   = rect;

  m_picker.Frame   = new CGRect(0, pickerY, pickerWidth, pickerHeight);
  m_button2.Frame  = new CGRect(0, pickerY - 20, pickerWidth, 40);

  string alignment = "", color1 = "", color2 = "", closeLabel = "";
  Utils.Extract(argument, ref alignment, ref color1, ref color2,

                         ref closeLabel);
  m_alignment      = alignment;
  Tuple<UIControlContentHorizontalAlignmentUITextAlignment> al =
                        AlignTitleFunction.GetAlignment(alignment);

  m_viewY = new UIView();
  m_viewY.Frame = new CGRect(00, mainWidth, mainHeight);

  TypePickerViewModel model = new TypePickerViewModel(

                                  AppDelegate.GetCurrentController());
  m_picker.ShowSelectionIndicator = true;
  m_picker.Hidden = true;
  m_picker.Model = model;

  if (!string.IsNullOrEmpty(color1)) {
    m_viewY.BackgroundColor = UtilsiOS.String2Color(color1);
    if (string.IsNullOrEmpty(color2)) {
      color2 = color1;
    }
    m_picker.BackgroundColor = UtilsiOS.String2Color(color2);
  }

  m_button.BackgroundColor = UIColor.Clear;
  m_button.SetTitleColor(UIColor.Black, UIControlState.Normal);
  m_button.Hidden = false;
  m_button.Layer.BorderWidth = 1;
  m_button.Layer.CornerRadius = 4;
  m_button.Layer.BorderColor = UIColor.LightGray.CGColor;
  UIImage img = UtilsiOS.CreateComboboxImage(rect);
  m_button.SetBackgroundImage(img, UIControlState.Normal);
  m_button.ImageView.ClipsToBounds = true;
  m_button.ContentMode = UIViewContentMode.Right;
  m_button.HorizontalAlignment = al.Item1;
  m_button.TouchUpInside += (sender, e) => {
    ResetCombos();
    m_button2.Hidden = false;
    m_picker.Hidden  = false;
    model = m_picker.Model as TypePickerViewModel;

    string text = GetText();
    int row = model.StringToRow(text);
    model.Selected(m_picker, (int)row, 0);
    mainView.BecomeFirstResponder();
    mainView.AddSubview(m_viewY);
  };

  if (string.IsNullOrEmpty(closeLabel)) {
    closeLabel = "X";
  }
  m_button2.SetTitle(closeLabel + "\t"UIControlState.Normal);
  m_button2.HorizontalAlignment =

      UIControlContentHorizontalAlignment.Right;
  m_button2.BackgroundColor = UIColor.FromRGB(100100100);
  m_button2.SetTitleColor(UIColor.White, UIControlState.Normal);
  m_button2.Hidden = true;
  m_button2.TouchUpInside += (sender, e) => {
    m_button2.Hidden = true;
    m_picker.Hidden = true;
    string text = model.SelectedText;
    SetText(text, alignment, true /* triggered */);
    ActionDelegate?.Invoke(WidgetName, text);

    m_viewY.RemoveFromSuperview();
    mainView.BecomeFirstResponder();
  };

  mainView.AddSubview(m_button);
  m_viewY.AddSubview(m_picker);
  m_viewY.AddSubview(m_button2);

  m_viewX = m_button;
  m_viewX.Tag = ++m_currentTag;
}

An example of using the combo box in the CSCS code is shown in Code Listing 18. It will create a combo box widget on the top of the screen. The "center:red:clear" initialization parameter means that the text in the combo box is centered, the combo box (UIPicker) has a red background color, and the UIButton on the top of the screen has a clear (transparent) background.

Code Listing 18: Adding a Combo Box in the CSCS Code

locComboWidgets = GetLocation("ROOT""CENTER""ROOT""TOP"100);
AddCombobox(locComboWidgets, "comboWidgets""center:red:clear"36060);


sfWidgets = {"CircularGauge""DigitalGauge""QRBarcode""Code39Barcode",  

    "BusyIndicator","SplineGraph""DoughnutGraph""SemiDoughnutGraph",

    "DataGrid""Picker""Excel""Pdf""Word"};
AddWidgetData(comboWidgets, sfWidgets, """center");

The result of the code in Code Listing 18 is shown in Figure 6.

Note that we don’t have to use the "center:red:clear" initialization; it’s only done for brevity. You can achieve the same effect by calling the generic SetValue() and SetBackgroundColor() functions like this:

SetBackgroundColor(comboWidgets, "clear");

SetValue(comboWidgets, "alignment""center");

SetValue(comboWidgets, "backgroundcolorpicker""red");

You can also change the X appearing on the button above the UIPicker and all the colors. For example, if you want to have Done instead of X appear in the yellow color on the green background, use the following CSCS code:

SetValue(comboWidgets, "backgroundcolorbutton2""green");
SetValue(comboWidgets, "fontcolor2""yellow");
SetValue(comboWidgets, "text2""Done");

A Custom Combo Box for iOS

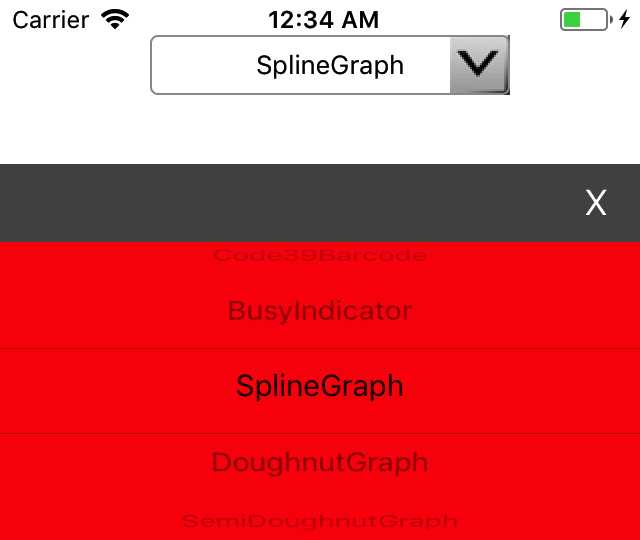
Figure 6: A Custom Combo Box for iOS

To register our combo box widget with the parser, the usual statement is used (the same statement is used for both the standard combo box on Android, and the custom one on iOS):

ParserFunction.RegisterFunction("AddCombobox"

                                new AddWidgetFunction("Combobox"));

Autocomplete with a trie data structure

Autocomplete is a feature, suggesting the whole word or phrase while the user is typing. One of the algorithms for auto-completion involves the trie data structure (the name comes from “retrieval”); sometimes it is also called a prefix tree. Trie is very efficient when you’re searching for strings that start with a given prefix. The time complexity to search or to insert a string into the trie is at most the length of the string, because for each letter in the string, a new tree level is inserted (unless it already exists in the trie).

The trie itself is not a UI element; therefore, we can add it to the CSCS by extending the Variable class. See Code Listing 19 for details.

Code Listing 19: A Fragment of the Implementation of a Trie

public class WordHint
{
  string m_text;

  public int Id { get; }
  public string OriginalText { get; }
  public string Text { get { return m_text; } }

  public WordHint(string word, int id)
  {
    OriginalText = word;
    Id = id;
    m_text = UIUtils.RemovePrefix(OriginalText);
  }
}


public class TrieCell
{
  string m_name;
  WordHint m_wordHint;

  Dictionary<stringTrieCell> m_children =

      new Dictionary<stringTrieCell>();

  public int Level { getset; }
  public WordHint WordHint { get { return m_wordHint; } }
  public Dictionary<stringTrieCell> Children {get { return m_children; }}

  public TrieCell(string name = ""WordHint wordHint = null,

                  int level = 0)
  {
    if (wordHint != null && wordHint.Text == name) {
      m_wordHint = wordHint;
    }

    m_name = name;
    Level = level;
  }

  public bool AddChild(WordHint wordHint)
  {
    if (!string.IsNullOrEmpty(m_name) && !wordHint.Text.StartsWith(

                      m_name, StringComparison.OrdinalIgnoreCase)) {
      return false;
    }

    int newLevel = Level + 1;

    bool lastChild = newLevel >= wordHint.Text.Length;

    string newName = lastChild ? wordHint.Text :
                                 wordHint.Text.Substring(0, newLevel);
    TrieCell oldChild = null;
    if (m_children.TryGetValue(newName, out oldChild)) {
      return oldChild.AddChild(wordHint);
    }

    TrieCell newChild = new TrieCell(newName, wordHint, newLevel);
    m_children[newName] = newChild;

    if (newLevel < wordHint.Text.Length) {

      // if there are still chars left, add a grandchild recursively.
      newChild.AddChild(wordHint);
    }

    return true;
  }
}

public class Trie : Variable
{
  TrieCell m_root;

  public Trie(List<string> words)
  {
    m_root = new TrieCell();

    int index = 0;
    foreach (string word in words) {
      AddWord(word, index++);
    }
  }

  void AddWord(string word, int index)
  {
    WordHint hint = new WordHint(word, index);
    m_root.AddChild(hint);

    string text = hint.Text;
    int space = text.IndexOf(' ');
    while (space > 0) {
      string candidate = text.Substring(space + 1);
      if (!string.IsNullOrWhiteSpace(candidate)) {
        hint = new WordHint(candidate, index);
        m_root.AddChild(hint);

      }
      if (text.Length < space + 1) {
        break;
      }
      space = text.IndexOf(' ', space + 1);
    }
  }

  public void Search(string text, int max, List<WordHint> results)
  {
    text = UIUtils.RemovePrefix(text);
    TrieCell current = m_root;

    for (int level = 1; level <= text.Length && current != null; level++) {
      string substr = text.Substring(0, level);
      if (!current.Children.TryGetValue(substr, out current)) {
        current = null;
      }
    }

    if (current == null) {
      return// passed text doesn't exist
    }
    AddAll(current, max, results);
  }

  void AddAll(TrieCell cell, int max, List<WordHint> results)
  {
    if (cell.WordHint != null && !cell.WordHint.Exists(results)) {
      results.Add(cell.WordHint);
    }
    if (results.Count >= max) {
      return;
    }

    foreach (var entry in cell.Children) {
      TrieCell child = entry.Value;
      AddAll(child, max, results);

      if (results.Count >= max) {
        return;
      }
    }
  }
}

To register the trie with the parser, we use the following statements:

ParserFunction.RegisterFunction("GetTrie",    new CreateTrieFunction());
ParserFunction.RegisterFunction("SearchTrie"new SearchTrieFunction());

The CreateTrieFunction() function is trivial since it just initializes the trie. Check out the implementation of the SearchTrieFunction class in Code Listing 20.

Code Listing 20: The Implementation of the SearchTrieFunction Class

public class SearchTrieFunction : ParserFunction
{
  protected override Variable Evaluate(ParsingScript script)
  {
    List<Variable> args = script.GetFunctionArgs();

    Utils.CheckArgs(args.Count, 2, m_name);

    Trie trie = Utils.GetSafeVariable(args, 0nullas Trie;
    Utils.CheckNotNull(trie, m_name);


    string text = args[1].AsString();
    int max = Utils.GetSafeInt(args, 210);

    List<WordHint> words = new List<WordHint>();
    trie.Search(text, max, words);

    List<Variable> results = new List<Variable>(words.Count);
    foreach (WordHint word in words) {
      results.Add(new Variable(word.Id));
    }

    return new Variable(results);
  }
}

Basically, SearchTrieFunction creates and returns a list of matching words. The list consists of word IDs, which must be then associated with the words. Code Listing 21 shows how.

Code Listing 21: The Implementation of the Autocomplete in CSCS

AutoScale(1.0);
findMaxWords = 10;
language1 = "en-US";
language2 = "es-MX";
words[language1] = {"bat""bicycle""big""bill""bone" };
words[language2] = {"barba""barco""bicicleta""billete""bonito"};
wordsFound   = {};
countryPics  = {};

locTextEdit = GetLocation("ROOT""CENTER""ROOT""TOP"010);
AddTextEdit(locTextEdit, "textEdit""Type word dog"48060);
AddAction(textEdit,        "find_text");

locListView = GetLocation("ROOT""CENTER", textEdit, "BOTTOM"04);
AddListView(locListView, "listView"""480720);
SetVisible(listView, false);

function find_text(sender, arg)
{
  SetVisible(listView, false);
  text = GetText(textEdit);
  if (size(text) == 0) {
    return;
  }

  wordsFound  = {};
  countryPics = {};
  total = search_voice(0, text, language1);
  if (total < findMaxWords) {
    total = search_voice(total, text, language2);
  }
  if (total == 0) {
    return;
  }

  SetVisible(listView, true);
  AddWidgetData(listView, wordsFound);
  AddWidgetImages(listView, countryPics);
  if (firstSearch && total > 0) {
    AddAction(listView, "list_chosen");
    firstSearch = 0;
  }
}

function search_voice(total, text, language)
{
  searchTrie = GetTrie(language, words[language]);
  results = SearchTrie(searchTrie, text, findMaxWords - total);
  for (id : results) {
    wordsFound[total]  = words[language][id];
    countryPics[total] = language;
    total++;
  }
  return total;
}

Note that the curly braces denote either a map or a list in CSCS, unlike Python. The results of running Code Listing 21 after the user has typed bi, are shown in Figure 7.

Running Autocomplete on iOS (left) and Android (right)

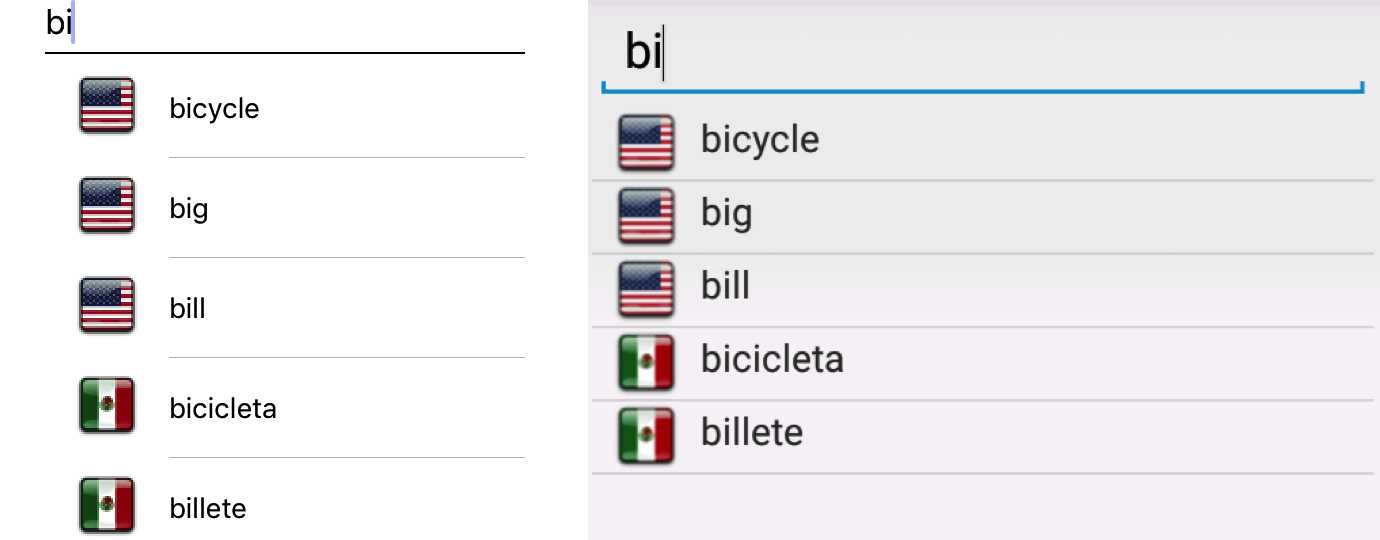
Figure 7: Running Autocomplete on iOS (left) and Android (right)

There are just 10 words used in the dictionary. They were added in these statements:

words[language1] = {"bat""bicycle""big""bill""bone" };
words[language2] = {"barba""barco""bicicleta""billete""bonito"};

How do you add more words that you read from a file? As an example, I added a dictionary.txt file as an asset to the sample project in the accompanying source code. It contains more than 1,500 words in 10 languages.

The words are tab separated. American English is in the second column, and Mexican Spanish is in the seventh.

Code Listing 22 shows how to read data from a file and assign it to CSCS data structures. Note that the dictionary.txt file contains some language-specific information in the first four rows—that’s why we skip them.

Code Listing 22: Reading and Processing Data From a File in CSCS

WriteConsole(Now(), " Starting reading file.");

lines = ReadFile("dictionary.txt");
words[language1] = {};
words[language2] = {};
lineNr = 0;
for (line : lines) {
  if (++lineNr < 5) {
    continue;
  }
  tokens = tokenize(line, "\t");
  if (size(tokens) < 7) {
    continue;
  }
  add(words[language1], tokens[1]);
  add(words[language2], tokens[6]);
}
WriteConsole(Now(), " Added ", size(words[language1]), " words");

Summary

In this chapter, we saw how to implement custom widgets in CSCS, taking as a GUI example a combo box, and as a non-GUI example, an autocomplete using a trie data structure.

In the next chapter, we are going to look into adding custom widgets that are developed by someone else and imported into the project.

Scroll To Top
Disclaimer
DISCLAIMER: Web reader is currently in beta. Please report any issues through our support system. PDF and Kindle format files are also available for download.

Previous

Next


You are one step away from downloading ebooks from the Succinctly® series premier collection!
A confirmation has been sent to your email address. Please check and confirm your email subscription to complete the download.