
WPF Succinctly®

CHAPTER 5
WPF and MVVM
Model-View-ViewModel (MVVM)
When you begin to learn about WPF and XAML, you will hear of MVVM or the Model-View-ViewModel design pattern. MVVM is a user interface design pattern invented by John Gossman and based on the Presenter Model pattern by Martin Fowler.
The Model-View-ViewModel pattern allows developers to completely separate the user interface from the logic required to facilitate the user interface and the business logic and data. Separation of UI, business logic, and data allows for a nice, clean, testable piece of software. WPF data binding is extremely powerful because it allows you to separate your user interface from your business logic. The MVVM pattern provides excellent examples of how to use WPF data binding in new ways to achieve a completely decoupled application design.
We will start with the Model. The Model represents the data that you wish to interact with. This could be information from a database, properties of your business objects, or even an XML file. Any software package will deal with data, and it's best if your user interface is decoupled from your specific data model because your data is likely to change. Generally in WPF, your Model will implement the INotifyPropertyChanged interface. This interface provides members that will facilitate change notification. This means that your user interface will need to know when your Model changes without being tightly coupled to your Model. This goes both ways. Your Model will need to know when the user has changed data in your Model via user interface controls. We will cover the INotifyPropertyChanged interface in more detail with examples, but know that its members provide events that facilitate change notification.
Next we have the ViewModel. The ViewModel is a class that sits between your XAML View and your data model. This layer of abstraction is key because if your ViewModel is designed in a loosely coupled nature, your model and views are open to change. The ViewModel is typically implemented as a class with properties that point to your model's properties. You will generally use WPF data binding to bind to ViewModel. The ViewModel doesn't care about the specifics of your view or your model. This makes unit testing extremely easy.
At the top of the pattern we have the Views, which are WPF Windows or UserControls. The View makes up the visual part of your application. When you begin studying WPF, you will come across some MVVM purists who believe that there should be absolutely no code in your View's code behind. Although this does offer the most flexible design, it's also one of the more difficult designs to accomplish. It will require that you eliminate certain common design choices such as control event handlers and the like.
I will show an example of a no code-behind approach. However, this is not required to implement the MVVM pattern. Understand that the point behind MVVM is that you want your model and your view to be decoupled and to communicate only via the ViewModel. The purpose of this decoupled architecture is to allow you to easily change the view or model without breaking existing code. You also want to be able to fully unit test all of your code without worrying about using difficult tools because you've created a tightly coupled XAML view to your business logic.
MVVM example
Here is a short MVVM example to illustrate how this can work together. Imagine that you have a contact manager application. The purpose of this application is to keep up with your many contacts. Naturally you will need to save a contact's name, telephone number, email address, and home address. This will represent your Model. Examine the following Contact class diagram.
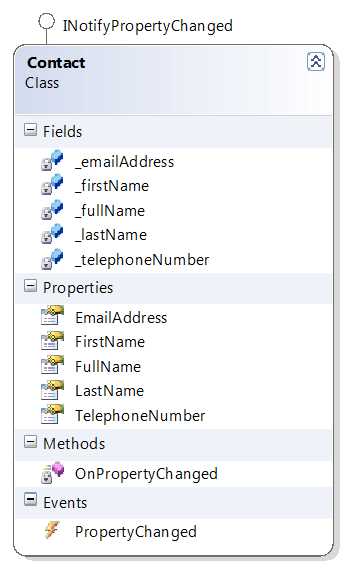
- Contact Class Diagram
We will start by implementing a class that we'd like to use for data binding. Naturally you will probably implement a contact class. This class would have a property for the contact's first name, last name, phone number, and email address.
Contact.cs
using System; using System.Collections.Generic; using System.Linq; using System.Text; using System.ComponentModel; namespace ContactMvvm { public class Contact : INotifyPropertyChanged { #region "private fields" private string _firstName; private string _fullName; private string _lastName; private string _telephoneNumber; private string _emailAddress; #endregion #region "Public Properties" public string FirstName { get { return _firstName; } set { _firstName = value; OnPropertyChanged("FirstName"); } }
public string EmailAddress { get { return _emailAddress; } set { _emailAddress = value; OnPropertyChanged("EmailAddress"); } } public string LastName { get { return _lastName; } set { _lastName = value; OnPropertyChanged("LastName"); } } public string TelephoneNumber { get { return _telephoneNumber; } set { _telephoneNumber = value; OnPropertyChanged("TelephoneNumber"); } } #endregion #region "INotifyPropertyChanged members" public event PropertyChangedEventHandler PropertyChanged; //This routine is called each time a property value has been set. This will //cause an event to notify WPF via data-binding that a change has occurred. private void OnPropertyChanged(string propertyName) { var handler = PropertyChanged; if (handler != null) { handler(this, new PropertyChangedEventArgs(propertyName)); } } #endregion } } |
Don't be overwhelmed by the INotifyPropertyChanged implementation. This will be covered in another chapter.
Please note that this is a plain CLR object, complete with a namespace, class name, and properties. This is the Model in MVVM; it represents our data.
Next we will create a ViewModel class that will take the data from our Model and present the data to the View through WPF data binding. The ViewModel class inherits from a class called ObservableCollection<>. ObservableCollection<> is a generic class that accepts our model as the generic type. This class basically turns our ViewModel into a collection of Contact objects with built-in change notifications to facilitate the WPF data binding mechanisms.
When we use ObservableCollection, WPF data binding knows when items are added or removed. I've created one private routine PrepareContactCollection, which creates three instances of our Contact class and adds them to the ViewModel's internal collection. We will bind a ListView's ItemsSource property to the ViewModel as well as bind the main grid's DataContext property to the ViewModel. By setting the DataContext of the top-level grid, we will cause the child controls to inherit the DataContext for data binding. The ItemsSource property of the ListView will populate the ListView with each item that exists in our ObservableCollection of contacts. Here is a class diagram and the code:

- Class Diagram of an ObservableCollection
ContactManagerViewModel.cs
using System; using System.Collections.Generic; using System.Linq; using System.Text; using System.Collections.ObjectModel; namespace ContactMvvm { public class ContactManagerViewModel : ObservableCollection<Contact> { #region "constructor" public ContactManagerViewModel() { PrepareContactCollection(); } #endregion #region "private routines" private void PrepareContactCollection() { //Create new contacts and add them to the ViewModel's //ObservableCollection. var ContactOne = new Contact { FirstName = "John", LastName = "Doe", EmailAddress = "[email protected]", TelephoneNumber = "555-555-5555" }; Add(ContactOne); var ContactTwo = new Contact { FirstName = "Bob", LastName = "Watson", EmailAddress = "[email protected]", TelephoneNumber = "555-555-5555" }; Add(ContactTwo); var ContactThree = new Contact { FirstName = "Joe", LastName = "Johnson", EmailAddress = "[email protected]", TelephoneNumber = "555-555-5555" }; Add(ContactThree); } #endregion } } |
Tip: Notice that by inheriting from ObservableCollection<Contact> we gain an Add() method. This allows us to populate the ViewModel with instances of our Contact Model.
Now we want to write a XAML user interface and bind our ViewModel to the controls. The first thing that we will do is import the object's namespace so we can access the object in XAML. We will do this by specifying xmlns:viewModel in the Window element. viewModel is an arbitrary value and can be anything that you wish to associate with your newly imported namespace.
Next we will create a resource dictionary and add a static resource that represents an instance of this ViewModel. This allows us to bind to our ViewModel without writing any C# code! Here is the XAML markup.
ContactManager.xaml
<Window x:Class="ExceptionValidation.ContactManager" xmlns="http://schemas.microsoft.com/winfx/2006/xaml/presentation" xmlns:x="http://schemas.microsoft.com/winfx/2006/xaml" Title="ContactManager" Height="300" Width="300" xmlns:viewModel="clr-namespace:ContactMvvm"> <Window.Resources> <viewModel:ContactManagerViewModel x:Key="contactViewModel" /> </Window.Resources> <Grid DataContext="{StaticResource ResourceKey=contactViewModel}"> <Grid.ColumnDefinitions> <ColumnDefinition /> <ColumnDefinition /> </Grid.ColumnDefinitions> <Grid.RowDefinitions> <RowDefinition Height="93*" /> <RowDefinition Height="29*" /> <RowDefinition Height="27*" /> <RowDefinition Height="30*" /> <RowDefinition Height="81*" /> </Grid.RowDefinitions> <ListView Grid.ColumnSpan="2" BorderThickness="2" x:Name="lstContacts" IsSynchronizedWithCurrentItem="True" ItemsSource="{StaticResource ResourceKey=contactViewModel}" DisplayMemberPath="FirstName" Margin="0,0,0,28" Grid.RowSpan="2" />
<TextBlock Grid.Column="0" Grid.Row="1" Text="First name" /> <TextBox Grid.Column="1" Grid.Row="1" Text="{Binding Path=FirstName}" /> <TextBlock Grid.Column="0" Grid.Row="2" Text="Last name" /> <TextBox Grid.Column="1" Grid.Row="2" Text="{Binding Path=LastName}" /> <TextBlock Grid.Column="0" Grid.Row="3" Text="Email address" /> <TextBox Grid.Column="1" Grid.Row="3" Text="{Binding Path=EmailAddress}" /> <TextBlock Grid.Column="0" Grid.Row="4" Text="Telephone number" /> <TextBox Grid.Column="1" Grid.Row="4" Text="{Binding Path=TelephoneNumber}" /> </Grid> </Window> |
Notice that we set the grid's DataContext property binding to the ViewModel static resource that we created in the dictionary. The DataContext provides a binding context for your WPF controls. When we set the DataContext on the grid, this value will propagate down to the child elements via property inheritance—this is why all of the TextBox Binding values can be set to properties of the Model. This is because the DataContext is set to our ViewModel, which is an ObservableCollection<Contact>. So when we set our binding paths, WPF knows we are dealing with a Contact object and the values are mapped to the correct properties. This will also work if we had properties inside of our ViewModel class. We could bind to these values as well.
The following figure shows the program's output:

- Completed Contact Manager
As you can see, we've created a data-bound WPF window with data from our custom Contact object. You can update the values in the text box and the values will change in the ListView. You can click in the ListView and the values will update based on your selection. The user interface is 100% data-bound and we didn't write any event handlers in the code behind! We were able to do it in 100% XAML. Also note that resource dictionaries are not limited to CLR objects. You can store XAML brushes, third-party controls, styles, type converters, or any other type of objects for use in your XAML markup.
- 100+ essential WPF UI controls like DataGrid, Charts, and Diagram.
- 10+ built-in themes, plus Theme Studio app for designing custom themes.
- Powerful document processing libraries for Excel, PDF, Word, and PowerPoint file formats.