
Windows Store Apps Succinctly®

CHAPTER 5
Tiles, Toasts, and Notifications
The previous chapters have discussed several different ways that a Windows Store app can be activated. These activations have occurred as responses to user interaction with Windows and as a result of the app participating in different Windows contracts and extensions—remember that launching an application from its Start tile is actually an implementation of the Launch contract. However, Windows Store apps have ways to provide information and seem alive even when the app itself hasn’t been activated: tiles and toasts.
For Windows Store apps, the tiles that appear on the Start screen are more than just oversized desktop icons. These tiles are "live tiles"—their display can be updated with text, images, icons, and animations in response to notifications from both within the system and from external sources. Apps can have both primary and secondary tiles, the latter of which can be used to provide additional information that is passed to the application if they are used to launch the app.
Toasts provide apps a way to communicate information to users while they are using another app. Toasts appear as pop-up notifications in the upper corner of the app, and much like live tiles can include text and images. Toast messages also include information that can be passed to the application if users choose to use the toast to launch the application.
This chapter will show how live tiles can be used to add functionality to otherwise inactive Windows Store apps. Then, toasts will be explored, including configuring how they appear, controlling when they appear, and reacting to what occurs when they are used to launch an app. The chapter will conclude with a discussion of push notifications, which allow updates to be triggered from services external to both the app and the device itself.
Live Tiles
Every Windows Store app that is installed initially has a tile on the Windows Start screen that can be used to launch the application. By default, each app includes a square tile and optionally can include a larger “wide” tile, with the app’s users deciding which size tile they want to include on their Start screen. The initial default content of an app’s tile is set in the app manifest file, and includes the following options:
- The tile’s standard-size logo image.
- The tile’s wide-size logo image.
- Whether title text should be displayed when the standard, wide, both, or neither tile is shown.
- Whether the foreground for text and other content is light or dark if it is being shown.
- The background color of the tile.
Note: If an app includes a wide tile, when the app is installed the wide tile will be the one that is initially displayed. Users can then choose to resize it to be displayed as the smaller tile, or even opt to remove the tile from the Start screen altogether. When an app is removed from the Start screen, it is still available to be launched by users from the results of a search in the Start screen unless they uninstall the app. |
Beyond the content initially set for a tile, an app can affect the tile’s appearance in several ways. This includes directly or periodically updating text and image content that is displayed within the tile, updating numeric or glyph “badge” content on the tile, or even creating secondary tiles that provide users the opportunity to directly access specific app functionality from their Windows Start screen.
Updating the Live Tile Content
Through updates to live tile content, an app can be made to seem alive and engaging, even when the app itself isn’t actually running. Tiles can be updated immediately, on a predetermined repeating schedule, or at a set time. They can even be set up to cycle through a rotating queue of up to five tile designs. Both the standard and wide tile contents can be updated in these ways.
A tile’s contents are defined by using XML that specifies a combination of text and images that are to be displayed. This XML is based on a set of predefined templates provided by Windows. There are 46 predefined template types—10 square and 36 wide—which can be chosen for tile layouts. Some of these layouts are considered “peek” layouts; their content includes an image that fills the tile and is scrolled in and out with alternate content that includes some text and perhaps an additional image. There are four square and 14 wide layouts that support peek.
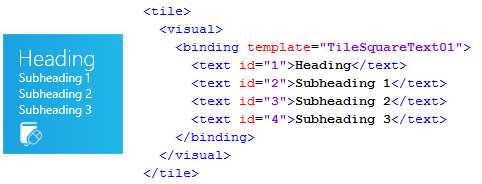
- An Updated Tile and the Corresponding XML Template
In addition to text and image information, a tile can also include a “branding” setting. A tile’s branding indicates whether the content in the lower corner of the tile (lower left corner in left-to-right languages) will display the app’s small logo, the app’s title, or no content whatsoever. The small logo is the default.
Immediate Tile Updates
The first step in specifying a tile update is to define the XML to be used to define the tile’s contents. The XML for each template can be found in the tile template catalog, which is available at http://msdn.microsoft.com/en-us/library/windows/apps/Hh761491.aspx. This XML can be compiled by hand, or the GetTemplateContent static method of the TileUpdateManager class can be used to provide the basic XML for each template, which can then be filled in with the values to be displayed. Once the XML is defined, call the Update method on an instance of the application’s TileUpdater, which is retrieved from the TileUpdateManager class, with a TileNotification object that includes the XML, and optionally an expiration time for the tile. Note that if the app includes a wide tile, the notification should include populated templates for both the square and wide tiles, making it necessary to merge the XML. The following code shows an immediate tile update performed this way for an app that includes both wide and square tiles, with the tile set to expire two hours from when it is first shown (when it expires, it reverts to the app’s original tile):
// Ensure updates are enabled. var updater = TileUpdateManager.CreateTileUpdaterForApplication(); if (updater.Setting == NotificationSetting.Enabled) { // Get the default XML for the desired tile template. var tileSquareXml = // Locate the elements to be modified. var textSquareElements = tileSquareXml.GetElementsByTagName("text").ToList(); // More detailed searching of XML for specific attributes omitted for brevity... textSquareElements[0].InnerText = "Heading"; textSquareElements[1].InnerText = "Subheading 1"; textSquareElements[2].InnerText = "Subheading 2"; textSquareElements[3].InnerText = "Subheading 3"; // Get the default XML for the desired tile template. var tileWideXml = // Locate the elements to be modified. var textWideElements = tileWideXml.GetElementsByTagName("text").ToList(); textWideElements[0].InnerText = "Wide Heading"; textWideElements[1].InnerText = "Wide Subheading 1"; textWideElements[2].InnerText = "Wide Subheading 2"; textWideElements[3].InnerText = "Wide Subheading 3"; // Inject the wide binding node contents into the visual element of the Square XML. var wideBindingNode = tileWideXml.GetElementsByTagName("binding").First(); var squareVisualNode = tileSquareXml.GetElementsByTagName("visual").First(); var importNode = tileSquareXml.ImportNode(wideBindingNode, true); squareVisualNode.AppendChild(importNode); var notification = new TileNotification(tileSquareXml); notification.ExpirationTime = DateTimeOffset.Now.AddHours(2); updater.Update(notification); } |
Note that this code first performs a check to ensure that updates are enabled. Users can disable tile updates on a tile-by-tile basis by selecting the tile in the Start screen and selecting Turn live tile off from the app bar. If a live tile’s updates are disabled, they can be re-enabled by selecting Turn live tile on.
Note: This process of locating an XML template, looking up the corresponding XML in the MSDN documentation, and writing code based on that schema can be time consuming and prone to error. The App tiles and badges sample published by Microsoft includes the NotificationsExtensions project which can be used to build a reusable WinMD component. The sample can be obtained at http://code.msdn.microsoft.com/windowsapps/app-tiles-and-badges-sample-5fc49148, and instructions for how to use it in a Visual Studio project can be found at http://msdn.microsoft.com/en-us/library/windows/apps/Hh969156.aspx. This component provides a strongly typed object model for populating tile, badge, and toast templates, and as a result also provide IntelliSense and compile-time support to help prevent errors. The remaining discussion and examples in this chapter will make use of this component for its template definitions. |
// Ensure updates are enabled. var updater = TileUpdateManager.CreateTileUpdaterForApplication(); if (updater.Setting == NotificationSetting.Enabled) { // Prepare the square tile. var tileSquareUpdate = tileSquareUpdate.TextHeading.Text = "Heading"; tileSquareUpdate.TextBody1.Text = "Subheading 1"; tileSquareUpdate.TextBody2.Text = "Subheading 2"; tileSquareUpdate.TextBody3.Text = "Subheading 3"; // Prepare the wide tile. var tileWideUpdate = tileWideUpdate.TextHeading.Text = "Wide Heading"; tileWideUpdate.TextBody1.Text = "Wide Subheading 1"; tileWideUpdate.TextBody2.Text = "Wide Subheading 2"; tileWideUpdate.TextBody3.Text = "Wide Subheading 3"; // Inject the square tile contents into the wide tile. tileWideUpdate.SquareContent = tileSquareUpdate; // Send the notification. var notification = tileWideUpdate.CreateNotification(); notification.ExpirationTime = DateTimeOffset.Now.AddHours(2); updater.Update(notification); } |
The previous code shows the same immediate tile update performed using the NotificationExtensions helper class.
Queued Tile Updates
In addition to setting a single tile update, it is also possible to queue up to five tiles that Windows will automatically cycle through. This is known as queuing, and simply requires that queuing be enabled. Windows will cycle through the five most recent tile updates, with the exception that tiles with the same Tag value will replace each other. The following code shows three tile sets being built up and queuing being enabled through a call to EnableNotificationQueue:
// Build up a list of tiles to be queued. // Build the first tiles. var tileSquareUpdate = TileContentFactory.CreateTileSquareText01(); tileSquareUpdate.TextHeading.Text = "Queue 1"; tileSquareUpdate.TextBody1.Text = "Subheading Q1-1"; tileSquareUpdate.TextBody2.Text = "Subheading Q1-2"; tileSquareUpdate.TextBody3.Text = "Subheading Q1-3"; var tileWideUpdate = TileContentFactory.CreateTileWideText01(); tileWideUpdate.TextHeading.Text = "Wide Queue 1"; tileWideUpdate.TextBody1.Text = "Wide Subheading Q1-1"; tileWideUpdate.TextBody2.Text = "Wide Subheading Q1-2"; tileWideUpdate.TextBody3.Text = "Wide Subheading Q1-3"; tileWideUpdate.SquareContent = tileSquareUpdate; updater.Update(tileWideUpdate.CreateNotification()); // Build the second tiles. var tileSquareUpdate2 = TileContentFactory.CreateTileSquarePeekImageAndText01(); // Tile property values omitted for brevity... var tileWideUpdate2 = TileContentFactory.CreateTileWidePeekImage02(); // Tile property values omitted for brevity... updater.Update(tileWideUpdate2.CreateNotification()); // Build the third tiles. var tileSquareUpdate3 = TileContentFactory.CreateTileSquareImage(); // Tile property values omitted for brevity... var tileWideUpdate3 = TileContentFactory.CreateTileWideImageAndText01(); // Tile property values omitted for brevity... updater.Update(tileWideUpdate3.CreateNotification()); // Enable queuing. updater.EnableNotificationQueue(true); |
Scheduled Updates
The previous sections have discussed making immediate changes to the application tiles. Another option is for the tile to be updated at a later, predetermined time. In this case, the tile XML and a delivery time are used to create a ScheduledTileNotification, and instead of calling Update on the application’s TileUpdater instance, the ScheduledTileNotification is passed to a call to AddToSchedule, as shown in the following code:
// Set up the tile that is to appear at a later time. var tileSquareUpdate = TileContentFactory.CreateTileSquareText01(); // Tile property values omitted for brevity... var tileWideUpdate = TileContentFactory.CreateTileWideText01(); // Tile property values omitted for brevity... tileWideUpdate.SquareContent = tileSquareUpdate; // Set the time when the update needs to occur as 1 hour from now. var deliveryTime = DateTimeOffset.Now.AddHours(1); // Schedule the update. var scheduledTileNotification = updater.AddToSchedule(scheduledTileNotification); |
Future updates can be cleared by retrieving the scheduled notification from the TileUpdater instance and calling RemoveFromSchedule. To help with this, it is possible to specify an Id value for the ScheduledTileNotification instance, which can then be examined later in the list of pending updates.
// Get the list of scheduled notifications. var scheduledUpdates = updater.GetScheduledTileNotifications(); // Try to find scheduled notifications with a matching Id. foreach(var scheduledUpdate in scheduledUpdates.Where(x => x.Id == "SomeId")) { updater.RemoveFromSchedule(scheduledUpdate); } |
Note: By default, scheduled updates are set to expire in three days in order to help prevent the display of stale content to users. The expiration value can be changed, or set to null to never expire. If queuing is enabled, scheduled updates are added to the end of the queue, and if that results in more than five tiles, the first item is removed from the queue. As noted before, if an existing tile update entry contains a Tag attribute, a replacement update with the same Tag value will overwrite the existing tile entry. |
Periodic Updates
A tile can also be set to be updated at a fixed, repeating time period. For this type of update, instead of supplying XML for the tile, a URI to an HTTP or HTTPS endpoint is specified, which Windows will poll at the indicated interval for the XML to use for the tile’s content. Available polling intervals include 30 minutes, one hour, six hours, 12 hours, and daily. The periodic update can be set up with the StartPeriodicUpdate method on the application’s TileUpdater instance. It is also possible to specify a specific time for when the polling should begin, otherwise the first request will occur immediately. A tile can only have one periodic update interval, though multiple URIs—up to five—can be provided which will be called at the polling interval to provide multiple tiles for display via queuing by using the StartPeriodicUpdateBatch method. The server can provide a Tag value for batched tiles by setting the X-WNS-Tag HTTP response header in the value that is returned from the specified endpoints.
// Set up for polling every 30 minutes. updater.StartPeriodicUpdate(pollingUri, PeriodicUpdateRecurrence.HalfHour); // Delay the initial request by 1 minute. var offsetTime = DateTimeOffset.Now.AddMinutes(1); updater.StartPeriodicUpdate(pollingUri, offsetTime, PeriodicUpdateRecurrence.HalfHour); // Provide a list of URIs to call. var batchUris = new []{pollingUri1, pollingUri2, pollingUri3}; // Note that Notification Queuing must be enabled. updater.EnableNotificationQueue(true); updater.StartPeriodicUpdateBatch(batchUris, PeriodicUpdateRecurrence.HalfHour); |
The periodic update can be stopped by calling the StopPeriodicUpdate method on the application’s TileUpdater instance.
updater.StopPeriodicUpdate(); |
Note: Like scheduled updates, periodic updates are initially configured to expire every three days. Expiration values are set in the X-WNS-Expires HTTP response header in the value returned from the specified endpoints. |
Clearing Tile Contents
The last tile update to be discussed is the ability to clear any tile updates that have occurred and reset the tile to the default tile layout specified in the application manifest file. That can simply be accomplished by calling the Clear method on the application’s TileUpdater instance.
updater.Clear(); |
Badges
On top of containing text and image content, live tiles also host a small piece of status information in the corner opposite the tile’s branding (lower right for left-to-right languages). This information is known as a badge, and can either be a number (1–99) or one of a set of provided glyphs. Information conveyed through badges often includes the number of pending items that require the user’s attention, such as unread email messages, or perhaps some status information like a problem alert or unavailable network destination.
![]()
- Live Tile Showing a Numeric Badge
Like the live tile content, the badge content is defined through specific XML content. As was previously mentioned, a numeric badge can have a number from 1 to 99, and there are 12 available badge values that can be set, including none. The available badge values are defined in the badge image catalog available at http://msdn.microsoft.com/en-us/library/windows/apps/hh761458.aspx. To update a badge value for an application’s tile, a BadgeUpdater instance for the application is obtained from the BadgeUpdateManager class, and the desired badge XML is passed to the Update method provided by the BadgeUpdater instance.
var updater = BadgeUpdateManager.CreateBadgeUpdaterForApplication(); // Prepare a numeric notification and pass the updated badge number to the updater. var content = new BadgeNumericNotificationContent(42); updater.Update(notification); |
Note: As with the tile content, the NotificationsExtensions library simplifies the process of specifying the badge value without needing to directly work with the XML DOM. |
While scheduled updates cannot be set for badges, periodic updates can be configured in a manner that is nearly identical to periodic tile updates, with the exception that there is no provision for batching since there’s also no notion of queued badges. Otherwise, the syntax for the call to the application’s BadgeUpdater instance is identical to that of the TileUpdater.
Likewise, the tile’s badge content is independent from the tile contents, so it is cleared independently of the tile contents, though the same Clear call is used on the BadgeUpdater instance as is used on the TileUpdater.
Secondary Tiles
Apps can optionally create additional live tiles known as secondary tiles that can be used to launch the application with parameters for presenting users with a specific set of information. For example, a weather application could create a specific tile that, when used to launch the application, takes users to a display of the weather for a specific city they are interested in. Likewise, Internet Explorer’s pinning feature creates secondary tiles that instruct the browser to navigate to specific websites.
Working with Secondary Tiles
The process of adding a secondary tile is known as pinning, and must be initiated programmatically. It results in a system-defined dialog being shown to users for them to approve the addition of the tile. Users can remove a secondary tile at any time directly from the Start screen, and an app can also remove a secondary tile programmatically, though users will be presented with a dialog to confirm the removal. A secondary tile can be created with the following parameters:
- An Id value to identify the secondary tile.
- A short name to be displayed directly on the tile.
- A display name to be displayed with the tile for tooltips, in the All Programs list, and in Control Panel applications.
- The arguments to be provided to the application when it is activated via this tile.
- An options value to indicate whether the name should be displayed on the square or wide tiles, as well as whether the secondary tile will be shared through the cloud if the app is installed by the user (identified by his or her Microsoft ID) on a different machine.
- URIs to the images that will be placed on the tile (the wide tile logo can be omitted if a wide tile is not desired.)
In addition to the constructor properties, a secondary tile can also be given its own background color.
To pin a new secondary tile, a new SecondaryTile instance should be created, its properties set, and the new tile’s RequestCreateAsync value should be called.
var secondaryTile = new SecondaryTile( "TileId", "Secondary Tile Sample", "Secondary Tile Sample Display Name", "Secondary Tile Activation Args", TileOptions.ShowNameOnLogo | TileOptions.ShowNameOnWideLogo, new Uri("ms-appx:///Assets/Logo.png"), new Uri("ms-appx:///Assets/LogoWide.png")) { BackgroundColor = Colors.ForestGreen }; await secondaryTile.RequestCreateAsync(); |

- User Dialog Presented when Adding a Secondary Tile
Secondary tiles can be updated in all of the same ways as primary tiles. Instead of obtaining a TileUpdater or BadgeUpdater reference by calling the respective TileUpdateManager CreateTileUpdaterForApplication and BadgeUpdateManager CreateBadgeUpdaterForApplication methods, the CreateTileUpdaterForSecondaryTile and CreateBadgeUpdaterForSecondaryTile methods are called with the Id for the secondary tile to be updated.
Removing secondary tiles programmatically involves locating the tile by its Id or creating a new SecondaryTile instance with the same Id, and then calling the tile’s RequestDeleteAsync method.
var matchingTile = new SecondaryTile(SecondaryTileId); await matchingTile.RequestDeleteAsync(); |
Responding to Secondary Tile Activation
When a user selects a secondary tile from the Start screen, the application goes through the same launch sequence as was outlined in Chapter 3. The application is activated via the Launch contract, which will result in the OnLaunched method override being called in the application object. An app being launched via one of its secondary tiles can be distinguished from a launch via the primary tile by the value in the launch arguments’ TileId parameter, which will match the value set when the secondary tile was created. Furthermore, the method’s arguments will contain a value for the Arguments property. It is up to the app implementation to decide how the TileId value and the content of the Argument parameter should affect application startup, such as by presenting the application’s initial page with certain data loaded, or perhaps starting the application in a different page.
protected override void OnLaunched(LaunchActivatedEventArgs args) { // Initialization content omitted for brevity... if (args.TileId == "TileId") { if (!rootFrame.Navigate(typeof(SecondaryTilePage), args.Arguments)) { throw new Exception("Failed to create secondary tile page"); } |
Toast Notifications
Toast notifications are small message pop-ups that can be triggered to appear in the upper corner (upper right for left-to-right languages) of the Windows Start screen over any running applications. They give the application responsible for the toast notification the opportunity to alert users to some event regardless of what app is currently running, and are the only mechanism available for one Windows Store app to interrupt another. Users can react to a toast notification in one of three ways:
- They can ignore the notification, and after a period of time the notification will disappear.
- They can explicitly close the notification by dragging it off the screen or tapping the X icon it provides.
- They can use the notification to launch the corresponding app by tapping or clicking within the body of the notification window.
To be able to display toast notifications, the app has to indicate it is Toast Capable in the manifest file.
Note: Whereas most external activities that can launch an app require an entry in the declarations section of the manifest, toast notifications are enabled in the application UI section. |
In addition to the app itself enabling toast notifications, users can disable notifications system-wide for a period of time (one hour, three hours, or eight hours) through the Notifications icon in the Settings panel. This is quite useful for situations like presentations where unexpected notifications could be annoying, embarrassing, or otherwise problematic. Users can also elect to disable notifications system-wide or for specific apps from within the Notifications section of the PC settings app.
Raising Toast Notifications
The content that appears in a toast notification is defined in XML in a manner very similar to the way content is defined for a live tile. There are eight available templates—four text-only and four that combine images and text. These templates are defined in the toast template catalog available at http://msdn.microsoft.com/en-us/library/windows/apps/hh761494.aspx. To display a toast notification, a ToastNotifier instance is obtained from the ToastNotificationManager class, and the desired toast XML is wrapped in a ToastNotification instance and passed to the Show method provided by the ToastNotifier instance.
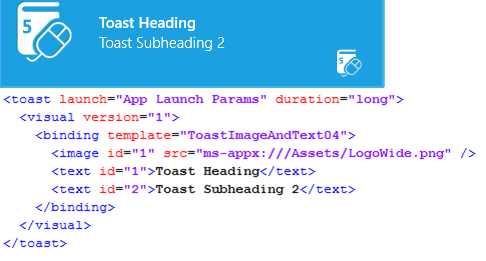
- A Toast Notification and Its Corresponding XML
Showing Immediate Notifications
The following code shows the process involved in showing a toast notification:
// Ensure updates are enabled. var notifier = ToastNotificationManager.CreateToastNotifier(); if (notifier.Setting == NotificationSetting.Enabled) { // Build the content of the toast notification. var content = ToastContentFactory.CreateToastImageAndText04(); content.TextHeading.Text = "Toast Heading"; content.TextBody1.Text = "Toast Subheading 1"; content.TextBody1.Text = "Toast Subheading 2"; content.Image.Src = "ms-appx:///Assets/LogoWide.png";
// Specify parameters to be passed to the app on launch. content.Launch = "App Launch Params"; // Show the notification. var notification = content.CreateNotification(); notifier.Show(notification); } |
Note: For toast notifications that show images for Windows Store apps, the image source must be a URI that uses the http, https, ms-appx, or ms-appdata schemes, and if ms-appdata is used, it must refer to a location in local application data storage (ms-appdata:///local/). |
A toast notification can be configured to be shown for either a short duration (seven seconds) or a long duration (25 seconds). Toast notifications displayed for short durations include either the system’s default audible alert, or can be set to use one of several alternate system-provided brief alert sounds. Notifications displayed for long durations can optionally use any of these sounds, as well as may opt to play one of several additional system-provided looping sounds that play for the duration of the toast’s display. In both cases, an option exists to omit playing any sounds at all. The following code shows a toast notification configured for long duration with a looping sound:
// Build the content of the toast notification. var content = ToastContentFactory.CreateToastImageAndText04(); // Toast contents properties omitted for brevity... // Specify long duration and a looping sound. content.Duration = ToastDuration.Long; content.Audio.Content = ToastAudioContent.LoopingCall2; content.Audio.Loop = true; // Show the notification. var notification = content.CreateNotification(); notifier.Show(notification); |
Scheduling Toast Notifications
In practice, toast notifications triggered for immediate display like the ones shown so far will not be used directly from application code. For the most part, the application will be interrupting itself, and in these cases, perhaps a message dialog would be a more appropriate way to get users' attention. Instead, these immediate notifications will normally be used from background tasks, which will be discussed in more detail in the next chapter.
An alternative to immediate invocation of a toast notification is to schedule the notification to appear at a pre-scheduled time, perhaps as a reminder for users to return to the app to perform some task. Important notifications can be scheduled to repeat at a predetermined "snooze” interval, so if users dismiss the toast without invoking the application, the toast will reappear some time later. When a snooze interval is set, the maximum number of snoozes must also be set. The following code shows how a scheduled notification can be configured:
// Build the content of the toast notification. var content = ToastContentFactory.CreateToastImageAndText04(); // Toast contents properties omitted for brevity... // Set the time at which the toast should be triggered. var deliveryTime = DateTimeOffset.Now.AddMinutes(1); // Configure a one-time scheduled toast. var scheduledNotification = new ScheduledToastNotification( // Configure a repeating scheduled toast. var snoozeInterval = TimeSpan.FromMinutes(5); // Must be between 60 secs and 60 mins. var maximumSnoozeCount = (UInt32)5; // Can be 1-5 times. var scheduledNotification = new ScheduledToastNotification( content.GetXml(), deliveryTime, snoozeInterval, maximumSnoozeCount); notifier.AddToSchedule(scheduledNotification); |
Scheduled updates can be cleared by retrieving the scheduled notification from the ToastNotifier instance and calling RemoveFromSchedule. To help with this, it is possible to specify an Id value for the ScheduledToastNotification instance, which can then be examined later in the list of pending updates.
// Retrieve the scheduled notifications. var notifier = ToastNotificationManager.CreateToastNotifier(); var notifications = notifier.GetScheduledToastNotifications(); // Alternatively, find the notifications that have a specific Id. //var notification = new ScheduledToastNotification(content.GetXml(), deliveryTime) //var notifications = notifier.GetScheduledToastNotifications() // Remove the indicated notifications. foreach (var notification in notifications) { notifier.RemoveFromSchedule(notification); } |
Responding to Toast Notification Activations
When users choose to activate the app by tapping or clicking within the body of the toast notification, the application will go through its launch sequence, including running the application's OnLaunched method. Like launching the app from a secondary tile, this sequence will occur regardless of whether the app is already running. If launch parameters are set on the toast notification, they will be included in the Arguments parameter of the method’s arguments. It is up to the application implementation to decide how these arguments will be used to direct the user interface.
In addition to the activation and launch execution, a running application can subscribe to activation and dismissal events on an immediate notification. Both events return an instance of the notification that is triggering the event, and the dismissed event includes a parameter within its arguments that indicates how the notification was dismissed. Code for subscribing to these events follows:
// Build the content of the toast notification. var content = ToastContentFactory.CreateToastImageAndText04(); // Toast contents properties omitted for brevity... // Create the notification instance. var notification = content.CreateNotification(); // Subscribe to the activation event. notification.Activated += (activatedNotification, args) => { // Handle the activated event. }; // Subscribe to the dismissal event. notification.Dismissed += (dismissedNotification, args) => { // Handle the dismissed event. }; // Show the notification. notifier.Show(notification); |
Note: These events are not available on scheduled notifications, so it is not currently possible to start an app, immediately query the list of outstanding scheduled notifications, and set up in-app event handlers for them. |
Push Notifications
Up to this point, this chapter has focused on live tile updates and toast notifications that are initiated by the app itself, either immediately or through the use of some of the available scheduling options. In addition to these approaches, Windows Store apps can also make use of a mechanism known as a push notification to allow events that occur outside of the machine to to display tile updates or toasts through services managed by Windows. These push notifications extend the ability for an app to provide additional interaction with users, regardless of whether the app is running.
Note: As mentioned previously, background tasks can also offer some options for tile and toast updates to be updated when the app itself is not running. In some cases, push notifications offer a few advantages over using polling within background tasks since the action is server-initiated instead of polled, and execution time constraints are not a concern with push notifications. Nonetheless, background tasks do offer some interesting options for extending an app’s functionality. Background tasks will be discussed further in the next chapter. |
Push notifications are powered by a combination of a local service managed by Windows and a Microsoft-provided, cloud-based service known as the Windows Notification Service (WNS). The following diagram illustrates the sequence for working with push notifications:
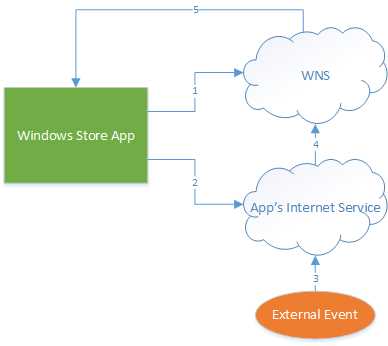
- Push Notification Life Cycle
This diagram illustrates the following steps:
- The Windows Store app requests and is issued a push notification channel.
- The Windows Store app provides this channel to the Internet service that will be sending the notification, which stores the channel information along with any other relevant information for later use.
- Some event occurs which causes the Internet service to decide it is appropriate to send a push notification to its subscribers.
- The Internet service uses some criteria to identify which subscribers should receive a notification, gathers the list of channels for those subscribers, and sends the notification to the Windows Notification Service in the form of an XML payload by calling each of the channel URIs.
- If the channel is still valid, the Windows Notification Service routes the notification to the appropriate device, where the notification payload and device settings determine how the notification should be displayed.
To provide some context, if a sports app were to provide users with the ability to receive push notifications for news related to their favorite teams, the app would first obtain a channel. The app would then upload that channel URI plus some information to describe the user’s favorite teams to a sports Internet service related to that sports app, which would store that information internally. The sports service would then receive score and news updates in some manner. As each notification-worthy update arrived, the sports service would first build the appropriate notification XML. It would then query the notification information it had stored in order to identify channels where the favorite teams matched the incoming news. The sports service would then issue the notification XML to the WNS by using each one of these channels, and WNS in turn would provide the notification to the corresponding device, potentially displaying a toast message or a tile update indicating a change in the game score.
Note: The functionality offered by push notifications and the related services for Windows Store apps is very similar to the push notification functionality offered for Microsoft’s Windows Phone. While there are some small differences between the two, an understanding of one will help form an understanding of the other. |
There are four kinds of push notifications available that can be sent to Windows Store apps. Tile, badge, and toast notifications are the same as the app-initiated notifications that have been discussed so far. In addition to these, push notifications include a raw notification option. A raw notification simply includes custom text content that can be sent to the Windows Store application—it is up to the application to determine how best to process the text. In order to interact with a raw notification, either the app has to be running, or a background task has to be configured to handle the notification on the app’s behalf. Background tasks will be discussed in the next chapter.
Now that the background of push notifications has been presented, the specific details for each of the steps involved will be discussed.
Configuring an App for Push Notifications
In order for a Windows Store app to participate in push notifications, it must first be registered with the Windows Store. Information related to this registration process will be presented here, while a more complete discussion of registering an app with the Windows Store will be included in the subsequent chapter concerning app deployment.
The simplest way to associate an app with the Windows Store is to select the Associate App with the Store menu option from the project’s Store context menu command in Visual Studio:
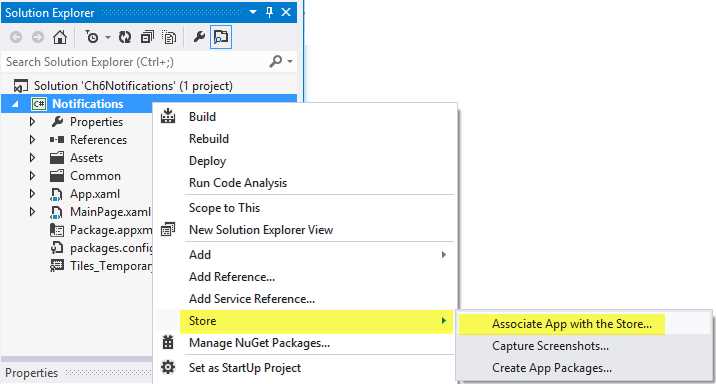
- Associating an App with the Windows Store from Visual Studio
This will start the Associate Your App with the Windows Store wizard. The wizard will prompt for Windows Store credentials (discussed later), and then list the apps that have been registered in the Windows Store with those credentials. Once an app has been selected, the final page of the wizard will list changes that will be made to the app as a result of completing the wizard. These changes typically include:
- Updating the package name to a store-determined unique name.
- Updating the package’s digital signature file to a new file that includes a store-determined Publisher ID value.
Once the app’s manifest has been configured to be associated with an app registration in the Windows Store, the app can request a notification channel. The notification channel includes a URI uniquely associated with an installation of the app for a user on the machine. This channel is returned by a call to the CreatePushNotificationChannelForApplicationAsync method of the PushNotificationChannelManager class. A notification channel URI has the format https://xxx.notify.windows.com/?token=<token>, where the xxx value is determined by the WNS service, and the token is also provided by the WNS service.
The notification channel includes properties for both the channel URI and its expiration. It is important to note that the channels provided do expire after a period of time—currently 30 days—so an app must periodically update the Internet service issuing push notifications. To do this, it is a good idea to request a new channel each time the app is invoked, as well as to cache the channel URI value to see if the value returned when the app is invoked has already been sent to the Internet service. This latter step helps to reduce the amount of unnecessary calls to the Internet service by only making the update call when a change has been detected. The following code shows an implementation for this process using the ApplicationData LocalSettings storage:
// Request the channel. var channel = await //var secondaryTileChannel = await PushNotificationChannelManager // Retrieve the previous published channel Uri (if any) from settings. var oldChannelUri = String.Empty; var localSettings = ApplicationData.Current.LocalSettings; if (localSettings.Values.ContainsKey("previousChannelUri")) { var oldChannelUriValue = localSettings.Values["previousChannelUri"]; oldChannelUri = oldChannelUriValue == null } // Send an updated channel Uri to the service, if necessary. if (!oldChannelUri.Equals(channel.Uri, StringComparison.CurrentCultureIgnoreCase)) { // The Channel has changed from the previous value (if any). Publish to service. PublishChannelToService(channel.Uri); // Cache the sent Uri value. localSettings.Values["previousChannelUri"] = channel.Uri; } |
Note: The notification channel is actually associated with a particular application tile. It is possible to obtain a notification channel for a secondary tile by calling CreatePushNotificationChannelForSecondaryTileAsync instead of CreatePushNotificationChannelForApplicationAsync. With such a channel, a tile or badge update notification can be sent which targets a particular tile. |
Once a Windows Store app has obtained a notification channel URI and shared it with the Internet service, perhaps along with other relevant data that helps the service decide when it is time to send a notification to a particular channel, the service is ready to start sending push notifications.
Sending Push Notifications
When it is time for the Internet service to send a notification to a user, the service will issue an HTTP POST request to the Windows Notification Service using the notification channel URI supplied by the Windows Store app. The content of the POST request includes some authentication information, as well as the XML payload that describes the toast, tile, badge, or raw notification.
The Windows Notification Service requires that calls to issue push notifications include an access token that must be obtained by authenticating with the WNS. This authentication requires that the caller supply the application’s Package Security Identifier (Package SID) and client secret values available from the Windows Store entry for the app. These values are available by selecting the app in the Dashboard, navigating to the App Name > Advanced Features page, and then the Push Notifications and Live Connect Services Info link. Note that one access token can be used for multiple notification calls; it is not necessary to obtain a new one for every channel URI being called—though the tokens do expire, so it may be necessary to periodically refresh them.
Once the access token is available, the process of sending a notification includes preparing the XML payload, which is identical to the client-side XML for notifications that has been discussed so far, followed by simply issuing the request. Once the notification has been issued, the response codes should be examined so that expired or invalid notification channel URIs can be removed or otherwise marked to ensure they are not called again. A service that repeatedly attempts to issue notifications to bad endpoints may be throttled to prevent it from issuing notifications. Furthermore, a check should be made prior to sending a notification to ensure that the URI is actually a notification URI, and not a malicious attempt to intercept data destined for a user by providing an alternate URI to the Internet service. All valid notification channel URIs will use the domain notify.windows.com.
Note: Since the information exchange with the WNS is accomplished using Internet-standard protocols, the Internet service that triggers the notification does not have to be implemented in .NET. For .NET implementations, the Microsoft DPE team has released a helper library similar to the previously discussed NotificationsExtensions library that provides a strongly typed object model for building and sending tile, badge, toast, and raw notifications (and also provides IntelliSense and compile-time support as well). This library is available as a NuGet package that can be obtained at http://www.nuget.org/packages/WnsRecipe (for more information about including NuGet packages, please refer to http://docs.nuget.org/docs/start-here/overview). The remaining discussions and examples in this chapter will make use of this component for preparing and sending push notifications. For information on building and issuing notifications by hand, please refer to the MSDN documentation at http://msdn.microsoft.com/library/windows/apps/xaml/Hh868244.aspx. |
A typical sequence for sending notifications to endpoints that match some particular criteria from a .NET service (perhaps a WCF service) is shown in the following sample. Note that only one tile, toast, badge, or raw notification can be sent at a time. The creation of multiple notifications in this sample is simply to illustrate the various factory classes that can be used.
If a user is offline when a toast message is sent, the notification is dropped. The most recent tile and badge notifications will be cached by the service, with the number of tile notifications that make it to the client depending on whether queuing is enabled. By default, raw notifications are not cached.
Note: Microsoft has recently announced the Windows Azure Mobile Services (WAMS). Currently available in preview form, the service promises to provide the opportunity for mobile developers to quickly stand up cost-effective back-end support services for their apps, featuring “No hassles, no deployments, and no fear.” As of the time of this writing, WAMS includes built-in support for cloud-based data access, user authentication, and building and sending push notifications to Windows Store apps. Additional information about WAMS, including a tutorial that includes configuring push notifications, can be found at http://www.windowsazure.com/en-us/develop/mobile/. |
Interacting with Push Notifications from the App
The push notification channel provides an event that can be used to notify the app when a notification occurs on that channel. There are two general scenarios this event can be used for. First, it provides an app a way to be notified that a raw notification has been received in order for the app to process that notification as appropriate. Second, the app has the opportunity to cancel Windows’ default processing of a notification (for example, to suppress displaying a toast notification that is intended to call attention to new data arriving for an app if the new data will automatically be displayed in the running app’s user interface.)
The following code shows this event being used with a channel when the channel is obtained during app startup:
// Subscribe to the notification being received while the app is running. channel.PushNotificationReceived += (o, e) => { if (e.NotificationType == PushNotificationType.Raw && e.RawNotification != null) { // TODO - Process the supplied raw notification contents DoSomethingWithRawNotificationContent(e.RawNotification.Content); } else { // Illustrates cancelling Windows' default handling of the notification. e.Cancel = true; } }; |
Recap
This chapter examined the use of tiles and toasts to add additional dimensions to the ways in which a Windows Store app can appear to interact with users, even when the app itself isn’t actively running. This included mechanisms for working with both primary and secondary live tiles, showing toast notifications to call a user’s attention to one app while working in another, and using push notifications to allow actions occurring outside of the user’s machine to work with these tiles and toasts.
The next chapter will introduce the facilities exposed to allow Windows Store apps to perform tasks in the background when the main app itself isn’t activated through the Background Transfer and Background Task mechanisms.
- 1800+ high-performance UI components.
- Includes popular controls such as Grid, Chart, Scheduler, and more.
- 24x5 unlimited support by developers.