
Windows Store Apps Succinctly®

CHAPTER 6
Hardware and Sensors
While the chapter on Contracts and Extensions discussed using a printer from a Windows Store app, this is only one of several different opportunities available for a Windows Store app to take advantage of the increasing wealth of hardware resources typically connected to today’s tablet, laptop, and desktop computers. Several APIs are available that can be used by Windows Store apps to provide easy access to many of the hardware resources connected or installed in the machine on which the apps are running. These tools help enhance Windows Store apps by allowing them to provide richer, more immersive experiences where the apps can obtain information from or even be designed to react to information in the physical environment in which they’re being used.
This chapter will present several common ways that Windows Store apps can incorporate hardware integration, starting with obtaining data from sensors that measure the various forces acting on the device running the apps. This will be followed by a discussion of the facilities for obtaining a device’s geographic location. The chapter will conclude with a discussion of multimedia integration focused on integrating with cameras and microphones.
Note: Not all devices will have access to all sensors—many laptops may lack orientation sensors, and desktops with GPS sensors may be understandably rare. While some of the sensors have fallback implementations that use alternate means to obtain information, such as location sensors using network information to calculate a device’s position, availability is ultimately up to the combination of the functional elements installed in the device by the manufacturer or those that are added onto the device after the fact. Because Windows Store apps are intended to run on a variety of devices and form factors, well-built apps should take into account whether the desired devices are available and provide alternate functionality when possible and when it makes sense to do so. |
Interacting with Sensors
Sensors are used to measure the external forces exerted on a device. The WinRT API provides Windows Store apps with the ability to interact with several different kinds of sensors that measure forces such as movement in 3-D space, angular velocity, compass direction, pitch, roll, and yaw, and also the intensity of light that the device is being exposed to. This support is provided by the classes in the Windows.Devices.Sensors namespace.
The following list summarizes the sensors that are available and what they measure:
- SimpleOrientationSensor: Returns basic device orientation, expressed via an enumeration that indicates to which edge the device has been rotated, or whether the device is simply lying face-up or face-down where it isn’t sitting on any particular vertical edge.
- Accelerometer: Measures the forces acting on the device in the x, y, and z directions, expressed in terms of Gs. The accelerometer also can raise an event indicating if the device is being shaken.
- Compass: Indicates the orientation of the device in degrees relative to both magnetic and true north.
- Gyrometer: Indicates the angular (rotational) velocity of the device in degrees per second about the x, y, and z axes.
- Inclinometer: Indicates the pitch, roll, and yaw of the device in degrees.
- LightSensor: Indicates the amount of light that the surface of the device is exposed to, expressed in lux.
- OrientationSensor: Sophisticated sensor that returns quaternion and rotation matrix data for the device.
These sensors are all accessed in very similar manners; the main difference in the interaction is the precise contents of the measured forces that are returned. A reference to the sensor (if present) is obtained through a GetDefault method. From there, the sensor reference can be interrogated directly to obtain its present value, or the app code can subscribe to a ReadingChanged event. All of the sensors except the simple orientation sensor expose ReportInterval and MinimumReportInterval properties that indicate in milliseconds how often the event will be raised (reported)—the ReportInterval property must be set to at least the read-only MinimumReportInterval value that is provided. If zero is provided as the ReportInterval, the device driver default value is used as the interval.
// Values will be null if no such sensor is available. // Null checks omitted for brevity. var simpleOrientation = Windows.Devices.Sensors.SimpleOrientationSensor.GetDefault(); var accelerometer = Windows.Devices.Sensors.Accelerometer.GetDefault(); var compass = Windows.Devices.Sensors.Compass.GetDefault(); var gyrometer = Windows.Devices.Sensors.Gyrometer.GetDefault(); var inclinometer = Windows.Devices.Sensors.Inclinometer.GetDefault(); var orientationSensor = Windows.Devices.Sensors.OrientationSensor.GetDefault(); var lightSensor = Windows.Devices.Sensors.LightSensor.GetDefault(); // Obtaining immediate readings for the sensor values. var orientation = simpleOrientation.GetCurrentOrientation(); var accelerometerReading = accelerometer.GetCurrentReading(); var compassReading = compass.GetCurrentReading(); var gyrometerReading = gyrometer.GetCurrentReading(); var inclinometerReading = inclinometer.GetCurrentReading(); var orientationReading = orientationSensor.GetCurrentReading(); var lightSendorReading = lightSensor.GetCurrentReading(); // Subscribing to sensor value change events. simpleOrientation.OrientationChanged += HandleSimpleOrientationReadingChanged; //_accelerometer.ReportInterval // = Math.Max(_accelerometer.MinimumReportInterval, desiredReportInterval); _accelerometer.ReadingChanged += HandleAccelerometerReadingChanged; // ...etc... // Special "shaken" event exposed by the accelerometer. _accelerometer.Shaken += HandleAccelerometerShaken; |
When using sensor events, it is important to be mindful of the frequency at which these events are being raised, as there is a cost in battery life and CPU load related to handling these events. When an application is suspended, the event handlers are dormant until the application is resumed—the events are not queued up while the app is suspended. Finally, it is important to note that the events are not raised on the application’s UI thread, so if user interface elements are to be updated as a result of these events, the calls must be properly marshalled, which is accomplished with the Dispatcher object.
private async void HandleSimpleOrientationReadingChanged ( { // Marshal the call to display sensor content to the UI thread with the Dispatcher. await Dispatcher.RunAsync(Windows.UI.Core.CoreDispatcherPriority.Normal, () => { DisplaySimpleOrientationReading(args.Orientation, args.Timestamp); }); } private async void HandleAccelerometerReadingChanged( { // Marshal the call to display sensor content to the UI thread with the Dispatcher. await Dispatcher.RunAsync(Windows.UI.Core.CoreDispatcherPriority.Normal, () => { DisplayAccelerometerReading( args.Reading.AccelerationY, args.Reading.AccelerationZ, args.Reading.Timestamp ); }); } |
Determining a Device’s Location
In addition to determining the forces acting on a device, it is also possible for Windows Store apps to obtain the device’s geographic position, as well as to receive updates as the position changes. Internally, Windows makes use of the Windows Location Provider, which coordinates a combination of triangulation of known Wi-Fi hotspots and IP address lookup. The WinRT Location APIs internally examine the Windows Location Provider and any installed GPS hardware to determine which is currently capable of supplying the most accurate data (usually GPS, though when indoors a GPS sensor may not be able to obtain satellite data). For app developers, this process is relatively transparent.
Protecting Users’ Privacy
It is important to note that location information is considered to be personally identifiable information. As a result, there are several mechanisms and policies in place that exist to help protect app users’ privacy and keep users in control over how such information is gathered and exchanged. Apps that intend to use the Location APIs are required to declare the Location capability in the application manifest. When an app attempts to access location information through these APIs for the first time following installation, users will be prompted as to whether access to location information should be allowed. This setting will be reflected within a Location entry in the Permissions panel that is automatically added to apps obtained from the Windows Store, and can be accessed through the app’s Settings charm. Because a user is prompted through a message box, the initial access of the Location APIs must occur on the application’s UI thread and cannot be part of a background task. Users may use this setting to disable or re-enable the location setting for an app at any time. Finally, within the Privacy section of the Windows PC settings, users may elect to completely disable all apps’ access to location information.
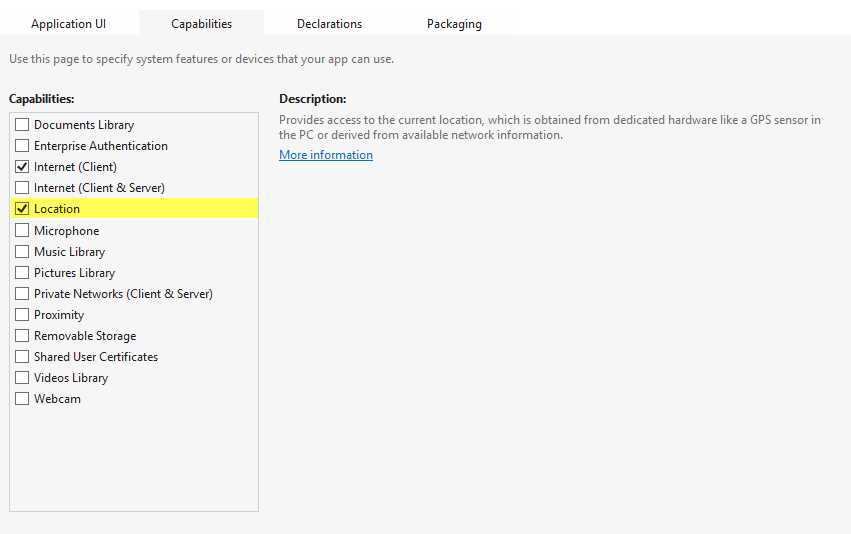
- Application Capabilities Screen with the Location Capability Selected
Obtaining Location Information
Location information is accessed through the Geolocator class in the Windows.Devices.Geolocation namespace. The GetGeopositionAsync method asynchronously returns a Geoposition value, which includes a Coordinate property that returns a Geocoordinate component. The Geocoordinate value includes:
- The latitude and longitude in degrees.
- The altitude in meters (if available).
- The speed in meters per second and heading in degrees from true north (if available).
The following code illustrates directly requesting position information from the Geolocator. Note that the call to obtain the information is actually deferred until after it is certain the locator is ready for interaction by waiting for the proper status to be returned from the StatusChanged event. It is also important to note that if the Geolocator is in a Disabled state due to users disabling location information either at the app or system levels, a call to GetPositionAsync will result in an AccessDeniedException being thrown.
// Obtain a reference to the Geolocator. var locator = new Windows.Devices.Geolocation.Geolocator(); // Wait for the locator to achieve a "ready" state before requesting information. locator.StatusChanged += async (o, args) => { if (args.Status == Windows.Devices.Geolocation.PositionStatus.Ready) { // Obtain the position information. var position = await locator.GetGeopositionAsync(); var latitude = position.Coordinate.Latitude; var longitude = position.Coordinate.Longitude; var altitude = position.Coordinate.Altitude; var speed = position.Coordinate.Speed; var heading = position.Coordinate.Heading; // Use the position information to update a map, geotag a photo, etc. } }; |
It is also possible to register to receive PositionChanged events from the Geolocator when its location value changes. The Geolocator uses two settings to help determine when to raise these events. The first setting is defined in the MovementThreshold property and indicates in meters the minimum distance change that must occur before the event is raised. The second property is set via the ReportInterval property, and identifies the minimum number of milliseconds that need to elapse between event notifications.
Note: In order to conserve resources, the Geolocator defaults to a mode in which position information is not obtained using GPS hardware. This mode provides potentially less accurate data, but also optimizes power consumption. If the Windows Store app requesting the location information requires more accurate data, the app should set the DesiredAccuracy value for the Geolocator to High. This value will potentially engage any available GPS hardware to provide higher-accuracy data. Apps that are listening for PositionChanged events will likely be interested in this higher-accuracy data, and should consider using the High DesiredAccuracy setting. |
The following code shows subscribing and reacting to the PositionChanged event. Note that this event is not guaranteed to return on the application’s UI thread, so if UI updates are being made as a reaction to this event, it will be necessary to asynchronously marshal the UI update call to the appropriate thread.
// Set minimum threshold in meters. locator.MovementThreshold = 20.0; // Set minimum interval between updates in milliseconds. locator.ReportInterval = 3000; // Subscribe to the PositionChanged event. locator.PositionChanged += async (o, args) => { // Marshal UI calls using the Dispatcher. await Dispatcher.RunAsync(Windows.UI.Core.CoreDispatcherPriority.Normal, () => { var latitude = args.Position.Coordinate.Latitude; var longitude = args.Position.Coordinate.Longitude; var altitude = args.Position.Coordinate.Altitude; var speed = args.Position.Coordinate.Speed; var heading = args.Position.Coordinate.Heading; // Use the position information to update a map, geotag a photo, etc. }); }; |
Note: Apps will not receive PositionChanged events while suspended. When an app resumes from suspension, it will only receive new events—PositionChanged events are not queued while the app is in a suspended state. | ||
Tip: For map-based apps, the Bing Maps SDK for Windows Store apps includes a map control that can be used in XAML applications and offers a tremendous amount of functionality. Along with some documented configuration steps required to use this control, developers must register to obtain a key at the Bing Maps Account Center, and the key must be provided to the map control through its Credentials property. Instructions for obtaining this SDK and configuring an app to use this control can be found at http://msdn.microsoft.com/en-us/library/hh846481.aspx. | ||
Using the Simulator to Emulate Position Changes
The debugging simulator that was introduced in Chapter 1 includes functionality for simulating updates in position information. Tapping the Set Location button (it looks like a globe) in the simulator’s margin will bring up the Simulated Location dialog. When Use simulated location is selected, it is possible to enter latitude, longitude, and altitude information that will be sent to the location API as a position update when the Set Location button is tapped. This allows easier testing and debugging of location-aware applications.
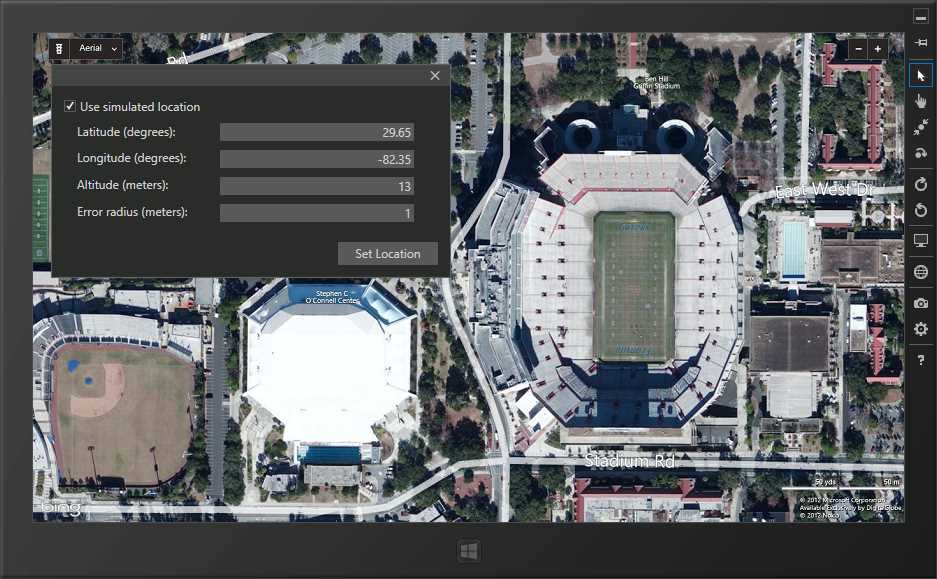
- Using the Debugging Simulator's Location Simulation Tools with a Map Application
Multimedia Integration with Cameras and Microphones
Windows Store apps have access to a rich set of media APIs. While this section will briefly discuss playback as a side effect of a broader discussion of multimedia capture, the available set of APIs include tools for:
- Consuming (playing back) multimedia content, including working with the playback stream to manipulate levels or add effects.
- Acquiring multimedia content.
- Accessing and interacting with multimedia hardware devices.
- Creating and manipulating playlists to provide sequenced multimedia playback.
- Streaming multimedia content to Play To-enabled devices.
- Interacting with multimedia content protected with digital rights management (DRM) tools.
- Converting multimedia content between different formats.
Note: Beyond these high-level concepts, there are many advanced scenarios that can be developed through integration with DirectX and with the Media Foundation Pipeline that are well outside the scope of this book. Additional information on advanced multimedia integration with Windows Store apps can be found in the MSDN documentation. |
Protecting Users’ Privacy
Access to a user’s camera and microphone is considered to be access to "sensitive” devices—those that may provide access to a user’s personal data. Like location sensors, any app that makes use of the APIs that interact with cameras and microphones must first declare the appropriate capabilities in the application manifest file, where each webcam and microphone are listed as available capabilities. When either or both of these capabilities is indicated, the first time these devices are accessed users will be prompted to confirm that they are comfortable allowing such access (note that this includes threading concerns similar to those discussed in relation to user location information). Likewise, the Permissions panel in the application’s Settings panel will include an entry for Webcam, Microphone, or Webcam and microphone that users may change at any time to disable access to the corresponding hardware.
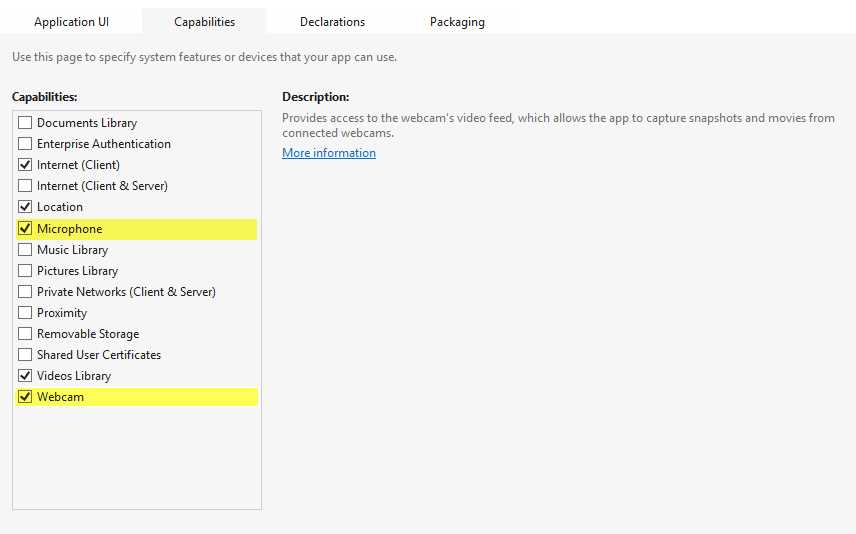
- Application Capabilities Screen with the Microphone and Webcam Capabilities Indicated
Capturing Video with the CameraCaptureUI
The simplest way for a Windows Store app to obtain pictures, audio, and videos from a user’s webcam and microphone is through the use of the CameraCaptureUI class. This class provides the ability to invoke a pre-built user interface for capturing pictures and videos with support for configuration options, including:
- Customization of the resulting picture file’s format (JPG, PNG, JPG-XR) and max resolution.
- Support for setting properties for the built-in, on-screen cropping interface.
- Selection of the resulting video file format (MP4, WMV).
- Setting the maximum video capture duration.
- Setting the maximum supported video resolution (high definition, standard definition, low definition, and highest available.)
- Support for built-in, on-screen video trimming.
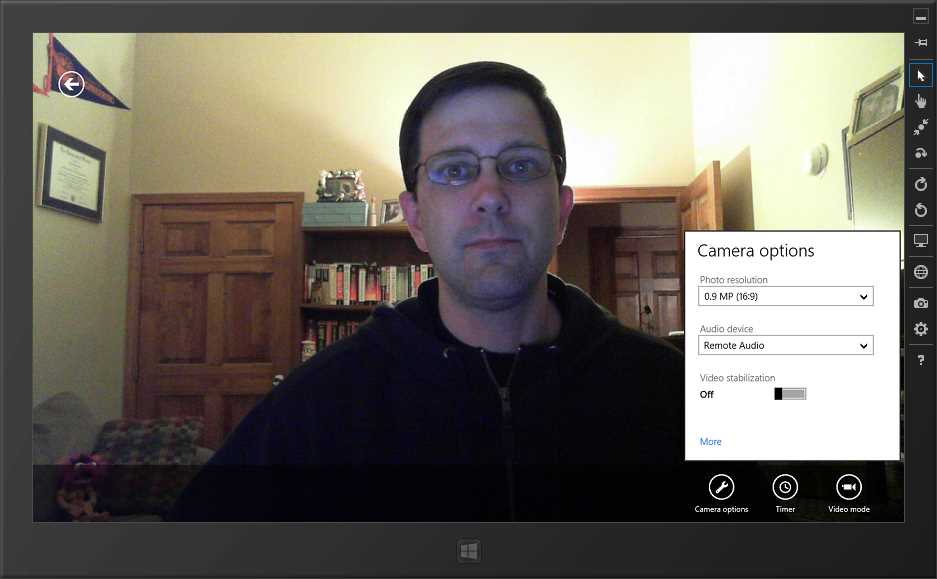
- The CameraCaptureUI Image Capture Screen
The CameraCaptureUI user interface is invoked through a call to CaptureFileAsync, where a selection can be made as to whether the resulting UI will support photo, video, or user selection of either mode. If users select content to be returned through the UI, the content is returned as a StorageFile, which can then be stored on disk, potentially with some user interaction such as with a FileSavePicker. This sequence is shown in the following code:
// Create and invoke the CameraCaptureUI. var cameraCaptureUI = new Windows.Media.Capture.CameraCaptureUI(); var capture = await cameraCaptureUI .CaptureFileAsync(Windows.Media.Capture.CameraCaptureUIMode.PhotoOrVideo); // Process the returned content. if (capture != null) { // Figure out the start folder based on whether image or video content was returned. var saveStartLocation = capture.ContentType.StartsWith("image", StringComparison.OrdinalIgnoreCase) ? Windows.Storage.Pickers.PickerLocationId.PicturesLibrary : Windows.Storage.Pickers.PickerLocationId.VideosLibrary; // Display a FileSavePicker to allow users to save the file. var savePicker = new Windows.Storage.Pickers.FileSavePicker(); savePicker.FileTypeChoices.Add(capture.DisplayType, new List<String> { capture.FileType }); savePicker.SuggestedFileName = capture.Name; savePicker.SuggestedStartLocation = saveStartLocation; var saveFile = await savePicker.PickSaveFileAsync(); if (saveFile != null) { // Copy in the file. await capture.CopyAndReplaceAsync(saveFile); } } |
The CameraCaptureUI display takes care of handling when there is no video hardware connected or users have disabled video access by presenting the appropriate text on the screen.
Obtaining Finer Control over Multimedia Capture
Whereas the CameraCaptureUI offers a lot of functionality, there may be scenarios where Windows Store apps can benefit from more direct control of the media capture process. To achieve this, the DeviceInformation and MediaCapture classes can be used.
The DeviceInformation class provides the ability to enumerate hardware devices that meet specific criteria like audio or video capture devices. These values can be used to give users the ability to select which audio and video devices to use.
// Locate the available video capture devices. var videoDeviceClass = Windows.Devices.Enumeration.DeviceClass.VideoCapture; var videoDevices = await Windows.Devices.Enumeration.DeviceInformation.FindAllAsync(videoDeviceClass); // Locate the available audio capture devices. var audioDeviceClass = Windows.Devices.Enumeration.DeviceClass.VideoCapture; var audioDevices = await Windows.Devices.Enumeration.DeviceInformation.FindAllAsync(audioDeviceClass); |
Media interaction is coordinated through the MediaCapture class. This class allows several configuration values, including:
- Specifying the capture mode to be audio, video, or both. Note that the CameraCaptureUI does not allow any mechanism for only capturing audio.
- Setting the audio and video device Ids to be used. These Id values are obtained from the DeviceInformation query that was previously discussed.
The Media Capture Manager is first initialized with these setting values. It is then possible to set the MediaCapture instance to be the Source item for a CaptureElement control, which will allow the media content to be displayed in the application UI. The StartPreviewAsync method can be used to start the flow of data through the multimedia stream.
// Create and initialize the Media Capture Manager. var captureMode = Windows.Media.Capture.StreamingCaptureMode.AudioAndVideo; var settings = new Windows.Media.Capture.MediaCaptureInitializationSettings { StreamingCaptureMode = captureMode, VideoDeviceId = selectedVideoDevice.Id, AudioDeviceId = selectedAudioDevice.Id, }; var captureManager = new Windows.Media.Capture.MediaCapture(); await captureManager.InitializeAsync(settings); // Connect the UI CaptureElement control to the Media Capture Manager. // Note that this control is defined in XAML as // <CaptureElement x:Name="VideoCapturePreviewRegion"/>. VideoCapturePreviewRegion.Source = _captureManager; // Start data flowing through the stream. await captureManager.StartPreviewAsync(); |
To capture a picture from the MediaCapture class, the CapturePhotoToStorageFileAsync and CapturePhotoToStreamAnsyc methods are provided. An ImageEncodingProperties provides the ability to configure the type of image that will be emitted, including the width, height, and image type.
// Configure a File Save Picker and get the file to save into. var savePicker = new Windows.Storage.Pickers.FileSavePicker { SuggestedStartLocation = Windows.Storage.Pickers.PickerLocationId.PicturesLibrary, SuggestedFileName = "Webcam Picture" }; savePicker.FileTypeChoices.Add("PNG File (PNG)", new List<String> { ".png" }); var saveFile = await savePicker.PickSaveFileAsync(); if (saveFile != null) { // Set the properties for the picture to capture. var pictureProperties = new Windows.Media.MediaProperties.ImageEncodingProperties { Width = 320, Height = 240, Subtype = "PNG", }; // Write the picture into the file. await captureManager.CapturePhotoToStorageFileAsync(pictureProperties, saveFile); } |
Capturing audio and video is similar, except that an encoding profile is used to define the desired output content, and rather than capture being a one-shot operation as it is when working with pictures, the process needs to be started and then stopped when complete. There are several different kinds of audio and video output profiles that can be created, including M4A, MP3, MP4, WMA, and WMV files. These encoding profiles can be built programmatically or by supplying existing media files or streams whose settings will be used to construct a matching profile.
// Set the media encoding profile properties.
It is also possible to show a video settings user interface to allow adjusting properties of the multimedia data by calling the static CameraOptionsUI.Show method and passing it a copy of the current MediaCapture instance. There are several other properties defined for the MediaCapture class, including the ability to interact with the multimedia pipeline by adding effects and setting more specific audio and video device properties. More information about these advanced various facilities provided by the MediaCapture class can be found in the MSDN documentation at http://msdn.microsoft.com/en-us/library/windows/apps/windows.media.capture.mediacapture.aspx. RecapThis chapter discussed several of the ways that Windows Store apps can interact with system hardware. This included retrieving data about the system’s environment through sensors, obtaining the device’s location, and using the device’s camera and microphone to obtain static images, audio, and video. This treatment was certainly not all-inclusive, as there are several other hardware interactions that are supported for Windows Store apps, including ways to retrieve detailed information about touch, manipulation, and gestures, the ability to interact with SMS messaging hardware, and access to proximity (NFC) sensors, just to name a few. The next chapter will conclude this discussion of developing Windows Store apps by examining what options are available and what requirements need to be met in order to successfully deploy Windows Store apps. |
- 1800+ high-performance UI components.
- Includes popular controls such as Grid, Chart, Scheduler, and more.
- 24x5 unlimited support by developers.