
Windows Store Apps Succinctly®

CHAPTER 4
Contracts and Extensions
Windows Store apps introduce the concept of contracts and extensions. Contracts and extensions provide extensibility points that allow a Windows Store app to participate in several common Windows user experience scenarios, such as searching an app for information, sharing data between apps, sending app information to a printer, and providing users with app settings options, among others. In many cases, when an app is built to participate in these contracts and extensions, doing so provides the app with additional ways in which it can be activated by the end user. In fact, as was briefly noted in the previous chapter’s discussion about the Windows Store application life cycle, launching an app from its Start screen tile is actually an implementation of the Launch contract.
This chapter will focus on the implementation of several of the more common extensibility scenarios. Initially, this will include the facilities exposed through the Windows 8 charms bar: Search, Share, Device, and Settings. After that, the chapter will explore additional extensions that allow an app to participate in the file picker UI pages, and how an app can be set up to respond to requests to open certain file and URI types.
The Windows 8 Charms
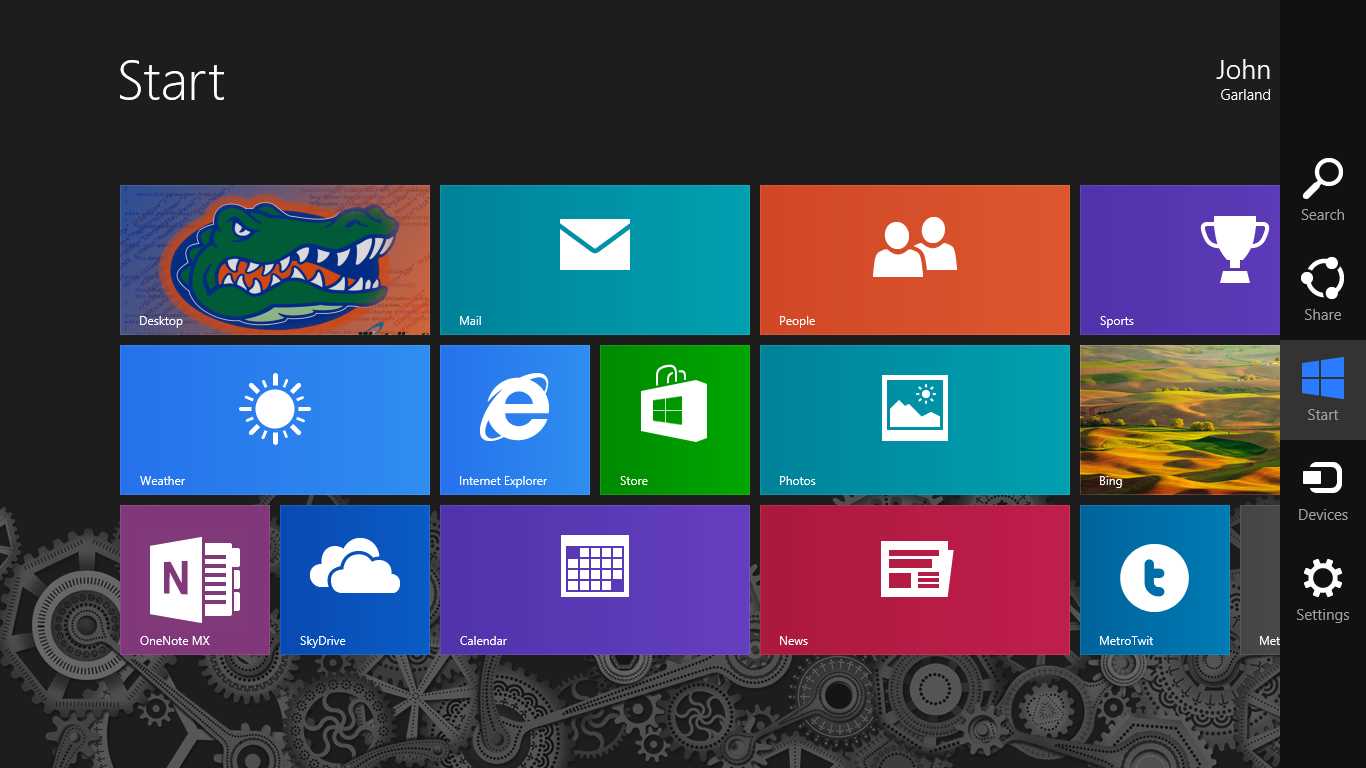
- The Windows Start Screen Showing the Charms Bar
The Windows environment includes a new UI element called the charms bar. The charms bar is available on touch devices by swiping from the right side of the screen, and can be accessed on desktops by moving the pointer to the upper-right or lower-right screen corners, or by using the Windows logo key+C keyboard shortcut (remember it as “C for charms”).
There are five charms on the charms bar (top to bottom):
- Search: Allows users to search participating applications for content.
- Share: Allows users to exchange data from one application to another.
- Windows: Not an application-interactive button. Provides an on-screen equivalent to the Windows logo button commonly found on most Windows PC keyboards.
- Devices: Allows users to exchange content with hardware devices.
- Settings: Allows users to manage application settings.
As mentioned, each of these charms provides your application the ability to participate in an extension of behavior that is built into Windows in a consistent and predictable manner. As application users become more familiar with these Windows 8 features, they will more easily discover common application functionality they would have previously had to find in haphazard ways, like searching for menu names that vary wildly between applications. Fortunately, incorporating these behaviors into a Windows Store app is relatively straightforward, especially when the functionality and additional application exposure that is afforded by doing so is considered.
Searching for Content in an App
A user can bring up the search by tapping or clicking on the Search charm, or by using the Windows logo key+Q keyboard shortcut (remember it as “Q for query”). When the search is invoked, Windows shows a system-provided Search pane. This pane includes a text box for entering the search query, an area for the searched application to provide search suggestions, and a list of applications registered to participate in the Search contract. The order of the listed applications is based on application usage.
Participating in Search
The simplest way for an application to be set up to participate in the Search contract is to add the Search Contract item from the project’s Add Existing Item command. This step addresses three of the key steps that are required for search. First, it adds the Search declaration to the application’s manifest. This declaration is what allows Windows to know that when the application is installed, it should take the necessary steps to set up the application to be included in the list of available searchable apps.
Second, it adds an OnSearchActivated method override to the Application class. The OnSearchActivated method is called when the application is activated via the Search contract instead of the previously discussed OnLaunched method that is called when the application is launched from the Start screen. The arguments provided to this method include the user’s input language and a QueryText property, the latter of which contains the text entered in the Search text box by the user prior to submitting the query. Users submit queries by tapping Search next to the text box or pressing Enter.
Note: Just like the OnLaunched event, if the application activation is handled through the OnSearchActivated method, the app has 15 seconds to display a user interface by calling Window.Current.Activate, or Windows may decide to terminate it. |
The final change provided is the inclusion of a starter results page for displaying the search results, as well as some UI elements related to filtering them. The OnSearchActivated method takes care of invoking this page and passing the QueryText value into it as its navigation parameter. The application logic to obtain and display the results will of course vary depending on the application’s actual needs.
Interaction with the displayed search UI is managed through the SearchPane class, usually by obtaining a reference that is scoped to the current application by calling the static SearchPane.GetForCurrentView method. The following code illustrates some of the basic functionality that can be accessed through this object to coordinate an app’s interaction with search:
// Retrieve the SearchPane reference. var searchPane = Windows.ApplicationModel.Search.SearchPane.GetForCurrentView(); // Set the text to be shown in the Search box if the user hasn't entered any characters. searchPane.PlaceholderText = "Text To Show"; // Retrieve any characters the user has entered into the Search box. var queryText = searchPane.QueryText; // Show the search pane if the user types any characters on the keyboard. searchPane.ShowOnKeyboardInput = true; // Show the search pane programmatically without and with indicated text. searchPane.Show(); searchPane.Show("Pre-entered text"); // Set the search pane text without showing it. // This is used to keep in sync with in-app search content. searchPane.TrySetQueryText("Text to sync"); // Event raised when the text in the search pane is updated. searchPane.QueryChanged += OnSearchQueryChanged; // Event raised when the search is submitted. searchPane.QuerySubmitted += OnSearchQuerySubmitted; |
It is important to note some of the special circumstances related to when the OnSearchActivated method is called and when the QuerySubmitted event is raised:
- If the app does not subscribe to the QuerySubmitted event, submitting a query will simply result in the OnSearchActivated method being called whether the application is running or not.
- If the app subscribes to the QuerySubmitted event and is in the foreground when a query is submitted, the QuerySubmitted event handler will be called and the OnSearchActivated method will not be called.
- Even if the QuerySubmitted event has been subscribed to, if the app is snapped when a query is submitted, the app will be restored to full-screen and OnSearchActivated will be called with a PreviousExecutionState of Running instead of the QuerySubmitted event handler.
- Similarly, if the app is in a suspended state when the query is submitted, the QuerySubmitted event handler will also be skipped and OnSearchActivated will be called with a PreviousExecutionState of Suspended.
Note that using the QuerySubmitted event to handle query requests when the app is running offers a performance benefit over simply allowing OnSearchActivated to handle all of the requests. However, because the OnLaunched and OnSearchActivated methods can be called multiple times within a single application session, registering for the QuerySubmitted event in these methods is not advisable, as doing so may result in multiple registrations. As a result, the best place to subscribe to register for the SearchPane event handlers is within the Application object’s overrideable OnWindowCreated method, which serves the purpose of being a single, consistent method that can be used for application initialization functions, especially those related to contract-related events:
protected override void OnWindowCreated(WindowCreatedEventArgs args) { // Retrieve the SearchPane reference. var searchPane = Windows.ApplicationModel.Search.SearchPane.GetForCurrentView(); // Event raised when the text in the search pane is updated. searchPane.QueryChanged += OnSearchQueryChanged; // Event raised when the search is submitted. searchPane.QuerySubmitted += OnSearchQuerySubmitted; base.OnWindowCreated(args); } |
Search Suggestions
In addition to providing a space for users to enter query text, the Search pane allows the foreground app to supply recommendations that will be shown to users based on the text they have entered. There are two kinds of recommendations that can be shown: query suggestions and result suggestions. Query suggestions are simply text values the application offers as hints for the completed value a user is entering, usually akin to the autocomplete functionality offered in many form-entry applications. When the user selects a query suggestion value, the application treats the value as if the user had typed it directly into the Search pane text box, and its entry point into the application is through the QuerySubmitted event logic as outlined in the previous sample. Result suggestions are more detailed values that are meant to show a specific record that matches the query and include a title, some descriptive text, and an icon. Typically when a user selects a result suggestion, the application navigates directly to the display of the selected record. When a result suggestion is selected, the app SearchPane object raises a ResultSuggestionChosen event. A combination of query and result suggestions can be displayed simultaneously, but a total of only five items can be displayed at any given time. There is a mechanism to provide some separator text anywhere in the list, but it will also count against the five-item total.
The following code shows the handling of a request for query suggestions, where up to two query results will be displayed (using a custom FindQuerySuggestions method to encapsulate whatever custom logic may be appropriate), followed by a separator, followed by up to two suggestion results (similarly using a custom FindResultSuggestions method for application-specific logic):
private void OnSearchSuggestionsRequested(SearchPane sender, { // Typically use the args.QueryText value to determine what selections to display. var queryText = args.QueryText; // Request a deferral to deal with async operations. var deferral = args.Request.GetDeferral();
// Optionally cancel the request: // args.Request.IsCanceled = true; // Append the first two suggestion items. var querySuggestions = FindQuerySuggestions(queryText).Take(2); args.Request.SearchSuggestionCollection.AppendQuerySuggestions(querySuggestions); // Add just a single query suggestion: // args.Request.SearchSuggestionCollection.AppendQuerySuggestion(suggestion); // Insert a separator to distinguish between query and result suggestions. args.Request.SearchSuggestionCollection.AppendSearchSeparator("Separator Label"); // Add the first two result suggestions. var resultSuggestionRecords = FindResultSuggestionRecords(queryText).Take(2); foreach (var record in resultSuggestionRecords) { // Note: The image to display should be 40 x 40. args.Request.SearchSuggestionCollection.AppendResultSuggestion( record.Title, record.Detail, record.Tag, record.Image, record.ImageAltText); } deferral.Complete(); } |
In the event that one of the suggestion results is selected, the ResultsSuggestionChosen event will be raised.
private void OnSearchResultsSuggestionChosen(SearchPane sender, { var selectedItemTag = args.Tag; // Given the tag, find the item that matches that tag. var matchingItem = FindResultSuggestionItemByTag(selectedItemTag); // Do something to display the specific matching item. DisplayMatchingItem(matchingItem); } |
The previous code sample might result in the following Search pane contents:

- Search Pane with Suggestions
Tip: When a search is invoked while the app is running, debugging is straightforward. However, there is also a facility in Visual Studio that allows debugging apps that aren’t currently running by actually waiting for the apps to run before attaching the debugger. This functionality is enabled from within the Debug tab on the Visual Studio project’s Properties page. There is a check box next to “Do not launch, but debug my code when it starts” within the Start Action section. If this value is selected when Visual Studio is used to debug an application, Visual Studio will enter its debugging mode, but the app itself won’t be launched. When the app is launched—either through a tile or activation through one of the contracts—Visual Studio will then be attached and any breakpoints or other diagnostic tools will be functional for the application. This technique is not limited to just search; it will work for activations related to any of the contracts discussed in this chapter. |
Sharing Content between Apps
While Windows Store apps can continue to leverage the Clipboard as a mechanism for sharing data between apps, Windows Store apps have access to a new and more sophisticated system for sharing data that is exposed via the Share contract. This system allows Windows to broker the exchange of data, resulting in applications having the ability to exchange content without needing to be intimately aware of each other’s implementation details. This also gives end users the ability to deliberately send information from one Windows Store app to another and interact with user interfaces specifically designed to facilitate this process.
Applications can participate in the Share contract in one of two ways: an app can be a share source, which provides data that can be consumed by other applications, or an app can be a share target, which means that it is capable of receiving data shared by other apps. Note that being a share source does not preclude an app from also registering and being a share target.
Users can share content out of their app by using the Share charm or by using the Windows logo key+H keyboard shortcut (remember it as “H for sHare”). This initiates the share life-cycle by sliding out the Share pane. The content types that can be shared by an app include:
- Text
- Richly formatted text
- HTML
- URI
- Bitmaps
- File references (a.k.a. StorageItems)
- Custom data (including waiting to determine the data until the target actually requests it, which will be discussed in the next section)
Share Life Cycle
The general life cycle followed by a share operation is illustrated in the following figure:
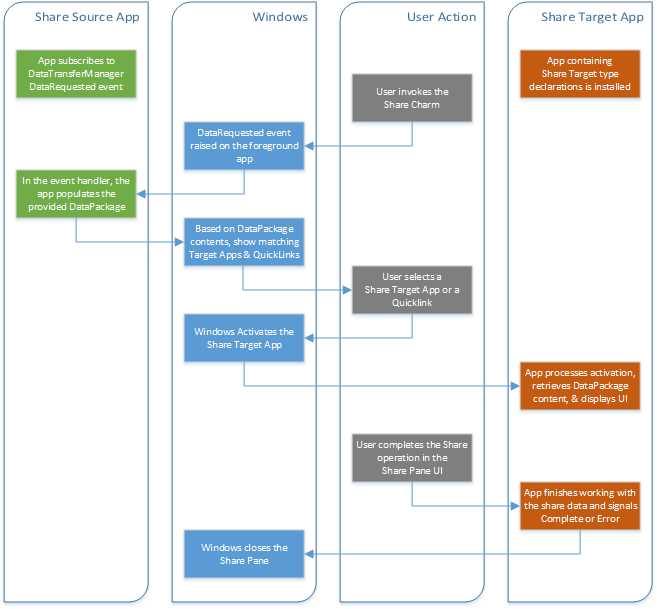
- The Life Cycle of Sharing Data between Applications
The steps depicted in Figure 16 include the following:
- Before users can invoke the Share contract to share data from a share source application, the foreground application must first register its intent to participate by subscribing to the DataRequested event exposed by the DataTransferManager class.
- When users tap the Share charm, Windows will raise the DataRequested event in the foreground application.
- In the event handler, the foreground application will place the data it intends to share into the data member of the event’s arguments, which is a DataPackage object. The application can put several different data types into the data package at once. In fact, doing so increases the number of applications that can receive the share data, as well as the ways these applications can respond to receiving it.
- When the event returns, based on the types of data that have been put into the data package, Windows will show a list of share target applications that have indicated they are capable of receiving one or more of the provided data types.
- When users select one of the displayed apps, that app will be activated for sharing, resulting in its Application object’s OnShareActivated method being called, with the shared information passed in as part of the method’s arguments.
- The share target app is given an opportunity to put UI content in the Share panel, so users can preview the content being shared, what the share target app intends to do with it, and control the process.
- Users complete the operation in the Share pane UI provided by the share target app, resulting in Windows closing the Share pane.
Now that the general sequence of the share operation has been explained, the share source and share target app functionality will be discussed in detail, as well as a quick discussion of a couple of circumstances in which the behavior deviates slightly from this sequence.
Sharing Data from the Share Source App
As was mentioned in the share life-cycle discussion, a share source indicates itself as such by providing a handler to the DataRequested event on the DataTransferManager class. A reference to the DataTransferManager is obtained by calling the GetForCurrentView method on the DataTransferManager class.
Note: Some readers may notice that this pattern of calling SomeManager.GetForCurrentView() is repeated throughout the various contract and extension implementations in Windows Store apps. |
The code for registering as a share source is as follows:
protected override void OnWindowCreated(WindowCreatedEventArgs args) { // Obtain a reference to the DataTransferManager. var dataTransferManager =
// Subscribe to the DataRequested event. dataTransferManager.DataRequested += OnShareDataRequested; // Subscribe to the TargetApplicationChosen event, which is // used to get the name of the app that requested the share, // mostly for analytics/statistical purposes. dataTransferManager.TargetApplicationChosen += { String selectedAppName = targetAppChosenEventArgs.ApplicationName; }; base.OnWindowCreated(args); } |
Note: There is no need to register any kind of share source declaration in the app manifest file since a share source app is not activated or otherwise enumerated by Windows. The interaction is user-initiated when the app is already in the foreground. |
When users invoke the Share charm while an app registered in this way is in the foreground, the app’s DataRequested event handler will be called. Within that event handler, the app is responsible for filling the DataPackage object provided within the event’s arguments. At a minimum, the Title property must be set and at least one data element must be provided, or the Share panel will indicate that an error has occurred. After the Title is provided, the app can provide one or more representations of the data to be shared.
Note: When an app is being displayed in the snapped state and the Share charm is invoked, the context for the share will be the foreground (large) app regardless of which of the two apps last had focus. If the Share panel was invoked programmatically using the DataTransferManager.ShowShareUI() static method, the app must first be unsnapped. To unsnap the app, see the EnsureUnsapped method shown in Chapter 3. |
To provide data, the app calls the appropriate Set<DataType> method on the provided DataPackage instance. As previously mentioned, several different data types can be provided. It makes sense for an app to provide as many as possible in order to reach as many share target apps as possible, as well as to allow those targets to choose the data format that makes the most sense for their app. The following code shows different ways that data can be provided to the DataPackage:
var dataRequest = args.Request; dataRequest.Data.Properties.Title = "Windows Store apps Succinctly Share"; dataRequest.Data.Properties.Description = "Content shared from the Windows Store apps Succinctly book."; // This bitmap is used later. var bitmapUri = new Uri("ms-appx:///Assets/Logo.png"); var bitmapReference = RandomAccessStreamReference.CreateFromUri(bitmapUri); // Plain text. dataRequest.Data.SetText("Plain Text to share"); // Richly formatted text. dataRequest.Data.SetRtf(@"{\rtf1\ansi\pard This is some {\b bold} text.\par}"); //// A URI. dataRequest.Data.SetUri(new Uri("http://www.syncfusion.com")); // HTML var rawHtml = "Windows Store apps Succinctly: <img src='assets/logo.png'>"; var formattedHtml = HtmlFormatHelper.CreateHtmlFormat(rawHtml); dataRequest.Data.SetHtmlFormat(formattedHtml); dataRequest.Data.ResourceMap.Add("assets\\logo.png", bitmapReference); // Share a stream that contains a bitmap's contents. dataRequest.Data.Properties.Thumbnail = bitmapReference; dataRequest.Data.SetBitmap(bitmapReference); // Allows defining a custom type of data to exchange beyond the system-provided values. dataRequest.Data.SetData("Custom Format 1", new []{"Some text", "other text"}); // Allows defining an object that will only be fetched if it is explicitly requested. dataRequest.Data.SetDataProvider("Custom Format 2", DelayedDataRequestCallback); // Share StorageFile items: // In case obtaining data to be shared is an async operation, use a deferral to prevent // the DataRequested event from slipping through before the async operation completes. var deferral = dataRequest.GetDeferral(); var file1 = await StorageFile.GetFileFromApplicationUriAsync(bitmapUri); dataRequest.Data.SetStorageItems(new[] {file1}, true); deferral.Complete(); |
From this sample, there are some important things to note:
- For HTML, the HtmlFormatHelper.CreateHtmlFormat call prepares the HTML fragment by ensuring all of the necessary HTML headers are included. Furthermore, the ResourceMap property is used to provide streams for the content that is referenced within the HTML fragment that would otherwise be inaccessible to the share target application.
- Note that when the bitmap is being set, a thumbnail is also being set. This will facilitate previewing the content in the share target application.
- Custom formats can be specified beyond the system-provided values, and can be exchanged as long as the share target app also knows about that type.
- A variation on the custom format option, a “data provider,” can be supplied which withholds the actual data payload until the share target requests the specific format ID, at which time the supplied callback method is run in the share source app to provide the requested data.
- Like other system-raised events where asynchronous operations may be called, it may be necessary to request a deferral in order to prevent control from being returned to Windows prior to the completion of the async operation.
If the app is not able to provide data (e.g., the app’s current page is showing a list of items where the selected item is what is shared, yet at present nothing is selected) it should provide a message indicating that sharing is not currently possible.
var dataRequest = args.Request; var message = “Nothing is currently selected. Please select an item to share”; dataRequest.FailWithDisplayText(message); |
Consuming Shared Data in the Share Target App
The other half of the Share contract is the share target app. Because this app is activated as the result of a share, there are a few more steps involved in setting it up than its share source counterpart. Once again, the simplest way for an application to be set up to implement the Share Target contract is to add the Share Target Contract item from the project’s Add Existing Item command. This step addresses the three key steps required for share targets.
First, it adds the Share Target declaration to the application’s manifest, and also sets up a couple of simple data formats: text and uri. These values can be removed, new formats can be added, or both, to indicate that the app can serve as a target for shares exposing one or more of these formats. In addition to formats, file types can be specified in the manifest in order to support shares exposing StorageFiles items that reference files of the given type (there is also a check box that can be selected to support any file type). If the app is able to receive one or more custom shared content types, those data formats must also be specified in the manifest.
The data format values specified in the manifest are used by Windows when the app is installed to record the sharing data types this app is able to receive. When a share is initiated, the value types present in the DataPackage provided by the share source app are used so that the list that Windows presents in the Share pane only includes apps that can handle one or more of the items in the DataPackage.
The second item provided by the Visual Studio template is the addition of an OnShareTargetActivated method override to the Application class. The OnShareTargetActivated method is called when the application is activated via its selection in the Share panel, similar to how the OnSearchActivated override behaves for the Search contract. The OnSearchActivated method will be called if the app is either being launched or resumed from a suspended state. Note that if the app is being resumed from a suspended state, the Resumed event is also going to be raised.
The last item added to the project in Visual Studio is a UI page that will be displayed within the Share pane when the app is activated as a share target. The provided OnSearchActivated method includes code to instantiate this page and then to call a provided Activate method, which accepts the arguments that were provided to the OnSearchActivated method. These arguments include a ShareOperation property which contains information specific to the Share contract. Within the Activate method implementation, various properties are set to display some of the shared data on the page, the current window is set to the page instance, and the Activate method is called to display the page UI.
It is up to the application to determine the page contents that are to be displayed in the Share pane. The general approach is to extract the shared data from the data package and display them in the UI in context of how the app will be consuming the shared data—for example, an email application UI that resembles an email editor window, including elements allowing users to select destination email addresses. As mentioned previously, the information related to the Share contract is provided in a ShareOperation object. In this object, the Data property provides access to a DataPackageView, which is a read-only version of the data package that was provided by the Share source application. This data includes methods that can be used to retrieve data from the package, as well as a Properties value that includes additional data about the share operation itself, including the Title and Description values that were provided.
Obtaining the data is usually a two-step operation. First, the DataPackageView is queried to see if it contains data of a particular format. If a format match is found, the data is then asynchronously retrieved using one of the provided methods, which basically all take the shape Get<DataType>Async(). An example of retrieving some of the data formats is shown in the following sample. In this example, the code returns as soon as a match is found, indicating preferred shared data types.
var dataPackageView = shareTargetActivatedEventArgs.ShareOperation.Data; // Retrieve shared custom items. if (dataPackageView.Contains("Custom Format 1")) { var customItem = await dataPackageView.GetDataAsync("Custom Format 1"); // TODO: Make use of the custom data format value. return; } // If a custom format entry is not found, retrieve shared RTF content. if (dataPackageView.Contains(StandardDataFormats.Rtf)) { var rtfText = await dataPackageView.GetRtfAsync(); // TODO: Make use of the shared text. return; } // If neither a custom format entry nor RTF content is found, retrieve plain text. if (dataPackageView.Contains(StandardDataFormats.Text)) { var sharedText = await dataPackageView.GetTextAsync(); // TODO: Make use of the shared text. return; } |
In most cases, the share target should try to retrieve and do something useful with data from each of the data types that have been indicated in the app manifest, even if the app stops as soon as it finds its first available data item.
Within the Share pane, in addition to previewing the shared data, users should also be provided with a means to “commit” the share operation, processing the data in whatever way is appropriate. When the data processing begins, the ReportStarted method on the ShareOperation object should be called to allow Windows to display UI elements that show the operation in progress, followed by either ReportCompleted or ReportError once the operation has finished.
try { this._shareOperation.ReportStarted(); // Process the shared data and any on-screen data entry the user has done. this._shareOperation.ReportCompleted(); } catch (Exception ex) { var message = "An error has occurred during sharing: " + ex.Message; this._shareOperation.ReportError(message); } |
Callback Data
There is a special case for sharing where the process is slightly different. When the share source application includes a custom type value in the Data Package by using the SetDataProvider call, it is indicating that it is going to wait to provide the data until the share target application actually requests it by calling GetDataAsync with a format type that matches the custom type provided. There is nothing special that needs to be done in the share target application, but the share source must provide and implement a callback method that will be invoked when the share target call to GetDataAsync is issued. This provides an opportunity for the share source application to avoid performing unnecessary work which may be resource intensive, or for which there is some other reason to be avoided until the data is actually needed and requested. An example callback method is shown in the following sample. Note the use of a deferral in case an async operation is used to prevent returning to the share target before the async operation has completed.
private async void DelayedDataRequestCallback(DataProviderRequest request) { var deferral = request.GetDeferral(); var data = await PerformSomeAsyncOperationToGetData(); request.SetData(data); deferral.Complete(); } |
QuickLinks
When a share target app handles a request for sharing data, it can optionally provide a QuickLink which contains information that can be used in a subsequent share request to quickly invoke the share with a packaged set of parameters, presumably those that were used in the previous invocation. For example, an email application would use this to add a QuickLink to the last recipient of an email via a share, with the presumption that users are likely to share to that email address again in the future.
To set up a QuickLink, when users commit a share in the share target app, an instance of the QuickLink class should be created with a descriptive title, potentially a thumbnail icon, and an ID value that can indicate what should be done when the QuickLink is invoked. It is also necessary to set the supported data formats and supported file types that the QuickLink will recognize—these are set independently of the values defined in the manifest for the share target app. Finally, the QuickLink object is provided to the ReportCompleted method call that is used to indicate that the share has been completed.
// Configure the QuickLink. var bitmapUri = new Uri("ms-appx:///Assets/Logo.png"); var thumbnail = RandomAccessStreamReference.CreateFromUri(bitmapUri); var quickLink = new QuickLink() { Title = "Share to Succinctly App", Thumbnail = thumbnail, Id = "UI/user provided data to be reused" }; // Indicate the data formats and file types this QuickLink will support. quickLink.SupportedDataFormats.Add(StandardDataFormats.Text); quickLink.SupportedDataFormats.Add("Custom Format 1"); //quickLink.SupportedFileTypes.Add(...); // Indicate that the Share contract has been completed. this._shareOperation.ReportCompleted(quickLink); |
The resulting QuickLink in the Share UI is shown in the following figure:

- A Share QuickLink
When the QuickLink is invoked by the user during a share, the ShareOperation object contained in the arguments passed to the OnShareTargetActivated method will include a QuickLinkId property that contains the Id value supplied when the QuickLink object was created. It is up to the share target app to decide how to process that Id value to create the consistent experience intended for users. In some cases, the contents in the QuickLinkId string will be sufficient. In others, it may be that the Id value is all or part of a key into the ApplicationData settings or provides some other mechanism to obtain the state value from storage. Code for using the QuickLinkId to obtain values from ApplicationSettings follows:
// Check to see if Share was invoked with a QuickLink. if (!String.IsNullOrWhiteSpace(args.ShareOperation.QuickLinkId)) { // Retrieve meaningful settings values. var settingsId = "QuickLink" + args.ShareOperation.QuickLinkId; var settings = ApplicationData.Current.LocalSettings.Values[settingsId]; // Set up the UI with the share data and the value(s) obtained from settings. // ... } else { // Just set up the UI with the share data. // ... } |
Sending App Content to Devices
The Devices charm provides the ability to send app content to devices, rather than to other apps, which is handled by the Share charm. Within the Devices charm, three key device sharing scenarios are available: Print To, Play To, and Send To. Print To supports sending content to a printer, Play To supports sending media content to a Microsoft-certified DLNA device, and Send To supports sending content to a device that is enabled for Near Field Communication (NFC). Since printing from an app is more likely to be the most relevant scenario, this section will limit its scope to a discussion of printing.
Note: For further information on Play To, please refer to the documentation on MSDN at http://msdn.microsoft.com/en-us/library/windows/apps/xaml/Hh465183(v=win.10).aspx. For further information on Send To, please refer to the documentation on MSDN at http://msdn.microsoft.com/en-us/library/windows/apps/xaml/Hh465221(v=win.10).aspx. |
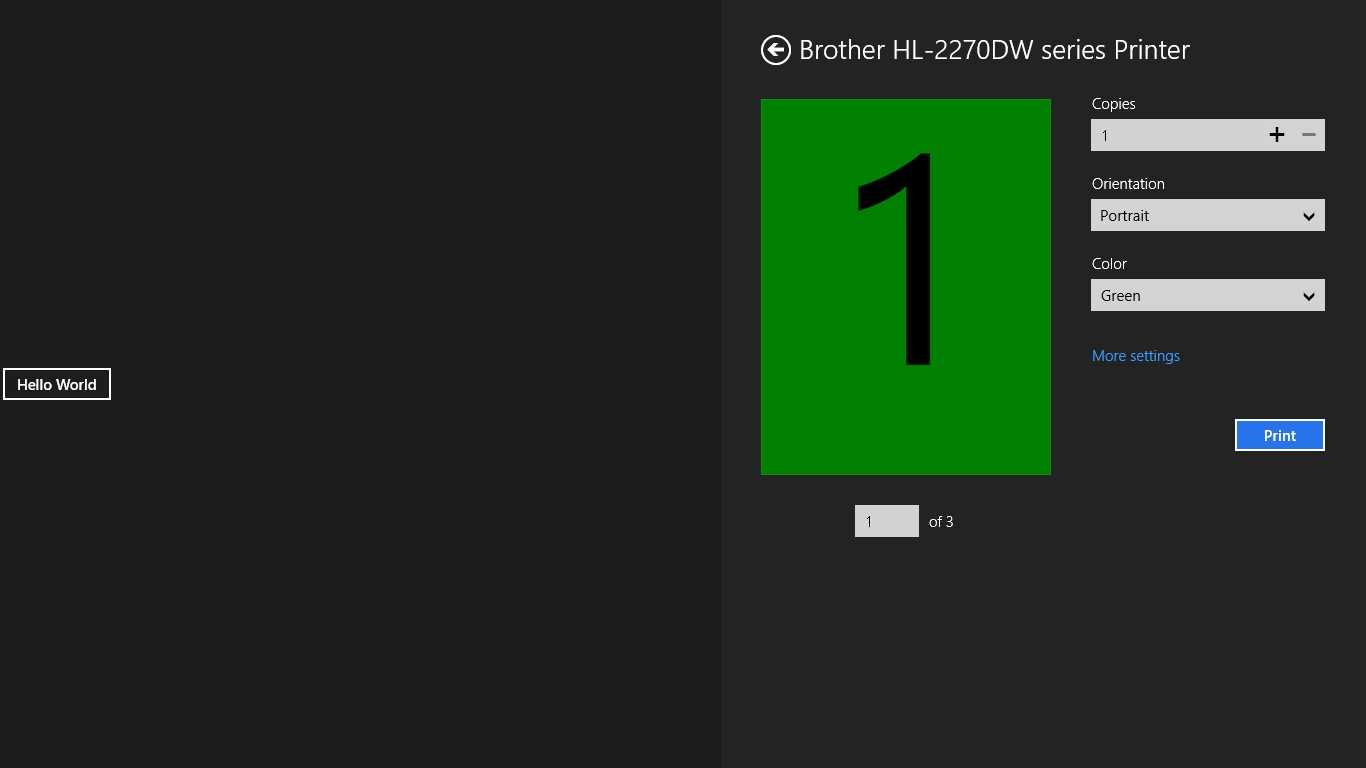
- The Windows Print Panel
Implementing the Print Contract
At a high level, there are three essential steps required for an app to participate in the Print contract:
- A PrintDocument object needs to be defined and set up to handle the events that will be raised on it as a response to user interaction with the Windows Print UI.
- Second, the application needs to subscribe to the OnPrintTaskRequested event of the PrintManager. In this event handler, a new PrintTask needs to be created and a callback needs to be set up to provide the PrintTask with the previously created PrintDocument.
- The layout of the content to be presented for previewing and printing needs to be provided. The printing system expects XAML-defined UIElement values to represent the layout of this content, which offers tremendous opportunities for reuse of existing layout controls, although some adjustments will need to be made to translate between layouts that are appropriate for an on-screen display and those that are meant to fit on a printed page.
Beyond these essential steps, options are available for receiving events related to the progress of the PrintTask, as well as for customizing the print options shown to users such as those specific to the current app’s needs.
Note: There can only be one subscription to the OnPrintTaskRequested event in an app at any given time. Attempting to add another subscription will throw an exception. This is important to note because having a handler for this event notifies Windows that the application is currently in a context where it can print and that it is appropriate to show printers when the Devices pane is shown. Because of this, there are times in a given app when the event should be handled and times when it should not be handled. This is typically done by subscribing to the event in a page’s OnNavigatedTo method and unsubscribing in the OnNavigatedFrom method, rather than the single app-wide subscription within the OnWindowCreated override that is used in many of the other contracts. Failing to unsubscribe can result in a situation where a subsequent page attempts to create an error-causing second subscription. |
The following code shows the typical process of setting up a PrintDocument, subscribing to its events, subscribing to the OnPrintTaskRequested event, and setting up the callback to provide the PrintTask with the PrintDocument contents.
protected override void OnNavigatedTo(NavigationEventArgs e) { // Create the PrintDocument and subscribe to its events. _printDocument = new PrintDocument(); _printDocument.Paginate += OnRequestPrintPreviewPages; _printDocument.GetPreviewPage += OnGetPreviewPage; _printDocument.AddPages += OnAddPrintPages; // If this handler is declared, printers are shown when the Device Charm is // Likewise, if this handler is subscribed to twice, an exception is thrown var printManager = Windows.Graphics.Printing.PrintManager.GetForCurrentView(); printManager.PrintTaskRequested += OnPrintTaskRequested; } protected override void OnNavigatedFrom(NavigationEventArgs e) { var printManager = Windows.Graphics.Printing.PrintManager.GetForCurrentView(); printManager.PrintTaskRequested -= OnPrintTaskRequested; } private void OnPrintTaskRequested(PrintManager sender, { var printTask = args.Request.CreatePrintTask("Print task title", { await Dispatcher.RunAsync(Windows.UI.Core.CoreDispatcherPriority.Normal, () => { // Called when a printer device is selected. taskSourceRequestedArgs.SetSource(_printDocument.DocumentSource); }); }); // Called before pages are requested for preview. printTask.Previewing += (s, e) => Debug.WriteLine("Submitting"); // Called when the user hits "print". printTask.Submitting += (s, e) => Debug.WriteLine("Submitting"); // Called once for each page that is printed. printTask.Progressing += (s, e) => Debug.WriteLine("Progressing - " + // Called after all pages are printed. printTask.Completed += (s, e) => { // Completion values include Abandoned, Canceled, Failed, Submitted. if (e.Completion == PrintTaskCompletion.Failed) { //Notify user that an error occurred - needs to be marshalled to UI thread. } }; } |
The following is being done in this code:
- In the page’s OnNavigatedTo method, a new PrintDocument is being created and handlers are being provided for its events. The purpose of each of these handlers will be discussed later.
- Also in the page’s OnNavigatedTo method, a handler is provided for the PrintTaskRequested event.
- On the page’s OnNavigatedFrom event, the OnPrintTaskRequested method is being unsubscribed from the PrintTaskRequested event.
- In the OnPrintTaskRequested method, a new PrintTask titled “Print task title” is created through the provided event arguments. This is also being set up with a callback to set the task’s source from the previously created PrintDocument source property. Note that this has to execute on the UI thread, even though the callback is likely not to be, so the call needs to be marshalled to the UI thread using the page’s Dispatcher object’s RunAsync method.
- Additionally, some optional event handlers are being provided for the created PrintTask. These handlers are executed throughout the various steps in the lifetime of the PrintTask and can be used to provide user feedback regarding the status of the printing operation.
The three essential event handlers for the PrintDocument are used to provide the content displayed in the Print Preview window, as well as the content being sent to the printer. These handlers need to be set up for the Paginate, GetPreviewPage, and AddPages events.
The Paginate event is fired when users have selected a printer and the Windows Print panel is going to display the print preview content for the print job. The handler for this event is responsible for using the provided PrintTaskOptions, which contain the current print settings concerning page size, orientation, etc., to determine the number of pages available to be previewed and calling the SetPreviewPageCount on the current PrintDocument with the result of this page count. In most cases, the act of calculating the pagination involves actually laying out the page contents, in which case it makes sense to store the elements for later use.
// This handler for the Paginate event is raised to request the count of preview pages. private void OnRequestPrintPreviewPages(Object sender, PaginateEventArgs e) { _printPages.Clear(); #region Prepare Preview Page Content #endregion
_printDocument.SetPreviewPageCount(_printPages.Count, PreviewPageCountType.Final); // Can also be Intermediate to indicate the count is based on non-final pages. } |
Note: In most cases, the act of calculating the pagination involves actually laying out the page contents, in which case it makes sense to store the elements for later use. Furthermore, the GetPreviewPage event does not provide information about the page settings, so the page size being targeted is not available at that point to help calculate the pagination. |
The GetPreviewPage event is fired to request the actual UI elements that are to be displayed within the Print Preview panel for the current page. As mentioned previously, usually this simply provides elements that were calculated in the previous Paginate event. This event will be called once for every preview page that is being displayed.
// This requests/receives a specific print preview page. private void OnGetPreviewPage(Object sender, GetPreviewPageEventArgs e) { // e.PageNumber is the 1-based page number for the page to be displayed // in the preview panel. _printDocument.SetPreviewPage(e.PageNumber, _printPages[e.PageNumber - 1]); } |
The final event handler to be provided is for the AddPages event. This event is raised when the system is ready to start printing. In this method, the final page rendering should occur based on the print options provided in the event arguments, with a call to the PrintDocument AddPage method for each page. The call should complete with a call to the AddPagesComplete method of the PrintDocument to signal that all of the pages have been provided.
// This is called when the system is ready to print and provides the final pages. private void OnAddPrintPages(Object sender, AddPagesEventArgs e) { var finalPages = new List<UIElement>(); #region Prepare Final Page Content #endregion foreach (var finalPage in finalPages) { _printDocument.AddPage(finalPage); } _printDocument.AddPagesComplete(); } |
Customizing Print Settings
There are two ways that the print settings in the Windows Print panel can be customized. First, the quantity and order of the default values can be selected. Second, a custom setting value can be provided. In either case, before working with the options it is necessary to obtain an “advanced” version of the options by using the PrintTaskOptionDetails GetFromPrintTaskOptions method.
When the PrintTask is created, the print options that are displayed can be altered by working with the DisplayedOptions collection. The various standard options can then be simply added to the collection using the StandardPrintTaskOptions properties.
// Get an OptionDetails item from the options on the current print task. var advancedPrintOptions = PrintTaskOptionDetails.GetFromPrintTaskOptions(printTask.Options); // Choose which of the "standard" printer options should be shown. The order in // which the options are appended determines the order in which they appear in the UI. var displayedOptions = advancedPrintOptions.DisplayedOptions; displayedOptions.Clear(); displayedOptions.Add(StandardPrintTaskOptions.Copies); displayedOptions.Add(StandardPrintTaskOptions.Orientation); |
For custom properties, first it is necessary to define the custom option. The new item can then be added to the collection of displayed options. The last step is to provide a handler for when the value is changed and to instruct the PrintDocument to forcibly be refreshed so that the new options values can be used in recalculating the pagination, resulting in the Paginated and GetPreviewPane events being reraised.
// Create and populate a new custom option element - shown as a list option UI element. var colorIdOption = advancedPrintOptions.CreateItemListOption("ColorId", "Color"); colorIdOption.AddItem("RedId", "Red"); colorIdOption.AddItem("GreenId", "Green"); colorIdOption.AddItem("BlueId", "Blue"); colorIdOption.TrySetValue("RedId"); // Add the custom option item to the UI. displayedOptions.Add("ColorId"); // Set up a handler for when the custom option item's value is changed. advancedPrintOptions.OptionChanged += async (o, e) => { if (e.OptionId == null) return; var changedOptionId = e.OptionId.ToString(); if (changedOptionId == "ColorId") { await Dispatcher.RunAsync(CoreDispatcherPriority.Normal, () => { // Force the preview to be recalculated. _printDocument.InvalidatePreview(); }); } }; |
It is up to the code in the Paginate and AddPages event handlers to check for the custom setting and incorporate the setting’s value into the page layout calculations.
// Obtain the custom property value to use in pagination calculations. var printTaskOptionDetails = PrintTaskOptionDetails.GetFromPrintTaskOptions(e.PrintTaskOptions); var colorIdOptions = printTaskOptionDetails.Options["ColorId"]; var colorId = colorIdOptions.Value.ToString(); var selectedColor = colorId == "RedId" ? Colors.Red : colorId == "GreenId" ? Colors.Green : colorId == "BlueId" ? Colors.Blue : Colors.Black; |
Managing App Settings
The last charm to discuss is the Settings charm. Probably no other feature in Windows applications is more scattered throughout different menu and submenu combinations, toolbar icons, and other user interface controls than application settings. The Settings charm is intended to let Windows provide one common and predictable user interface element for users to manage their settings across all installed applications.
Users can invoke the Settings pane by either selecting the Settings charm or by using the Windows logo key+I keyboard combination. When invoked, the Settings pane will be opened in the context of the foreground app. In the event an app is being displayed in snapped view, the Settings pane will open for the filled app.
Note: The Settings pane can also be invoked programmatically by calling the SettingsPane.Show() static method—note that the app has to be unsnapped or this will throw an exception. To unsnap the app, see the EnsureUnsapped method shown in the previous chapter. |
For an app to participate in the Settings contract, it needs to provide a list of SettingCommand objects and corresponding UI content to be displayed for each object. It is up to the app to display the UI content from within the handler callback that is specified in the SettingsCommand constructor. Since Settings does not launch the application, it does not require any special entries in the declarations section of the app manifest file. The following code shows an app registering for the CommandsRequested event, which is called when the Settings charm is invoked for the current app, to display About and Options entries in the Settings pane, plus empty lambda expressions for the handlers:
protected override void OnWindowCreated(WindowCreatedEventArgs args) { var settingsPane = SettingsPane.GetForCurrentView(); settingsPane.CommandsRequested += (o, e) => { // Create "about" and "options" links in the Settings pane. var aboutCommand = new SettingsCommand("aboutCmdId", "About", handler => {/*...*/}); var optionsCommand = new SettingsCommand("optionsCmdId", "Options", handler => {/*...*/}); var settingsPaneCommandsRequest = e.Request; settingsPaneCommandsRequest.ApplicationCommands.Add(aboutCommand); settingsPaneCommandsRequest.ApplicationCommands.Add(optionsCommand); }; base.OnWindowCreated(args); } |
When one of the links displayed by Windows for each added SettingsCommand is selected, the corresponding callback handler is invoked. Within this handler, the app should display the appropriate settings user interface elements.
Tip: When working with HTML and JavaScript, a SettingsFlyout control is provided for the purpose of displaying settings controls within the Settings pane region. The XAML/.NET frameworks do not currently include a corresponding control, so either one must be created or a pre-existing control needs to be obtained from somewhere. The Callisto controls available on GitHub provide a settings flyout that works quite well in this capacity. The Callisto controls are available at https://github.com/timheuer/callisto, and the SettingsFlyout control will be used in the upcoming examples in this section. |
To display a panel, first a UserControl must be created that contains the desired UI elements for users to make the necessary settings changes. An instance of that control is created and placed within the SettingsFlyout as its Content. The FlyoutWidth property for the Callisto SettingsFlyout control can be either SettingsFlyoutWidth.Narrow or SettingsFlyoutWidth.Wide, corresponding to the 346-pixel wide or 646-pixel wide values indicated in the published guidelines for Settings pane contents. The SettingsFlyout is then displayed when its IsOpen property is set to True.
var optionsCommand = new SettingsCommand("optionsCmdId", "Options", handler => { // Display an "About" flyout. var flyout = new SettingsFlyout { Content = new OptionsControl(), FlyoutWidth = SettingsFlyout.SettingsFlyoutWidth.Narrow, // Wide IsOpen = true, }; }); |
Note: It is important to note that settings should be implemented as light-dismiss controls, meaning that the control will be dismissed when users touch some other part of the app. The app should apply settings changes as soon as users stop interacting with that specific setting control, and should not include a Save or a Commit button. |
Other Extensibility Options
In addition to the contracts that are exposed through the charms, there are several other contracts and extensions that can be used to integrate and extend a Windows Store app. These additional options provide functionality for participating when a device is inserted into a computer, providing camera options and effects, integrating with the contact picker UI, handling files of a given extension, integrating with the file picker UIs, integrating with family safety options, and handling activation for a given protocol, among others. This section will focus on the more common file picker UI integrations, as well as the file type and URI schema handling. Additional information about the other contracts and extensions can be found in the MSDN documentation at http://msdn.microsoft.com/en-us/library/windows/apps/hh464906.aspx.
File Picker Contracts
As was discussed in the previous chapter, the File Save Picker and File Open Picker can be extended to integrate app data instead of just presenting files within the file system. When an app implements the File Picker contracts, it will be presented as an option within the file picker pull-down, and when selected, will present an application page within the file picker’s content region.
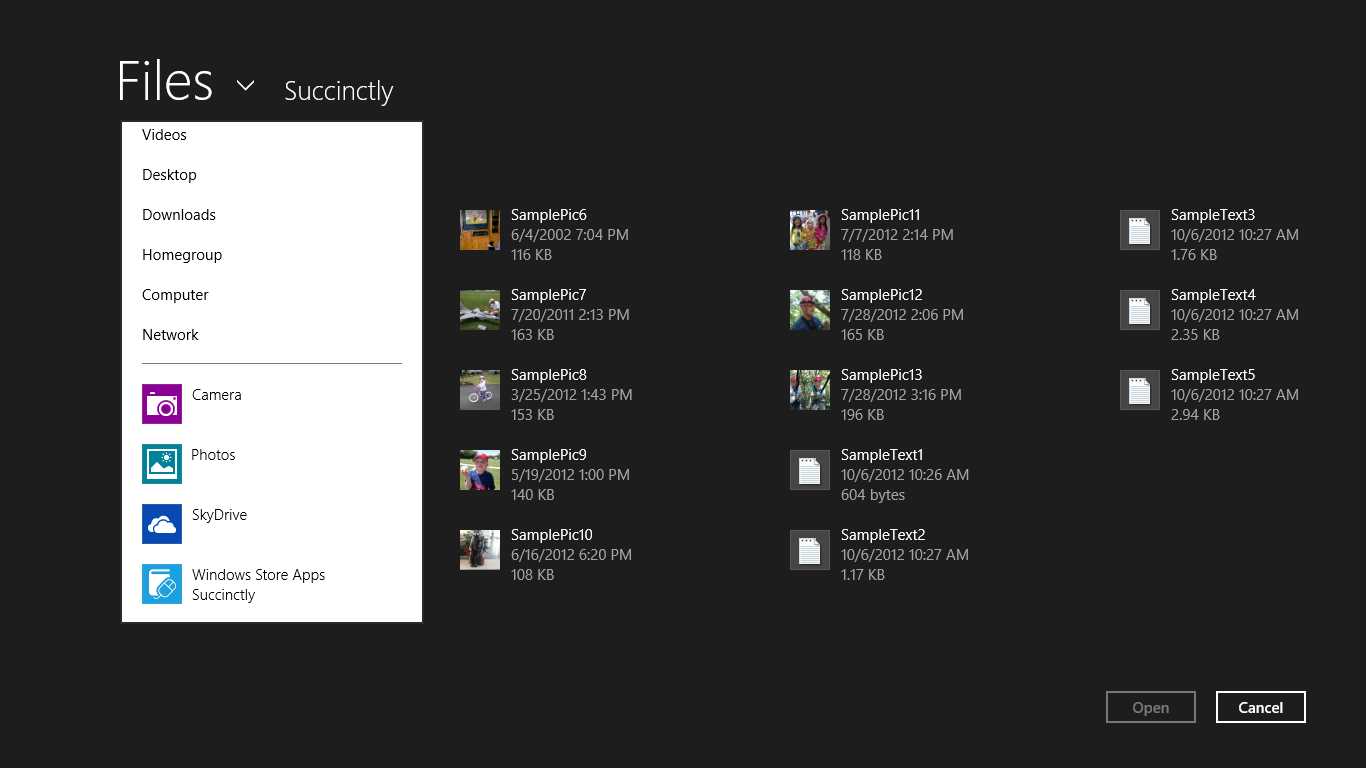
- Apps Integrated with the File Open Picker
There are several reasons why it may be advantageous to have an app provide custom integration into the File Open Picker and File Save Picker. Some examples include:
- Allowing the app the ability to load or save content from the app’s private ApplicationData storage contents. Through file picker integration, the app can provide other apps a managed view into these otherwise inaccessible storage areas.
- Providing access to items that are not actually files on disk, such as network content (like SkyDrive), device access (such as images obtained from an attached camera), or perhaps data stored within a private SQLite database. External apps will see these as though they were files on the file system.
Integrating with the File Save Picker
To integrate with the File Save Picker, an app needs to do the following:
- In the app manifest file, add the FileSavePicker declaration. Within this declaration, one or more file types need to be specified, or the Supports any file type check box must be selected. The file type specification is used to determine if the app should be shown in the File Save Picker pull-down based on the file types that have been specified by the calling app in the displayed File Save Picker instance. If an app cannot handle any of the file types the picker is set up to save, there is no value in presenting it as an option to users.
- In the Application class, provide an override for the OnFileSavePickerActivated method.
- Within the OnFileSavePickerActivated override, create a UI control (typically a Page) to be displayed in the File Save Picker content area, set it to the current window contents, and call Activate. This page is primarily used to allow users to navigate whatever hierarchy the app’s pseudo file system is intended to provide so that they can ultimately select a specific file location to save to.
- Subscribe to the TargetFileRequested event exposed by the FileSavePickerUI property on the activation arguments passed to OnFileSavePickerActivated. This event will be raised when users tap the Save or Commit button in the File Save Picker. In this event handler, the selected target file should be provided to the event’s arguments through the TargetFile property. The application that invoked the File Save Picker UI will receive this value as the result from the call to display the File Save Picker, and can then process the file save operation.
The following code shows the Activate call and the related TargetFileRequested event handler that are provided by the user interface instantiated in the OnFileSavePickerActivated method:
public void Activate(FileSavePickerActivatedEventArgs args) { _fileSavePickerUI = args.FileSavePickerUI; _fileSavePickerUI.TargetFileRequested += HandleTargetFileRequested; Window.Current.Content = this; Window.Current.Activate(); } private async void HandleTargetFileRequested(FileSavePickerUI sender, TargetFileRequestedEventArgs args) { // Request a deferral to accommodate the async file creation. var deferral = args.Request.GetDeferral(); // Create the file in ApplicationData to be returned as the user's selection. var localFolder = ApplicationData.Current.LocalFolder; args.Request.TargetFile = await localFolder.CreateFileAsync(sender.FileName, // Complete the deferral. deferral.Complete(); } |
The app that calls the File Save Picker can then use this file as a target for its data:
private async void HandleSaveFileClicked(Object sender, RoutedEventArgs e) { var picker = new FileSavePicker(); picker.SuggestedFileName = "Sample File Name"; picker.FileTypeChoices.Add("Image Files", var chosenFile = await picker.PickSaveFileAsync(); if (chosenFile != null) { await _fileToSave.CopyAndReplaceAsync(chosenFile); } } |
Integrating with the File Open Picker
The process to integrate with the File Open Picker is very similar to integrating with the File Save Picker, though it is simplified somewhat because Visual Studio provides a File Open Picker Contract item that can be added to a project, which automates much of the process. Nonetheless, the steps are as follows:
- In the app manifest file, add the FileOpenPicker declaration. Within this declaration, one or more file types need to be specified, or the Supports any file type check box must be selected. The file type specification is used to determine if the app should be shown in the File Open Picker pull-down, based on the file types that have been specified by calling the app in the displayed File Open Picker instance. If an app cannot handle any of the file types the picker is set up to open, there is no value in presenting it as an option to users.
- In the Application class, provide an override for the OnFileOpenPickerActivated method.
- Within the OnFileSavePickerActivated override, create a UI control (typically a Page) to be displayed in the File Open Picker content area, set it to the current window contents, and call Activate. This page is used to show users the files they can choose to open, as well as to provide navigation through the pseudo file system that the app is providing.
- As users select content in the user interface provided, the app should update the FileOpenPickerUI that was provided in the activation arguments by calling the AddFile and RemoveFile methods. These values will be what are returned to the calling app when users tap the Open button in the picker. Note that File Open Pickers can be set to allow single or multiple selection. For single selection, only one item can be added at a time.
- When using multiple selections in the File Open Picker, it is necessary to subscribe to the FileRemoved event on the FileOpenPickerUI element. The File Open Picker UI exposes a list of the chosen items, and users can remove the selected items from this list. This event is used to give the custom UI the opportunity to stay in sync with the list of selected items.
The following code shows the Activate call, the calls to AddFile and RemoveFile resulting from users making selection changes in the UI, and the FileRemoved event handler to keep the UI in sync with the File Open Picker’s contents:
public void Activate(FileOpenPickerActivatedEventArgs args) { this._fileOpenPickerUI = args.FileOpenPickerUI; _fileOpenPickerUI.FileRemoved += FilePickerUI_FileRemoved; Window.Current.Content = this; Window.Current.Activate(); // Custom code to populate the UI with the files in the currently displayed context. DisplayCurrentFolderFiles(); } private void FileGridView_SelectionChanged(Object sender, SelectionChangedEventArgs e) { // Add any newly selected files in the UI to the Picker. foreach (var addedFile in e.AddedItems.Cast<SampleFile>()) { if (_fileOpenPickerUI.CanAddFile(addedFile.BackingFile)) { _fileOpenPickerUI.AddFile(addedFile.Title, addedFile.BackingFile); } } // Remove deselected items from the Picker. foreach (var removedFile in e.RemovedItems.Cast<SampleFile>()) { _fileOpenPickerUI.RemoveFile(removedFile.Title); } } private async void FilePickerUI_FileRemoved(FileOpenPickerUI sender, { // Ensure the call occurs on the UI thread. await Dispatcher.RunAsync(Windows.UI.Core.CoreDispatcherPriority.Normal, () => { // Find the GridView item matching the item removed from the Picker UI list. var selectedFiles = fileGridView.SelectedItems.Cast<SampleFile>(); var removedSelectedFile = if (removedSelectedFile != null) { fileGridView.SelectedItems.Remove(removedSelectedFile); } }); } |
Note: The FileRemoved event is actually not raised on the UI thread, so any interactions with the UI need to be marshalled over to the UI thread or a runtime exception will occur. This can be done by using the Dispatcher.RunAsync method. |
The app that calls the File Open Picker can then use the selected files as it sees fit:
private async void HandleOpenFileClicked(Object sender, RoutedEventArgs e) { var picker = new FileOpenPicker(); picker.FileTypeFilter.Add(".txt"); picker.FileTypeFilter.Add(".jpg"); picker.FileTypeFilter.Add(".png");
// Single file selection. var firstFile = await picker.PickSingleFileAsync();
// Multiple file selection. var selectedFiles = await picker.PickMultipleFilesAsync(); } |
While the examples listed so far have focused on implementing the contract to allow managed access to application data storage, the items being exchanged do not strictly have to be files within a file system. An alternative to consider involves using the StorageFile.CreateStreamedFileAsync method to create a StorageFile object around a stream of data, which could be data obtained from a device or a network call. For more information on this method, please refer to the documentation at http://msdn.microsoft.com/en-us/library/windows/apps/windows.storage.storagefile.createstreamedfileasync.aspx.
Handling File Types and Protocols
The final extensibility tools that will be discussed are the File Type Activation and Protocol Activation extensions. These extensions allow a Windows Store app to register as one that can be activated when some other part of the system attempts to launch a file with a certain extension, or a URI with a certain protocol, respectively.

- Display in Windows Explorer of an Associated File
The steps required to participate in these extensions are very similar for both cases:
- In the app manifest file, add either a file type associations or protocol declaration. Note that multiple declarations of these protocols are allowed within any one app to allow multiple association groups to be defined.
- For file type associations, a name must be provided which simply serves as a unique identifier for each entry (it must be all lowercase letters), and one or more supported file type values must be included, which include a file type extension with the period, and a content type (the MIME type). There are several other optional customization options available, including the display name that is shown next to files of this type in Windows, a logo to be shown for files of this type, and the tooltip value to be shown.
- For protocol associations, a name must be provided which serves both as a unique identifier for the entry and the name of the protocol (it must be all lowercase letters). Optionally, a display name and a logo can also be provided.
- The corresponding activation method override needs to be provided in the application class:
- For file types, the OnFileActivated override needs to be provided. The activation arguments that are provided include a list of files that lead to the activation in the Files property and a Verb property that identifies the activation verb related to this activation.
- For protocols, the general-purpose OnActivated override needs to be provided, in which case the activation arguments’ Kind parameter will be set to ActivationKind.Protocol, and the provided IActivatedEventArgs can be cast to a ProtocolActivatedEventArgs object. The activation URI is contained in the Uri property.
Examples of the activation method overrides are provided in the following sample:
protected override void OnFileActivated(FileActivatedEventArgs args) { var listOfSelectedFiles = args.Files; var verb = args.Verb; // Display a UI that is appropriate to the item of the given file type. Window.Current.Content = new MainPage(); Window.Current.Activate(); } protected override void OnActivated(IActivatedEventArgs args) { if (args.Kind == ActivationKind.Protocol) { var protocolArgs = args as ProtocolActivatedEventArgs; var activationUri = protocolArgs.Uri; // Display a UI that is appropriate to the item of the given protocol. Window.Current.Content = new MainPage(); Window.Current.Activate(); } else { // Handle an alternate activation. } } |
Recap
This chapter introduced several ways that Windows Store apps can participate in common Windows user experience scenarios, allowing information to be exchanged between the app and Windows, and in some cases, between apps. This included discussing the various contracts exposed to support interaction with the Windows charms bar, as well as other options that included integrating an app with the File Open Picker and File Save Picker, and registering a file to be used when a particular file type or URI protocol type is invoked. In several cases, these integration points involved adding ways in which an application could be activated, allowing an app to have even more opportunities to be consumed by end users.
The next chapter will look at additional options for a Windows Store app to provide information to users even when they aren’t actually running, through support for tiles, toasts, and notifications.
- 1800+ high-performance UI components.
- Includes popular controls such as Grid, Chart, Scheduler, and more.
- 24x5 unlimited support by developers.