
Windows Store Apps Succinctly®

CHAPTER 3
Application Life Cycle and Storage
Windows desktop application developers may find it surprising to learn that there is usually only one Windows Store app running at any given time. When an app is moved from the main display screen and into the background, it enters a suspended state where it ceases to receive any CPU, disk, or network time, and is for the most part completely dormant with no impact on system performance other than its in-memory footprint. In fact, as will be discussed further, the app may be completely unloaded from memory under certain circumstances, including if the OS decides it needs to reclaim that memory. This is a fundamental shift from desktop application development, where it is assumed that end-users will manage application lifetimes. For Windows Store apps, the system takes on that responsibility and it is no longer the end users’ concern.
Note: Some readers may wonder about Windows Store apps being displayed side-by-side when one of the apps is displayed in the snapped view. In this case, there are two apps running at the same time, but the concepts presented here still apply, since it is still a very limited number of apps, and an app can be taken out of snapped view by either expanding the primary app to fullscreen-landscape view, or if the hardware supports it, by rotating the device and changing the display to fullscreen-portrait view. |
It turns out that in many cases, and perhaps with some small adjustments to some old habits, apps simply don’t need to run when users aren’t interacting with them. This limited lifetime model actually presents benefits in terms of enhanced battery lifetimes, system responsiveness, and reduced resource contention. This ultimately benefits end users, albeit sometimes at the expense of additional development complexity in order to ensure that these lifetime transitions are as seamless as possible.
With all that in mind, this chapter will discuss the life cycle of Windows Store apps, related events, and other interaction points that developers can use to work within this lifetime model. A key part to doing this is the ability to store and retrieve application state and other related data, so this chapter will then discuss the file storage options available to Windows Store apps, including how to use application data, file and folder pickers, and options available for programmatic file system access.
Life Cycle of a Windows Store App
The following diagram illustrates the lifetime transitions for a Windows Store app:
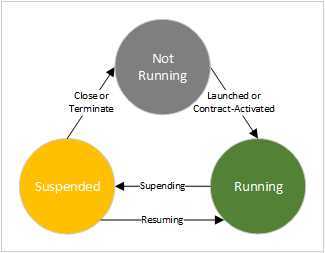
- Life Cycle of a Windows Store App
As expected, the app is initially in the NotRunning state. When the app is launched by a user, Windows starts the process of launching and activating the app. The app’s splash screen will be displayed based on the image and background color indicated in the app’s manifest file. The app has 15 seconds to complete activation by showing its first window, or Windows may elect to terminate the app (this will also result in the app failing certification to get into the app store).
Note: Contracts and extensions are implementations of standard functionality for interacting with Windows, other apps, or both, which an app can participate in to provide alternate ways in which an app can be invoked. Technically, it is a misnomer to indicate that tile-based invocation is distinct from a contract—it is actually a behind-the-scenes implementation of the Launch contract. Contracts will be discussed further in the next chapter. |
Once the app is showing its UI screens, it is in the Running state. If it is moved to the background as a result of another app being brought to the foreground, it will enter the Suspended state following a brief pause. The pause allows users time to quickly change their mind and restore the app without incurring any of the expense of handling entry into the Suspended state. Apps also enter the Suspended state when the machine is entering standby mode, the user is logging out, or the system is being shut down. In the latter cases, the Suspended state is being entered on the way to the app being closed or terminated, as will be discussed shortly.
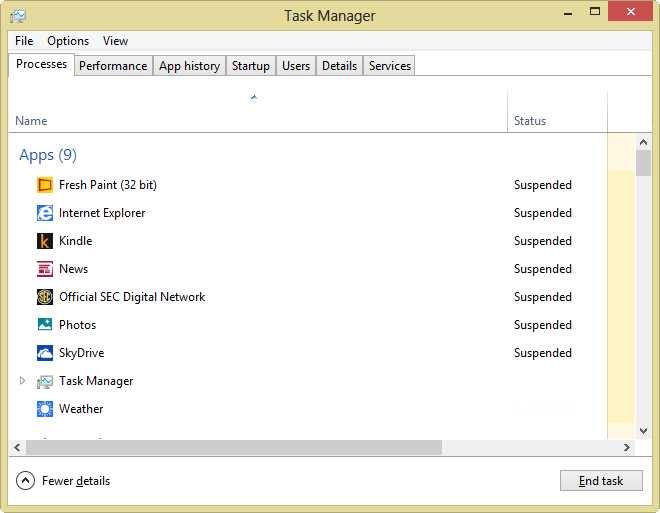
- Task Manager Showing Active Weather App and Several Suspended Apps
When an app is in the Suspended state, it is not scheduled for any CPU time by the OS kernel, all threads are suspended, and no disk or network input/output is consumed. However, the app does remain in memory. Because of this, when a suspended app is invoked, Windows is able to immediately return it to the Running state. An app has five seconds to handle any activities related to going into the Suspended mode, or Windows may consider it unresponsive and terminate the app (and again, this circumstance will cause the app to fail the Windows Store certification process.)
There is one more state transition to consider. When an app is closed by the user, or if Windows determines there are too many apps in the Suspended state and needs to reclaim some memory, the app will be unloaded from memory—a process called termination. The app will not receive any notification that it is being terminated—it simply ceases to be in memory anymore. Running apps being closed by either the user or the OS first enter the Suspended state on their way to the terminated state, but the process is irrevocable at that point—there is no way to prompt a user and cancel the closing process, and there is no special notification as the app enters the Suspended state that it is on its way to being terminated.
From these descriptions, it should start to become apparent that it is fairly important to save an app’s state before it enters the Suspended state, since there’s no way to know for sure if it will remain in memory before it is launched again. Fortunately, there are some application events and methods that allow an opportunity to do just that.
Application Activation
When an app is activated, the system sends an Activated event that includes one of several ActivationKind values indicating how the activation occurred. This event is handled by the Application class and surfaces through one of several overridable methods; the specific method being called depends on the ActivationKind value. In cases where the app is invoked from its start tile—recall that this is a result of an invocation of the Launch contract—the ActivationKind is set to Launch, and the Application object’s OnLaunched method will be called. Other methods that handle different activation circumstances include OnActivated, OnCachedFileUpdatedActivated, OnFileActivated, OnFileOpenPickerActivated, OnFileSavePickerActivated, OnSearchActivated, and OnShareTargetActivated. Several of these other methods will be visited in more detail in later chapters.
The OnLaunched method receives a LaunchActivateEventArgs value, which includes several useful properties including the PreviousExecutionState value. This can be used to determine if the app was previously terminated or if it was closed normally. If the PreviousExecutionState value is ApplicationExecutionState.Terminated, then the app was previously closed by a system-initiated termination event and it is likely that the application’s saved state needs to be loaded to bring the app back to where it was prior to suspension. This can be seen in the default OnLaunched implementation provided by Visual Studio:
// The OnLaunched method override. protected override void OnLaunched(LaunchActivatedEventArgs args) { // ...code omitted for brevity. if (args.PreviousExecutionState == ApplicationExecutionState.Terminated) { //TODO: Load state from previously suspended application. } // Create the page to use for the Current Window Content and activate it. if (Window.Current.Content == null) { Window.Current.Content = new MainPage(); } Window.Current.Activate(); } |
When restoring state, remember that the app has 15 seconds to activate its first window, which it signals by calling Window.Current.Activate, or it may be terminated by the OS. If restoring state could take longer, it may be better to run code in OnLaunched that handles the state restore as a background operation. Using an extended splash screen for this purpose is discussed in a later section.
Note: If the app would benefit from returning to a previous state following system-initiated termination or being explicitly closed by the user, the ApplicationExecutionState.ClosedByUser value can be included in the check demonstrated in the previous code sample. Other values for the ApplicationExecutionState enumeration and the circumstances that lead to their use can be found at http://msdn.microsoft.com/en-us/library/windows/apps/xaml/windows.applicationmodel.activation.applicationexecutionstate.aspx. |
Application Suspension
The Application.Suspending event is fired prior to an app being suspended, and allows the app an opportunity to save any state it may need to retrieve in case the app is terminated while it is suspended. It also releases any exclusive resources and file handles to allow other apps access to them while the current app is inactive. The key consideration is that there is no way to know if a suspended app will be terminated, so it must be assumed that it will be.
If some of the operations being called in the Suspending event handler are asynchronous—as many of the IO operations are—extra work must be done to prevent the Supending event handler from completing, and to prevent the app from signaling it has finished its work prior to the asynchronous activity being completed. To address this, an object called a SuspendingDeferral, or simply a deferral, may be obtained from the event handler’s provided arguments. When the asynchronous operation completes, the Complete method on the deferral must be called to indicate that the app is ready to be suspended. Note that even when a deferral is requested, the app still only has five seconds to complete any necessary handling or it may be terminated by the OS. The following code illustrates registering and handling the Suspending event:
// The application class constructor. public App() { this.InitializeComponent(); this.Suspending += OnSuspending; } // The Suspending event handler with an asynchronous operation. private async void OnSuspending(Object sender, SuspendingEventArgs e) { var deferral = e.SuspendingOperation.GetDeferral(); //TODO: Save application state and stop any background activity. await SomeAsynchronousMethod(); deferral.Complete(); } |
Resuming From Suspension
Most apps do not need to do anything to recover from simply being suspended. When resumed, the application’s in-memory state is right where it was before the suspension. However, if the app is displaying information that is in any way time-sensitive, such as an app that displays periodically updated data (e.g., sports scores or weather information), or an app that displays real-time information (e.g., a stopwatch), it is likely that the correct behavior following a return to the Running state is to refresh the application’s data in some way, especially since the app could have theoretically been suspended for any amount of time—from just a few seconds to several hours or even longer. To facilitate this, the app can make use of the Application.Resuming event. The code for responding to the Resuming event follows:
// The application class constructor. public App() { this.InitializeComponent(); this.Resuming += OnResuming; } // The Resuming event handler with an asynchronous operation. private void OnResuming(Object sender, Object e) { //TODO: Refresh data. } |
Handling Long-Running Start-up Activities
There are generally three scenarios for how application content will be displayed to a user when an app is launched:
- The app either doesn’t require any significant initial data load or doesn’t do anything to defer the data load. Any desired data load is performed prior to calling Window.Current.Activate, and the app’s main window is fully populated and immediately available for use at this point.
- The app requires extensive or otherwise time-consuming data load or initialization. While the main page is displayed shortly after launch, data for the page is loaded asynchronously and gradually filled into an initially empty or partially complete UI.
- The app requires extensive or otherwise time-consuming data-load or initialization. However, instead of showing an incomplete UI to users while this processing occurs in the background, a copy of the splash screen is first displayed instead of the normal app landing page. Once the data load has been completed, the extended splash screen is dismissed and users are shown a main window fully populated and immediately available for use. This particular approach is known as showing an extended splash screen and will be discussed in this section.
To display an extended splash screen, the app uses the SplashScreen API methods to obtain the positioning information about the graphic element on the standard splash screen, which it then uses to create and display a matching window, perhaps augmented with a progress ring or other information. Once the time-consuming initialization has completed, the app displays its landing page.
To set up the splash screen, start with a blank Page. Add an Image control within a Canvas and set the content color to match the app’s splash screen color. In the following sample, a ProgressRing control is also added to provide some extra feedback.
<Grid Background="#FF8000"><!-- Matching color from app splash screen setting. --> <Canvas Grid.Row="0"> <Image x:Name="SplashImage" Source="ms-appx:///Assets/SplashScreen.png" /> <ProgressRing x:Name="ProgressRing" Width="60" Height="60" IsActive="True"/> </Canvas> </Grid> |
Next, set up the extended splash screen page’s code-behind to set the initial splash element positions to match the original splash screen, as well as to react to orientation changes and other screen resize events.
public sealed partial class ExtendedSplash : Page { private readonly SplashScreen _splash; public ExtendedSplash() { this.InitializeComponent(); } public ExtendedSplash(SplashScreen splashScreen) : this() { _splash = splashScreen; Window.Current.SizeChanged += (o, e) => { // This will run in response to view state or other screen size changes. UpdateSplashContentPositions(); }; // Set the initial position(s). UpdateSplashContentPositions(); } private void UpdateSplashContentPositions() { if (_splash == null) return; var splashImageRect = _splash.ImageLocation; SplashImage.SetValue(Canvas.LeftProperty, splashImageRect.X); SplashImage.SetValue(Canvas.TopProperty, splashImageRect.Y); SplashImage.Height = splashImageRect.Height; SplashImage.Width = splashImageRect.Width; // Position the extended splash screen's progress ring. var progressRingTop = splashImageRect.Y + splashImageRect.Height + 20; var progressRingLeft = splashImageRect.X + (splashImageRect.Width / 2) - ProgressRing.SetValue(Canvas.TopProperty, progressRingTop); ProgressRing.SetValue(Canvas.LeftProperty, progressRingLeft); } } |
This code sets up a constructor that accepts and stores a reference to the original splash screen, hooks the Window.SizeChanged event to make a call to update the displayed elements’ screen positions in the event of screen resolution or orientation changes, and makes a call to set the initial position values based on the original splash screen’s image position.
In the application’s OnLaunched method override, start the long-running start-up task, set the current window to an instance of the extended splash screen which has been provided a reference to the original splash screen, and call Window.Current.Activate.
protected override void OnLaunched(LaunchActivatedEventArgs args) { // Other launched code omitted for brevity… DoLongStartup(); if (Window.Current.Content == null) { Window.Current.Content = new ExtendedSplash(args.SplashScreen); } Window.Current.Activate(); } |
Finally, asynchronously perform the long-running startup task and then navigate to the real landing page for the app.
private async void DoLongStartup() { // Simulate the long-running task by delaying for 10 seconds. await Task.Delay(10000); // On completion, navigate to the real main landing page. Window.Current.Content = new MainPage(); } |
Using the Suspension Manager
As mentioned in previous chapters, Visual Studio provides some helper classes with certain project templates or when some files are added to the project. Among these are the LayoutAwarePage and SuspensionManager classes. The SuspensionManager provides several boilerplate features related to persisting and restoring application state across Suspend/Terminate/Resume sequences. First, the SuspensionManager works with the Frame object to which it is associated to save and restore the sequence of pages through which the user has navigated so that the Frame’s navigation stack can be restored following a termination without requiring developers to implement such a scheme. These classes also work together to provide a simple solution for saving page state across these lifetime events.
To use the SuspensionManager, it must be configured when the app is activated in the activation handler method. This configuration involves providing the SuspensionManager the Frame with which it will be working, and then calling the RestoreAsync method when the application is invoked following a termination. The relevant code in a typical Application.OnLaunched method is highlighted in the following sample:
protected override async void OnLaunched(LaunchActivatedEventArgs args) { Frame rootFrame = Window.Current.Content as Frame; // Do not repeat app initialization when the Window already has content; // just ensure that the window is active. if (rootFrame == null) { //Create a Frame to act as the navigation context and navigate to the first page. rootFrame = new Frame(); //Associate the frame with a SuspensionManager key. SuspensionManager.RegisterFrame(rootFrame, "AppFrame"); if (args.PreviousExecutionState == ApplicationExecutionState.Terminated) { // Restore the saved session state only when appropriate. try { await SuspensionManager.RestoreAsync(); } catch (SuspensionManagerException) { //Something went wrong restoring state. //Assume there is no state and continue. } } // Place the frame in the current window. Window.Current.Content = rootFrame; } if (rootFrame.Content == null) { // When the navigation stack isn't restored, navigate to the first page, // configuring the new page by passing required information as a navigation // parameter. if (!rootFrame.Navigate(typeof(SomeAppPage))) { throw new Exception("Failed to create initial page"); } } // Ensure the current window is active. Window.Current.Activate(); } |
When suspending, the SuspensionManager is asked to save state in a handler for the Application.Suspending event.
private async void OnSuspending(Object sender, SuspendingEventArgs e) { var deferral = e.SuspendingOperation.GetDeferral(); await SuspensionManager.SaveAsync(); deferral.Complete(); } |
Note: This setup code is provided out-of-the-box with the Visual Studio Grid App and Split App projects. However, the Blank App project type does not include it. If an item is added to a project started with that template, and includes the SuspensionManager and LayoutAwarePage classes, this initialization code must be explicitly added and configured. Also, if an extended splash screen is used, the relevant code needs to be moved out of the OnLaunched method and called after the long-running operation has completed and the app is ready to display its regular UI. |
Once the SuspensionManger is set up and configured to save and restore state, code can be added to any page that derives from LayoutAwarePage to participate in state saving and restoring by overriding the LoadState and SaveState methods. Each of these methods receives a Dictionary object which accepts strings for keys, into which the values are to be loaded and saved, respectively. The following code shows this in the code-behind for a page where the contents of a text box are saved and retrieved:
protected override void LoadState(Object navigationParameter, { // Retrieve the stored value(s) and reset the control's state. if (pageState != null && pageState.ContainsKey("StateTextBox")) { var text = pageState["StateTextBox"].ToString(); StateTextBox.Text = text; } } protected override void SaveState(Dictionary<String, Object> pageState) { // Save the control's state. pageState["StateTextBox"] = StateTextBox.Text; } |
Note: The content of the pageState dictionary is written to disk as an XML file in the app’s local application data storage. As a result, care should be taken when including large content like bitmaps. It may be more optimal to exchange a path reference to where such a file may be obtained rather than the file itself. |
Background Transfers and Tasks
While it is true that Windows Store apps cannot run unless they are in the foreground, there are situations in which this imposes excessive limitation on the app’s functionality. For example, it would be an unreasonable imposition to require a user to keep an app up and running in order to be able to upload or download large files over a network. Other scenarios include monitoring external resources for available content to be retrieved and displayed to users, perhaps in the event they do not have network access the next time they launch the app—an example of this would be detecting and downloading new incoming messages from a central server or service. To address these needs, Windows Store apps have access to a Background Transfer and Background Task infrastructure. The Background Transfer APIs provide Windows Store apps with the ability to upload and download files from both HTTP and HTTPS endpoints, as well as download from TFP endpoints, all while the app is not actively running. Background Task provides a restricted-execution environment in which small work items can be run under system supervision with regards to the resources and amount of CPU time available to the task. These tasks do not run constantly, but instead run as a response to some system event that acts as a trigger for the task. Among other goals, the system management is intended to help prevent CPU or other resource-intensive processes from executing unfettered and depleting system resources such as battery life, or perhaps running up high network bandwidth costs.
Working with Background Transfer and Background Task are advanced concepts whose detailed implementation is beyond the scope of this book. For more information on these topics, please refer to the MSDN documentation. Details for using Background Transfer can be found at http://msdn.microsoft.com/en-us/library/windows/apps/xaml/hh452975.aspx. Details related to supporting a Windows Store app with Background Task can be found at http://msdn.microsoft.com/en-us/library/windows/apps/xaml/hh977056.aspx.
Data Storage in Windows Store Apps
While the previous section discussed how to participate in the Windows Store app life-cycle process and the importance of strategically saving and retrieving data for the application, how that data can be saved and retrieved wasn’t addressed. This section will explain how various file storage mechanisms available to Windows Store apps can be used to complete that picture.
The data that an app stores and retrieves generally falls into one of two categories: application data, which includes settings and application state information, and user data, which includes data users produce or consume while using the application. In the case of a simple text editor program, the application data may include a user’s last selected font value, what document was last opened, and where in that document the cursor was last positioned. The application data may also include the setting chosen for Tab key behavior. For all of these sets of values, the data is likely to be stored in a location and format specific to the app, and will usually be meaningless to any other application. On the other hand, the user data is the actual text file on disk the user is actively editing, which can be opened by any text editor.
Tip: Data storage in Windows Store apps is mainly achieved either through the classes in the Windows.Storage namespace or its descendants—primarily the StorageFile and StorageFolder classes. Locations are usually identified using predefined constants or user interface controls. In some circumstances, a few special URI schemes have been created which can provide access to certain file locations on disk, including the ms-appx scheme to access files stored inside the application package and the ms-appdata scheme to access files stored in one of the application data locations. Additional information about available URIs can be found at http://msdn.microsoft.com/en-us/library/windows/apps/xaml/Hh965322.aspx. The StorageFile.GetFileFromApplicationUriAsync method can take one of these URIs that points to a file and returns a corresponding StorageFile reference. |
Working with Application Data
Windows Store apps have access to their own set of per-user data stores through the ApplicationData class. The ApplicationData instance is exposed to the API as a singleton object available through the ApplicationData.Current property. Access to three different data stores is provided by this class—local, roaming, and temporary. As its name implies, the local application data store is specific to the machine on which the app is installed. There is no quota for the amount of space avilable in the local store; it is limited by the disk space available where a user’s Windows profile data is stored. The roaming data store actually supports replicating data across machines where the user has logged in with his or her Microsoft account (formerly Live ID). There is a maximum limit of 100 KB per app that can be synchronized, and unused roaming data is purged from its cloud storage location after 30 days of inactivity. Finally, while the temporary data store has no size or set expiration limit, its contents may be cleared at any time by system maintenance or if the user selects to clear temporary files from the Disk Cleanup utility.
Note: Data in the ApplicationData stores is preserved across application upgrades as new versions of the application become available. However, when the application is uninstalled, these data stores are removed along with the application and their values are lost (with the exception of values stored in the roaming store.) |
Local Application Data
Within the local store, there are two ways to access data: the settings container or folders. Settings exposes a hierarchy of named “containers,” which in turn may contain other containers (up to 32 containers deep) and key-value pairs. A "simple" value may be up to 8 KB in size, whereas a composite value using the ApplicationDataCompositeValue class may be up to 64 KB. Settings data is actually stored in a registry file, and values must be base Windows Runtime data types. The list of available types can be found at http://msdn.microsoft.com/en-us/library/windows/apps/br205768.aspx.
The following code demonstrates accessing the settings in the local storage.
var localSettingsStore = ApplicationData.Current.LocalSettings; // Simple settings values. localSettingsStore.Values["TextValue"] = "Value 1"; localSettingsStore.Values["IntValue"] = 42; // Composite value. var compositeValue = new ApplicationDataCompositeValue(); compositeValue["CompositeValue1"] = "Composite 1"; compositeValue["CompositeValue2"] = 42; localSettingsStore.Values["CompositeValue"] = compositeValue; // Using a custom container: data in. var createdContainer = localSettingsStore.CreateContainer("TestContainer", createdContainer.Values["SomeOtherValue"] = "Value 2"; // Using a custom container: data out. var accessedContainer = localSettingsStore.Containers["TestContainer"]; var value = accessedContainer.Values["SomeOtherValue"]; |
To access data via folders, the ApplicationData object’s LocalFolder property will provide access to the root folder, which is a StorageFolder instance. StorageFolder is the WinRT type for working with folders in the file system. Keep in mind that most of these methods will be asynchronous.
The following code creates a file, writes data into it, and then opens the same file for data retrieval.
var localFolderStore = ApplicationData.Current.LocalFolder; // Create or open a file in LocalFolder and write some data into it. var writeFile = await localFolderStore.CreateFileAsync("SampleFile.dat", CreationCollisionOption.ReplaceExisting); await FileIO.WriteTextAsync(writeFile, "Some Text"); // Open the file from LocalFolder and read the text out of it. var readFile = await localFolderStore.GetFileAsync("SampleFile.dat"); var text = await FileIO.ReadTextAsync(readFile); |
Roaming Application Data
The roaming data store uses the cloud to allow application data to be synchronized across multiple machines where a user has signed in using the same Microsoft ID, enabling a continuous app experience that can span multiple devices. The roaming data store allows settings and folder access just like the local store, except through the RoamingSettings and RoamingFolder properties instead of their local counterparts. There are a couple of important differences to consider, however:
- The RoamingStorageQuota property can be used to see how much storage space is remaining for the app to use.
- The synchronization is not immediate. Under normal circumstances it occurs every few minutes, though network connectivity and latency can affect it. Since the sync can happen at any time, the app can subscribe to the DataChanged event to be informed as to when an update has occurred.
- A special setting value named HighPriority can be created in the RoamingSettings root that will receive special treatment. It can accept a regular or composite value, but it is limited to 8 KB. This value is synchronized considerably more frequently than other values, nearing instantaneous synchronization in some circumstances.
- There is behavior related to synchronizing versioned data. Application data versioning will be discussed in a subsequent section.
The following code shows how to obtain the roaming store quota, subscribe to data synchronization updates, and write to the HighPriority setting key.
// Obtain the remaining storage space. UInt64 quota = ApplicationData.Current.RoamingStorageQuota; // Subscribe to the data change event to be notified when data is synchronized. ApplicationData.Current.DataChanged += (o, e) => { // Update the application based on the possibility of new data. }; // Write to the "high Priority" value. var roamingStore = ApplicationData.Current.RoamingSettings; roamingStore.Values["HighPriority"] = "Some high priority value"; |
Tip: Even though RoamingSettings are the only settings that automatically raise the DataChanged event when data in the store changes, the ApplicationData.SignalDataChanged method can be called to explicitly force the event to be raised, regardless of what data stores are being used. This can allow scenarios where one part of the application notifies the other part that an application data change has occurred. |
Temporary Application Data
The temporary application data store is similar to the local store, except that it only offers access via folders, which are accessed through the TemporaryFolder property. As previously mentioned, the data in the temporary store can be removed via system or user-initiated cleanup events, so the data cannot be counted on between application sessions. In most cases, this store is useful for caching data that can be conveniently recovered once removed.
ApplicationData Versioning
The ApplicationData class includes a mechanism for checking and setting a version identifier for the data, as well as for invoking custom logic to be called when the data needs to be upgraded or otherwise acted upon to accommodate a version change. The mechanisms for accomplishing this include the ApplicationData.Version property and the corresponding SetVersionAsync method.
The Version property simply allows interrogation of the current version value. SetVersionAsync allows specifying a target version number and a callback. After the callback is executed, the ApplicationData.Version value will be set to match the value provided to the method. The callback receives a SetVersionRequest parameter, which includes CurrentVersion and DesiredVersion values, so the code executed by the callback can appropriately update the data as necessary.
Clearing ApplicationData Stores
The contents of any one or all of the ApplicationData stores can be cleared programmatically via the ClearAsync method. The override that doesn’t take a parameter simply clears all stores; otherwise, a value from the ApplicationDataLocality enumeration can be passed to specify a single store. Note that this enumeration is not a flag-type enumeration, so only one store can be cleared at a time with this particular override. These methods are illustrated in the following sample:
// Clear just the local store. await ApplicationData.Current.ClearAsync(ApplicationDataLocality.Local); // Clear all stores. await ApplicationData.Current.ClearAsync(); |
Tip: Used judiciously, clearing ApplicationData can be useful in the Application.OnLaunched method when the app’s PreviousExecutionState is not terminated as a technique to prevent any additional restoration code that may be scattered throughout the app from inadvertently restoring the app’s state when it shouldn’t. |
Working with User Data
If storage outside of the application data stores is required for documents or other user data, Windows Store apps have some options available for them. User-initiated access to the file system may occur through file and folder pickers which allow users to select file system locations and where restrictions are applied based on user file system permissions. Based on the locked-down nature of Windows Store apps that has been previously discussed, programmatic file-system access is limited, and what is available outside of the application data stores and some select folders related to application deployment will generally require that application manifest settings be declared.
Using File and Folder Pickers
User-initiated file system access can be invoked via the file and folder picker members of the Windows.Storage.Pickers namespace. The main classes which will be used include the FileOpenPicker, FileSavePicker, and FolderPicker.
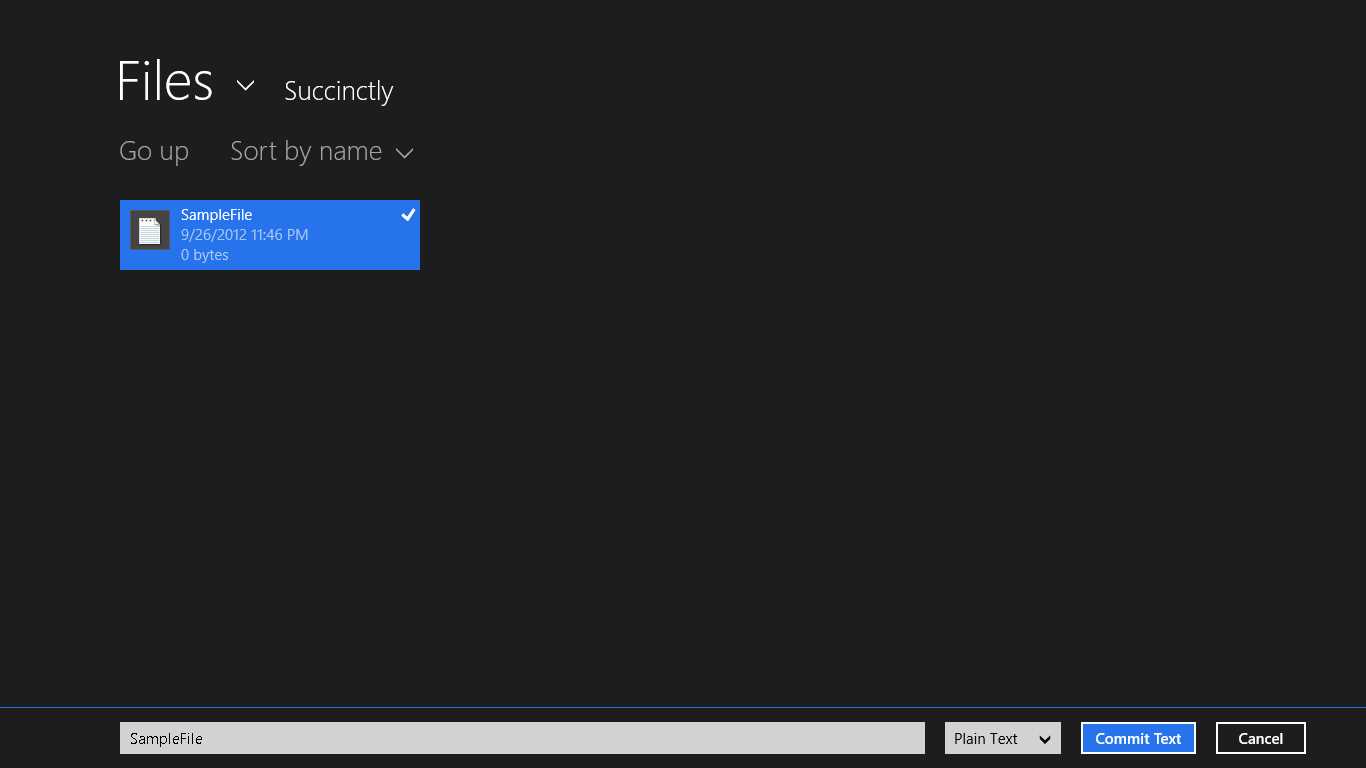
- Showing the FileSavePicker Screen
As their names imply, the FileOpenPicker and FileSavePicker classes offer access to UI screens that allow users to select a file to open and save, respectively. Similarly, the FolderPicker presents a UI screen that allows users to select a folder.
Note: The FileSavePicker and FileOpenPicker actually offer the ability to be extended to browse into an apps’ data through the use of the File Open Picker and File Save Picker contracts. An app that integrates with one or more of these contracts appears as a selectable element in the respective file picker’s drop-down, and when selected can present UI elements that appear within the picker UI for selecting content. For an example of an app that extends the file pickers in this way, look at the SkyDrive app. These contracts will be discussed further in a later chapter. |
For the most part, invocation is very similar for each of these three selection pages. An instance of the class is created, and various properties are set. All three selection pages share the ability to set the text that will appear on the page’s OK or Commit button. They also all share a SuggestedStartLocation, which accepts a value of the PickerLocationId, and includes values for several common Windows folder locations. The SuggestedStartLocation is only used the first time the dialog is used after the app has been launched. After that, the most recent folder selected by the user will be used. If the app uses several pickers for different purposes, the SettingsIdentifier property allows a String token value to be associated with the control. Pickers with the same SettingsIdentifier token will share their recently used folder values. The FileOpenPicker and FolderPicker allow setting the display mode for the content between a list and a tile display, based on the PickerViewMode enumeration value that is selected.
If a user selects a value appropriate to the provided page and taps Commit, he or she will either be returned a StorageFile object for the FileSavePicker and FileOpenPicker, or a StorageFolder object for the FolderPicker. These values are then used by the application code to work with the selected file or folder as necessary.
// Save picker. var savePicker = new FileSavePicker { SuggestedStartLocation = PickerLocationId.DocumentsLibrary, CommitButtonText = "Commit Text", SuggestedFileName = "Some file Name", DefaultFileExtension = ".txt", }; savePicker.FileTypeChoices.Add("Plain Text", new List<String>() { ".txt", ".text" }); var chosenSaveFile = await savePicker.PickSaveFileAsync(); // Open picker. var openPicker = new FileOpenPicker { SuggestedStartLocation = PickerLocationId.ComputerFolder, CommitButtonText = "Commit Text", ViewMode = PickerViewMode.List, }; openPicker.FileTypeFilter.Add(".txt"); openPicker.FileTypeFilter.Add(".text"); var chosenOpenFile = await openPicker.PickSingleFileAsync(); // Folder picker. var folderPicker = new FolderPicker { SuggestedStartLocation = PickerLocationId.Desktop, CommitButtonText = "Commit Text", ViewMode = PickerViewMode.Thumbnail, }; // Use "." to show only folders and not display any files. folderPicker.FileTypeFilter.Add("."); var chosenFolder = await folderPicker.PickSingleFolderAsync(); |
Note: The FileOpenPicker, FileSavePicker, and FolderPicker cannot be displayed when the app is in snapped view. To be able to display these items, it is important to first check to see if the ApplicationView.Value is ApplicationViewState.Snapped. If it is snapped, a subsequent call to ApplicationView.TryUnsnap can be issued to try to take the app out of snapped mode. Ultimately, if that fails, users should be notified that the desired picker element cannot be displayed. This approach is shown in the next code sample. |
Programmatically Accessing Files and Folders
For the most part, file system access for user data should be handled through the file pickers. Most direct programmatic file access will be directed to application data folders and take place through the ApplicationData API. In a few cases, there may be cause to gain programmatic access to additional locations. As evidenced by the application data discussion in this chapter, there are certain file system locations that all Windows Store apps can programmatically access by default. These include:
- Locations Windows Store Apps Can Access by Default
Location | Access With |
Application Data Directory | ApplicationData.Current.[Local | Roaming | Temporary]Folder |
Application Installation Directory | Windows.ApplicationModel.Package.Current.InstalledLocation |
User’s Downloads Folder Content | Only files or folders in the user’s Downloads folder that were created by the app. |
If the application needs programmatic access to additional locations, the app manifest will need to be modified. In most cases, a Capability value will need to be set for the specific location where access is needed, and additional file type associations may need to be declared to indicate which file types in the location your app can access.
- Folders Apps Can Access
To Access | Access With |
|---|---|
Music Library | Add the MusicLibrary capability. |
Pictures Library | Add the PicturesLibrary capability. |
Videos Library | Add the VideoLibrary capability. |
Homegroup Libraries | Add any one of the MusicLibrary, PicturesLibrary, or VideoLibrary capabilities. |
Removable Devices | Add the RemovableDevices capability. |
DLNA Devices | Add any one of the MusicLibrary, PicturesLibrary, or VideoLibrary capabilities. |
UNC Folders | Add the PrivateNetworkClientServer capability. |
Note: Programmatic storage access to the Documents library is only available under very specific circumstances, and in general, access to this folder is only available to Windows Store apps through the file pickers. For information on the specific cases where programmatic Documents library access is available, please see http://msdn.microsoft.com/en-us/library/windows/apps/xaml/hh464936.aspx. |
An example of programmatically accessing the Pictures library to show an image in an app is shown in the following code. Note that for this example, the PicturesLibrary capability was added to the app.
// Locate the well-known folder, assuming the capability has been declared. var storageFolder = KnownFolders.PicturesLibrary; if (storageFolder == null) return; // Locate a subfolder. var succinctlyFolder = await storageFolder.GetFolderAsync("Succinctly"); if (succinctlyFolder == null) return; // Locate a specific file. var succinctlyImageFile = await succinctlyFolder.GetFileAsync("Succinctly.jpg"); if (succinctlyImageFile != null) { // If the picture was found, load it into the on-page image control. using (var fileStream = await succinctlyImageFile.OpenAsync(FileAccessMode.Read)) { var bitmapImage = new BitmapImage(); bitmapImage.SetSource(fileStream); selectedImage.Source = bitmapImage; } } |
Additional Data Storage Options
There are a few other options for data storage that deserve a brief mention. First, the FileOpenPicker and FileSavePicker extensions provided by the Windows Store SkyDrive app were briefly mentioned. Beyond local file storage, SkyDrive is an interesting option for storing data in your application’s data. To that end, Microsoft provides the Live Connect API for interacting with this and other services from your apps. More information about using the Live Connect API to make use of SkyDrive from within your application can be found at http://msdn.microsoft.com/live.
If it would be helpful for a Windows Store app to maintain its application data in a relational database, a version of the SQLite database engine has been made available that can be used from the Windows Runtime. Information about SQLite can be found at http://sqlite.org/ and instructions for using it from within a Windows Store app can be found at http://timheuer.com/blog/archive/2012/08/07/updated-how-to-using-sqlite-from-windows-store-apps.aspx.
Recap
This chapter introduced the Windows Store application life cycle and showed the related events and methods that can be used to preserve and restore state information based on this life cycle. It also showed how an extended splash screen could be used to provide a pleasant user experience for apps that require prolonged initialization at start up. The chapter then presented the options available to Windows Store apps for data storage, including the ApplicationData APIs that provide local, roaming, and temporary storage options, and concluded with a discussion of options for accessing the file system to store or retrieve user data either via the FilePicker members or through direct access to the limited set of folders and circumstances where this is available.
The following guidelines should serve as best practices for saving and restoring state in a Windows Store app:
- Save application settings immediately.
- Save user data incrementally as the app is used.
- When the app is being suspended, record the user’s current location and state information.
- When an app is launched, check to see if it was previously terminated. If so, restore the users' session as if they had never left.
- When a suspended app is resumed, refresh any time-sensitive data. Otherwise, do nothing.
The next chapter will explore the contracts and extensions mechanisms that Windows Store apps can participate in to take advantage of enhanced integration with Windows and other Windows Store applications.
- 1800+ high-performance UI components.
- Includes popular controls such as Grid, Chart, Scheduler, and more.
- 24x5 unlimited support by developers.