
Developing Windows Services Succinctly®

CHAPTER 3
Service Installer
Creating a Windows Service project is a bit different from other kinds of projects. In order to be correctly deployed, Visual Studio ships installation components that can install resources associated with service applications. Installation components register an individual service on the system to which it is being installed and let the Services Control Manager know that the service exists.
Adding a Service Installer
Working with a service application allows you to automatically add the appropriate installers to the project. You can also accomplish this by double-clicking on the monitorservice.cs file name (where service base class is stored) in the Solution Explorer tree, and the Service Designer screen (shown in the following figure) will appear.
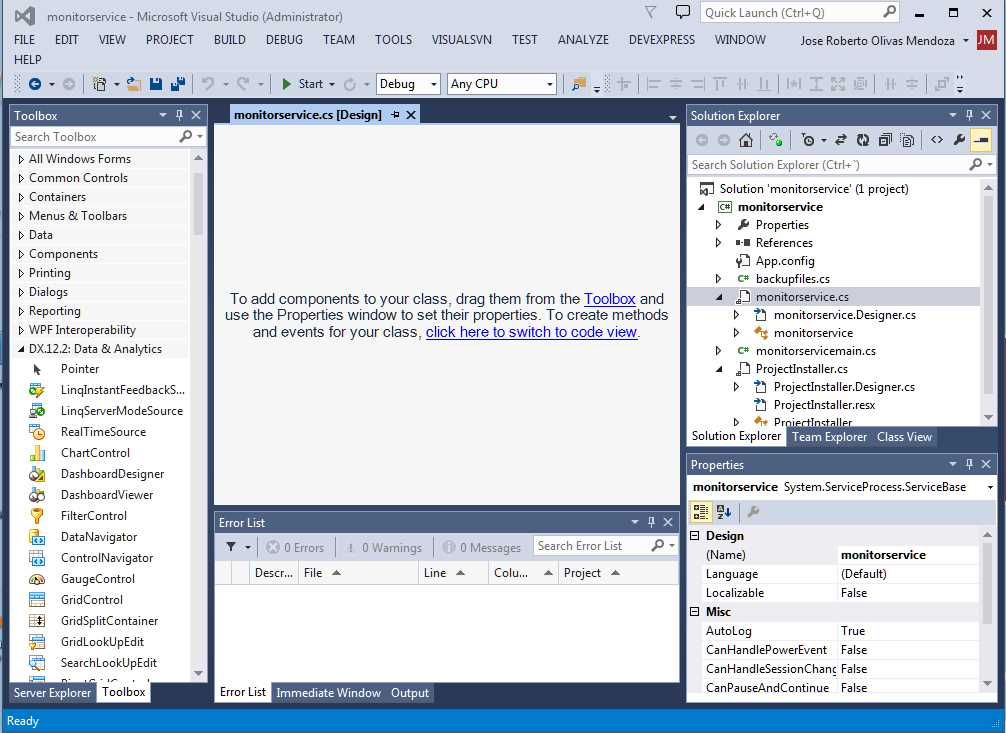
- Service designer screen
Right-clicking on the gray area will bring up the Service Designer context menu. To automatically add the proper installer code to the project, click Add Installer.
The installer code
Two files, ProjectInstaller.cs and ProjectInstaller.Designer.cs, will be added to the project. All properties needed for service installation will be set here. The following code sample shows the contents of ProjectInstaller.cs.
Code Sample 9
using System; using System.Collections; using System.Collections.Generic; using System.ComponentModel; using System.Configuration.Install; using System.Linq; using System.Threading.Tasks;
namespace monitorservice { [RunInstaller(true)] public partial class ProjectInstaller : System.Configuration.Install.Installer { public ProjectInstaller() { InitializeComponent(); } } } |
The RunInstaller attribute of the ProjectInstaller class tells that Visual Studio's Custom Action Installer or the InstallUtil.exe will be invoked when the assembly is installed. InstallUtil.exe will be discussed later.
A constructor method is the only one created by the IDE, and this method calls the InitializeComponent() method in order to setup the values needed to install the service correctly.
Establishing service installation properties
To establish service installation properties, right-click the ProjectInstaller.cs file name in the monitorservice project tree, and then choose View Designer from the context menu that appears.
The designer window for ProjectInstaller.cs will appear with two icon buttons in it. One of these is linked to an instance of a serviceProcessInstaller object, and the other one to an instance of a ServiceInstaller object. These two instances contain the properties needed to make the Windows service installation successful.
These properties are:
- Account – Indicates the account type under which the service will run
- Description – Indicates the service’s description (a brief comment that explains the purpose of the service)
- DisplayName – Indicates the friendly name that identifies the service to the user
- ServiceName – Indicates the name used by the system to identify this service
- StartType – Indicates how and when this service is started (as discussed in the Introduction)
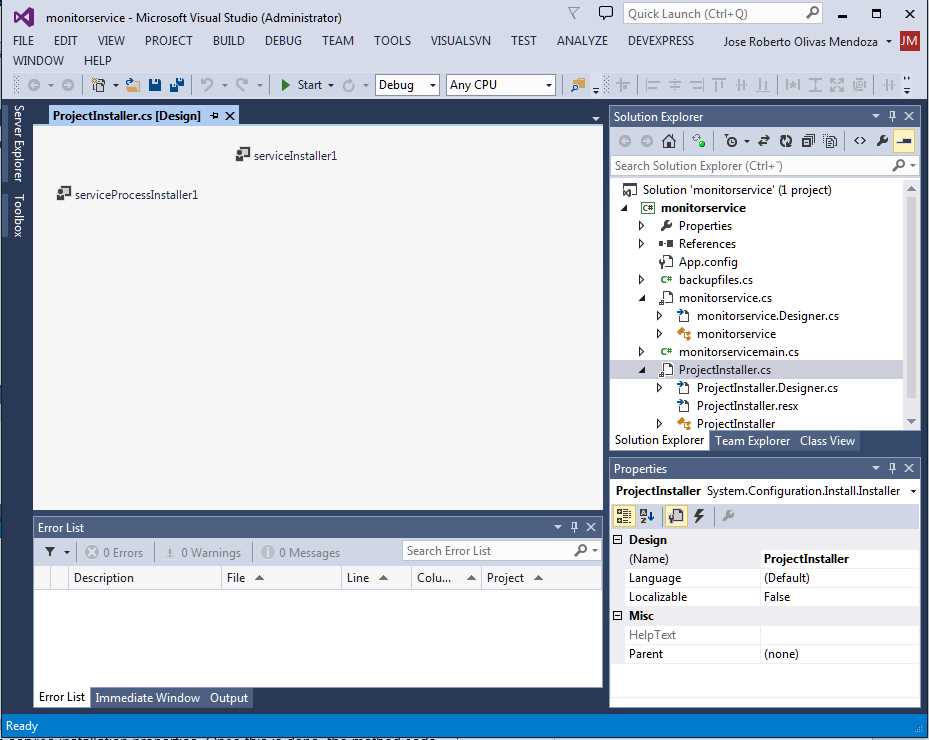
- ProjectInstaller.cs designer screen with iconic buttons
Clicking on each button allows you to change the properties listed previously. To accomplish this task, it is necessary to use the Properties Window corresponding to each button, and enter the proper values in the corresponding textbox’s Properties window.
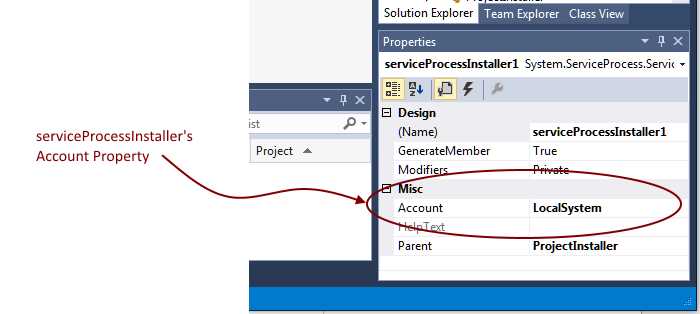
- Figure 7: serviceProcessInstaller Properties window
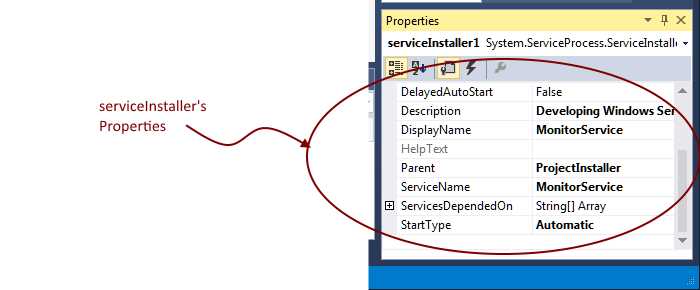
- serviceInstaller Properties window
Once this is done, the InitializeComponent method’s code will look like the following sample.
Code Sample 10
private void InitializeComponent() { this.serviceProcessInstaller1 = new System.ServiceProcess.ServiceProcessInstaller(); this.serviceInstaller1 = new System.ServiceProcess.ServiceInstaller(); // // serviceProcessInstaller1 // this.serviceProcessInstaller1.Account = System.ServiceProcess.ServiceAccount.LocalSystem; this.serviceProcessInstaller1.Password = null; this.serviceProcessInstaller1.Username = null; // // serviceInstaller1 // this.serviceInstaller1.ServiceName = "MonitorService"; this.serviceInstaller1.DisplayName = "MonitorService"; this.serviceInstaller1.Description = "Developing Windows Services Succinctly Tutorial"; this.serviceInstaller1.StartType = System.ServiceProcess.ServiceStartMode.Automatic; // // ProjectInstaller // this.Installers.AddRange(new System.Configuration.Install.Installer[] { this.serviceProcessInstaller1, this.serviceInstaller1});
} |
The code creates both an instance of ServiceProcessInstaller class and an instance for ServiceInstaller class. Then, it stores the name of the account that will be in charge of managing the service in the Account property of the ServicesProcessInstaller instance. In this case, the installer will use the LocalSystem account.
The StartType property of the ServiceInstaller instance will tell the installer that service will start automatically. The name that will be displayed in the Windows Services snap-in is stored in the DisplayName property, and a description for the service is stored in the Description property.
Now, the entire code for project installer will look like the following sample.
Code Sample 11
//ProjectInstaller.cs using System; using System.Collections; using System.Collections.Generic; using System.ComponentModel; using System.Configuration.Install; using System.Linq; using System.Threading.Tasks;
namespace monitorservice { [RunInstaller(true)] public partial class ProjectInstaller : System.Configuration.Install.Installer { public ProjectInstaller() { InitializeComponent(); } } } //ProjectInstaller.Designer.cs namespace monitorservice { partial class ProjectInstaller { /// <summary> /// Required designer variable. /// </summary> private System.ComponentModel.IContainer components = null;
/// <summary> /// Clean up any resources being used. /// </summary> /// <param name="disposing">true if managed resources should be disposed; otherwise, false.</param> protected override void Dispose(bool disposing) { if (disposing && (components != null)) { components.Dispose(); } base.Dispose(disposing); }
#region Component Designer generated code
/// <summary> /// Required method for Designer support - do not modify /// the contents of this method with the code editor. /// </summary> private void InitializeComponent() { this.serviceProcessInstaller1 = new System.ServiceProcess.ServiceProcessInstaller(); this.serviceInstaller1 = new System.ServiceProcess.ServiceInstaller(); // // serviceProcessInstaller1 // this.serviceProcessInstaller1.Account = System.ServiceProcess.ServiceAccount.LocalSystem; this.serviceProcessInstaller1.Password = null; this.serviceProcessInstaller1.Username = null; // // serviceInstaller1 // this.serviceInstaller1.ServiceName = "MonitorService"; this.serviceInstaller1.DisplayName = "MonitorService"; this.serviceInstaller1.Description = "Developing Windows Services Succinctly Tutorial"; this.serviceInstaller1.StartType = System.ServiceProcess.ServiceStartMode.Automatic; // // ProjectInstaller // this.Installers.AddRange(new System.Configuration.Install.Installer[] { this.serviceProcessInstaller1, this.serviceInstaller1});
}
#endregion
private System.ServiceProcess.ServiceProcessInstaller serviceProcessInstaller1; private System.ServiceProcess.ServiceInstaller serviceInstaller1; } } |
At this point, the process of adding a Service Installer is complete.
Chapter summary
A Windows Service project is a bit different from others. To deploy it correctly, Visual Studio ships installation components that register an individual service on the target system and let the Services Control Manager know about its existence.
The Service Designer screen of the service base class file is used to add the appropriate installers to the project. To show this screen, you double-click on the file name in the Solution Explorer tree. Right-clicking on the gray area will bring up a context menu where the Add Installer item can be found. Clicking on it will automatically add the proper installer code.
To successfully deploy the service in the target computer, it’s necessary to establish values for some properties in the service installation code. These properties are: Account, which indicates the account type under which the service will run; Description, which indicates a brief comment that explains the purpose of the service; DisplayName, which indicates the friendly name that identifies the service; ServiceName, which indicates the name used by the system to identify it; and StartType, which indicates how and when this service is started. The Designer View of the project installer code file (ProjectInstaller,cs) is used to set these values.
- 1800+ high-performance UI components.
- Includes popular controls such as Grid, Chart, Scheduler, and more.
- 24x5 unlimited support by developers.