
Windows Azure Websites Succinctly®

CHAPTER 3
Provisioning Resources
Once you have established a local development environment and an Azure account, you’re ready to start provisioning services on the Azure platform. In this section, you will learn how to provision some of the services most pertinent to website development. The primary method of provisioning that will be described in all cases will be through the use of the Windows Azure Management Portal. However, PowerShell integration will also be briefly discussed to demonstrate how PowerShell can be used within the Azure ecosystem to automate many repetitive management tasks executed by DevOps.
For any resource to be provisioned, the process starts by selecting the “New” command in the Management Portal at http://manage.windowsazure.com as shown in Figure 5:
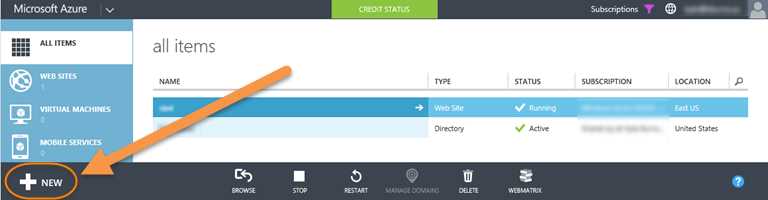
- Create new resource
Azure Web Sites
To provision a new Azure Web Site using the Azure Management Portal, the first step is to determine the URL at which you want the website exposed. By default, Azure Web Sites will be exposed to the public with the URL format of http://your-site.azurewebsites.net, where your-site is specified by you and must be unique among Azure-hosted websites. Options exist to specify custom DNS names instead of the default naming but those options will not be discussed in this book.
While defaults will be provided for you in most cases, it is also good to put some thought into where you want your service to be hosted. Microsoft has several data centers hosting Azure services across the globe. They are currently in the following locations:
- North-Central U.S.
- South-Central U.S.
- West U.S.
- East U.S.
- Brazil
- Beijing, China
- Shanghai, China
- East Asia
- Southeast Asia
- North Europe
- West Europe
- East Japan
- West Japan
As you look through the list of regions, you may notice that, for the most part, they come in pairs which are opposite each other on the same continent. This arrangement is used by Microsoft to provide redundancy where the alternate location for the hosted services and data is still on the same continent as the primary source yet far enough away to make it unlikely that both locations would be affected by major catastrophic events such as floods and earthquakes.
When choosing a region for your Azure Web Site, the most important consideration is latency. When your Azure Web Site’s intended visitors are geographically close together, hosting your Azure Web Site as close to them as possible will ensure that fewer network hops are required for the round trip to and from your Azure Web Site and provide reduced response time. It’s also important to take into consideration the location of any other hosted services that your Azure Web Site will consume because locating the website in the same region as the services that it consumes will reduce latency between them and also, at times, will prevent charges incurred as data enters and leaves the Azure data center.
Once you know the desired URL and region for your website, you can begin the process of creating the website by selecting the “NEW” command within the Azure Management Portal. This command will present a hierarchical menu and you should navigate to “Compute…Web Site” in the menu. You will be presented with three options from which to choose: “Quick Create,” “Custom Create,” and “From Gallery”.
Quick Create
When “Quick Create” is selected, additional options are presented to specify the desired URL and to optionally override the defaults which have been presented for your web hosting plan that you want attached to the site and the region in which you want it hosted. These options are shown in Figure 6. After specifying the URL and selecting “Create Web Site,” your website will be provisioned within the Azure data center and prepared for you to deploy content:

- Quick Create options
Custom Create
When “Custom Create” is selected, a dialog (shown in Figure 7) is presented allowing you, in addition to the options available for “Quick Create,” to specify a database which is available to the site (this can be a free, 20MB SQL database for light needs or a paid SQL Server or MySQL database instance) and set up the site for deployment from source control providers such as Visual Studio Online, GitHub, and others. Depending upon the options selected, additional steps may be added to the setup wizard such as selection and configuration of the source control provider and database details. After completing the wizard, your website and, optionally, database, will be provisioned. If a source control provider was selected, the website content will be deployed from the source control provider and will be ready to be viewed by website visitors.
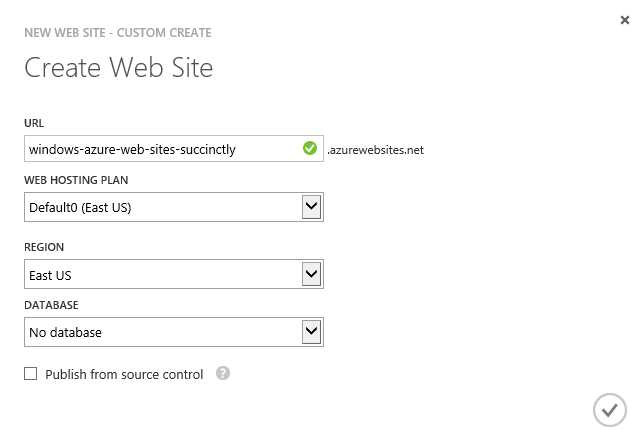
- Custom Create options
From Gallery
When “From Gallery” is selected, the Web App Gallery (shown in Figure 8) is displayed as the first page in a wizard to help configure your new website. Within the Gallery there is an ever growing list of preconfigured options that range from starter templates to jump-start, laying down the framework for your website to complete applications including popular CMS, blogging, and e-commerce frameworks. Each application available in the gallery may require different information to complete the setup and configuration, so the wizard will dynamically walk you through collecting the information that is applicable to your website. Upon completion of the wizard, your website will be fully provisioned and ready, either for you to finish building upon the starter template or for visitors to start consuming your content.
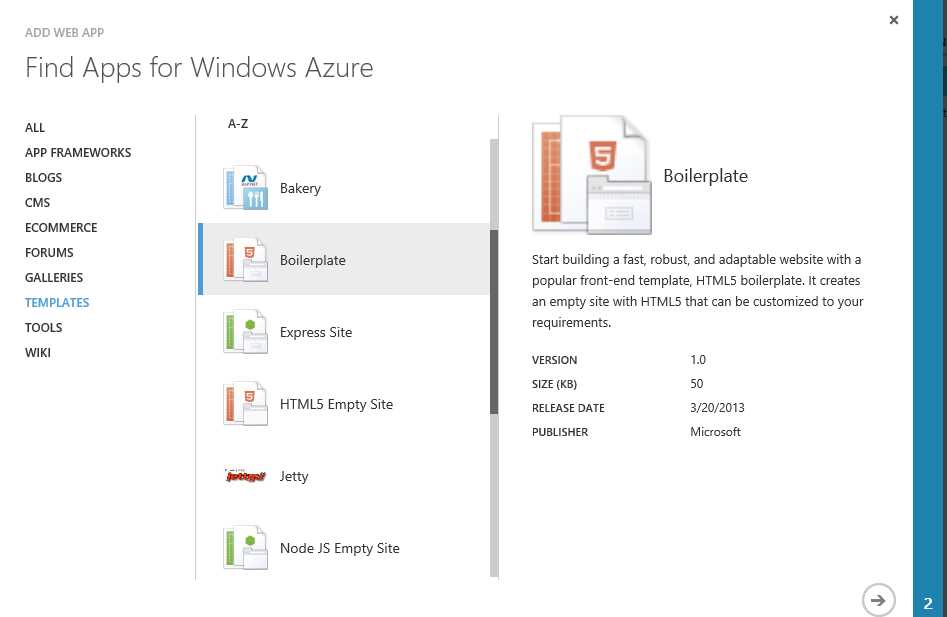
- Web App Gallery
Storage
A common need for Azure Web Sites is additional storage beyond the free 20MB SQL Database that is provided. In cases where this additional storage is needed, Azure Storage is often used because of its flexibility, scalability, and low cost in comparison with other data services. As with Azure Web Sites, the first step in provisioning a new storage account is to decide the URL at which the storage account will be accessible. By default, Azure Storage accounts will be exposed to the public with the URL format of http://your-site.core.windows.net, where your-site is specified by you and must be unique among Azure-hosted storage accounts. The difference in subdomains leaves open the convention, if desired, of using the same value for the your-site portion of the URL in both your Azure Web Site and Azure Storage account.
Aside from the URL, the other two pieces of information that must be supplied when creating a Azure Storage account are the Location/Affinity Group and Replication options desired. By default, the Location/Affinity group options will only include Location (the data center in which your data will reside), but you have the ability in the Management Portal to create logical containers called Affinity Groups. Affinity Groups are used to instruct Azure that certain Compute and Storage resources should be grouped close to each other within the data center in order to reduce the network hops between them, reducing transfer cost and latency. Replication options determine how the data is replicated to balance performance, cost, and durability. These include the following:
- Geo-redundant: This option is selected by default and specifies that the data is replicated to a geographically separated data center in addition to having multiple copies (three to be precise) stored within the local data center. The copying of the data between data centers provides protection against losing data if a man-made or natural disaster were to destroy the local data center or data housed there.
- Read access geo-redundant: This option is similar to the geo-redundant option but adds the ability to provide direct read-only access to the copies of the data housed on the separate store. This can provide fault tolerance and allow for load balancing across the resources.
- Locally redundant: This option provides the option to forego the replication of the data to a secondary data center. While this may seem undesirable (there’s a reason why it is not the default), in certain circumstances applications may not require the additional redundancy. This option offers a discounted pricing structure over geo-replicated storage. Additionally, data transfer using a locally redundant account is faster than that of a geo-replicated account.
When you know the configuration options that you will specify for your Storage account, you can provision the account by selecting the “NEW” command in the Azure Management Portal and navigating the menu hierarchy to “Data Services…Storage…Quick Create.” Specify the desired options and select “Create Storage Account” and Azure will provision your new storage account.
Other Services
SQL Database, Service Bus Queues or any of the other services offered on the Azure platform can be provisioned for use by your application by selecting the “NEW” command in the Azure Management Portal, navigating the hierarchy to find the service, and then following intuitive wizards intended to gather configuration options for the provisioned service.
Summary
In this chapter, you learned how to make services available within your Azure account. Depending on the options selected, many of the services that you may have created will not yet be useful or be in a state where you would want anyone to come visit your website. In the coming chapter, you will learn how to develop and deploy content and code to be hosted within these services.
- 1800+ high-performance UI components.
- Includes popular controls such as Grid, Chart, Scheduler, and more.
- 24x5 unlimited support by developers.