
Windows Azure Websites Succinctly®

CHAPTER 5
Deploying Websites
It almost goes without saying that, except in cases where a gallery template fully meets your needs right out of the box, your shiny new Azure Web Site is relatively useless to you unless you are able to deploy either new content or changes to the content created from the selected gallery template. As with many tasks in Azure, there is more than one right way to accomplish deployments. In this chapter, we will examine several of these options.
Deploy via FTP
File Transfer Protocol (FTP) is a method for moving files between network-connected hosts that has been in common use for decades. As a deployment mechanism, it has many limitations that make it less desirable for large or complex deployments. But its simplicity and almost universal availability across platforms of FTP client and server software make it almost guaranteed that it will be available to you to move files.
Most operating systems in use today provide a command line FTP client through which you can enter commands to perform, including such actions as listing directory contents, uploading files, and downloading files. Many also provide a graphical client that allows you to interact with files and directories on the server in much the same manager as the native file manager application for the operating system. For the most part, however, these clients tend to be limited in features that are present in dedicated FTP clients such as automatically performing date checks to avoid download or uploading of content that has not changed since the last synchronization. Today the go-to FTP client for many people is the open source FileZilla software which can be found at http://filezilla-project.org and is distributed under the GNU General Public License.
Configuring Azure for FTP Deployment
Before you can use an FTP client to deploy content to an Azure Web Site, it must be configured for FTP access. This primarily consists of setting up the credentials which can be used to connect with the FTP client because FTP cannot use the Microsoft Account credentials that you use for most Azure management tasks. Because the credentials will be used for other deployment options that cannot use the Microsoft Account credentials, they are referred to within the Azure Management Portal as “Deployment Credentials” rather than specifically being referred to as FTP credentials.
To configure deployment credentials for an Azure Web Site, select the site in the Azure Management Portal by clicking on the site name, which will bring up details for the selected site. Use the top navigation bar to navigate to the Dashboard tab and find “Set up deployment credentials” in the quick glance section which is shown in Figure 16:
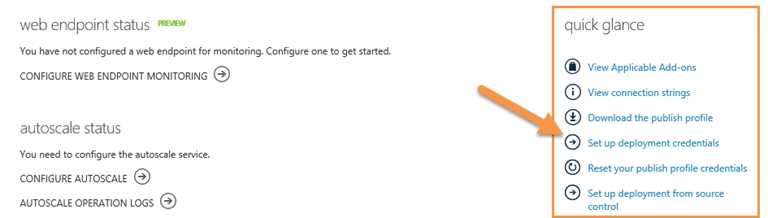
- Dashboard deployment credentials command
The Management Portal will respond by displaying the dialog shown in Figure 17 which prompts you for the username and password to be used for deployment via either Git or FTP. Enter a username and password and save changes:
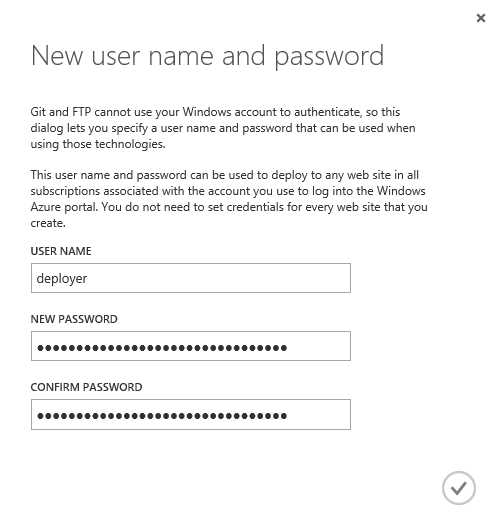
- Set deployment credentials
Your Azure Web Site is now ready to accept connections from the FTP client of your choice to deploy assets.
Obtaining Connection Information for FTP Client
Once your Azure environment is configured with deployment credentials, you need to know where to point your FTP client to interact with the Azure FTP server. This information, along with the credentials themselves, can be obtained by downloading a file called “Publish Profile” from the Azure Management Portal. To obtain deployment credentials for an Azure Web Site, select the site in the Azure Management Portal by clicking on the site name which will bring up details for the selected site. Unless you have selected the option to skip the Quick Start screen, the Quick Start screen will be displayed. You can find the “Download publish profile” command in the “Publish your app” section shown in Figure 18:
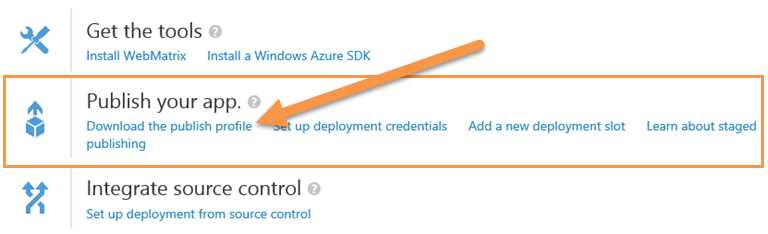
- Quick Start download publish profile
If you have already selected the option to skip the Quick Start screen, the “Download the publish profile” command can be found on the Dashboard tab under quick glance as shown in Figure 19:
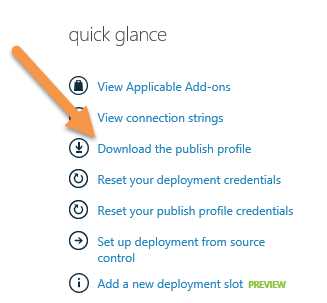
- Dashboard download publish profile
Regardless of where you find the command, the Azure Management Portal will respond by serving up a file named your-site.azurewebsites.net.PublishSettings where your-site is the name of your website. This file is an XML document that includes sections for various deployment methods that are each contained in a node called publishProfile. The XML format for a publishProfile node is as follows:
<publishProfile profileName="delete-me - FTP" |
The appropriate publishProfile node for finding the FTP connection information is the one where the publishMethod attribute has a value of “FTP”. The publishUrl node contains the URL of the root directory for publishing website content and the credentials are contained in the userName and userPWD (password) attributes. You’ll notice that these differ from the actual credentials entered when setting up the deployment credentials. This is because Azure uses the information that you use as a seed to generate the actual credentials.
Note: It’s important to remember that the credentials contained in this file will grant whomever obtains them the ability to control the content on your website, so the PublishSettings file should be kept safe. FTP is not a secure protocol so I would also recommend frequently changing the deployment credentials and generating a new PublishSettings file for whatever application you’re using.
Once you have obtained the appropriate URL and credentials, you can connect to the website using your preferred FTP client and website files. Figure 20 demonstrates connecting with the FileZilla FTP client:
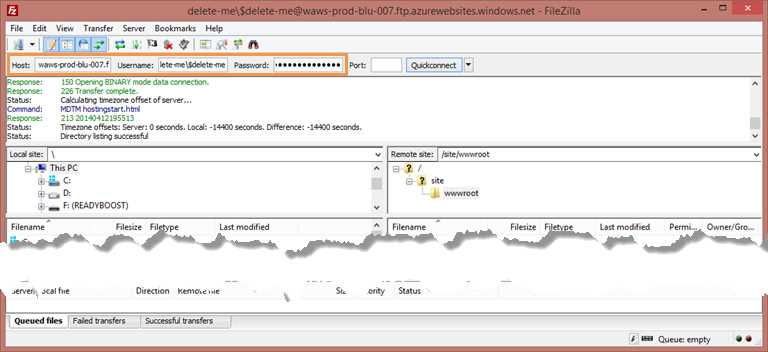
- FileZilla FTP connection
Note: In addition to dedicated FTP clients, some web integrated development environments (IDEs) such as Adobe Dreamweaver feature integrated FTP management tools that allow you to manage and deploy assets from within the development environment.
Resetting the Publish Profile and Deployment Credentials
Username/Password credentials are only as secure as the ability to keep them secret and that can often be hard to do. PublishSettings files can unwittingly be made available on a network drive, trusted employees can suddenly become disgruntled former employees, and vulnerabilities such as OpenSSL Heart Bleed are discovered with alarming regularity. Sometimes you might even find that you’ve forgotten to obscure your credentials when capturing screen shots for a blog entry or a book. These factors all support the assertion that even the most secure credentials must be changed on a regular basis if they are protecting anything of importance.
When deployment credentials have been previously established, two additional commands are made available within the Azure Management Portal. These commands are:
- Reset your deployment credentials: This command establishes new “seed” values to be used for the username/password.
- Reset your publish profile credentials: This command generates new values for the actual credentials used in the publish profile. After using the command, the information in existing PublishSettings files will no longer be able to be used to connect and deploy to your website. So, if multiple people are deploying to the same website, it is important to communicate when the PublishSettings files that each individual has is no longer current.
To access the commands used to change the credentials used to deploy content, navigate to the Quick Start or Dashboard screen as described earlier. The “Reset your deployment credentials” command appears in the Quick Start screen in the “Publish your app” section and both commands appear on the Dashboard screen in the quick glance section.
Deploy from Visual Studio
While FTP deployment is an option for cross-platform compatibility and opens up the broadest range of tools that you can use to manage your website (every major operating system in use today includes an FTP client and a simple text editor), there’s a very good chance that the majority of people creating websites on the Azure platform will at least have access to Visual Studio and will want a more user-friendly approach to development and deployment than UI and command-line FTP (not that there’s anything wrong with that). For developers using Visual Studio 2013, deployment of websites hosted in Azure is well integrated into the developer workflow. In this section, we will cover some of the available options for deployment using Visual Studio.
Copy Web Site
One option that you can leverage to deploy websites from Visual Studio is to use the “Copy Web Site” command to initiate an FTP-based copy of the contents. This command can be found in Visual Studio either as a sub item of the “Website” menu as shown in Figure 21 or by right-clicking on the project for the website within the Solution Explorer as shown in Figure 22:
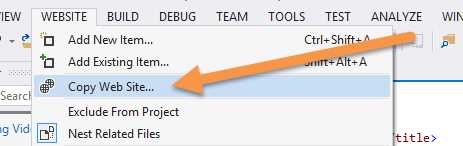
- Copy Web Site from website menu

- Copy Web Site context menu
Regardless of how “Copy Web Site” is invoked, Visual Studio displays a window that includes the files within the web project in a “Source Web Site” section and a “Remote Web Site” section that is initially empty. This interface, which is shown in Figure 23, looks very similar to many popular graphical FTP clients because it essentially has the same job:
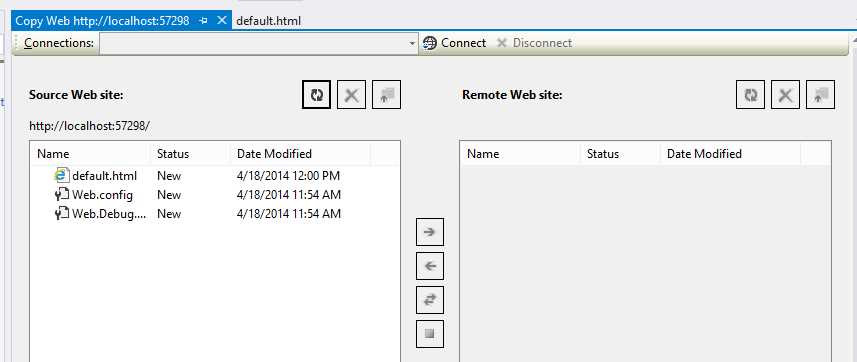
- Copy Web Site UI
From the Copy Web Site UI, the first thing that you need to do is establish a connection to your Azure Web Site using the information obtained from your PublishSettings file. This is initiated by invoking the Connect command which is next to the Connections drop-down menu at the top of the window. This displays a dialog that allows you to connect to either a folder on your local file system, a local IIS instance or an FTP server. Select FTP and fill in the connection information fields using values from your PublishSettings file to appear similar to what is seen in Figure 24. For the Server and Directory fields, you will have to extract the host name and path values from the publishUrl attribute:
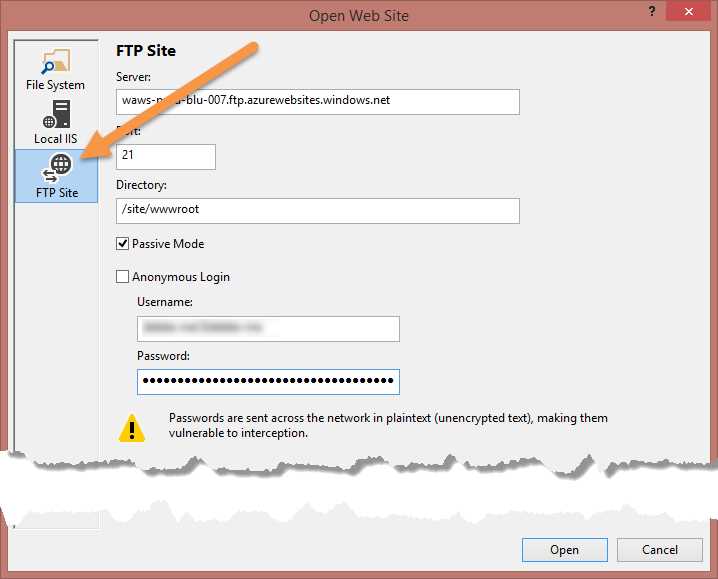
- Copy Web FTP connection
Once connection information and credentials have been supplied, accept the entries by selecting the Open command. Visual Studio will then connect via FTP to Azure and the web root will be displayed in the “Remote Web Site” section. From this point, you manually select files to synchronize and use the commands located between the Source and Remote Web Site sections to perform the synchronization. Figure 25 demonstrates copying files from the Source Web to the Remote Web:
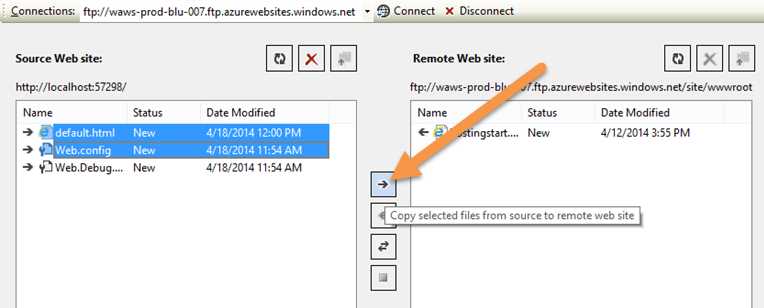
- Copy files to remote
One thing that is very important to remember when using the Copy Web Site tool is that it is essentially just an FTP client integrated into Visual Studio. Therefore, many advanced tasks such as integrated build and configuration transforms cannot be achieved with this tool. This makes the tool only suitable for the simplest of websites and it is not even available for Web Application projects.
Publish Web Site
Note: The tooling for Publish Web Site is not integrated into the free Express versions of Visual Studio so, if you have chosen to or must use Express, this section will not be applicable to you.
In the previous section, I discussed that a fairly significant drawback to the “Copy Web Site” deployment method in Visual Studio is that it is just a straight copy of website files and doesn’t take into consideration things such as databases and build transformations. The “Publish Web Site” command is a more powerful alternative to “Copy Web Site” that does handle these type of tasks.
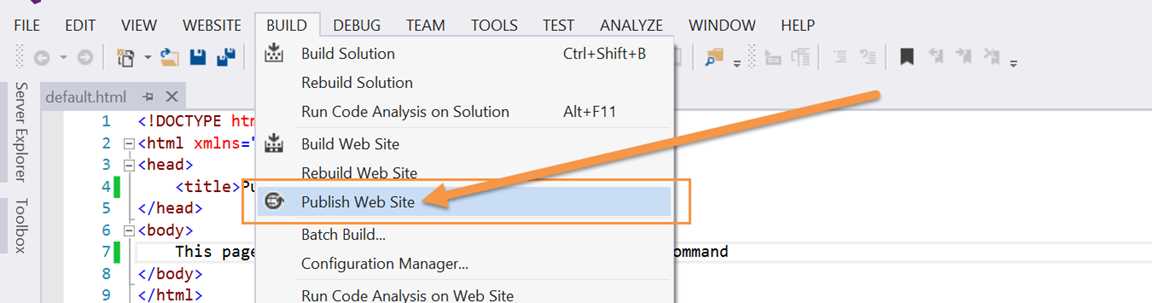
The Publish Web Site command and the Copy Web Site command are both available from the main Visual Studio menu and as a context menu item in the Solution Explorer. In the main Visual Studio menu system, the command is found in the Build menu (as shown in Figure 26) and the context menu item (shown in Figure 27) is presented when right-clicking on the web project in the Solution Explorer:
- Publish Web Site from the Build menu

- Publish Web Site from the context menu
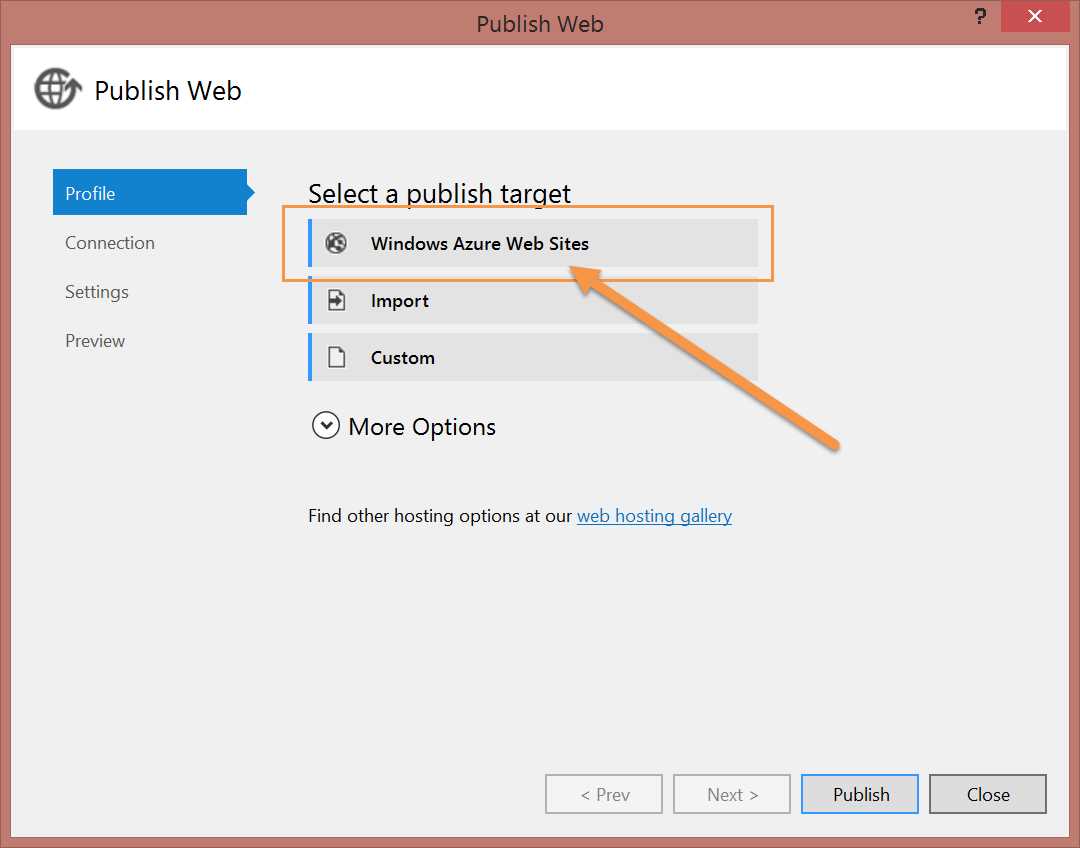
Regardless of the manner with which the menu was invoked, Visual Studio responds by displaying the “Publish Web” dialog. When the dialog is displayed, the first thing you have to do is provide information to Visual Studio about the intended destination of your website. In the case of many third-party hosting providers, this may include manually importing a PublishSettings file or manually entering the type of information found in a PublishSettings file. But, with the Azure integration built into the tooling, much of the manual effort is eliminated by selecting “Windows Azure Web Sites” in the “Select a publish target” section displayed in Figure 28. At that point, you will be asked to log into Azure using your Microsoft Account, and the Visual Studio will connect to the Azure Management Portal and download your PublishSettings file to automatically import your settings:
- Publish Web Site dialog
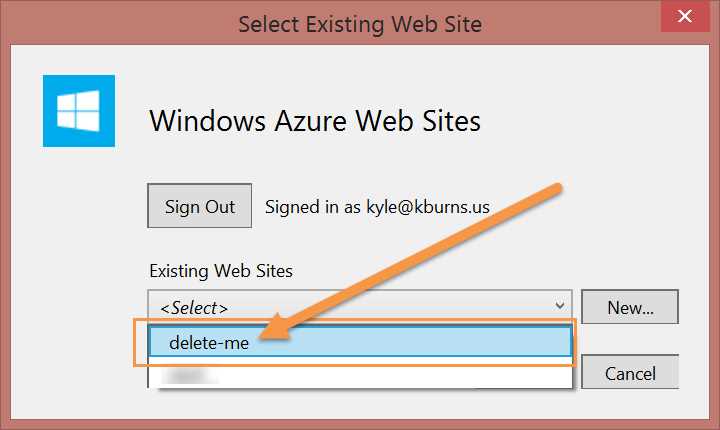
Once your PublishSettings file is imported, Visual Studio will ask you to select which of your provisioned websites on Azure should be used as the target for the current project, as illustrated in Figure 29. Select the appropriate site and then accept your selection:
- Publish Web Site select site
At this point, the Publish Web dialog is fully populated using the information from the website’s PublishSettings and the deployment can already be initiated by selecting the Publish command. However, you may also need to customize settings on one of the tabs prior to beginning the process.
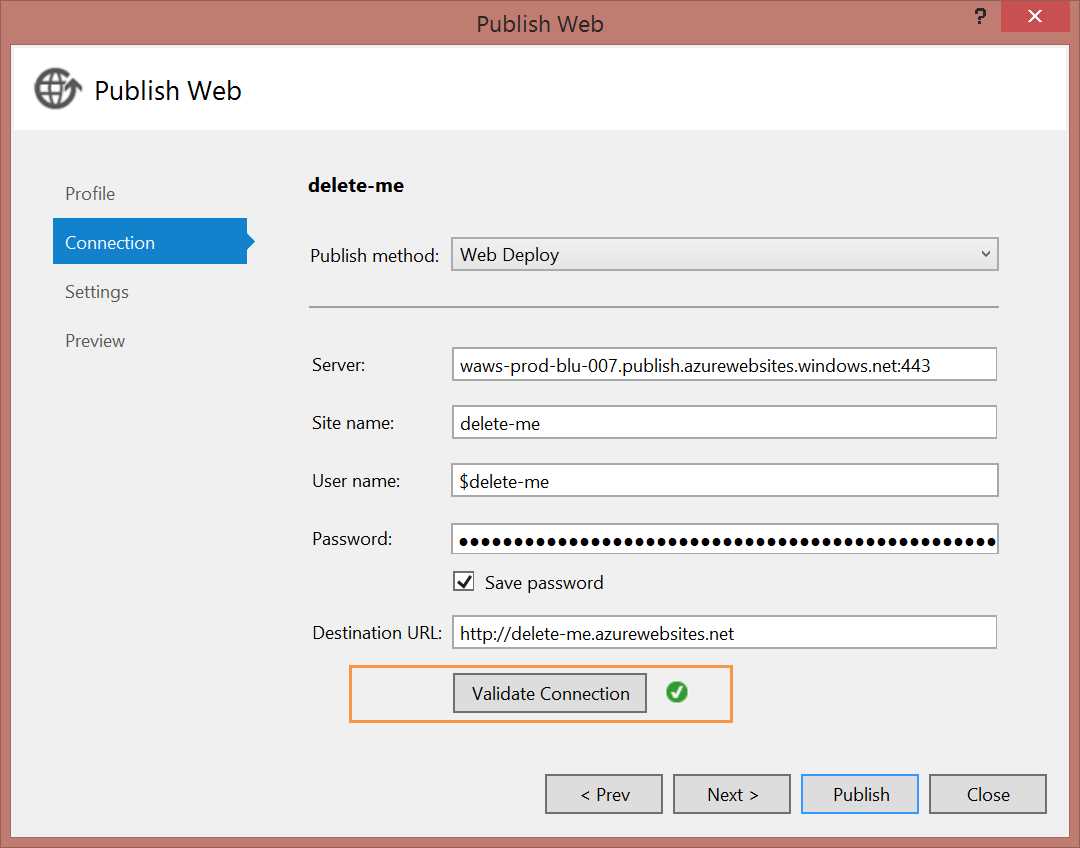
Connection Tab
The Connection tab, which is shown in Figure 30, is used to specify the publish method to be used for the deployment (in this example, we will stick with Web Deploy) as well as the connection and credential information applicable to the selected type. The Azure integration allowed this to be completely filled out without intervention, but you may want to (as an exploratory step) select the Validate Connection command to see the result, which can be seen in Figure 30:
- Publish Web Site connection settings
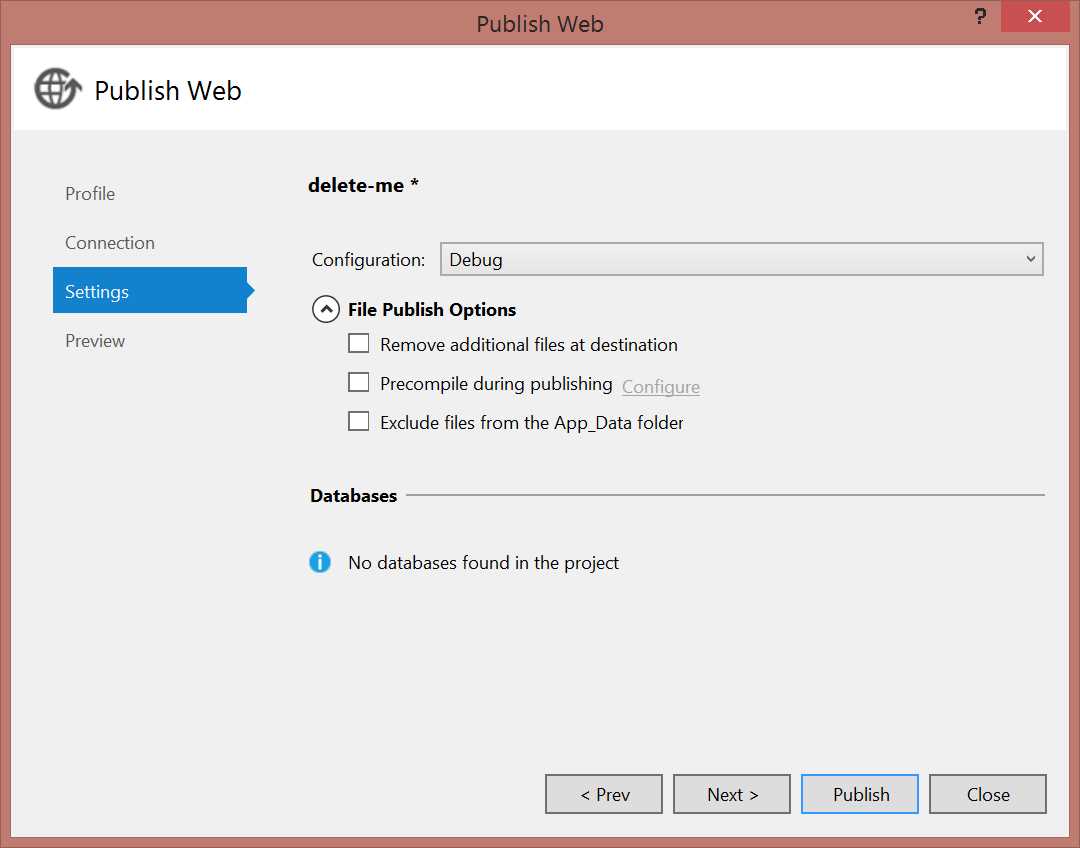
Settings Tab
The Settings tab, shown in Figure 31, is where you will most commonly need to customize your deployment options prior to publishing your website to Azure. On this tab, you’re given the option to select the configuration which will be used both for your build mode and the generation of appropriate configuration transform. Additionally, you can select from several options related to publishing files including:
- Remove additional files at destination: This option is used to establish your Visual Studio project as the one true source of which files should exist, and it specifies that no files that are not represented in your project should remain deployed within the Azure Web Site directory.
- Precompile during publishing: ASP.NET, by default, performs on-demand compilation of web content based on markup being in one file and the code related to that webpage or control being in a separate file known as a “code-behind”. This provides a great deal of flexibility in being able to modify code in place after it has been deployed. But, in certain circumstances, you will prefer either the performance impact of having the code compiled before visitors attempt to access your website or the comfort of knowing that the raw source file is not published directly to the web host file system. In these cases, you can execute a build prior to deploying the website and have generated assemblies in the bin folder instead of code-behind files. This will still allow you to modify markup without a build and deploy cycle but any application code change will require a new deployment.
Note: When considering the precompile option, it’s important to think about all of the application information surrounding what it does and why you are using it. If you’re choosing the tool simply to protect the application code from disclosure to website visitors, you can instead be comfortable knowing that the code-behind files will not be directly served up by IIS. If you’re attempting to protect the application code from somebody who has direct access to your site’s deployment location (such as FTP access and deployment credentials), additional steps such as obfuscation will be required to keep the individual from being able to simply reverse engineer the compiled assemblies using highly available .NET decompilation tools.
- Exclude files from the App_Data folder: Once a website is live, it is likely that subsequent deployments that overwrite the application’s data (which is, by default, stored in the App_Data folder) would have a negative and potentially destructive impact. You most certainly would not want to wipe out all of your website’s user registrations or blog postings every time you update the look and feel of a page or add new features. This options allows you to specify that your publish action should consider the App_Data directory to be off-limits to avoid a potentially costly mistake.
In addition to the release configuration and file publishing options, this tab also gives you the ability to specify options related to your database deployment, including the connection string which is to be used for your database hosted in Azure and whether or not your application should execute database migration code against this database when the application starts using Entity Framework’s Code-First Migrations tool.
- Publish Web Site settings
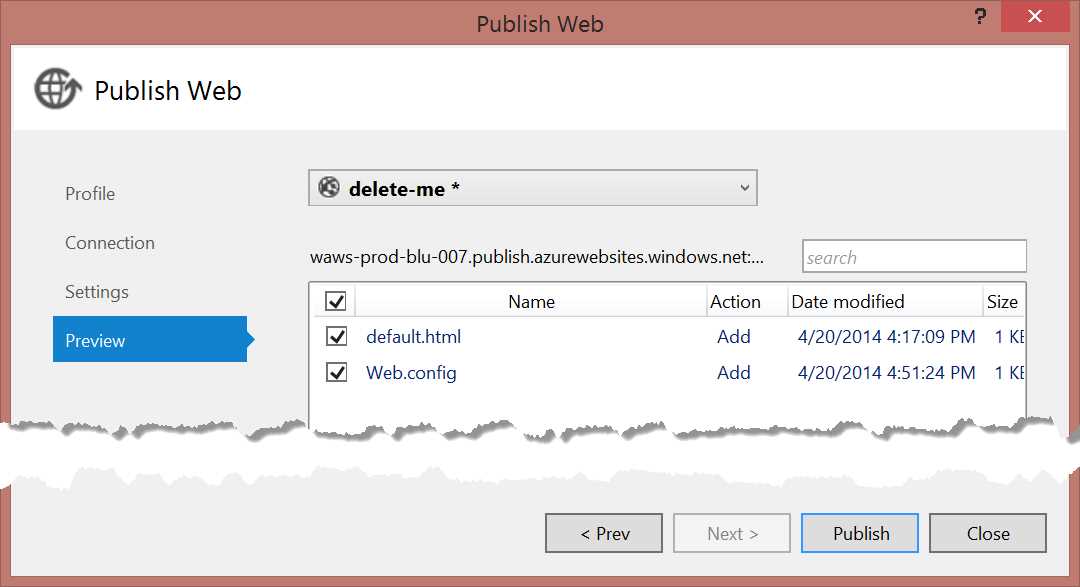
Preview Tab
The name Preview might suggest that you will have the opportunity to view what your deployed website will look like to the end user of the website prior to actually committing the changes, but the Preview tab actually gives you a preview of the actions that the deployment tool has determined are necessary to achieve a successful deployment. The output of generating preview actions is illustrated in Figure 32 and includes the list of assets upon which some action will be taken, the action to be taken (in our case, everything is to be added), the date that the asset was last modified, and the size of the asset. It might be valuable as you are growing used to the tool and learning what to expect from its behavior to use the preview output as a sanity check of sorts to make sure that you know what will happen when you initiate the deployment action by selecting the Publish command:
- Publish Web Site preview
Publish Command
Once you’ve either jumped straight to the Publish command or first reviewed and configured the additional tabs, the deployment tool connects to Azure and executes all of the necessary changes. As a final step in the deployment, Visual Studio will launch your web browser to the site root as shown in Figure 33:

- Publish Web Site completed
Provisioning New Azure Web Sites
In the previous sections on deployment from within Visual Studio, the focus and assumption has been that the developer using Visual Studio is working with a new or existing web project within Visual Studio and desires to deploy the contents of that project to an Azure Web Site that has previously been provisioned. Visual Studio also offers the ability to create a new Azure Web Site either when creating a new Visual Studio web project or when configuring the target Azure Web Site for deployment in the Publish Web Site tool.
Publish Web Site
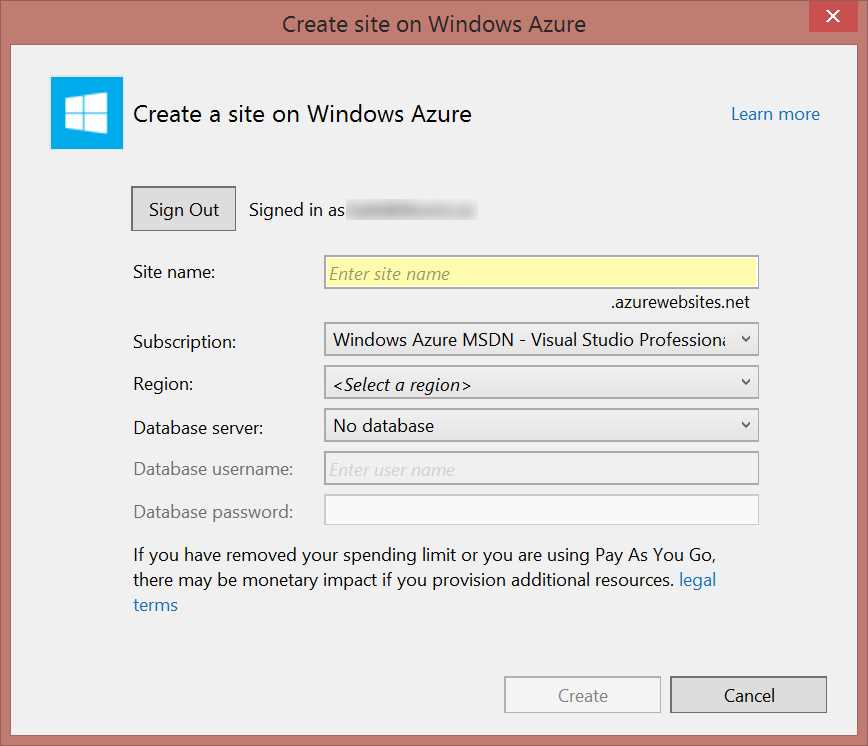
In order to create a new Azure Web Site during execution of the “Publish Web Site” tool, the tool is invoked either through the Build menu or context menu from the Solution Explorer as described in the previous section and “Windows Azure Web Sites” is selected as the publishing target. After logging into Azure, instead of selecting an existing Azure Web Site as described earlier, the “New” command is invoked which will display the dialog shown in Figure 34:
- Create Site dialog
In the Create Site dialog, you will need to specify a name for the new site, select the subscription to which the site should be tied for billing purposes, and select the region in which the site should be hosted. Additionally, if you choose to do so, you can select a database which the site should use to store data and create a new database, if necessary. After selecting the desired options, select the Create command and continue using the Publish Web Site tool as described earlier to deploy content to the newly created Azure Web Site.
New Web Project
In addition to creating a new Azure Web Site during the publishing process of a previously created web project, you can also use Visual Studio tooling to create a new Azure Web Site when you first create the web project. One advantage that this brings is it provides the opportunity to lock in the website’s base URL prior to completing the coding of the website. This ensures that you don’t come up with the perfect URL only to find that somebody else scooped it up while you were busy trying to develop a website as good as the URL.
To create a new Azure Web Site as part of the creation of a new web project, start by invoking the “New Project” dialog either by selecting “New Project” on the Visual Studio start page or by selecting “File…New…Project” from Visual Studio’s main menu. Visual Studio will display the New Project dialog which is shown in Figure 35:

- New Project dialog
After selecting the ASP.NET Web Application project type, Visual Studio displays the “New ASP.NET Project” dialog (shown in Figure 36) to collect details such as the specific type of web application to create, selection from among commonly selected references for convenience, and (most important to us now) the option to specify that new resources in Azure should be created for your project. The dialog gives you the option to select between creating the Azure resources using the Azure Web Site service or in a VM. Since our focus is on Azure Web Sites, select “Web Site”:
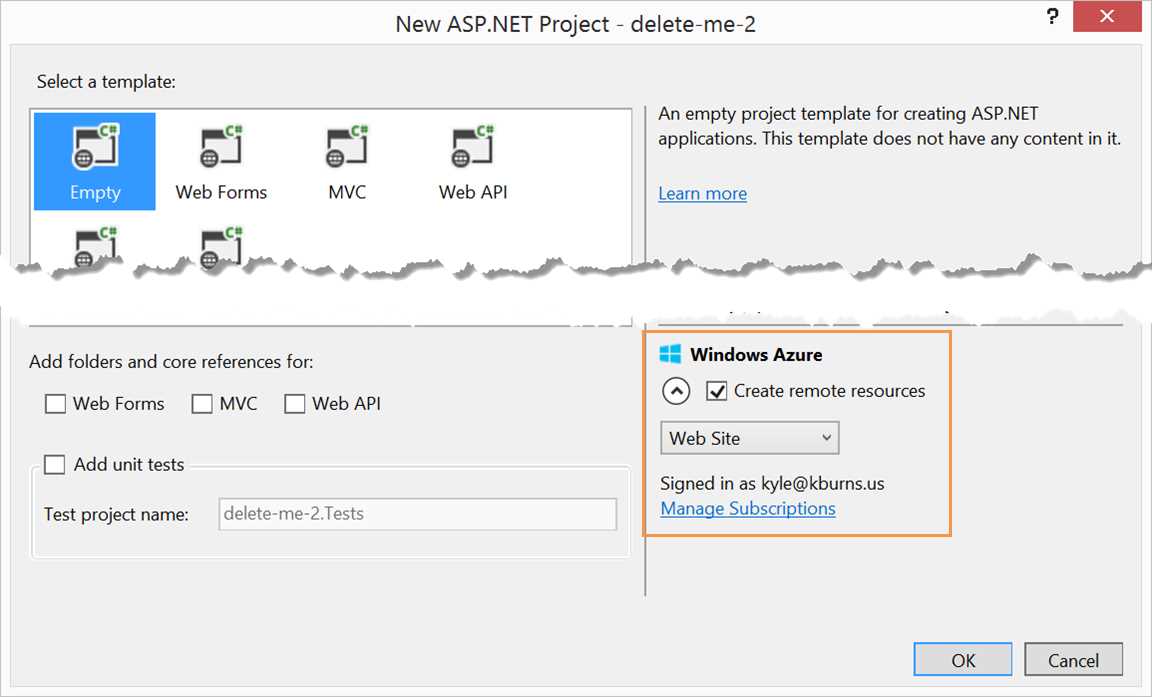
- New ASP.NET Project dialog
After specifying the website type and designating that the Windows Azure remote resource should be created, select OK. Visual Studio will then display the “Configure Windows Azure” dialog as shown in Figure 37. At a minimum, in this dialog you will specify a website name (a default will be specified based on the project name) and ensure that Subscription and Region are set appropriately. If your application will also require the creation of a database, a database server, username, and password will be specified in this dialog as well. After choosing the desired options, select OK and Visual Studio will finish creating the project and will interact with the Azure Management API to provision your Azure Web Site and, if applicable, database:
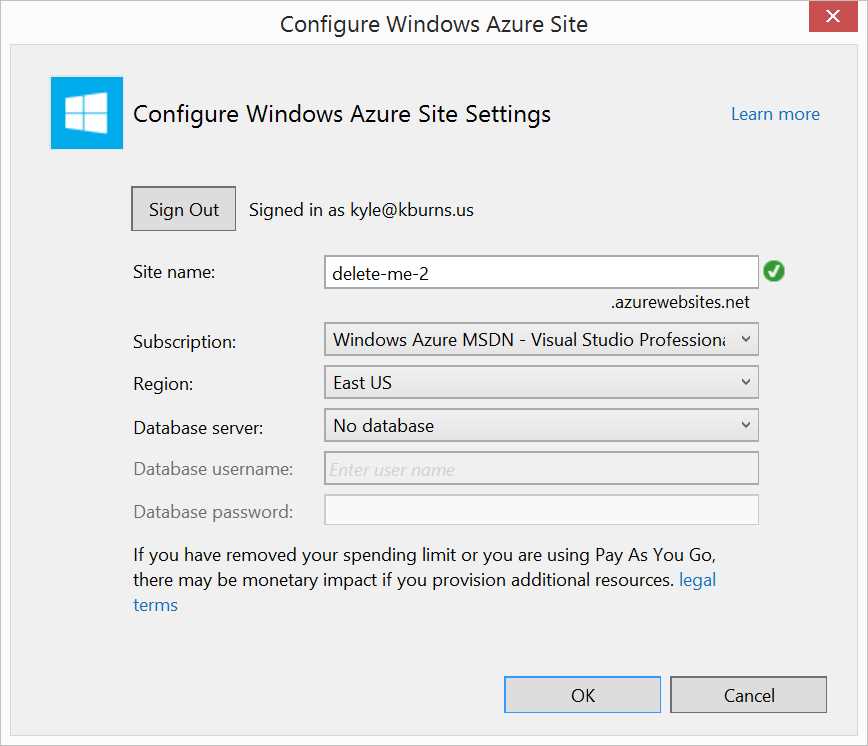
- Configure Windows Azure dialog
Once Visual Studio finishes setting up your project and Azure Web Site, work with the project just as you would any other web project. When you have a product that is suitable to share with the world, use the Publish Web Site command to deploy your assets.
Deploy from WebMatrix
In addition to Visual Studio, which is geared more to professional developers (even though the Express versions are marketed to the student and hobbyist), Microsoft has made WebMatrix available as a tool to allow for easy creation, editing, and deployment of websites.
The easiest way to work with your Azure Web Site that has previously been provisioned using the Azure Management Portal or some other tool is to sign into WebMatrix using the same Microsoft Account attached to your Azure account and from the startup page select “Open…Windows Azure”. This action displays a window showing the Azure Web Sites that have been configured in your Azure portal as shown in Figure 38. The dialog provides several categories to select from in the left-hand navigation. Selecting Windows Azure will display a list of your provisioned Azure Web Sites and allow you to select the website with which you want to work:

- WebMatrix Open Site dialog
After selecting OK from the Open dialog, the WebMatrix will display the website contents within the IDE and allow you to edit the files, create new files, and delete files. The connection to the website is a live remote connection so saving files in WebMatrix will automatically deploy the updates to your Azure Web Site.
Deploy from Source Control
Azure Web Sites has integration options to connect many popular source control repositories to your deployment location. Source control integration is included in the list for the sake of completeness but these options will be discussed in detail in the next chapter and will not be expanded upon here.
Automate Deployment
The deployment methods that have been discussed until this point have all revolved around clicking commands and selecting options in a graphical interface. But many administrators and developers find that management tasks such as provisioning resources and deploying code are completed more efficiently through a command line and, especially if the command line task can be scripted, are also less prone to error that way. In addition to a management REST API which could be used to produce your own command-line tools, Microsoft makes available a cross-platform command-line interface which has an installation package for Windows, Mac, and Linux as well as a set of scripting tools for use within Windows PowerShell. Any of these tools can be used to easily automate management tasks.
Azure Command-line Interface
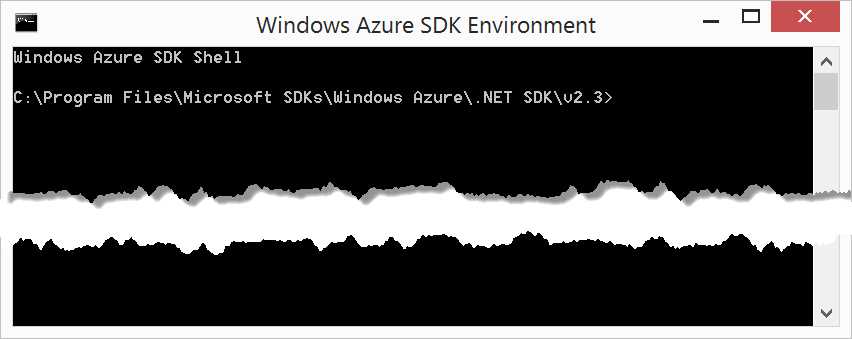
The Azure command-line interface provides a common command syntax for automating Azure management tasks from Windows, Mac, or Linux clients. In Windows, the tool is accessed by opening “Windows Azure Command Prompt” which will open a DOS-style command window similar to the one pictured in Figure 39:
- Windows Azure command prompt
This window is a standard Windows command window, but the path and other environment variables are set to ensure that the Azure command-line tools can be invoked. To access Azure commands, the azure command is typed followed by applicable options. If you’re at all like me, the first thing typed after opening the command window will be:
>azure help |
This displays documentation on the basic commands and services that can be controlled with the command-line tool—each with the ability to separately invoke help documentation for more detail. Since this book is focused primarily on Azure Web Sites, view the commands specific to this service by typing:
>azure help site |
Now that you have viewed the list of available commands, you may already be forming scripts in your mind. In order to get started using the tool, you need to get the environment ready to work with your Azure subscription. Intuitively, that would mean typing azure login at the command prompt and providing credentials but that would only work if you’re using an organizational account and a standard Microsoft account will not successfully log in. Instead, you will need to obtain your .publishSettings file and import it into the tool. This is initiated with the command:
>azure account download |
After typing the command, a web browser window will open to the Azure Management Portal and you will be prompted to download your .publishSettings file. Because you will use the path to the .publishSettings file in the next step from the command line, I highly recommend saving the file to a location that will be easy to remember and type. Assuming that the path C:\projects\my-settings.publishSettings was used during the download, next import the file into your command-line interface by using the following command:
>azure account import c:\projects\my-settings.publishSettings |
The command-line tool should import the file at this point and successful completion will display output similar to what is seen in Figure 40:

- Azure command-line interface import account
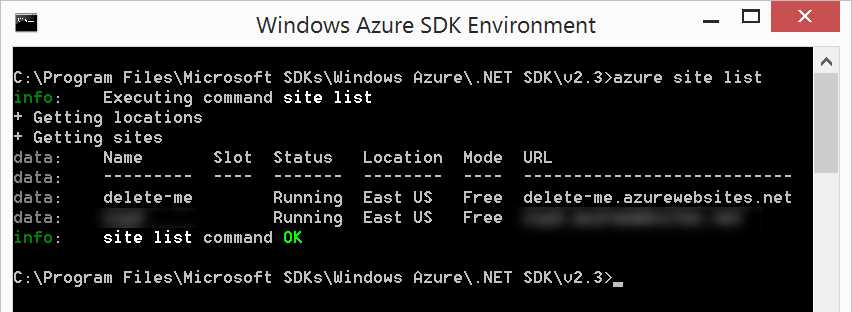
To see that the command-line tool is appropriately interacting with your Azure account at this point, obtain a list of Azure Web Sites that you have created by typing the following command and observing output similar to what is seen in Figure 41:
>azure site list |
- Azure CLI list sites
Now that you are interacting with Azure from the command, it’s time to provision a new site and deploy. We’ll walk through the process here but it’s important to point out that the example will make use of a Git repository, which will be explained in further detail in the next chapter.
Note: The following example references a site called delete-cli-deploy. If you’re following along on your own computer, you will encounter errors if you use the same site name used by the example because the site name must be unique within Azure. Be sure to pick your own unique site name when trying the example.
In the command-line interface, change your working directory to the directory containing the website files. The example website is stored on a directory on my computer with the path C:\projects\delete-cli-deploy to match what I will use as the Web Site name in Azure. Now issue the command azure site create delete-cli-deploy --git to initiate a new website creation. The tool will prompt for an appropriate region, which you should supply (I chose North Europe in the example). After providing several status updates, the tool will notify you that the website creation is complete. The command and output should be similar to what is shown in Figure 42:
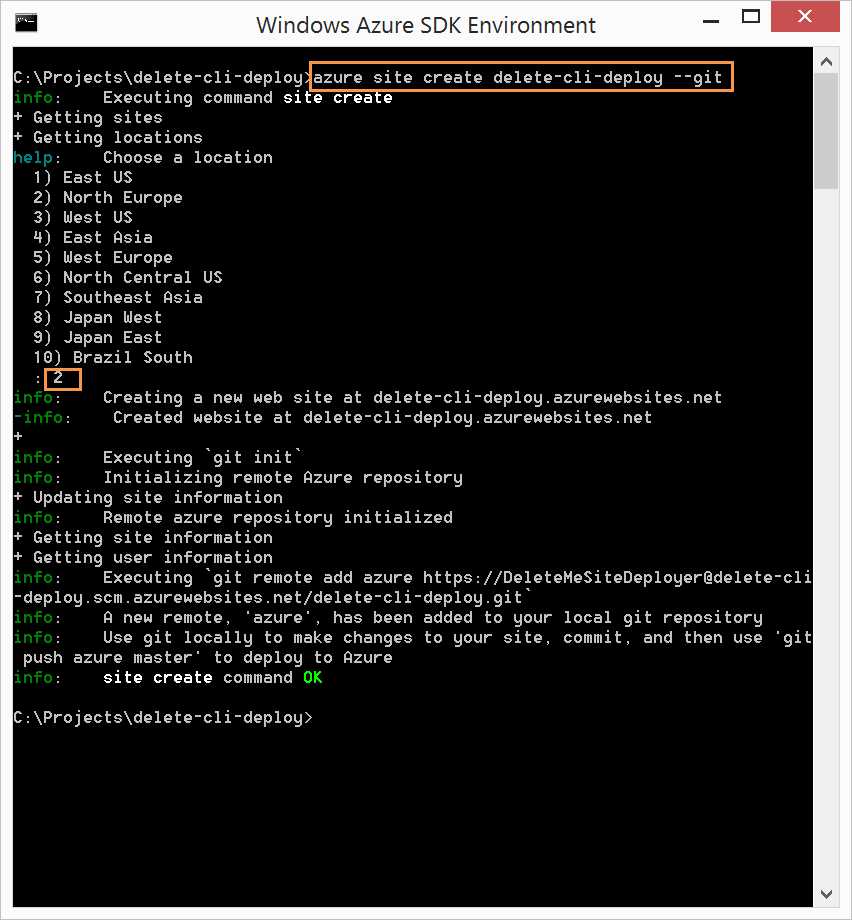
- Azure CLI create site
Once you have created the website, you need to add the contents of your local directory to the Git repository. This can be accomplished with the following commands:
git add . git commit –m “this is a checkin comment” |
Now that you have committed the changes to your Git repository, it’s time to deploy them to Azure. Use the following command to deploy the content:
git push azure master |
After prompting for deployment credentials, Git will deploy the content to your Azure Web Site. The result of having deployed can be seen by executing the final Azure command-line interface command that we will cover in this section:
azure site browse delete-cli-deploy |
The Azure command-line interface has a wealth of commands to explore and learn to leverage; we have only just scratched the surface in this section. I encourage anyone who may find themselves in a DevOps role or is just interested in automation to explore this tool either intuitively through the integrated help system or with the help of Microsoft’s online documentation.
Windows PowerShell
As an alternative to the Azure command-line interface, Windows PowerShell provides an environment tailored specifically to scripting management tasks, and integrates with the Microsoft .NET Framework to provide the ability to accomplish anything in your scripts that you are capable of writing .NET code to do. It also integrates with the same MS Deploy engine that is used within the tools used to deploy via the Visual Studio environment, so things such as deploying directly from Visual Studio without involving an intermediary such as Git are much more easily accomplished. PowerShell itself is a very powerful tool with the complexity that you would expect along with the power. “PowerShell Succinctly” could very easily get its own title in this e-book series so I will not make an attempt to provide instruction on PowerShell here. Instead, I will narrowly and clearly discuss the most basic commands necessary to connect to Azure through PowerShell and deploy a website created in Visual Studio.
The Azure PowerShell commands are most easily made available by launching the “Windows Azure PowerShell” item that was added to the Windows Start Screen when the PowerShell tool was installed. This will import the appropriate Azure cmdlets into the PowerShell environment and, on first load, you will be prompted to allow import of the modules. As with the command-line tools, the inquisitive developer (and I hope that includes everyone reading this book) may want to have their first act after launching the tool to explore the commands offered by typing help azure and exploring a bit.
Once you’ve completed any initial exploring from the help screens, the first thing you need to do in order to get productive is import your .publishSettings file from the Azure Management Portal. This is initiated with the command:
>Get-AzurePublishSettingsFile |
After typing the command, a web browser window will open to the Azure Management Portal and you will be prompted to download your .publishSettings file. Because you will use the path to the .publishSettings file in the next step from the command line, I highly recommend saving the file to a location that will be easy to remember and type. Assuming that the path C:\projects\delete-me\publish.publishSettings was used during the download, next import the file into your command-line interface by using the following command (wrapped for readability but enter on a single line):
>Import-AzurePublishSettingsFile -PublishSettingsFile |
The command-line tool will import the file at this point and, upon successful completion, prompt for the next command. If you have multiple subscriptions, you will be shown a message detailing the subscription that will be set as default and current, along with instructions for viewing additional subscriptions.
As with the command-line tool, a quick way to verify that you can successfully interact with your Azure account is to issue a command to retrieve a listing of Azure Web Site instances. At the PowerShell command prompt, type the following command:
Get-AzureWebsite |
After a few seconds, the system will respond by listing each website that you have added in Azure including the website name, running state, and the DNS address for the website. If this output is shown, you are set to use the .publishSettings file you imported to interact with your Azure account.
Once you have set up and verified your connection to Azure, deploying your project is a simple task accomplished with a single command. In the Azure PowerShell console, change the working directory to the directory containing the .csproj file for your web project and enter the following command:
Publish-AzureWebsiteProject -Name delete-me -ProjectFile .\delete-me.csproj |
The PowerShell cmdlet will invoke tools to build the project, create a package, and deploy the package to your Azure Web Site. Successful execution should produce results similar to what is seen in Figure 43:

- Azure PowerShell Publish project
Once the PowerShell command has completed execution, you can navigate a web browser to your website and view the updated contents.
As mentioned earlier, the functionality made available in the Azure PowerShell cmdlets is extensive and lets you wield a lot of control in your scripts. We’ve just barely scratched the surface here. I would encourage readers to visit Microsoft’s Azure Script Center at http://azure.microsoft.com/en-us/documentation/scripts/ where you will find a wealth of scripts either to use as is, or to study and tweak to solve exactly the problems that you need solved.
Summary
In this chapter, you have learned about several deployment options available to make your assets available to visitors of your Azure Web Site. For individual developers, working on the Microsoft platform deployment from Visual Studio will most likely be the first and most commonly used deployment method. But, as the application becomes more complex or additional developers are working in a team, automated deployment options will often enter into consideration. In the next chapter, you will focus a little more specifically on source control and on how two major source control systems integrate with Windows Azure.
- 1800+ high-performance UI components.
- Includes popular controls such as Grid, Chart, Scheduler, and more.
- 24x5 unlimited support by developers.