
Windows Azure SQL Reporting Succinctly®

CHAPTER 5
Report Parts
Report parts are a useful way to centralize business logic and simplify maintenance for commonly used elements in a report. In this chapter, I review the benefits of using report parts, and then explain how you can create and deploy report parts from each of the report development tools. I also explain how to manage the report parts on the SQL Reporting Server, and how users interact with report parts.
Benefits of Report Parts
Often the same types of data regions are used in multiple reports, but in different combinations. Although you can use subreports to reuse the same layout, report parts offer greater flexibility for less technical users to construct their own reports in Report Builder because they can use a report part as a starting point for report development, but they can also make changes to the report part without affecting the original version.
Users can also mix and match multiple report parts to personalize their reports. For example, rather than deploy one report with a table and another report with a chart, one user can combine these two items as report parts in a single report with the table on the left and the chart on the right. Another user can create a separate report with the chart report part on the left and the table on the right.
Not only can users take advantage of report parts for report personalization, they can also use them as a way to ensure the underlying data is correct for the report. Users of report parts don’t need to know how to write T-SQL queries to retrieve data from SQL Database because the query is already built and associated with the report part.
Report Part Creation
A report part is a single report item or a collection of report items that you selectively publish to the SQL Reporting server for others to use in their reports. Not only is the report item saved, but the related data source and dataset are also saved with it. Furthermore, if the report part references a report parameter in a filter or text box expression, the corresponding report parameter is also saved with the report part. Consequently, a user does not need to know how to build these supporting elements, but can successfully create a working report simply by dropping the report part into the body of a report.
You can create a report part from any of the following report items:
- Data regions: table, matrix, list
- Graphical data regions: chart, data bar, sparkline, gauge, indicator, map
- Report items: rectangle, image
- Parameter
To create a report part, you develop a report in BIDS, SSDT, or Report Builder by creating one or more of these report items in your report. You must select the individual items you want to add to the SQL Reporting server as a report part. When you deploy the report containing these items, the report parts are created and stored on the server.
If you create a nested structure, such as a table inside a list, the entire structure becomes a single report part. You cannot publish these items as individual report parts. However, the user can delete the nested table and then add a different report item to the list. However, you might consider creating nested items as standalone report items, in which case you can publish them as separate report parts. In that case, the user can select the separate report items and then nest them if desired.
Report Part Deployment
An item in your report does not become a report part until you select it as an item to publish by using either BIDS, SSDT, or Report Builder. When publishing from BIDS or SSDT, the report parts deploy to a common folder that you define specifically for report parts in the project properties, but you can move report parts to other folders on the SQL Reporting server and configure security on them if you are a SQL Reporting administrator.
Note: To deploy report parts to the SQL Reporting server, the user name you use to publish the report parts must be assigned to the Content Manager or Publisher role, as described in Chapter 6, Security. If the user name is assigned to the My Reports role, you can also deploy report parts to your My Reports folder.
Deployment from Report Designer
In BIDS or SSDT, after you develop your report, you select report parts to publish by opening Publish Report Parts from the Report menu. You can see the report part candidates in the dialog box in a list. Expand each item to view its thumbnail image, as shown in Figure 44. You can assign a new name and a detailed description to help users locate the item when using the search feature in the Report Part Gallery available in Report Builder. For example, instead of deploying a report part as Chart1, you can provide a more descriptive name, such as Sales by Territory By Year, and you can place keywords and more information about the chart type, the fields it contains, its axes, series, and groupings in the description.
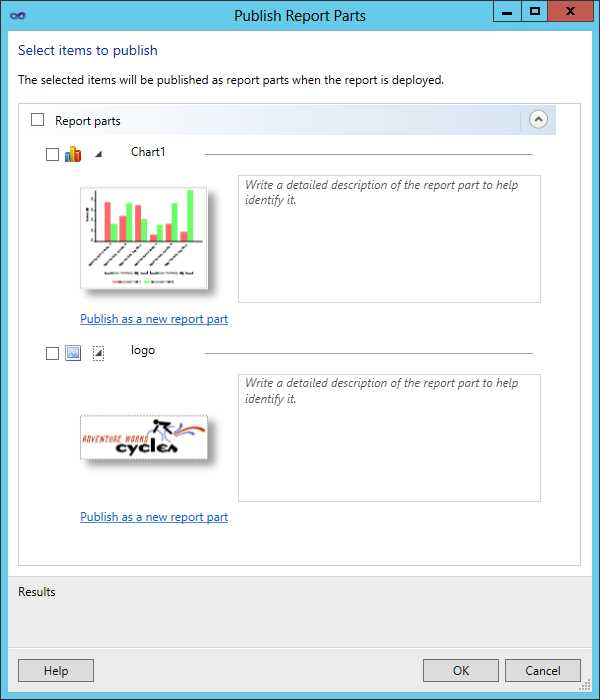
- Report Part Selection
A report part deploys to the SQL Reporting server only when you select the check box for each item you want to deploy. You are not required to deploy all report items in the Publish Report Parts dialog box. After you select the desired report parts, you must also deploy the parent report to deploy the report parts. The output window, shown in Figure 45, confirms successful deployment of the report parts in addition to the parent report.
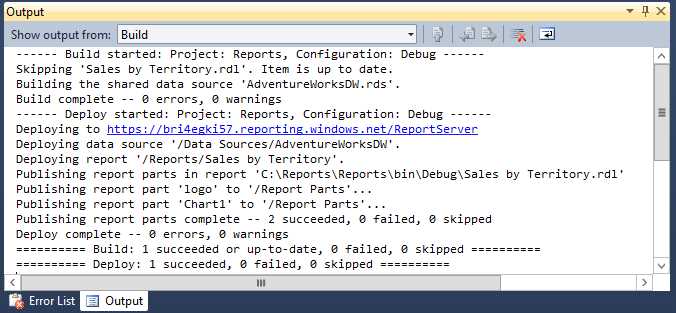
- Deployment output
Deployment from Report Builder
Report Builder also allows you to deploy report parts. To do this, click Report Builder in the upper left corner and select Publish Report Parts. In the first page of the Publish Report Parts dialog box, shown in Figure 46, you have the option to publish all report parts by using the default settings or to review and modify report parts first. You should choose the Review and modify report parts before publishing option because it’s better to assign the report parts clear names and add descriptions. When you choose this option, the second page of the Publish Report Parts dialog box displays, which is similar to the one you see in BIDS or SSDT. The difference in deploying from Report Builder is that you can optionally change the target folder for each report part.
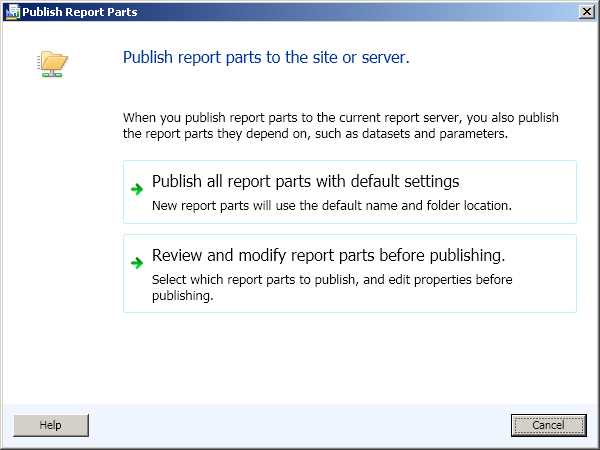
- Report Builder’s Publish Report Parts options
Report Part Redeployment
In any of the report development client tools, you can modify a report item that you have previously published as a report part. When you do this and then later open the Publish Report Parts dialog box, you see an additional option to deploy a new copy of the report part. In BIDS and SSDT, this option appears as a link entitled Publish As A New Report Part. When you click this link, a message box prompts you for confirmation to assign a new ID to the report part and displays a message that you cannot modify the prior version of the report part by continuing. If you click Yes, both versions of the report part are available on the SQL Reporting server, but only the last one published is available for modification in BIDS or SSDT. In Report Builder, instead of a link to click, you must select the Publish As A New Copy Of The Report Part check box to create a new version of the report part.
If you decide instead to redeploy your report part without creating a new version, the report part on the SQL Reporting Server is replaced with the new version. The next time a user opens a report containing that report part in Report Builder, an update notification will be displayed in the application window, as described later in this chapter in the Update Notification section.
Report Part Management
Once report parts are placed on the SQL Reporting server, you manage them like reports. You can browse the list of report parts in folders by using the Web service URL as described in Chapter 7, Report Access or by using the SQL Reporting management portal. However, you cannot click the report part link to view its contents.
You can configure security on report parts like you do for reports as described in Chapter 6, Security. A user must be assigned to the Browser or the Report Builder role to search for a report part in the Report Part Gallery and add it to a report in Report Builder.
Report Part Gallery
To add a report part to your report in Report Builder, go to the Insert tab of the ribbon and click Report Parts. The Report Part Gallery opens on the right side of the page, and includes a search box for you to locate a report part by a word or phrase in the report part name or description. You can view all available report parts by pressing Enter without typing a keyword, as shown in Figure 47.
Note: The Report Part Gallery is not available in BIDS or SSDT.

- Report Part Gallery
You can further refine the scope of the search by clicking Add Criteria near the top of the Report Part Gallery. You can select one or more of the following criteria:
- Created. A date range.
- Created By. Original author name in domain\user format or a partial string.
- Modified. A date range.
- Modified By. Author of the most recent version in domain\user format or a partial string.
- Server Folder. An ellipsis button to navigate folders on the SQL Reporting server in search of report parts.
- Type. One or more report part types in a list, such as chart, rectangle, or tablix, used as a filter for the search.
When report parts match the criteria you specify, an icon is displayed for each report part when you use the Thumbnail view in the Report Part Gallery. If you prefer to see the list of report parts by name, click Details at the top of the Report Part Gallery. In either view, you can select a report part to view the information about the original author, the last author, the created and modified dates, the location of the report part on the report server, and the description, if one exists. To add it to your report, double-click it or drag it to the report design surface.
When you add the report part to your report, the related data source and dataset are also added to the report and appear in the Report Data pane. If the report part uses an embedded dataset, you can view the query and also change it if you like. However, the data source connection string is not visible because a report part requires a shared data source, which keeps the connection string secure.
You can use the report part’s dataset to create other report items in your report. For example, if you add a chart from a report, you can use fields from its dataset to add a corresponding table. That way, even if users don’t know how to add a data source or write a query, they can take advantage of prebuilt components to add more content to a report without relying solely on report parts.
Because the dataset is accessible in your report, regardless of whether it’s shared or not, you can use it to add more report items to the report. For example, let’s say you add a chart from a report part. You can resize it to make room for a matrix, and then use fields from a dataset and apply formatting. Without knowing how to add a data source or write a query, you can easily select a report part from the library, and then reuse the dataset for your own report item.
You can also change the report part’s properties. For example, you can change the color palette of a chart if you like. Then you can deploy it to the server in its new form. You can replace the existing report part if you have the necessary permissions, or you can publish it as a new report part as described in the Report Part Deployment section earlier in this chapter. If you make a change to the report part, there is no obligation to update the report part on the report server. Your change can remain exclusive to your report.
Update Notification
If you have added a report part to your report that someone else subsequently modified and updated on the SQL Reporting server, you will see a notification the next time you open that report in Report Builder, as shown in Figure 48. If you already have Report Builder open and know that the report part you used has been redeployed to the server, you can click Report Builder and click Check for Updates on the menu to display the notification.
![]()
- Report parts update notification
You can click View Updates to see which report part is updated. However, you see only the name and description of the report part, the modified date, and the user who updated the report part. The only way to discover what type of change was made is to select the check box next to the report part name and click Update to apply the change to your report. If you decide you prefer the version that was in your report prior to the change, click Undo to restore it.
The final consideration is the difference in change management. With a report part, the user can edit the report part to personalize it or update the new report with the most current copy of the report part. It is important to note that the update can occur only when the user opens the report for editing in Report Builder, but not when rendering the report on the report server. A subreport always renders the most current version, without giving the user a choice. Furthermore, any changes to a subreport affect all reports that reference it, whereas changes to a report part affect only reports for which the report author applies the update.
- 1800+ high-performance UI components.
- Includes popular controls such as Grid, Chart, Scheduler, and more.
- 24x5 unlimited support by developers.