
Windows Azure SQL Reporting Succinctly®

CHAPTER 4
Report Management
When you finish report development, you deploy the report to production, which means you copy the report definition language (RDL) file to the report server. At that point, the report development process is complete and the report administration process begins. In the SQL Reporting management portal, you can upload content, manage shared data sources, and monitor SQL Reporting activity by reviewing the execution log or server usage statistics.
Report Deployment
Deployment is the process of moving files from the report developer’s computer to the SQL Reporting server. Usually, the report developer creates files as part of a solution in BIDS or SSDT. A solution can contain one or more report projects, each of which can contain a set of files, such as shared data sources, shared datasets, reports, and report parts. The deployment process copies these files to the ReportServer database. Similarly, a user can save a report developed in Report Builder to the SQL Reporting server.
There are two ways that you can deploy reports and related files to the report server from BIDS or SSDT:
- Click Deploy on the Build menu.
- Right-click a project in Solution Explorer and click Deploy on the Context menu.
Either way, when you select the project in Solution Explorer before initiating the deploy process, all reports, shared data sources, shared datasets, and report parts in the project deploy after you provide credentials for a user having a Content Manager or Publisher role assignment. Likewise, you can deploy a solution with multiple projects and deploy reports for all projects. In some cases, you might prefer to deploy a specific report or set of reports. To do this, select one or more reports individually in Solution Explorer, and deploy only those selected reports.
You might give certain users the necessary permission to add content to the SQL Reporting server from Report Builder. These users can save reports to the server when they have the server URL.
Note: When you deploy or upload a report with a shared data source, that data source must already exist on the SQL Reporting server to allow SQL Reporting to bind the two objects together. Otherwise, the procedure will fail.
Another option is to give users access to the SQL Reporting management portal as co-administrators where they can upload reports directly to the report server using the web application. However, this interface allows users to upload one report at a time by using the Upload button on the toolbar.
Redeployment
Sometimes report modifications are required to fix issues during testing or to accommodate changing business requirements. In that case, you need to edit the report definition file and then redeploy the report, which you can do using any of the methods described in the previous section of this chapter. However, it’s important to understand what happens during redeployment.
Let’s say that you’ve made a change to the RDL on your computer and that RDL has previously been deployed to the SQL Reporting server. The deployment process replaces the original report definition on the server with the new report definition as long as you retain the target folder setting. All existing report properties are preserved, so it’s not necessary to update the data source definition or security permissions when you redeploy a report.
Data Source Management
After you deploy a data source to the SQL Reporting server, you can make changes to it by altering the connection string or by changing the credentials associated with the data source. In the SQL Reporting management portal, navigate to the folder containing the data source and click the data source link to open the Edit Data Source dialog box shown in Figure 39.
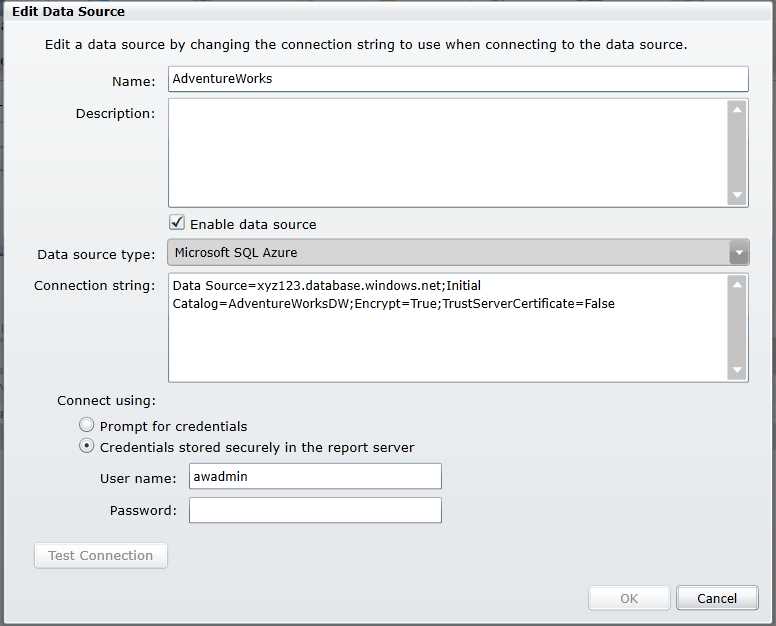
- Data source settings on SQL Reporting server
Notice the Connect Using options at the bottom of the Edit Data Source dialog box. Instead of storing credentials in the report server, you can select the Prompt For Credentials option to prompt the user for credentials when the user opens the report. If you select this option, the user sees the following message as a prompt: “Enter a user name and password to access the data source.” You can replace this prompt with a customized message if you like.
Execution Log
In the SQL Reporting management portal, click Download on the ribbon to get a copy of the execution log in CSV format. You provide a start date and end date for the data you want to download as well as a file name in which to store the data. The file includes the following information:
- ItemPath. The folder hierarchy in which the item is located on the SQL Reporting server.
- UserName. The user login name executing the report.
- ExecutionId. A unique identifier for a user session.
- RequestType. In SQL Reporting, the only valid value is Interactive.
- Format. The format to which the report is rendered.
- Parameters. The parameter values for the report execution.
- ItemAction. The action performed during report execution: Render, Sort, BookMarkNavigation, DocumentNavigation, GetDocumentMap, Findstring, Execute, or RenderEdit.
- TimeStart. The date and time the report execution started.
- TimeEnd. The date and time the report execution ended.
- TimeDataRetrieval. The number of milliseconds required to retrieve data.
- TimeProcessing. The number of milliseconds required to process the report.
- TimeRendering. The number of milliseconds required to render the report.
- Source. The source of the report execution, such as Live or Session, in which a subsequent request to export the report to another format occurs.
- Status. A successful status is logged as rsStatus. Otherwise the first error code encountered is logged.
- ByteCount. The byte size of a rendered report.
- RowCount. The total number of rows in all datasets in a report.
- AdditionalInfo. An XML fragment that contains more information about report execution. The information stored here can vary for each entry in the execution log.
An example of the AdditionalInfo value looks like this:
<AdditionalInfo> |
The AdditionalInfo column can contain the following values:
- ProcessingEngine. The engine used to process the report. A value of 2 represents the newer on-demand processing engine (post SQL Server 2005).
- ScalabilityTime. The number of milliseconds required to scale operations for the pagination and processing components. If this value is 0, the request was not executed under memory pressure.
- EstimatedMemoryUsageKB. The estimated peak memory in kilobytes reported by the pagination and processing components.
- DataExtension. Each data extension or data source used in the report, including the number of occurrences per data source.
- Connections. An XML structure of information about the connection, including the data source name, the duration of the connection, the dataset name, the number of rows retrieved per dataset, the total retrieval time per dataset, and the ExecuteReader time per dataset.
Server Usage Statistics
To view server usage statistics, click Statistics in the SQL Reporting management portal ribbon. A dialog box like the one shown in Figure 40 displays a line chart for usage by hour. When you choose the week or month views, the chart also includes data for maximum usage per hour.
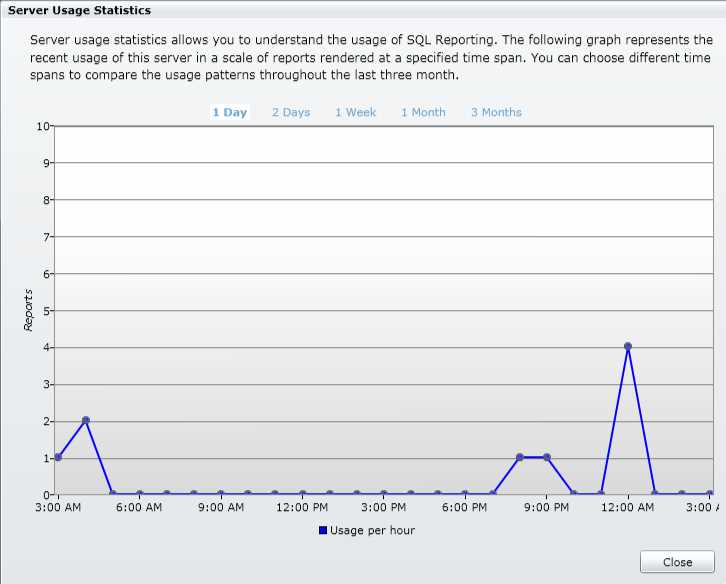
- Server usage statistics
Report Server Properties
You can use SQL Server Management Studio (SSMS) to configure several properties for your SQL Reporting server that are not accessible in the SQL Reporting management portal. Some properties enable specific features, such as My Reports. Other properties define global values for report execution time-out or the amount of report history that can accumulate for a report.
When you open SSMS, select Reporting Services in the Server Type drop-down list in the Connect To Server dialog box. If SSMS is already open, click Connect in the Object Explorer window, and click Reporting Services. In the Server Name text box, type the URL for your SQL Reporting server, such as https://xyz123.reporting.windows.net/ReportServer. In the Authentication drop-down list, select Basic Authentication, type the user name and password for the SQL Reporting administrator account, and then click Connect. The report server then appears in the Object Explorer window, as shown in Figure 41, with separate folders available for managing report execution jobs, security, and shared schedules. To access report server properties, right-click the server node at the top of the tree, and click Properties.
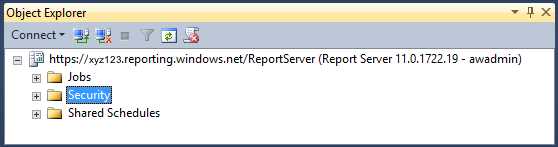
- SQL Reporting server in the SSMS Object Explorer
Note: The Server Properties dialog box in SSMS displays all properties for SQL Server Reporting Services, whether the server is on-premises or hosted by the Windows Azure platform. However, most properties are applicable only to an on-premises server.ote: Null values are ignored when evaluating any aggregate function.
General Properties
The General page of the Server Properties dialog box shown in Figure 42 displays the current version and edition of SQL Reporting as well as the authentication mode and the URL for the Web service. By default, the My Reports folder feature is disabled, but the ActiveX client print control is enabled. The My Reports folder feature allows users to save reports to a personal folder on the server. The ActiveX client print control adds a button to the HTML Viewer toolbar when viewing a report in a browser. The Print button allows users to print the report they are viewing without first downloading the report to their computers.
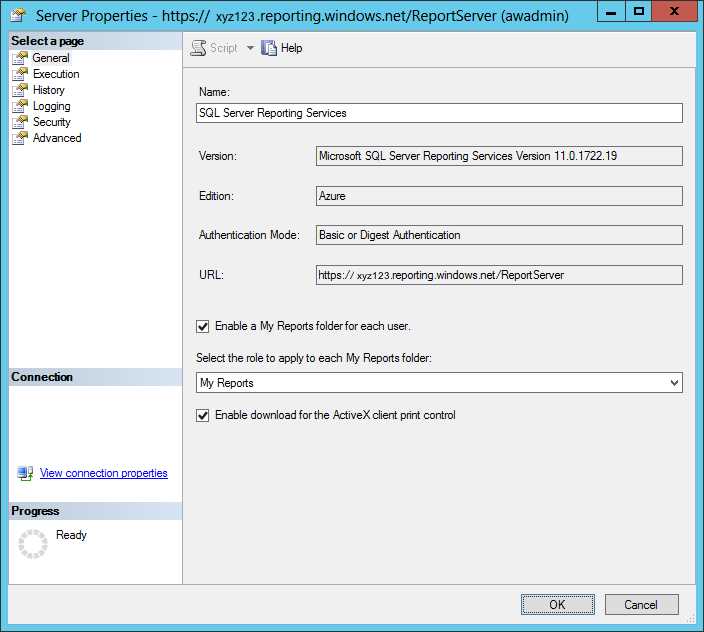
- General SQL Reporting server properties
To enable the My Reports feature, select the Enable a My Reports Folder For Each User check box and then select a security role, such as My Reports, in the Select The Role To Apply To Each My Reports Folder drop-down list. The role you select gives users the functional equivalent of the Content Manager role, but only for the user’s My Reports folder, as described in Chapter 7, Report Access. This permission allows users to add or delete content in a folder that only they can access.
You do have the option to disable the ActiveX client print control. If you disable the print control, users will not have the ability to print a report from the report page in the browser.
Execution Properties
The Execution page of the Server Properties dialog box allows you to control whether a time limit applies to report execution at the server level. The default setting is to limit report execution to 1800 seconds, as shown in Figure 43. If you expect some reports to require long execution times, you can switch to the Do Not Timeout Report Execution option. A report might time out because the query execution takes a long time or because a complex report requires longer processing and rendering times. You can edit a report’s dataset properties to place a time-out on the query only.

- General SQL Reporting server properties
- 1800+ high-performance UI components.
- Includes popular controls such as Grid, Chart, Scheduler, and more.
- 24x5 unlimited support by developers.