
Windows Azure SQL Reporting Succinctly®

CHAPTER 2
Getting Started
Before you can start delivering reports with SQL Reporting, you need to have data available for those reports. SQL Reporting can use only SQL Database as a data source, so you need to plan some time for establishing a database to use for reports. To do this, you need a Windows Azure subscription to which you add the SQL Database and SQL Reporting services. Then you create a database in SQL Database and migrate data into it.
Windows Azure Setup
SQL Database and SQL Reporting are separate services available on the Windows Azure platform. Windows Azure is a subscription-based, cloud-computing platform hosted by Microsoft. Prior to activating a subscription, you must create a Microsoft account (formerly known as a Windows Live ID) at http://go.microsoft.com/fwlink/p/?LinkID=238657. Next, sign up for Windows Azure at http://windows.azure.com.
Rather than pay licensing and maintenance fees for software, and investing in hardware, you can pay a monthly bill for provisioned services. At the time of this writing, Windows Azure is available as one of the following types of subscriptions:
- 3-Month Free Trial. You can sign up for a full-featured, free trial version of Windows Azure, which includes 750 hours of SQL Database and 100 hours per month of SQL Reporting, in addition to other services.
- Pay-As-You-Go. You pay for the services you use. SQL Database pricing is currently based on database size. SQL Reporting pricing is based on the number of clock hours per deployed instance. In addition, if the number of reports executed with a clock hour exceeds a specified threshold, an additional hour is billed. Refer to Pricing Details for current pay-as-you-go rates for SQL Database, SQL Reporting, and other services.
- 6-Month Plan or 12-Month Plan. With these plans, you make a minimum monthly commitment to receive a discount against the base pay-as-you-go rate. A higher monthly commitment earns a higher discount. If you don’t provision enough services to meet the minimum commitment, the balance rolls over to a future month, and is forfeited at the end of the subscription term if never used.
SQL Database Setup
When you create a new database on the SQL Database server, you must decide which edition to use and specify the maximum size of the database. You have the following choices for your database:
- Web edition: 1 GB or 5 GB
- Business edition: 10 GB, 20 GB, 30 GB, 40 GB, 50 GB, 100 GB, or 150 GB.
To add the SQL Database service to your subscription, use the Management Portal link on the Windows Azure home page. Then in the Management Portal, click New in the bottom left corner, point to Data Services, and then point to SQL Database. You have the following three options:
- Quick create. Use this option to create a database by providing a name, assigning it to a database server (or creating a new database server if none exist yet in your subscription), and creating a login name and password. The database is automatically created as a 1-GB Web edition database and assigned to a server and a data center location.
- Custom create. Use this option to create a database by providing a name, selecting an edition, a maximum database size, a collation method, and a server.
- Import. Use this option to copy a database from another SQL Database server or from an on-premises SQL Server database instance. Before you select this option, however, you must export the database that you want to copy to a BACPAC file and store it in a Windows Azure blob storage account. I explain more about how to do this in the Data-Tier Application Export and Import section later in this chapter. To perform the import, you supply the URL and a name for the database, select the server, and create a login name and password.
After creating your database, it appears in the SQL Databases list in the Windows Azure Management Portal, as shown in Figure 1. Here you can see its status, the data center location, the Windows Azure subscription with which it is associated, the server name, the database edition, and its size.

- SQL Databases in Windows Azure Management Portal
To view more information about the database, click its name in the SQL Databases list. At the top of the page is a dashboard containing one chart that displays database activity for the past 24 hours and another chart comparing the current size of the database to the maximum size defined. (If you later decide you want to change the edition type or the database size, click the Configure link at the top of the page.)
Scroll through the dashboard page to view additional information about the database in the lower portion of the page. Here you can find the fully qualified domain name of the server and to locate the URL for online management of the database. This URL opens the Management Portal for SQL Database, which allows you to execute queries or design tables, views, or stored procedures for your database. You might prefer to use SQL Server Management Studio instead if you already have an on-premises SQL Server instance available.
You cannot access the server through the online Management Portal or from SQL Server Management Studio until you add your computer’s IP address to the server configuration. To do this, click the SQL Databases icon in the navigation panel on the left, click the Servers link above the list of databases, and then click Configure. You can add your current IP address with a single click and you can set up additional rules to grant access to a range of IP addresses if necessary. Be sure to click Save at the bottom of the page when you have finished creating rules.
Data Migration Options
Once your database server is in place, you are ready to add a database and load data. If you are moving a database from an on-premises database server, you have several options:
- Deploy Database Wizard
- Database script
- Windows Azure SQL Data Sync
- Data-Tier Application Export and Import
- SQL Server Integration Services
- Bulk Copy Utility
Deploy Database Wizard
If you are running an on-premises SQL Server 2012 instance, you can use the Deployment Wizard in SQL Server Management Studio to deploy a SQL Server 2008, 2008 R2, or 2012 database. To do this, right-click the database to migrate in Object Explorer, point to Tasks, and click Deploy Database to SQL Azure. On the Deployment Settings page of the wizard, click Connect to define the connection to the server by providing the server name and login information. You can also change the database name if you like. You have the option here to specify the database edition and maximum size of the database.
Of all the data migration options available, the Deploy Database Wizard is the most straightforward. However, there are potential issues with your database that can cause problems with the migration. Review the guidelines and limitations at MSDN to understand what you need to address prior to migrating your database.
Database Script
In SQL Server Management Studio, you can use the Generate Scripts Wizard to produce T-SQL scripts for migrating your on-premises database to your SQL Database server. In Object Explorer, right-click the database, point to Tasks, and click Generate Scripts. Step through the wizard to select the objects to migrate, either the entire database or specific database objects, and save the scripts to a single file. Before you save the file, click Advanced on the Set Scripting Options page of the wizard to change some of the options for compatibility with SQL Database as shown in Table 2.
Scripting Options for Generate Scripts Wizard
Option | Setting |
Convert UDDTs to Base Types | True |
Script for the database engine type | SQL Azure Database |
Types of data to script | Schema and data |
Although you can open and execute script files in the Management Portal for SQL Database, a database script file is likely too large. The portal accepts input of 250,000 characters or less. To run your script, use SQL Server Management Studio to connect to your SQL Database server. In the Connect To Server dialog box, you need to provide the entire server name found on the database’s dashboard page of the Windows Azure Management Portal. For example, if your server is xyz123, then you type in xyz123.database.windows.net as the server name. Switch to SQL Authentication and type in the login name and password that you specified when creating the database. Then open the saved script file, select the applicable database in the Available Databases drop-down list in the toolbar, and then execute the script.
SQL Database does not fully support T-SQL. Consequently, you might need to modify your script before it can complete successfully. As with the Deploy Database Wizard, you should be familiar with the list of guidelines and limitations at MSDN to understand what you might need to change in your script.
The advantage of using a database script is that it is relatively straightforward. You can use a script to migrate a subset of your database or make changes to the schema where necessary. However, a potential problem with this approach is that the script performs single row inserts of your data. If you have a high volume of data, this approach to data migration can perform poorly.
Windows Azure Data Sync
Another option for migrating data is to use synchronization between an on-premises SQL Server 2005 SP2 (or later) and a SQL Database server. In the Windows Azure management portal, go to the SQL Databases page. Point to Add Sync on the ribbon at the bottom of the page, and click New Sync Agent. If this is the first time you have added a sync agent, you must click the link to download it and then execute the downloaded installer, but leave the New SQL Data Sync Agent dialog box open.
When installation of the agent is complete, return to the New SQL Data Sync Agent dialog box and type a name for the agent and then select a region and subscription for the agent. On the ribbon at the bottom of the page, click Manage Key and then click Generate to create the agent access key. Click the icon to the right of the key to copy it to your clipboard, and then run the newly installed application on your computer. Click Submit Agent Key on the ribbon and then paste the agent access key into the dialog box that displays.
Next, click Register on the ribbon to register the database. Click the applicable type of authentication, SQL or Windows, for the on-premises database and supply the server and database names in the SQL Server Configuration dialog box.
Back in the Windows Azure management portal, click SQL Databases in the navigation pane, point to Add Sync on the ribbon, and then click New Sync Group. Provide a name, and select the region and subscription for the sync group on the first page of the wizard. On the second page of the wizard, select a database in the Hub Database drop-down list, and then provide credentials for a connection to this database. In addition, you need to specify whether the hub or the client wins in the event of a conflict. On the third page, you specify a reference database, credentials if it uses SQL authentication, and a sync direction. You can choose one of the following options for sync direction:
- Bi-Directional
- Sync to the Hub
- Sync from the Hub
You can define the tables and columns to synchronize by establishing sync rules. To do this, click SQL Databases in the Windows Azure management portal, click the Sync link at the top of the page, click the Sync group, click the Sync Rules link, and then click the Define Sync Rules link. Next select either the hub or reference database in the drop-down list. Then click the arrow next to a table to display the columns that you want to synchronize. Click Select on the ribbon at the bottom of the page to select all columns in all tables. Another option is to select a single column in a table and then click Select to select all columns from the current table. When you finish making your selections, click Save.
You can use the Windows Azure management portal to synchronize the databases on demand or on a schedule. Click SQL Databases, click the Sync link, and then click the sync group. For on-demand sync, click Sync on the ribbon. Otherwise, click Configure, and then click On for Automatic Sync. You can then set a Sync Frequency ranging from five minutes to one month. Be sure to click Save before exiting the page.
Data-Tier Application Export and Import
You can use the Data-Tier Application (DAC) export process to copy a database’s schema definition and data into an export file (BACPAC). You then store this file in a Windows Azure blob storage account from which you use the DAC import process to migrate the data to a database in your SQL Database server. An advantage of using this approach is the ability to use source control and versioning to manage your database.
Windows Azure Blob Storage Account
Before you create the BACPAC file, you must create a blob storage account. In the Windows Azure Management Portal, click New in the lower left corner, point to Data Services, point to Storage, and then click Quick Create. In the URL box, type a subdomain name using a combination of lowercase letters and numbers with a minimum length of three and a maximum length of 24 characters. If the subdomain you type in is already in use on the Windows Azure servers, a warning message displays and prevents you from creating your account until you supply a unique name. When the name is valid, a green icon is displayed in the URL box, as shown in Figure 2.

- Storage account creation
You must also select a data center location in the Region/Affinity Group drop-down list. The Enable Geo-Replication check box is selected by default. The geo-replication option ensures that your data persists in multiple locations, at no additional cost, to mitigate an outage in a single data center. Click Create Storage Account to start the process, which can take several minutes to complete.
After the account is created, you must next add a Blob storage container to it. On the Storage page of the Windows Azure Management portal, click the account in the list, then click the Containers link at the top of the dashboard page, and then click Create a Blob Container. To create a new container, you assign it a name that conforms to the following rules:
- Between 3 and 63 characters
- Contain only letters, numbers, or -
- Cannot start with - or use - twice in succession
You also choose one of the following access methods:
- Private. Only you as the account owner can use the container.
- Public Blob. Anyone can access the blobs in the container, but not the container properties and metadata.
- Public Container. Anyone has full access to the container.
When the container is successfully created, you will have a URL like this: http://adventureworksazure.blob.core.windows.net/database-export.
BACPAC Export
SQL Server Management Studio includes the Export Data-Tier Application Wizard to create a BACPAC file that you can upload to the blob storage in Windows Azure. Right-click the database in Object Explorer, point to Tasks, and click Export Data-tier Application. On the Export Settings page of the wizard, you have two options for saving the BACPAC file. One option is to save the file locally and then use a custom application or tools like Azure Storage Explorer or Cloud Storage Studio 2 to upload the file to your blob storage. The other option is to save the file to Windows Azure, in which case you need to click Connect to define the connection settings.
Before you can define the connection settings in the wizard, you need the Storage Account and Account Key. You can find these values by opening the dashboard page for the storage account in Windows Azure Management Portal. Click Manage Keys at the bottom of the page to view the storage account name, primary access key, and secondary access key. You can click a button next to each of these fields to place the value in your computer’s clipboard and then paste the value into the corresponding field in the wizard.
Note: Be sure to paste the storage account first to clear the account key.
When you make a successful connection, you complete the Export Settings page of the wizard by selecting a container, as shown in Figure 3. You can set the file name and the temporary location for the file.

- Export Data-tier Application Wizard
On the Advanced tab, you can select specific tables to export if you prefer not to migrate the entire database, as shown in Figure 4.
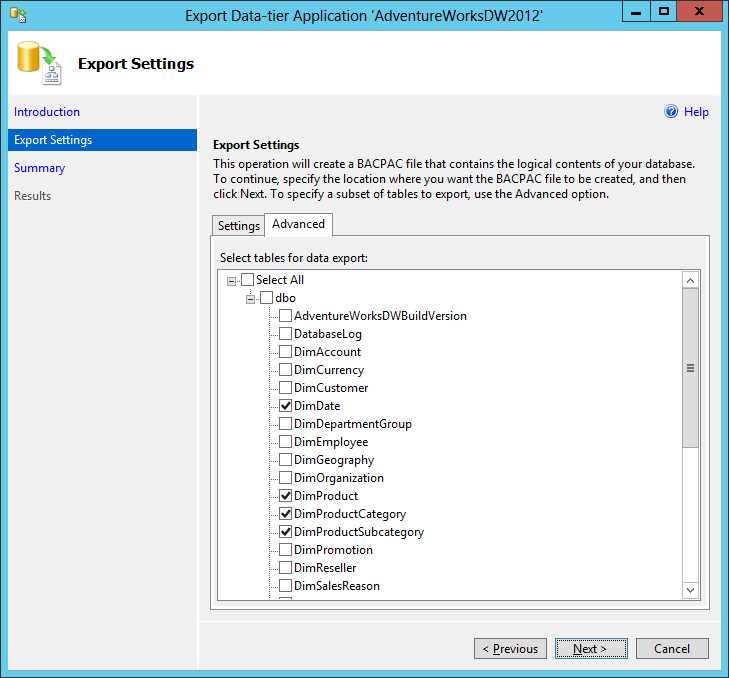
- Individual table selection for export
Migration into SQL Database
In the Windows Azure Management Portal, use the navigation pane to open the list of databases on your SQL Database server. Click Import on the ribbon at the bottom. You need to supply the URL for the BACPAC file. When you click the URL box, a dialog box opens to allow you to navigate the storage account and its containers to locate the BACPAC file.
You must name the database, select a database server or create a new one, and provide the login credentials. You have the option to select a check box to configure advanced database settings. Specifically, you set the edition and size of the database.
SQL Server Integration Services
You can use the SQL Server Import and Export Wizard in SQL Server Management Studio as a simple way to export data from your on-premises server to a SQL Database server. In Object Explorer, right-click the database, point to Tasks, and then click Export Data to launch the wizard. The Choose a Data Source page of the wizard automatically populates with the correct data source provider, server, authentication, and database selections. On the Choose a Destination page, select .NET Framework Data Provider for SqlServer. Then change the Encrypt property to True, type in the login password, set TrustServerCertificate to True, and type in the login User ID. The fully qualified name for the server and the name of the database goes into Initial Catalog, as shown in Figure 5.

- Properties for .NET Framework Data Provider for SqlServer
On the Specify Table Copy or Query page of the wizard, you have the option to select specific tables or write a query to define the data you want to migrate.
On the Review Data Type Mapping page, you might see warnings, but you can continue as long as no errors appear. You can then run the package built by the wizard. However, it’s possible that the package will fail. In spite of this failure, the wizard copies the schemas for each table to the target database in SQL Database. For example, if the source tables do not have clustered indexes, the wizard fails. You can leave the wizard open and then add a clustered index by using the SQL Server Management Studio interface or by running a T-SQL command like this (for each table to migrate):
|
create clustered index idxDateKey on dbo.DimDate (DateKey) |
After adding the clustered indexes, click Back to return to the Specify Table Copy or Query page and resume the wizard. You must switch to the query mode because the table copy mode creates tables in the target database during package execution, but the tables already exist if you try to run the wizard again after the initial failure. If you switch the wizard to query mode, you can write a SELECT statement to copy all or part of the data for a table, select the target table on the Select Source Tables and Views page, as shown in Figure 6, and then execute the wizard. You need to perform this set of steps for each table individually.

- Mapping source query to destination table
Note: For a one-time migration, the wizard should suffice, but if you are regularly migrating databases to SQL Database, consider building a more robust Integration Services package. In this package, you can separate the steps of copying schemas, adding clustered indexes, and copying data.
Bulk Copy Utility
The SQL Server bcp utility is yet another way to move data, although it is limited to only data. The advantage of this approach is higher performance for high data volumes as compared to using single row inserts with the Database Script method. The bcp utility cannot migrate the database schema, so you must use a separate process to prepare your database in SQL Database. For example, you can use the Generate Scripts Wizard in SQL Server Management Studio to define the database objects you want to copy, and set the Types of Data to Script option to export the schema only. You run the bcp utility once to export data from an on-premises SQL Server to store the data in data files, and then run it again to transfer the data from the data files into an empty database on your SQL Database server.
Note: You must use the bcp utility from the client tools that install with SQL Server 2008 R2 or later.
Export from Source Database
Run the bcp utility for each table that you want to migrate. To export data from your SQL Server database, use a command like this in a Command Prompt window:
|
bcp AdventureWorksDW2012.dbo.FactResellerSales out c:\your path\FactResellerSales.dat -S localhost -T -n -q |
Note that the second argument is the database, schema, and table name. The fourth argument is the output path for storing the exported data file. You can replace the argument following the -S parameter with a server or database instance name if you are not running the bcp utility on the source server. The remaining parameters are optional. The -n parameter keeps the native database types of the data while the -q parameter executes the SET QUOTED_IDENTIFIERS ON statement when connecting to the source database.
Import into Target Database
Next run the bcp utility to import the data into the target database on your SQL Database server. Let’s say you have a table that you want to process in two steps. You can use the following commands to define the rows to process in each execution of the bcp utility:
|
bcp AdventureWorksDW.dbo.FactResellerSales in c:\your path\FactResellerSales.dat –n –U awadmin –S tcp:xyz123.database.windows.net –P YourPassword –b 500 –L 29999 –h"TABLOCK" bcp AdventureWorksDW.dbo.FactResellerSales in c:\your path\FactResellerSales.dat –n –U awadmin –S tcp:xyz123.database.windows.net –P YourPassword –b 500 –F 30000 –L 61000 –h"TABLOCK" |
The -S parameter now references the SQL Database server with tcp: as a prefix. Notice also the -U and -P parameters that require the login name and password you set up for your database. The -b parameter specifies the number of rows to process per batch during execution of the bcp utility. The -F and -L parameters specify the first and last rows in the file to process, although in the first bcp command the -F is omitted to indicate processing starts with the first row. Last, the -h parameter is a hint to apply a table-level lock during processing.
Note: If your data contains Unicode characters, be sure to add the –w parameter to ensure these characters are retained and not converted.
SQL Reporting Setup
At the time of this writing, you perform the setup of the SQL Reporting server on a separate portal. To access this portal, click your user name in the top right corner of the Windows Azure Management Portal and click Previous Portal. In the lower left corner of the old portal, click Reporting and then in the center of the browser window, click Create a New SQL Reporting Server. In the Create Server dialog box, select a subscription and a region for hosting the new server. To minimize latency issues, consider selecting the same region that you use for the SQL Database that you plan to use as a data source for reporting. You must also establish an administrator name and password to use for managing the report server.
In the left panel, you can expand the Subscriptions folder to view the subscriptions associated with your account. Expand the subscription to view your SQL Reporting servers. Click on a server to see its Web service URL and manage its contents, which you will learn how to do in Chapter 4, Report Management.
- 1800+ high-performance UI components.
- Includes popular controls such as Grid, Chart, Scheduler, and more.
- 24x5 unlimited support by developers.