
Windows 8.1 Succinctly®

CHAPTER 5
Working with Files: Storage, Database, and Settings
The Storage
Windows Store apps’ storage management is another big difference compared to the traditional Windows apps approach. If desktop apps are able to virtually write and read files in any computer’s folder, Windows Store apps run in a sandbox. The storage works like a standard hard drive but it’s isolated: apps can’t read and write data outside this sandbox (unless the user explicitly allows it). The most important advantage of this approach is security. Apps aren’t able to access the core OS’s files so they can’t corrupt the phone’s integrity, whether intentionally or by mistake due to a bug. The data saved in the local storage is persisted; even if the app is closed or suspended, the data is not lost but, rather, is always available every time it’s launched again.
The Windows Runtime offers different types of storage which are available thanks to the ApplicationData.Current class that is part of the Windows.Storage namespace. Let’s take a look, in detail, at the available storages.
The Local Storage
The local storage is identified by the LocalFolder class and it’s the most widely used. It’s a traditional file system in which you can create files and folders just as you do on your computer’s hard disk. However, due to the isolated nature of the storage, the stored data can be accessed only by your app. Other apps can access to your data only by using a special contract (which will be detailed in Chapter 8).
The local storage follows the same life cycle of the app: once it’s uninstalled, the storage is also removed. There are no limitations in the storage quota that an app can use, other than the free available space on the device. The local storage also offers an easy way to manage a common scenario in app development (which is storing and reading settings) thanks to a class called LocalSettings. We’ll look at how to use it in more detail later in this chapter.
One important thing to mention about the local storage is that it’s strictly connected to the new backup feature introduced in Windows Phone 8.1. In fact, in the latest Windows Phone version, the built-in backup feature is able to save more than just the phone’s settings, including such things as the Start screen configuration, the e-mail accounts, or the lock screen image (also the local storage’s content of 8.1 apps). This way, if the user resets his or her phone or buys a new one, he or she will find it in its exact previous state, including its app’s data.
It’s important to highlight that this backup is saved to OneDrive (even if it’s transparent to the user, he or she won’t be able to see the data on his or her account) and it counts against his or her quota.
The Local Storage without Backup Support (Windows Phone Only)
The automatic backup feature applied to the local storage is helpful because, as developers, we don’t have to find an alternative way to provide a backup mechanism for our app. However, there are some apps that don’t play well with this feature. If the app downloads a lot of data from the Internet, it could be a waste of the OneDrive user’s storage, saving everything on the cloud.
For example, think about an app such as Spotify or Xbox Music. The local storage can become quite big since the user has the ability to download the music offline so that they can listen to it without an Internet connection. In this case, we’re not talking about content generated by the user but, rather, about content that is simply downloaded from Internet and stored locally.
For all of these scenarios, where saving the whole app’s content would be a waste of space on the user’s OneDrive account, Windows Phone 8.1 provides a special storage called LocalCacheFolder which is also part of the ApplicationData.Current class. It works exactly like the LocalFolder; the only difference is that the data created and put into this storage is not automatically saved during the backup procedure.
The Roaming Storage
The roaming storage is identified by the RoamingStorage class offered, as usual, by the ApplicationData.Current object. It has the same basic features of the local storage, which means that the data is isolated and it can store settings (by using the RoamingSettings class), files, and folders.
The most important feature of the roaming storage is that the data is automatically synchronized with all the devices of the users that are registered under the same Microsoft Account, whether or not they are Windows 8.1 computers, Windows 8.1 tablets, or Windows Phone 8.1 smartphones. This means that, if the user has installed the same app on multiple devices, we are able to synchronize the data so that, for example, the user can start a job on the tablet and then resume it on the phone (or the user can find the same settings on the phone that he or she configured on his or her tablet).
The roaming’s storage doesn’t follow the same life cycle of the app. Even if it’s uninstalled, the roaming data is kept for 30 days in case the user changes his or her mind and decides to reinstall the app again. The roaming storage is based on OneDrive, even if it doesn’t count against the user’s quota. However, there’s an important limitation when it comes to the storage’s size. The current limit is, in fact, 100 KB. Consequently, the roaming storage is ideal to save small data such as the app’s settings and not the real content (such as a database). If you need to synchronize the app’s content, it’s better to rely on a third-party solution (such as the mobile services offered by Azure, Microsoft’s cloud solution).
However, the 100KB limit is not fixed as Microsoft could decide to increase it in the future. For this reason, when you need to save some data in the roaming storage and you want to make sure to fill the maximum space, you don’t have to check against the 100KB quota but against a special property called RoamingStorageQuota. In this case, if Microsoft decides to increase it in a future Windows update, you won’t have to change your code to support the new quota. The following sample shows how to retrieve this information so that we can display it to the user with a pop-up message:
private async void OnShowQuotaClicked(object sender, RoutedEventArgs e) { string quota = string.Format("Roaming quota: {0} KB", ApplicationData.Current.RoamingStorageQuota); MessageDialog dialog = new MessageDialog(quota); await dialog.ShowAsync(); } |
What happens if you exceed the roaming quota? Nothing, as the data simply won’t be synchronized anymore until you delete some content. Another important limitation to mention is that the synchronization isn’t performed instantly but, rather, it depends on many scenarios including the network availability, whether or not the device is running in battery saver mode, etc. Consequently, you shouldn’t rely on the roaming storage for critical scenarios in which you need the data to be synchronized as soon as possible on all the devices.
Since the synchronization is performed out of developer’s control, we can subscribe to an event called DataChanged (offered by the ApplicationData.Current class) which is triggered when the synchronization has been performed and the data has been updated. This way, if for example the settings are changed, we can perform the required operations to properly update the app’s behavior. The following sample shows how to subscribe to this event:
public sealed partial class MainPage : Page { public MainPage() { this.InitializeComponent(); ApplicationData.Current.DataChanged += Current_DataChanged; } private void Current_DataChanged(ApplicationData sender, object args) { //update the application } } |
The Temporary Storage
The last storage’s type is called temporary storage and it is identified by the TemporaryFolder class offered by the ApplicationData.Current object. It’s used mainly for caching scenarios, which means data that can be useful to speed up the app (such as keeping a set of images downloaded from Internet) but that aren’t critical. This storage, in fact, can be erased at any time, without notice, by the user (in case he or she decides to clean up the temporary files) or by the system (in case of a maintenance task).
Unlike the other two storage’s types, the temporary storage doesn’t support settings management.
Working with Folders
A common scenario for developers is to organize the storage’s structure by using folders in order to keep files separated in a logical way. Every folder in the Windows Runtime is identified by the StorageFolder class which offers many methods to perform the most common operations (such as creating a new file, getting the list of available files, renaming a file, etc.).
Consequently, the main root of every storage’s type (for example, the LocalFolder and the RoamingFolder objects) are identified with the StorageFolder class. Here is a brief list of the most common operations that can be performed:
- CreateFolderAsync() to create a new folder
- GetFolderAsync() to get a reference to an existing subfolder
- DeleteAsync() to delete a folder
- RenameAsync() to rename a folder
The following sample code shows how to create a folder inside the local storage:
private async void OnCreateFolderClicked(object sender, RoutedEventArgs e) { await ApplicationData.Current.LocalFolder.CreateFolderAsync("myFolder"); await ApplicationData.Current.LocalFolder.CreateFolderAsync("myFolder2\\mySubFolder"); } |
As you can see, you’re able to manipulate not just folders but also subfolders by using the backslash (\) as separator between one folder and the other. If one of the subfolders doesn’t exist, the Windows Runtime will create it (for example, the second line of code will create both the myFolder2 and mySubFolder folders). In this case, we’re using a double backslash just to properly escape this special character.
The Windows Runtime also offers a way to check to see if a folder already exists before performing any operation by using the TryGetItemAsync() method. If the folder exists, you will get a reference to it in return; if not, you’ll get a null object. The following code, before creating a new folder called myFolder, checks to see if it already exists in the local storage:
private async void OnCreateFolderClicked(object sender, RoutedEventArgs e) { IStorageItem storageItem = await ApplicationData.Current.LocalFolder. TryGetItemAsync("myFolder"); if (storageItem == null) { await ApplicationData.Current.LocalFolder.CreateFolderAsync("myFolder"); } } |
Note: The TryGetItemAsync() method is available only in Windows. In Windows Phone, the only way to check to see if a folder exists is to use the GetFolderAsync() method and, by using a try / catch statement, catch the exception that is raised in case the folder doesn’t exist.
Working with Files
Files are identified by the StorageFile class which offers a set of methods to perform the most common operations such as:
- DeleteAsync() to delete a file
- RenameAsync() to rename a file
- CopyAsync() to copy a file from one location to another
- MoveAsync() to move a file from one location to another
The starting point from which to work with a file is the StorageFolder class since each file belongs to a folder (since, as we’ve mentioned, the storage’s root is also treated as a folder). We have two different options: to create a new file by using the CreateFileAsync() method or to get a reference to an existing file by using the GetFileAsync() method.
Let’s look at how to write and read a file in the local storage. The Windows Runtime offers two different approaches, one based on streams and the other on bulk operations.
Creating and Reading a File as a Stream
To create a file, we need to use the CreateFileAsync() method offered by the StorageFolder class which accepts as parameter the file’s name. The following sample shows how to create a text file in the local storage:
private async void OnCreateFileClicked(object sender, RoutedEventArgs e) { StorageFile file = await ApplicationData.Current.LocalFolder.CreateFileAsync("file.txt"); } |
In return, you’ll get a reference to the file you’ve just created. Also, when you’re working with files, you can use the TryGetItemAsync() method we’ve previously seen with folders to check to see whether or not a file already exists before performing any operation, like in the following sample:
private async void OnCreateFileClicked(object sender, RoutedEventArgs e) { IStorageItem storageItem = await ApplicationData.Current.LocalFolder.TryGetItemAsync("file.txt"); if (storageItem == null) { StorageFile file = await ApplicationData.Current.LocalFolder.CreateFileAsync("file.txt"); } } |
Note: It’s important to remember that, in this case also, the TryGetItemAsync() method is available only on Windows. On Windows Phone, you have to call the GetFileAsync() method and, by using a try / catch statement, catch the exception that is raised if the file doesn’t exist.
Once you have a reference to the file, you can call the OpenAsync() method to get the reading or writing stream. The type of stream is defined by the FileAccessMode property which is passed as parameter. To perform a writing operation, we need to use the ReadWrite value, like in the following sample:
private async void OnCreateFileClicked(object sender, RoutedEventArgs e) { IStorageItem storageItem = await ApplicationData.Current.LocalFolder.TryGetItemAsync("file.txt"); if (storageItem == null) { StorageFile file = await ApplicationData.Current.LocalFolder.CreateFileAsync("file.txt"); IRandomAccessStream randomAccessStream = await file.OpenAsync(FileAccessMode.ReadWrite); using (DataWriter writer = new DataWriter(randomAccessStream.GetOutputStreamAt(0))) { writer.WriteString("Sample text"); await writer.StoreAsync(); } } } |
When you open the file by using the OpenAsync() method, you get a reference to the content’s stream which is identified by the IRandomAccessStream class. Thanks to this stream, you’ll be able to use the DataWriter class to perform writing operations. It’s important to highlight that the IRandomAccessStream class provides access both to a writing and a reading stream. In this case, since we want to write some content to the file, we need to the use the output stream, which is obtained using the GetOutputStreamAt() method. The parameter identifies the stream position from which we want to start the writing operation. In our case, we use 0 to start from the beginning.
The DataWriter class is a special Windows Runtime class that makes it easier to write the most common data types to a file. In the sample, you can see the WriteString() method to write a text but you can use also, for example, WriteBytes() to write binary content, WriteDouble() to write a number, WriteDateTime() to write a date, and so on. Once you’ve written the content to the file, you can finalize the operation by calling the StoreAsync() method.
The approach to read the file’s content is a similar one. Also in this case, after getting a reference to the file by using the GetFileAsync() method, we need to open it by using the OpenAsync() method. In this case, since we just need to read the content, we can pass as parameter the Read value of the FileAccessMode enumerator. Here is a full sample:
private async void OnReadFileClicked(object sender, RoutedEventArgs e) { IStorageItem storageItem = await ApplicationData.Current.LocalFolder.TryGetItemAsync("file.txt"); if (storageItem != null) { StorageFile file = await ApplicationData.Current.LocalFolder.GetFileAsync("file.txt"); IRandomAccessStream randomAccessStream = await file.OpenAsync(FileAccessMode.Read); using (DataReader reader = new DataReader(randomAccessStream.GetInputStreamAt(0))) { uint bytesLoaded = await reader.LoadAsync((uint)randomAccessStream.Size); string readString = reader.ReadString(bytesLoaded); MessageDialog dialog = new MessageDialog(readString); await dialog.ShowAsync(); } } } |
As you can see, the code is very similar to the standard procedure. The main differences are:
- Since, in this case, we want to perform a reading operation, we need to retrieve the input stream by using the GetInputStreamAt() method offered by the IRandomAccessStream class. Also in this case, we need to specify the stream’s position from which to start the reading operation. By using 0, we’re going to read the content from the beginning.
- Instead of the DataWriter class, we used the DataReader one, which works in the same way. It offers a set of methods to read the most common data types. In this case, since we’re reading a text file, we call the ReadString() method but we could have used ReadDouble() to read a number or ReadDateTime() to read a date.
Creating and Reading a File with a Bulk Operation
In the previous section, we saw that, thanks to the DataWriter and DataReader classes, we are able work with files as streams. We are able to start the writing or reading procedure from any position and not just from the beginning. However, this precision isn’t always required. For these scenarios, the Windows Runtime offers a class called FileIO (which is part of the Windows.Storage namespace), which is easier to use to perform basic read and write operations.
The starting point is, as usual, the StorageFile class so we still need to use the APIs we’ve previously seen to create a file (in case of a writing procedure) or to get a reference to an existing one (in case of a reading procedure). The methods exposed by the FileIO class offers a simple way to write the most common data types such as WriteTextAsync() to write a string or WriteBufferAsync() to write a binary content such as an image. The following sample shows how to create a text file in the local storage:
private async void OnCreateFileClicked(object sender, RoutedEventArgs e) { StorageFile file = await ApplicationData.Current.LocalFolder.CreateFileAsync("file.txt"); await FileIO.WriteTextAsync(file, "Sample text"); } |
You can also add a text to an existing file by using the AppendTextAsync() method:
private async void OnReadFileClicked(object sender, RoutedEventArgs e) { StorageFile file = await ApplicationData.Current.LocalFolder.GetFileAsync("file.txt"); await FileIO.AppendTextAsync(file, "Sample text to append"); } |
The reading operations are performed in the same way, by using the reading methods offered by the FileIO class (such as ReadTextAsync() to read a string or ReadBufferAsync() to read a binary file). The following sample shows how to retrieve the previously saved text:
private async void OnReadFileClicked(object sender, RoutedEventArgs e) { StorageFile file = await ApplicationData.Current.LocalFolder.GetFileAsync("file.txt"); string text = await FileIO.ReadTextAsync(file); } |
Accessing Files by Using URLs
In some scenarios, it can be useful to access the app’s files by using an URL. For example, this can be the case when you’re using an Image control and you want to display an image that’s stored in the local storage. In Windows Store apps, you can use some special protocols to get access to the files of your app:
- The ms-appx:/// protocol is used to provide access to the files that are part of the Visual Studio project. However, to access to these files, you need to make sure that the Build action property (which can be set by right-clicking the file in Visual Studio and choosing Properties) is set to Content. For example, let’s say that you have an image called logo.png placed in the Assets folder of your project. The following sample shows how to display it by using an Image control in the XAML:
<Image Source="ms-appx:///Assets/logo.png" /> |
- The ms-appdata:/// protocol is used to provide access to the files that are stored in one of the available storage’s types. After the protocol, you need to specify which storage you want to use: local, localcache, roaming or temporary. The following sample shows how to use an Image control to display an image stored in the local storage:
<Image Source="ms-appdata:///local/Assets/logo.png" /> |
Debugging the App: Checking the Storage’s Content
When you’re developing and testing an app that writes some data to the storage, it is important to verify that everything is working fine and that the files are effectively created in the storage. Let’s look at how to do this.
Checking the Storage’s Content in Windows
The local storage in Windows is stored inside a special folder in the path %USERPROFILE%\AppData\Local\Packages\ (%USERPROFILE% is a special string that represents the root folder of your user account). Inside this folder, you’ll find many subfolders; each of them identifies one of the Windows Store apps you’ve installed on your device. Typically, apps manually deployed from Visual Studio and not installed from the Store are identified by the Package Name, which is an identifier that you can find in the Packaging section of the manifest file.
Inside this folder, you’ll find some subfolders; each of them refers to one of the storage’s types. You’ll simply have to open the folder which you’re interested in and verify that the data inside it is correct.
Checking the Storage’s Content in Windows Phone
Checking the storage’s content in Windows Phone isn’t as easy as it is in Windows since the platform allows users and developers to explore just some of the phone’s libraries (such as pictures, videos, documents, etc.). You can’t access the OS’s folders or the location to which local storage is saved. Visual Studio 2013 includes a tool to explore the phone’s storage but it’s not very intuitive to use since it’s a command-line app.
Consequently, many developers have created third-party tools that, by relying on this app, offer a visual interface which is easier for developers to use. One of the best available tools is called Windows Phone Power Tools and can be downloaded here.
Using this tool is easy. When you start it, a drop-down menu will allow you to choose between the device and one of the available emulators. Once the connection is successful, you’ll be able to use the Isolated Storage section to see the apps that have been manually deployed on the phone (by using Visual Studio or the app deployment tool provided with the SDK). Of course, for security reasons, you won’t be able to explore the local storage of apps installed from the Store.
Once you’ve chosen the right app, you’ll be able to perform the most common operations like you can do with a regular file explorer. You can browse, open, delete, or download files, or even upload a file from your computer to the phone (which can be useful to simulate real data during the testing phase).
Managing the App’s Settings
A common consideration while developing an app is settings management; the app can offer a settings page where the user can customize the app according to their needs. Both the local storage and the roaming storage offer an easy way to manage this scenario, by offering a class (LocalSettings for local storage, RoamingSettings for roaming storage) which is a collection where we can save our settings and identify them with a unique key so that we can retrieve them later.
Under the hood, it works in a similar fashion as the feature we described in Chapter 4 regarding managing the page’s state. The settings are identified with a Dictionary<string, object> collection where we can save our data (which can be a generic object), each of them identified by a string key. This data is automatically serialized and deserialized when it’s needed so that it’s persisted and maintained even if the app is closed.
The dictionary is stored in the Value property offered by the LocalSettings and the RoamingSettings classes. The following sample shows how to save some data into the roaming settings:
private void OnSaveSettingsClicked(object sender, RoutedEventArgs e) { if (ApplicationData.Current.RoamingSettings.Values.ContainsKey("IsEnabled")) { ApplicationData.Current.RoamingSettings.Values.Remove("IsEnabled"); } ApplicationData.Current.RoamingSettings.Values.Add("IsEnabled", true); } |
First we check, by using the ContainsKey() method, whether or not a value associated with a specific key already exists (in the sample, it’s called IsEnabled). If it does, before saving it using the Add() method, we delete it from the collection by using the Remove() method.
The following sample shows how to retrieve the recently saved value from the roaming settings:
private async void OnReadSettingsClicked(object sender, RoutedEventArgs e) { if (ApplicationData.Current.LocalSettings.Values.ContainsKey("IsEnabled")) { bool isEnabled = (bool)ApplicationData.Current.LocalSettings.Values["IsEnabled"]; MessageDialog dialog = new MessageDialog(isEnabled.ToString()); await dialog.ShowAsync(); } } |
The syntax should be familiar since it’s the standard one used when you work with Dictionary collections. After checking to see whether or not the value identified by the IsEnabled key exists, we retrieve it by specifying the key’s name inside square brackets. Since the dictionary can store a generic object, we need to perform a cast to the object’s type we expect. In our case, we cast it to bool since we previously saved a Boolean value.
It’s important to highlight that the settings aren’t able to store any type of data but only the native Windows Runtime types, which are listed in official MSDN documentation here.
When it comes to managing settings, the best storage type to use is the roaming one. This way, if you’re working on a Universal Windows app that can be installed both on Windows and on Windows Phone, you’ll be able to share the settings across the two different versions so that the user won’t have to customize the app twice.
Organizing Settings
The settings classes we’ve previously discussed also offer an easy way to organize the settings in different containers that, for example, can be related to different sections of your app. This way, instead of having all of the settings stored in just one collection, you can split them into many dictionaries, each of them with its own unique identifier.
To use containers, you first have to call the CreateContainer() method offered by one of the settings classes. The required parameters are the container’s name and a value of the ApplicationDataCreateDisposition enumerator which tells the Windows Runtime if the container should be created (if it doesn’t exist). Once you’ve created the container, it works like the standard settings; you’ll have access to a property called Values which is a Dictionary<string, object> collection. The following sample shows how to create a collection with name MainSettings in which we save an integer value:
private void OnSaveSettingsClicked(object sender, RoutedEventArgs e) { ApplicationDataContainer container = ApplicationData.Current.LocalSettings. CreateContainer("MainSettings", ApplicationDataCreateDisposition.Always); container.Values.Add("NumberOfItems", 10); } |
To get access to the existing containers, you can use the Containers property offered by the LocalSettings and RoamingSettings classes, which is a collection of all the available containers. Once you’ve retrieved a reference to the desired container, you can again use the Values collection to get the setting you’re looking for, in the same way we previously did:
private async void OnReadSettingsClicked(object sender, RoutedEventArgs e) { if (ApplicationData.Current.LocalSettings.Containers.ContainsKey("MainSettings")) { ApplicationDataContainer container = ApplicationData.Current.LocalSettings.Containers["MainSettings"]; int numberOfItems = (int)container.Values["NumberOfItems"]; MessageDialog dialog = new MessageDialog(numberOfItems.ToString()); await dialog.ShowAsync(); } } |
Integrating Settings in a Windows App
So far, we’ve seen how to manage settings from a logical point of view. LocalSettings and RoamingSettings are two classes that make it easier for the developer to store and read data. Now let’s take a look at how to integrate settings in our app from a visual point of view. Windows Phone doesn’t have any specific requirement. Typically, you just define a new page in the app and you provide in the main page a quick way for the user to access it.
In Windows 8.1, you have a specific requirement which is connected to the Charms bar. If you open the Charms Bar (the one on the right side of the screen), you’ll find a button called Settings. When you press Settings, a panel from the right is opened; this is the place to include all of the app’s settings:
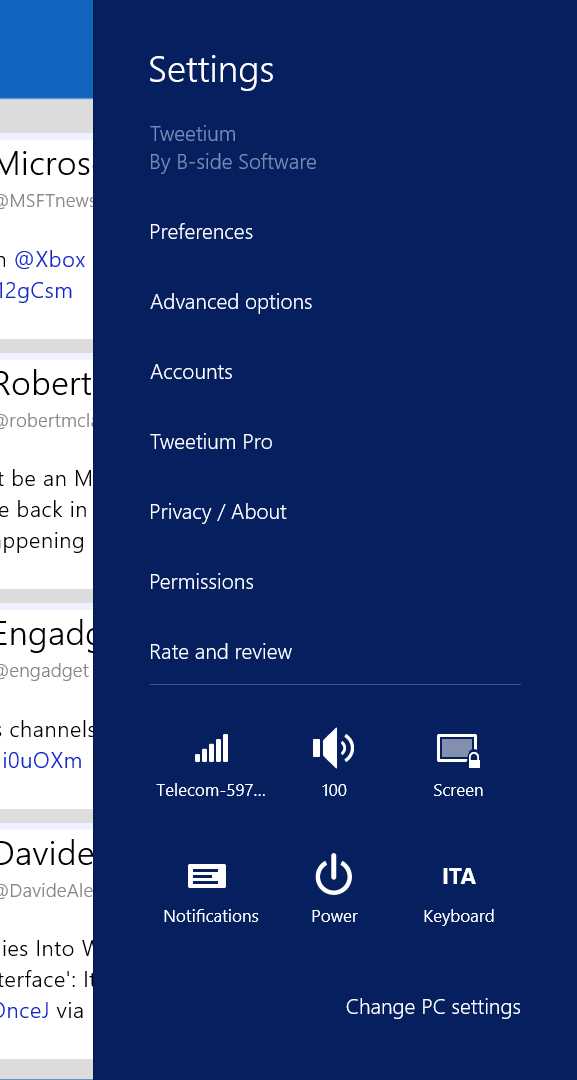
- The Settings panel of a Windows Store app for Windows
Let’s take a look at how to include our settings into this panel. The first step is to create the layout in which to place our settings. Each section is identified by a page which works like a traditional one. The only difference is that, instead of being displayed in full screen, it’s placed inside the right panel. Consequently, we need to keep in mind that we have less space to include our XAML controls.
To help developers, Visual Studio includes a specific template for settings pages. You can find it by right-clicking your project in Solution Explorer and choosing Add new item. You’ll find an option called Settings Flyout. This template will add a XAML control that, instead of inheriting from the Page class, it will derive from the SettingsFlyout one.
Here is a sample definition:
<SettingsFlyout x:Class="SampleApp.SettingsFlyout1" xmlns="http://schemas.microsoft.com/winfx/2006/xaml/presentation" xmlns:x="http://schemas.microsoft.com/winfx/2006/xaml" xmlns:d="http://schemas.microsoft.com/expression/blend/2008" xmlns:mc="http://schemas.openxmlformats.org/markup-compatibility/2006" mc:Ignorable="d" IconSource="Assets/SmallLogo.png" Title="SettingsFlyout1" d:DesignWidth="346"> <StackPanel VerticalAlignment="Stretch" HorizontalAlignment="Stretch" > <StackPanel VerticalAlignment="Stretch" HorizontalAlignment="Stretch" > <StackPanel Style="{StaticResource SettingsFlyoutSectionStyle}"> <TextBlock Style="{StaticResource TitleTextBlockStyle}" Text="Setup transfers" /> <ToggleSwitch Header="Enable download" /> <ToggleSwitch Header="Enable upload" /> </StackPanel> </StackPanel> </StackPanel> </SettingsFlyout> |
The main differences, compared to a standard page, can be found in some of the properties of the SettingsFlyout class:
- It has a width of 346 pixels, which is the size of the Settings panel
- It has a title, which is set by the Title property
- It has an icon that is displayed near the title, which is set by the IconSource property
Except for these differences, the SettingsFlyout works just like a regular page. You can place any XAML control inside it (in the sample, we’ve added a TextBlock as header and two ToggleSwitch buttons) and, in the code behind, you can define the logic to store the values in the settings by using the approach we’ve seen previously in this chapter.
What we need to properly manage is the integration with the Charm bar. When the Settings button is pressed and our app is opened, we need to display the list of settings and the pages we’ve created. To do this, we need to use the OnWindowCreated() method which is offered by the App class. This method is triggered when the app’s window is created:
protected override void OnWindowCreated(WindowCreatedEventArgs args) { SettingsPane.GetForCurrentView().CommandsRequested += App_CommandsRequested; } private void App_CommandsRequested(SettingsPane sender, SettingsPaneCommandsRequestedEventArgs args) { //manage the settings } |
After we’ve retrieved a reference to the settings panel of the current app (by calling the GetForCurrentView() method of the SettingsPane class), we subscribe to the CommandsRequested event which is invoked when the user presses Settings.
When you press Settings, you’ll see a list of options which represents the different sections used to organize the settings. What we need to do in this event handler is to load all the sections which are simply a shortcut to the different settings pages we’ve previously created:
private void App_CommandsRequested(SettingsPane sender, SettingsPaneCommandsRequestedEventArgs args) { SettingsCommand command = new SettingsCommand("Settings", "Settings", handler => { SettingsFlyout1 settings = new SettingsFlyout1(); settings.Show(); }); args.Request.ApplicationCommands.Add(command); } |
We can have as many settings pages as we want; we just have to register all of them in the CommandsRequested event handler like in the previous sample. In this case, we have just one setting page which is represented by the XAML page we previously created. Every section is identified by a SettingsCommand which requires as parameters:
- A unique identifier of the command
- The name of the section that will be displayed in the Settings panel
- The operations to perform when the user taps on the section’s name in the panel
Typically, when the user taps on the section name, we need to display the settings page we’ve defined. We can do this by creating a new instance of the SettingsFlyout page we’ve previously created and then calling the Show() method.
The last step is to add all the SettingsCommand we’ve defined to the list of available sections that are displayed when the user taps on Settings in the Charms Bar. This list is represented by the ApplicationCommands collection which is one of the properties exposed by the method’s parameter. We simply call the Add() method, passing as parameter the SettingsCommand object we’ve defined.
Accessing the Files that are Included in the Project
When you download an app from the Store, the OS unpacks the package created by Visual Studio in a special system folder, which developers and users can’t access. Typically, the content of this folder matches the structure of your project in Visual Studio. Consequently, you may be required to access one of these files (such as a database or an image) from the code while the app is running. You can do this by using a special class called Package.Current.InstalledLocation which identifies your project’s root. It behaves like regular storage; every folder (including the InstalledLocation object itself) is identified with the StorageFolder class while files are mapped with the StorageFile class.
The only important difference between this and the local storage is that you can’t write data in the app folder, you can only read them. Every method to perform writing operations (such as CreateFileAsync()) will throw an exception. The following sample shows how to get a reference to a file stored in the project and to copy it to the local storage:
private async void OnCopyFileClicked(object sender, RoutedEventArgs e) { StorageFile file = await Package.Current.InstalledLocation.GetFileAsync("file.xml"); await file.CopyAsync(ApplicationData.Current.LocalFolder); } |
Importing a File or a Folder Stored in the Device
In this chapter, we’ve learned that the local storage is isolated; we can’t directly access the data created by other apps or stored in the phone (such as documents, images, or music tracks). Since this approach can become a serious limitation for many apps, the Windows Runtime offers a class called FileOpenPicker that can be used to import external files into our app. The FileOpenPicker class opens a special dialog box that is managed by the OS and that can be used to browse the various device’s folders.
Since Windows supports the ability to run multiple apps at the same time, while Windows Phone doesn’t, the implementation of this class is different based on the platform. Let’s look in detail about how to use it on both platforms.
Importing a File or a Folder in Windows
The way to use the FileOpenPicker class to import a file in Windows is simple, as you can see in the following sample:
private async void OnPickFileClicked(object sender, RoutedEventArgs e) { FileOpenPicker picker = new FileOpenPicker(); picker.FileTypeFilter.Add(".jpg"); picker.FileTypeFilter.Add(".png"); StorageFile file = await picker.PickSingleFileAsync(); if (file != null) { await file.CopyAsync(ApplicationData.Current.LocalFolder); } } |
The first option to set is the kind of files we want to import. This way, the picker will automatically display only the files that match the extension we choose. We need to add at least one extension to the FileTypeFilter collection, otherwise we’ll get an exception. If we want to support any kind of file, we can just add the asterisk (*) as the file’s type.
Once you’ve defined the supported extension, you just need to call the PickSingleFileAsync() method. The picker’s UI will be opened and the user will be able to choose any of the files on the device. Once they have made their choice, the picker will be closed and the control will be returned to your app. The PickSingleFileAsync() method will return a StorageFile object which contains the file selected by the user. The previous sample shows how to copy this file into the local storage. It’s important to always check that the file is not null before performing any operation since the user has the chance to cancel the import operation.
You can also use the FileOpenPicker class to import multiple files with a single operation by calling the PickMultipleFileAsync(). It works in the same way as the previous way, with the only difference being, instead of returning a single StorageFile object, it returns a collection of them. The following sample shows how to copy all the selected files into the local storage of the app:
|
private async void OnPickFilesClicked(object sender, RoutedEventArgs e) { FileOpenPicker picker = new FileOpenPicker(); picker.FileTypeFilter.Add(".png"); IReadOnlyList<StorageFile> files = await picker.PickMultipleFilesAsync(); if (files.Count > 0) { foreach (StorageFile file in files) { await file.CopyAsync(ApplicationData.Current.LocalFolder); } } } |
Files aren’t the only thing that can be imported. You can also import an entire folder, which means that you’ll get access to all of the files that are included in the folder. The operation is achieved in a similar way, with the exception that, in this case, we’re using the FolderPicker class, like in the following sample:
private async void OnPickFolderClicked(object sender, RoutedEventArgs e) { FolderPicker picker = new FolderPicker(); picker.FileTypeFilter.Add("*"); StorageFolder folder = await picker.PickSingleFolderAsync(); if (folder != null) { var files = await folder.GetFilesAsync(); foreach (StorageFile file in files) { MessageDialog dialog = new MessageDialog(file.DisplayName); await dialog.ShowAsync(); } } } |
Also, in this case, we need to add at least one element to the FileTypeFilter collection but, since folders don’t have a type, it’s enough to pass an asterisk (*) so that the user can import any folder on the device. Then, you can call the PickSingleFolderAsync() method which will open the usual picker UI. Once the user has selected a folder, the method will return a StorageFolder object that references it. This way, you’ll be able to perform additional operations on the folder such as creating, opening, or deleting a file, or creating a subfolder, etc. The previous sample gets the list of all of the files included in the folder and shows their name via a pop-up message.
Importing a File or a Folder in Windows Phone
Since Windows Phone isn’t able to keep two apps opened at the same time, when you activate the FileOpenPicker, the current app is suspended (to be resumed after the user has chosen the file or the folder to import). Consequently, after we’ve configured the FileOpenPicker in the same way as we did in Windows, we need to use methods that are available only on Windows Phone to activate it. These are called PickSingleFileAndContinue() for importing a single file and PickMultipleFilesAndContinue() for importing multiple files.
Here is a complete sample:
private void OnOpenFileClicked(object sender, RoutedEventArgs e) { FileOpenPicker picker = new FileOpenPicker(); picker.FileTypeFilter.Add(".jpg"); picker.FileTypeFilter.Add(".png"); picker.PickSingleFileAndContinue(); } |
As you can see, the biggest difference with the Windows approach is that the PickSingleFileAndContinue() method doesn’t return a reference to the selected file; we need to get it in another way since the app is suspended.
To help developers to manage this scenario, Microsoft has created a class called ContinuationManager; however, it’s not included in the Windows Runtime. Instead, Microsoft has published the source code in the MSDN documentation. Here is the full class definition which you can copy into a new class inside your project:
#if WINDOWS_PHONE_APP /// <summary> /// ContinuationManager is used to detect if the most recent activation was due /// to a continuation such as the FileOpenPicker or WebAuthenticationBroker /// </summary> public class ContinuationManager { IContinuationActivatedEventArgs args = null; bool handled = false; Guid id = Guid.Empty; /// <summary> /// Sets the ContinuationArgs for this instance using default frame of current Window /// Should be called by the main activation handling code in App.xaml.cs /// </summary> /// <param name="args">The activation args</param> internal void Continue(IContinuationActivatedEventArgs args) { Continue(args, Window.Current.Content as Frame); } /// <summary> /// Sets the ContinuationArgs for this instance. Should be called by the main activation /// handling code in App.xaml.cs /// </summary> /// <param name="args">The activation args</param> /// <param name="rootFrame">The frame control that contains the current page</param> internal void Continue(IContinuationActivatedEventArgs args, Frame rootFrame) { if (args == null) throw new ArgumentNullException("args"); if (this.args != null && !handled) throw new InvalidOperationException("Can't set args more than once"); this.args = args; this.handled = false; this.id = Guid.NewGuid(); if (rootFrame == null) return; switch (args.Kind) { case ActivationKind.PickFileContinuation: var fileOpenPickerPage = rootFrame.Content as IFileOpenPickerContinuable; if (fileOpenPickerPage != null) { fileOpenPickerPage.ContinueFileOpenPicker(args as FileOpenPickerContinuationEventArgs); } break; case ActivationKind.PickSaveFileContinuation: var fileSavePickerPage = rootFrame.Content as IFileSavePickerContinuable; if (fileSavePickerPage != null) { fileSavePickerPage.ContinueFileSavePicker(args as FileSavePickerContinuationEventArgs); } break; case ActivationKind.PickFolderContinuation: var folderPickerPage = rootFrame.Content as IFolderPickerContinuable; if (folderPickerPage != null) { folderPickerPage.ContinueFolderPicker(args as FolderPickerContinuationEventArgs); } break; case ActivationKind.WebAuthenticationBrokerContinuation: var wabPage = rootFrame.Content as IWebAuthenticationContinuable; if (wabPage != null) { wabPage.ContinueWebAuthentication(args as WebAuthenticationBrokerContinuationEventArgs); } break; } } /// <summary> /// Marks the contination data as 'stale', meaning that it is probably no longer useful. /// Called when the app is suspended (to ensure future activations don't appear /// to be for the same continuation) and whenever the continuation data is retrieved /// (so that it isn't retrieved on subsequent navigations) /// </summary> internal void MarkAsStale() { this.handled = true; } /// <summary> /// Retrieves the continuation args if they have not already been retrieved and /// prevents further retrieval via this property (to avoid accidental double usage) /// </summary> public IContinuationActivatedEventArgs ContinuationArgs { get { if (handled) return null; MarkAsStale(); return args; } } /// <summary> /// Unique identifier for this particular continuation. Most useful for components that /// retrieve the continuation data via <see cref="GetContinuationArgs"/> and need /// to perform their own replay check /// </summary> public Guid Id { get { return id; } } /// <summary> /// Retrieves the continuation args, optionally retrieving them even if they have already /// been retrieved /// </summary> /// <param name="includeStaleArgs">Set to true to return args even if they have previously been returned</param> /// <returns>The continuation args or null if there aren't any</returns> public IContinuationActivatedEventArgs GetContinuationArgs(bool includeStaleArgs) { if (!includeStaleArgs && handled) return null; MarkAsStale(); return args; } } /// <summary> /// Implement this interface if your page invokes the file open picker /// API /// </summary> interface IFileOpenPickerContinuable { /// <summary> /// This method is invoked when the file open picker returns picked /// files /// </summary> /// <param name="args">Activated event args object that contains returned files from file open picker</param> void ContinueFileOpenPicker(FileOpenPickerContinuationEventArgs args); } /// <summary> /// Implement this interface if your page invokes the file save picker /// API /// </summary> interface IFileSavePickerContinuable { /// <summary> /// This method is invoked when the file save picker returns saved /// files /// </summary> /// <param name="args">Activated event args object that contains returned file from file save picker</param> void ContinueFileSavePicker(FileSavePickerContinuationEventArgs args); } /// <summary> /// Implement this interface if your page invokes the folder picker API /// </summary> interface IFolderPickerContinuable { /// <summary> /// This method is invoked when the folder picker returns the picked /// folder /// </summary> /// <param name="args">Activated event args object that contains returned folder from folder picker</param> void ContinueFolderPicker(FolderPickerContinuationEventArgs args); } /// <summary> /// Implement this interface if your page invokes the web authentication /// broker /// </summary> interface IWebAuthenticationContinuable { /// <summary> /// This method is invoked when the web authentication broker returns /// with the authentication result /// </summary> /// <param name="args">Activated event args object that contains returned authentication token</param> void ContinueWebAuthentication(WebAuthenticationBrokerContinuationEventArgs args); } #endif |
The purpose of this class is to make the suspension process transparent to the developer. It will take care of managing the activation event, redirecting the user to the page that invoked the FileOpenPicker and giving access to the file selected by the user.
Once you’ve added the ContinuationManager class to the project, it’s time to change the App class configuration. The first step to do so is to create a new instance of the class in the App constructor, like in the following sample:
public sealed partial class App : Application { public static ContinuationManager ContinuationManager { get; private set; } public App() { this.InitializeComponent(); this.Suspending += this.OnSuspending; ContinuationManager = new ContinuationManager(); } } |
The next steps are to properly manage the activating and suspending events, since they’re the ones that are involved when you use the FileOpenPicker in Windows Phone. When the picker is activated, the app is suspended. After the user has chosen the file, the app is reactivated and it contains the selected file in the activation parameters.
The following sample shows how to properly manage the OnActivated() method of the App class by using the ContinuationManager:
protected override void OnActivated(IActivatedEventArgs args) { if (args.Kind == ActivationKind.PickFileContinuation) { var continuationEventArgs = args as IContinuationActivatedEventArgs; if (continuationEventArgs != null) { ContinuationManager.Continue(continuationEventArgs); ContinuationManager.MarkAsStale(); } } } |
The most important activation events (like the ones related to some contracts or extensions) are managed with a specific method. However, the App class also offers a generic method that is triggered for all the activation events that are not covered with a specific one. The FileOpenPicker activation is one of them, so we need to manage the generic OnActivated() event. The method’s parameter contains a property called Kind which describes the activation event that triggered it by using one of the values of the ActivationKind enumerator. In our scenario, we need to manage the PickFileContinuation value. In this case, we can use the ContinuationManager by first calling the Continue() method (passing as parameter the activation arguments) and then the MarkAsStale() one. The Continue() method is the key of the operation; it redirects the user to the original page that invoked the picker UI, carrying as parameter the chosen file. The MarkAsStale() one, instead, is used to mark the current data as obsolete. This way, we make sure that the next usages of the FileOpenPicker won’t return old data. For the same reason, we need to call the MarkAsStale() method also in the OnSuspending() method. This way, when the app is suspended due to a FileOpenPicker usage, we make sure that the old data is gone. Here is how to properly manage the OnSuspending() method:
private void OnSuspending(object sender, SuspendingEventArgs e) { ContinuationManager.MarkAsStale(); } |
We’ve completed the work on the App class. The Continue() method of the ContinuationManager class will redirect the user to the page that invoked the picker so we need to move the code behind the class of that page. The first step to do this is to implement a special interface which is declared in the ContinuationManager class. It’s called IFileOpenPickerContinuable and it will require us to implement the ContinueFileOpenPicker() method. Here is a full sample:
public sealed partial class MainPage : Page, IFileOpenPickerContinuable { public MainPage() { this.InitializeComponent(); } public async void ContinueFileOpenPicker(FileOpenPickerContinuationEventArgs args) { StorageFile file = args.Files.FirstOrDefault(); if (file != null) { var stream = await file.OpenReadAsync(); BitmapImage image = new BitmapImage(); await image.SetSourceAsync(stream); SelectedImage.Source = image; } } } |
The ContinueFileOpenPicker() method will allow us to complete our operation. The method’s parameter contains a collection called Files, which is a list of files that have been selected in the picker by the user. The collection can contain just one file (in case you’ve used the PickSingleFileAndContinue() method) or it can contain more than one file (in case you’ve used the PickMultipleFilesAndContinue() method). The previous sample code manages a scenario in which the user can select an image using the picker. The selected image is retrieved in the ContinueFileOpenPicker() method and displayed to the user by using an Image control.
Importing a folder in Windows Phone uses the same approach. You’re going to use the FolderOpenPicker class which offers a method called PickFolderAndContinue(); this triggers the suspension of the app and the picker UI opening:
private void OnPickFolderClicked(object sender, RoutedEventArgs e) { FolderPicker picker = new FolderPicker(); picker.FileTypeFilter.Add("*"); picker.PickFolderAndContinue(); } |
As we previously did for files, we now need to properly manage the OnActivated() method in the App class. This time, the ActivationKind’s value we are looking for is called PickFolderContinuation. In this case, as we did before, we’re going to call the Continue() and the MarkAsStale() methods of the ContinuationManager so that the user can be redirect to the page that invoked the picker UI:
protected override void OnActivated(IActivatedEventArgs args) { if (args.Kind == ActivationKind.PickFolderContinuation) { var continuationEventArgs = args as IContinuationActivatedEventArgs; if (continuationEventArgs != null) { ContinuationManager.Continue(continuationEventArgs); ContinuationManager.MarkAsStale(); } } } |
The last step is to implement, in the code behind of the page that invoked the FolderOpenPicker, lthe IFolderPickerContinuable interface. This will require us to implement the ContinueFolderPicker method; it’s the one that will receive, as parameter, the selected folder. The following sample shows how to retrieve the selected folder (thanks to the Folder property) and display to the user the name of all the files stored in it:
public sealed partial class MainPage : Page, IFolderPickerContinuable { public MainPage() { this.InitializeComponent(); } public async void ContinueFolderPicker(FolderPickerContinuationEventArgs args) { StorageFolder folder = args.Folder; if (folder != null) { var files = await folder.GetFilesAsync(); foreach (StorageFile file in files) { MessageDialog dialog = new MessageDialog(file.DisplayName); await dialog.ShowAsync(); } } } } |
Accessing Files Stored on External Memory
Many tablets and smartphones offer a way to expand the internal storage memory by using a Secure Digital (SD) card or external Universal Serial Bus (USB) memory. The approach to access files and folders stored on external memory relies on the same concepts previously explained in this chapter, such as using the StorageFolder and StorageFile classes. However, there’s an important difference to keep in mind: you can’t freely access any file stored in the memory; you can only read and write files (whose type has been declared in the manifest file).
Consequently, the first step is to register the extensions we want to manage. We can do this in the Declarations section of the manifest file. We need to add a new File Type Association element which is available in the Available declarations drop-down menu. To work properly, this extension requires the following settings:
- A unique name that identifies the extension registration, which needs to be set in the Name field
- The file extensions we want to support. For each of them, we need to specify the File Type field (which is the extension such as .txt) and, optionally, the Content Type field (for example, in the case of a text plain, it’s text/plain)
Now we are able to access all the files whose extensions have been specified in the manifest file. We can do this thanks to the KnownFolders class which is a static class that offers quick access to all of the device’s libraries. We will talk about this again in Chapter 9 when we learn how to access the multimedia libraries. One of these libraries is called RemovableDevices, which is a StorageFolder object that provides access to the removable devices.
It’s important to keep in mind that a Windows device can have multiple removable devices (for example, a tablet with a USB memory and a SD card slot) or no removable devices at all (such as a smartphone without a SD card slot). Every device is treated as a folder. To discover all of the available removable memories, we need to call the GetFoldersAsync() method on the RemovableDevices class. The following sample code shows a typical scenario for a Windows Phone app. We first get the list of all of the available devices and, if the number of results is greater than zero, it means that the phone supports external memory. Only in this case, we get the list of all of the available files stored in the first memory (since a smartphone can’t have more than one SD card slot). We display it to the user by using a ListView control:
private async void OnGetFilesClicked(object sender, RoutedEventArgs e) { StorageFolder card = KnownFolders.RemovableDevices; IReadOnlyList<StorageFolder> folders = await card.GetFoldersAsync(); if (folders.Count > 0) { IReadOnlyList<StorageFile> files = await folders[0].GetFilesAsync(); FilesList.ItemsSource = files; } } |
It’s important to remember that, in this sample, the GetFilesAsync() method won’t return all of the files stored in the external memory; it will only return the files whose extension matches the one we’ve declared in the manifest file. In this sample, it would return only the text files, which extension is .txt.
Testing SD Card Support in a Windows Phone App
Testing a Windows Phone app against the SD card support isn’t always an easy task, since not all of the devices on the market offer external memory support. For this reason, the Windows Phone emulator is able to simulate the SD card so that we can test that our code is able to properly read and write files on an external memory.
This tool is included in the emulator’s Additional tools and it simply requires us to choose a folder on our computer (which will be plugged into the emulator and treated as if it’s an SD card). It’s important to highlight that, by enabling this feature, the selected folder won’t become a fake SD card but, rather, its content will just be copied inside the emulator. Consequently, if you execute some code that, for example, creates a new file on the SD card, you won’t immediately find it in the folder. You’ll need to enable the option called “Sync updated files back to the local folder when the SD card is ejected” and then press Eject to simulate the SD card removal. This way, the content of the emulator’s SD card will copied back to the original folder so that you can check that your code executed with success.
Managing the App’s Data
So far, we’ve learned how to manage the different storages that Windows and Windows Phone offer to developers, and how we can easily create and read files and folders. However, the most important requirement when it comes to managing local data is saving them in a more structured way so that it’s easier to perform the most common operations (such as adding, removing, or editing an item).
Let’s say that we want to develop an app that needs to manage a list of customers. We can’t simply write this information into a text file since it would be hard to create a logical connection between the data and to perform simple queries (such as retrieving the list of all of the customers or adding a new one). Let’s take a look at the best techniques with which to manage this scenario.
Serialization and Deserialization
Serialization is the simplest way to store the app’s data in the local storage. This process makes it possible to store complex data (such as objects) into plain text files which can be easily saved in storage. The most common standards used for this scenario are XML and JSON. Deserialization is simply the opposite approach: the plain data is converted back into complex objects which can be easily manipulated by the app.
Serialization is made easier by the Windows Runtime since it offers a set of built-in classes that are able to automatically perform these operations. We won’t have to manually write the XML or the JSON file that matches our data since the Runtime will take care of it for us. Usually, the serialization is performed every time the data is modified (for example, when an item is added, edited, or deleted) so that we can minimize the data loss risk in case of unexpected problems with the apps. Deserialization, instead, is performed when the app is opened or restored from a suspension.
Let’sl take a look at a serialization sample in which we’ll use a simple class to describe a person. In the app, we’re going to store a list of people:
public class Person { public string Name { get; set; } public string Surname { get; set; } } |
In a typical app, we’re going to work with a collection of data which can be retrieved, for example, from a web service or from a database. In the following sample, we’re going to create a sample set of data:
public sealed partial class MainPage : Page { private List<Person> people; public MainPage() { this.InitializeComponent(); } protected override void OnNavigatedTo(NavigationEventArgs e) { people = new List<Person> { new Person { Name = "Matteo", Surname = "Pagani" }, new Person { Name = "Ugo", Surname = "Lattanzi" } }; } } |
Serializing and Deserializing Data by Using XML
Since the serialization is performed using a text file, we’re going to use the previously described APIs to create a XML file in the local storage. The following sample creates a file called people.xml in the local storage by using the CreateFileAsync() and OpenAsync() methods that we’ve previously seen:
private async void OnSerializeDataClicked(object sender, RoutedEventArgs e) { DataContractSerializer serializer = new DataContractSerializer(typeof(List<Person>)); StorageFile file = await ApplicationData.Current.LocalFolder. CreateFileAsync("people.xml", CreationCollisionOption.ReplaceExisting); IRandomAccessStream randomAccessStream = await file.OpenAsync(FileAccessMode. ReadWrite); using (Stream stream = randomAccessStream.AsStreamForWrite()) { serializer.WriteObject(stream, people); await stream.FlushAsync(); } } |
The XML serialization and deserialization process is performed by using the DataContractSerializer class which is part of the System.Runtime.Serialization namespace. When we create a new instance of this class, we need to specify the data type we’re going to save; in our sample, it’s List<Person>.
Next, as we’ve previously seen in this chapter, we create a new file called people.xml. We open the writing stream by using the AsStreamForWrite() method on the IRandomAccessStream object. The serialization procedure is performed by using the WriteObject() method of the DataContractSerializer class, which requires the destination stream (the file we’ve just created) and the data that we want to serialize (the collection of Person objects). In the end, we call the FlushAsync() method which forces all of the data that is still in the buffer to be written in the stream.
If you check the content of your local storage, you’ll find a file called people.xml with the following content, which is a plain representation of our data:
<?xml version="1.0" encoding="utf-8" ?> <ArrayOfPerson xmlns="http://schemas.datacontract.org/2004/07/StorageWin8" xmlns:i="http://www.w3.org/2001/XMLSchema-instance"> <Person> <Name>Matteo</Name> <Surname>Pagani</Surname> </Person> <Person> <Name>Ugo</Name> <Surname>Lattanzi</Surname> </Person> </ArrayOfPerson> |
The opposite process (which is the deserialization) is a very similar one since it’s always performed by using the DataContractSerializer class. The differences is that, this time, we just need a reading stream, which is passed as parameter of the ReadObject() method offered by the DataContractSerializer class. Let’s look at the following sample:
|
private async void OnDeserializeClicked(object sender, RoutedEventArgs e) { StorageFile file = await ApplicationData.Current.LocalFolder.GetFileAsync("people.xml"); DataContractSerializer serializer = new DataContractSerializer(typeof(List<Person>)); IRandomAccessStream randomAccessStream = await file.OpenAsync(FileAccessMode.Read); List<Person> people = new List<Person>(); using (Stream stream = randomAccessStream.AsStreamForRead()) { people = serializer.ReadObject(stream) as List<Person>; } } |
After getting a reference to the people.xml file by using the GetFileAsync() method and opening the read stream by using the AsStreamForRead() method, we call the ReadObject() method that returns a generic object. It’s our duty to perform a cast so that we can get back the data type we expect (in our case, it’s a List<People> collection).
Serializing and Deserializing by Using JSON
The Windows Runtime also offers a way to serialize the data by using the JSON format, which has a shorter syntax and, consequently, requires less space to store. To work with the JSON format, we can use the same exact code we’ve previously seen by using XML. The only difference is that, instead of the DataContractSerializer class, we’re going to use the DataContractJsonSerializer one. Let’s take a look at the following sample:
private async void OnSerializeDataClicked(object sender, RoutedEventArgs e) { DataContractJsonSerializer serializer = new DataContractJsonSerializer(typeof(List<Person>)); StorageFile file = await ApplicationData.Current.LocalFolder. CreateFileAsync("people.json", CreationCollisionOption.ReplaceExisting); IRandomAccessStream randomAccessStream = await file.OpenAsync(FileAccessMode. ReadWrite); using (Stream stream = randomAccessStream.AsStreamForWrite()) { serializer.WriteObject(stream, people); await stream.FlushAsync(); } } |
As you can see, there are no differences except for the serialization class we’re using. The WriteObject() method will produce the following JSON file:
[ { "Name":"Matteo", "Surname":"Pagani" }, { "Name":"Ugo", "Surname":"Lattanzi" } ] |
Here is how we can perform deserialization:
|
private async void OnDeserializeClicked(object sender, RoutedEventArgs e) { StorageFile file = await ApplicationData.Current.LocalFolder.GetFileAsync("people.json"); DataContractJsonSerializer serializer = new DataContractJsonSerializer(typeof(List<Person>)); IRandomAccessStream randomAccessStream = await file.OpenAsync(FileAccessMode.Read); List<Person> people = new List<Person>(); using (Stream stream = randomAccessStream.AsStreamForRead()) { people = serializer.ReadObject(stream) as List<Person>; } } |
Controlling the Serialization
By default, all of the properties that belong to a class are automatically serialized when we use the DataContractSerializer or the DataContractJsonSerializer classes. However, there are some scenarios in which we would like to avoid serializing one or more properties (for example, if they contain binary data such as an image so they can’t be properly serialized).
To achieve this goal, the Windows Runtime offers a set of attributes that we can use to decorate our class, like in the following sample:
[DataContract] public class Person { [DataMember] public string Name { get; set; } [DataMember] public string Surname { get; set; } public BitmapImage Photo { get; set; } } |
First, we’ve added a DataContract attribute to the whole class. Then, we’ve added a DataMember attribute to every property we want to serialize; all of the others will be ignored. In the previous sample, only the Name and Surname properties will be serialized. The Photo property (which type is BitmapImage and can’t be serialized) will be ignored.
Using a Database: SQLite
Serialization is easy to use but it also has some limitations. The most important limitation it has is that all of the data needs to be stored in memory. Since we can’t manipulate the data directly, we first need to deserialize the entire collection in memory before we can perform any operation on it. In addition, serialization doesn’t play well when you have a lot of data with relationships between them (for example, when you don’t have to manage just a collection of people but also a collection of orders made by these people).
Databases are the best technology for these scenarios. By using databases, we are able to keep all of the data in the storage and retrieve only the subset that we need (thanks to queries). In addition, we are also able to create relationships between the data so that we can easily retrieve, for example, all of the orders made by a specific person.
Unlike Windows Phone 8.0 (which also offers native support to a database by using a Microsoft technology called SQL CE), Windows Phone 8.1 only relies on SQLite, a third-party technology for database support. SQLite offers the following advantages:
- It’s a widely used open-source project that is supported by many companies such as Adobe, Oracle, and Nokia.
- It’s able to work as a disconnected database engine. Unlike traditional database solutions such as SQL Server (which requires a special service called a Database Management System, or DBMS, to act as a middleman between the data and the apps), SQLite databases are plain binary files which can be directly accessed from the client app.
- It’s cross-platform; you’ll find a SQLite implementation for a lot of platform, both mobile (Windows Phone, Windows, iOS, Android, etc.) and traditional (desktop apps, web apps, etc.)
- It’s written in C++ which provides great performance.
Since SQLite is a third-party database, you won’t find it included in the Windows Runtime. You’ll have to install the SQLite engine separately.
Installing the SQLite Engine
The first step to start using SQLite in your Windows Store apps is to install the engine, which is available as a Visual Studio extension. There are two different extensions to install: one for Windows 8.1 here and one for Windows Phone 8.1 here.
Once you’ve installed the extensions, you’ll find them in the Add Reference menu, which is displayed when you right-click a project in Solution Explorer. If it’s a Windows project, you’ll have to look for the engine in the Windows 8.1 – Extensions section; it’s called “SQLite for Windows Runtime (Windows 8.1)”. If it’s a Windows Phone project instead, you’ll have to look for it in the Windows Phone 8.1 – Extensions section; it’s called “SQLite for Windows Runtime (Windows Phone 8.1)”. Before moving on, there’s an important change to apply. If you try to build your project after adding the engine, you’ll get a compilation error, which will state that the current architecture is not supported by the SQLite engine.
This is the downside of adding a C++ library to your project as native libraries can’t be compiled with the standard Any CPU configuration (which is used to create apps that are able to run either on x86, x64, or ARM devices). This means that we’ll need to change the configuration of our project to compile a specific package for each architecture. When we submit the app on the Store, we’ll have to submit all of the packages, and the Store will take care of offering to the user the most appropriate one for their device. This approach applies specifically to Windows apps, which can run both on x86 and x64 devices (such as computers) and on ARM devices (such as tablets). Windows Phone doesn’t suffer from this problem since you can find only ARM devices on the market.
To solve this problem, you’ll need to open the Configuration manager window which is available in the Build menu. Now, in the drop-down menu called Active Solution platform, you’ll need to choose the most appropriate configuration for your requirements. If you’re testing your app on a computer or on the Windows Phone emulator, you’ll have to choose X86 or X64. If you’re testing your app on an ARM tablet or on a Windows Phone device, you’ll have to choose ARM.
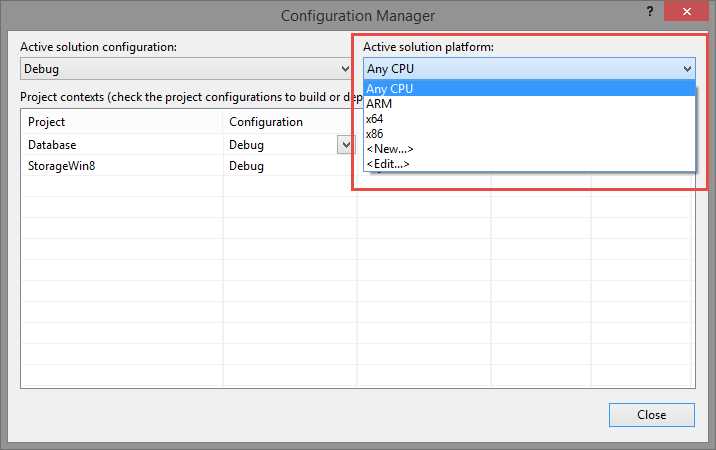
- The Configuration Manager window
Performing Operations on the Database: SQLite-net
In the previous step, what we installed was just the SQLite engine. However, without additional support, the only way we would have to perform operations on a database is to write C++ code, which is not so straightforward. In fact, if you’re reading this book, it’s more likely that you know C# or VB.NET. Consequently, some third-party developers have created a set of additional libraries that can help developers to perform operations on a database by using a high-level language such as C#.
Third-party developer Frank A. Krueger has created one of these libraries called SQLite-net. It’s an open-source project hosted on GitHub here and it’s available as a NuGet package here. If you’ve ever worked with SQL CE on Windows Phone 8.0, you’ll find this approach familiar. In fact, SQLite-net offers a LINQ-based approach similar to the one offered by libraries such as LINQ to SQL or Entity Framework. These libraries are called Object-Relational Mapping (ORM) and act as a middleman between the database and the app. Instead of forcing the developer to think about the app’s data in two different ways (that is, classes and objects in the code, and columns and rows in the database), it takes care of it for them by automatically translating operations on objects (such as adding an item to a collection) in queries that are performed on the database.
Creating a Database
The approach used by SQLite-net to work with a SQLite database is called code-first. We’ll be able to apply some special attributes to our classes in the code, which will tell the SQLite engine how to translate them in tables, rows, and columns. The first time that the app will be launched, the database will be created in the local storage by using the following conventions:
- Entities are converted into tables
- Properties are converted into columns
- Items are converted into rows
The following sample shows how to manage, again, a collection of people, this time with a SQLite database and the SQLite-net library. Here is the new definition of the Person class:
public class Person { [PrimaryKey, AutoIncrement] public int Id { get; set; } [MaxLength(30)] public string Name { get; set; } public string Surname { get; set; } } |
By default, SQLite-net will create a table in the database with the same name of the class. Additionally, every property will be converted into a column with the same name. The column’s type will be automatically detected based upon the property’s type (so, for example, a string property will be converted into a varchar column). If there are some properties that we don’t want to convert into columns, it’s enough to decorate them with the [Ignore] attribute.
SQLite-net also offers a set of additional attributes that can be used to customize the table generation. In the previous sample, you saw some of them including [PrimaryKey] and [AutoIncrement], which have been applied to the Id field to specify that it’s the primary key of the table and that it’s value will be auto-generated. You also saw [MaxLength] which is useful for optimizing performance by setting the maximum length of the string that can be stored in the column.
Once we’ve defined our database schema, we are ready to create it and perform the operations. The heart of the SQLite-net library is the SQLiteAsyncConnection class. Here is how we can use it to create the database when the app is launched:
private async void OnCreateDatabaseClicked(object sender, RoutedEventArgs e) { SQLiteAsyncConnection conn = new SQLiteAsyncConnection(Path.Combine(ApplicationData.Current.LocalFolder.Path, "people.db"), true); await conn.CreateTableAsync<Person>(); } |
The parameter required when we create a new instance of the SQLiteAsyncConnection object is the name and path of the database with which we want to work. In the previous sample, we’re working with a file called people.db stored in the local storage’s root. Then, for each table we want to create, we need to call the CreateTableAsync<T>() method where T is the type of data we want to store. If the table already exists, the method will simply do nothing. Consequently, we can safely call it every time the app starts and the existing data won’t be erased.
Performing Common Operations
The most common operation that you can perform with a database is inserting a new row into the table. We can do this by using the InsertAsync() method offered by the SQLiteAsyncConnection class, like in the following sample:
private async void OnInsertDataClicked(object sender, RoutedEventArgs e) { SQLiteAsyncConnection conn = new SQLiteAsyncConnection(Path.Combine(ApplicationData.Current.LocalFolder.Path, "people.db"), true); Person person = new Person { Name = "Matteo", Surname = "Pagani" }; await conn.InsertAsync(person); } |
As you can see, SQLite-net will take care of converting an object into a row for you. You’ll simply have to pass, to the InsertAsync() method, the object you want to store in the database. From the object’s type (in this case, Person), SQLite-net will automatically understand the correct table to which to store the data.
To retrieve the data, we can use the familiar LINQ methods applied to the Table<T> property offered by the SQLiteAsyncConnection object, where T is the data type with which we’re working. The following sample shows how to use the Where() LINQ method to retrieve all of the people whose name is Matteo:
private async void OnReadDataClicked(object sender, RoutedEventArgs e) { SQLiteAsyncConnection conn = new SQLiteAsyncConnection(Path.Combine(ApplicationData. Current.LocalFolder.Path, "people.db"), true); var query = conn.Table<Person>().Where(x => x.Name == "Matteo"); var result = await query.ToListAsync(); foreach (Person item in result) { Debug.WriteLine(string.Format("{0}: {1} {2}", item.Id, item.Name, item.Surname)); } } |
The only difference with a standard LINQ operation is that calling the Where() method just prepares the query; to effectively perform the operation and get the list of results, we need to call the ToListAsync() method.
Update operations are performed by using another method of the SQLiteAsyncConnection class which is called UpdateAsync(). However, before using it, we first need to retrieve (using the previous approach) the item we want to modify, so that we can pass it to the update method, like in the following sample:
private async void OnUpdateDataClicked(object sender, RoutedEventArgs e) { SQLiteAsyncConnection conn = new SQLiteAsyncConnection(Path.Combine(ApplicationData. Current.LocalFolder.Path, "people.db"), true); Person person = await conn.Table<Person>().Where(x => x.Name == "Matteo").FirstOrDefaultAsync(); person.Name = "Ugo"; await conn.UpdateAsync(person); } |
After retrieving all of the people whose name is Matteo, we get a reference to the first one of the list by using the FirstOrDefaultAsync() method. Then, after changing the person’s name, we pass the retrieved object to the UpdateAsync() method to perform the operation.
The insert and update operations can also be performed with multiple items by using the InsertAll() and UpdateAll() methods, which accepts a collection of objects instead of just a single one.
Finally, if you want to delete an existing item, you need to call the DeleteAsync() method offered by the SQLiteAsyncConnection class. Again, you’ll have to first get a reference to the item you want to delete so that you can pass it to the DeleteAsync() method, like in the following sample:
private async void OnDeleteDataClicked(object sender, RoutedEventArgs e) { SQLiteAsyncConnection conn = new SQLiteAsyncConnection(Path.Combine(ApplicationData. Current.LocalFolder.Path, "people.db"), true); Person person = await conn.Table<Person>().Where(x => x.Name == "Matteo").FirstOrDefaultAsync(); await conn.DeleteAsync(person); } |
SQLite-net: Pros and Cons
Similar to every other tool, SQLite-net has its pros and cons. For sure, the biggest SQLite-net pro is its simplicity. Thanks to the LINQ approach, we can easily use a database even if we’re not very familiar with the SQL syntax.
SQLite-net’s biggest con is that the library isn’t 100 percent complete since it doesn’t support all of the scenarios that a relational database can manage. The most important scenario are relationships; SQLite-net doesn’t offer a way to create a relationship between tables and to define foreign keys. Consequently, we don’t have an easy way to perform a query that is able to retrieve related data from two or more tables. The only viable approach is to perform multiple nested queries; those, however, have a negative impact on performance.
Portable Class Library for SQLite
Microsoft (through the Microsoft Open Technologies subsidiary) has created a library called Portable Class Library for SQLite, which offers a completely different approach than SQLite-net. Instead of providing a middle layer that translates operations on objects in SQL queries, it gives maximum flexibility to the developer. You’ll be able to interact with the database as you would do with a traditional app, by manually writing the SQL queries needed to perform the operations. We won’t talk in detail about the SQL statements we’ll describe in this chapter since it’s out of scope for this book; I’ll just assume that you have a basic knowledge of SQL.
You can install this library to your project using NuGet here.
Creating the Database
Since, in this case, there’s no middle layer that translates the code in query for us, we won’t have to set up any mapping between classes and tables. To create a table, we will just perform a CREATE TABLE query, like in the following sample:
private void OnCreateDatabaseClicked(object sender, RoutedEventArgs e) { using (SQLiteConnection conn = new SQLiteConnection("people.db")) { string query = "CREATE TABLE IF NOT EXISTS PEOPLE " + "(Id INTEGER PRIMARY KEY AUTOINCREMENT NOT NULL," + "Name varchar(100), " + "Surname varchar(100))"; ISQLiteStatement statement = conn.Prepare(query); statement.Step(); } } |
The connection is created by using the SQLiteConnection object, which requires as parameter the name of the file with which we want to work (in this case, it’s called people.db). By wrapping the connection inside a using statement, we make sure that, when the operation on the database is completed, we close the connection.
In the previous sample, we first define a simple string with the query to perform. Then we prepare it and turn it into a ISQLiteStatement object by calling the Prepare() method. In the end, we execute the query by calling the Step() method on the statement. Notice that, to the CREATE TABLE command, we’ve added the IF NOT EXISTS option. This way, we’ll be able to run the query multiple times without issues. If the table already exists, the query simply won’t be executed.
Performing Common Operations
To perform common operations using SQL, we need to introduce a new concept: parameters. In fact, SQLite supports a way to add parameters to a query so that some values can be defined at run time. The following sample shows how to use this approach to insert some data to the table we’ve previously created:
private void OnInsertDataClicked(object sender, RoutedEventArgs e) { using (SQLiteConnection conn = new SQLiteConnection("people.db")) { using (var statement = conn.Prepare("INSERT INTO People (Name, Surname) VALUES(@Name, @Surname);")) { statement.Bind("@Name", "Matteo"); statement.Bind("@Surname", "Pagani"); statement.Step(); statement.Reset(); statement.ClearBindings(); statement.Bind("@Name", "Ugo"); statement.Bind("@Surname", "Lattanzi"); statement.Step(); } } } |
The basic approach is the same: we define a query and we turn it into an ISQLiteStatement object by using the Prepare() method. However, this time, you will notice that we’ve added two parameters to the query which are identified by the @ symbol: @Name and @Surname. Before executing the query, we need to configure the statement so that it knows which values to assign to these parameters. We do this by using the Bind() method which requires the parameter’s name and the value we want to assign. Only after we’ve performed this operation can we call the Step() method to execute the query.
If we want to insert another item without creating a new ISQLiteStatement object, we can reset the already existing one by calling the Reset() and the ClearBindings() methods. This way, we can call the Bind() method again to assign new values to the parameters and then call the Step() method to execute the query.
When it comes to reading data from a table, we’re going to use the same approach, with one difference: when you’re retrieving some data from a table, you can get multiple rows as a result. Consequently, the library will return you an iterator which we will need to process in order to get all of the results. This goal is achieved using the same Step() method we’ve seen before; the difference is that, this time, every time we’ll call it, we’ll get just one row in return. Therefore, we will need to invoke it multiple times until all of the rows have been processed. Let’s take a look at the following sample:
private void OnReadDataClicked(object sender, RoutedEventArgs e) { using (SQLiteConnection conn = new SQLiteConnection("people.db")) { using (var statement = conn.Prepare("SELECT * FROM People ORDER BY Name;")) { while (statement.Step() == SQLiteResult.ROW) { long id = (long)statement[0]; string name = (string)statement[1]; string surname = (string)statement[2]; Debug.WriteLine("Id: {0} - Name: {1} - Surname: {2}", id, name, surname); } } } } |
After we’ve defined the query (which simply returns all of the rows stored in the People table, ordered by name), we turn it into a ISQLiteStatement object. Then we call the Step() method inside a while statement. This method returns the result’s type of the query: if the value is ROW, it means that there are still rows to process. This while statement makes sure that the iteration is repeated until all of the rows have been processed.
For each single row, we are able to extract the data by using the ISQLiteStatement object and by treating it as an array; every array’s position matches the table’s columns. Therefore, in the previous sample, we can use the index 0 to retrieve the value of the column Id or the index 1 to retrieve the value of the column Name. However, the array contains generic objects so we need to perform a cast to the type we expect.
In the end, when it comes to updating or deleting the data, there are no new concepts to introduce; the approach is always the same. We prepare the query, we set the parameters, and we perform it by converting it into an ISQLiteStatement object. The following sample shows how to perform an update:
private void OnUpdateDataClicked(object sender, RoutedEventArgs e) { using (SQLiteConnection conn = new SQLiteConnection("people.db")) { string query = "UPDATE People SET Name=@Name WHERE Id=@Id"; using (var statement = conn.Prepare(query)) { statement.Bind("@Name", "Ugo"); statement.Bind("@Id", 1); statement.Step(); } } } |
Here is, instead, how to perform a delete:
private void OnDeleteDataClicked(object sender, RoutedEventArgs e) { using (SQLiteConnection conn = new SQLiteConnection("people.db")) { string query = "DELETE FROM People WHERE Id=@Id"; using (var statement = conn.Prepare(query)) { statement.Bind("@Id", 1); statement.Step(); } } } |
Portable Class Library for SQLite: Pros and Cons
The biggest pro in using the Portable Class Library for SQLite is its flexibility: since you can write SQL statements, you’ll be able to perform any operation that is supported by SQLite (such as managing indexes, relationships, etc.). However, this approach is more complex to use and makes the code harder to read since you will work with two different data approaches: tables, rows, and columns for the database, and objects and classes for the app. Consequently, you will need to manually convert from one data type to the other every time you need to perform an operation.
Using an Existing Database
There are many scenarios in which you don’t need to start from scratch to create the database but where you already have a prepopulated one with some data. However, we can’t simply add it to our project in Visual Studio and connect to it. If you remember what we learned in this chapter, the content of the project is copied into a read-only folder of the system. Because of this, we won’t be able to perform any operation that alters the data in the database (such as adding a new item or editing an existing one).
Consequently, the best approach is to copy the database from the project to the local storage the first time the app is started. This way, since the database will be stored in the local storage, we will have both read and write access. Thanks to the knowledge we acquired in this chapter, it’s easy to write a method that performs this operation:
private async Task CopyDatabase() { bool isDatabaseExisting = false; try { StorageFile storageFile = await ApplicationData.Current.LocalFolder. GetFileAsync("people.db"); isDatabaseExisting = true; } catch { isDatabaseExisting = false; } if (!isDatabaseExisting) { StorageFile databaseFile = await Package.Current.InstalledLocation. GetFileAsync("people.db"); await databaseFile.CopyAsync(ApplicationData.Current.LocalFolder); } } |
In this sample, we assume that we have a file called people.db in our project. First, we check to see whether or not the file is already existing in the local storage by calling the GetFileAsync() method (and intercepting the exception that can be raised if the file doesn’t exist).
Only if the database doesn’t exist do we then copy it from the project by using the Package.Current.InstalledLocation class we previously mentioned in this chapter. The copy is performed by using the CopyAsync() method, which requires the destination folder as parameter (in this case, the local storage).
Exploring the Database Content
During the testing phase, we may be required to take a look at the data stored in the database in order to understand if everything is okay. There are many free and commercial tools available on the Internet that are able to open a SQLite database and perform queries on it. You can find a complete list on the official SQLite website here.
One of the best available tools (which comes both in a free and a paid version) is called SQLite Expert, which can be downloaded here.
Storing Sensitive Data
The Windows Runtime offers a set of classes specifically to help store sensitive data such as service credentials. These classes, which are part of the Windows.Security.Credentials namespace, are able to:
- Keep the data isolated so that they can’t be accessed by other apps
- Encrypt the data
- Synchronize the data with all of the other devices registered with the same Microsoft Account and that have been marked as trusted
The key class to store sensitive data is called PasswordVault, which can store one or more PasswordCredential objects, like in the following sample:
private void OnSavePasswordClicked(object sender, RoutedEventArgs e) { PasswordVault vault = new PasswordVault(); PasswordCredential credential = new PasswordCredential("YourServiceCredentials", "username", "password"); vault.Add(credential); } |
Every credential is identified by a unique name, which is the first parameter passed to the class constructor (in the sample, it’s YourServiceCredentials). Then, you can specify the username and the password to store. To add a PasswordCredential object to the vault, it’s enough to call the Add() method.
To retrieve the stored credentials, you can use the FindAllByResource() method offered by the PasswordVault class; it will return a list of PasswordCredential objects that match the given resource name. Typically, you will get just one result since you can’t have two credentials stored with the same name. The following sample retrieves the previously stored credentials and displays them to the user:
private async void OnGetPasswordClicked(object sender, RoutedEventArgs e) { PasswordVault vault = new PasswordVault(); IReadOnlyList<PasswordCredential> credentials = vault.FindAllByResource("YourServiceCredentials"); if (credentials.Count > 0) { PasswordCredential credential = credentials.FirstOrDefault(); credential.RetrievePassword(); string message = string.Format("Username: {0} - Password: {1}", credential.UserName, credential.Password); MessageDialog dialog = new MessageDialog(message); await dialog.ShowAsync(); } } |
The only thing to highlight here is that, before accessing to the Password property of the PasswordCredential class, we need to call the RetrievePassword() method as a security measure; otherwise, we won’t be able to read its value.
- 1800+ high-performance UI components.
- Includes popular controls such as Grid, Chart, Scheduler, and more.
- 24x5 unlimited support by developers.