
W3.CSS Succinctly®

CHAPTER 14
Images
You can use the <img> tag to display a picture on a website. The W3.CSS framework provides several classes that can be used to control the image’s borders and appearance.
CSS Images
Here is the HTML to display an image.
Code Listing 69
<div class="w3-container w3-margin"> <img src="BabyGirlCuddles.jpg" alt="Granddaughter"> </div> |
This will produce the image shown in Figure 51.

Figure 51: Grandpa cuddles
We can use the following classes to control how the image appears on the page:
- w3-circle: Places the image in a circle.
- w3-rounded: Adds rounded corners.
- w3-bordered: Adds a border around entire image.
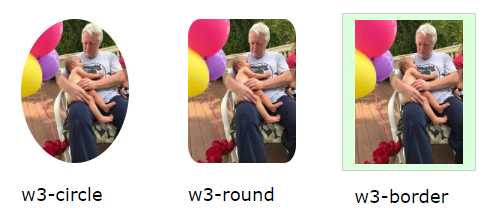
Figure 52: Sample image classes
Responsive images
You can add the w3-image class to the <img> tag to create a responsive image. The image size will adjust to the screen, but will never be larger than the original image size.
Note: If you want a full responsive image (meaning it can be larger than original size), you need to set the width property to 100% (via an inline style).
Image opacity
You can use the opacity classes to set the opacity of the image from 25 percent to 75 percent. The class names are:
- w3-opacity-min: 75 percent opacity
- w3-opacity: 50 percent opacity
- w3-opacity-max: 25 percent opacity
Figure 53 shows the various opacity effects.
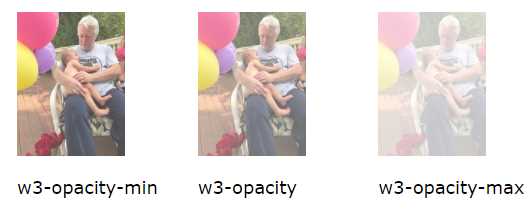
Figure 53: Image opacity
Grayscale
You can use the grayscale classes to set the level of grayscale for an image. The class names are:
- w3-grayscale-min: Minimal grayscale effect.
- w3-grayscale: Mostly grayscale image.
- w3-grayscale: Full grayscale effect.
Figure 54 shows the grayscale effect on an image.
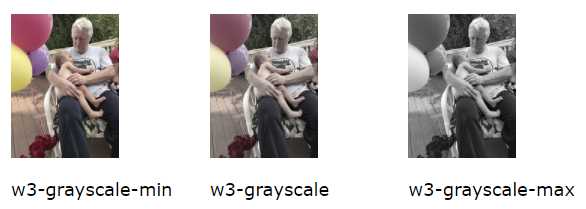
Figure 54: Grayscale
CSS slideshow
You can use the W3.CSS framework and a bit of JavaScript to create a slideshow of images. Figure 55 shows the basic appearance of the slideshow. The user can click the buttons to move among the images in the slideshow.

Figure 55: Slideshow
Setting the images
The first step is to add the images you want to view and assign them the same class name. The following snippet shows the image setup and the two buttons for navigation.
Code Listing 70
<div class="w3-display-container w3-content" style="width:8%;"> <img class="w3-image mySlides" src="BabyGirlCuddles.jpg"> <img class="w3-image mySlides" src="FingersSmall.jpg"> <p> <button class="w3-button w3-black" onclick="plusDivs(-1)">❮</button> <button class="w3-button w3-black" onclick="plusDivs(1)">❯</button> </p> </div> |
The HTML entities are used for the buttons to provide the navigation arrows. We will need a JavaScript function called plusDivs() to move among the images.
JavaScript code
The following is the code that needs to be added within a script tag in the <head> section of the website to allow the navigation between images.
Code Listing 71
<script> var slideIndex =1; showDivs(1);
function plusDivs(n) { showDivs(slideIndex += n) ; }
function showDivs(n) { var x = document.getElementsByClaseName('mySlides'); if (n > x.length) { xslideIndex =1;} if (n < 1) { slideIndex =x.length;} for (var i=0; i < x.length; i++) { x[i].style.display ="none"; } x[i].style.display ="block"; } </script> |
The script declares a variable (slideIndex) to keep track of the currently selected image and initializes it to the first image. The buttons will call the plusDivs() function with a parameter indicating the next image to display.
ShowDivs() will simply set the display style of all the images to none, and then set the selected image’s style to block, causing it to be shown.
Summary
W3.CSS provides classes to control the appearance and shape of images, and makes it very easy to create a slideshow of your image collection with minor JavaScript.
- 1800+ high-performance UI components.
- Includes popular controls such as Grid, Chart, Scheduler, and more.
- 24x5 unlimited support by developers.