
Vue.js Succinctly®

CHAPTER 4
Finalizing the App: Database
Quick intro
Throughout the previous chapters, we built the foundation of our application, and now have an almost functional application. The only thing we are missing is being able to persist the data the app uses, which will be the focus of this chapter.
To make things simple, we are going to use a Google spreadsheet as our app’s database table, and we’ll access the data using a JavaScript library and service specifically designed to use a Google Sheets spreadsheet—this service is called Sheetsu.
Sheetsu dashboard
The first thing to do is to sign up for the Sheetsu service—this can easily be done by signing up with your existing Gmail or Google account. The setup process is fast and simple, and can be completed in less than a minute.
Once you’re signed up for the Sheetsu service, you’ll be redirected to the dashboard, which looks as follows.

Figure 4-a: The Sheetsu Dashboard
To get started, click Go to Google Sheet. This will open the Google spreadsheet in a different browser tab, which we can see as follows.

Figure 4-b: The Google Spreadsheet Table
I’ve added the column names, the two records described within the data function of App.vue, and a third, additional record.
Click on the Settings link next to the name of the table, in this case called Example Table, to give it another name. You should see the following dialog with the default properties shown.
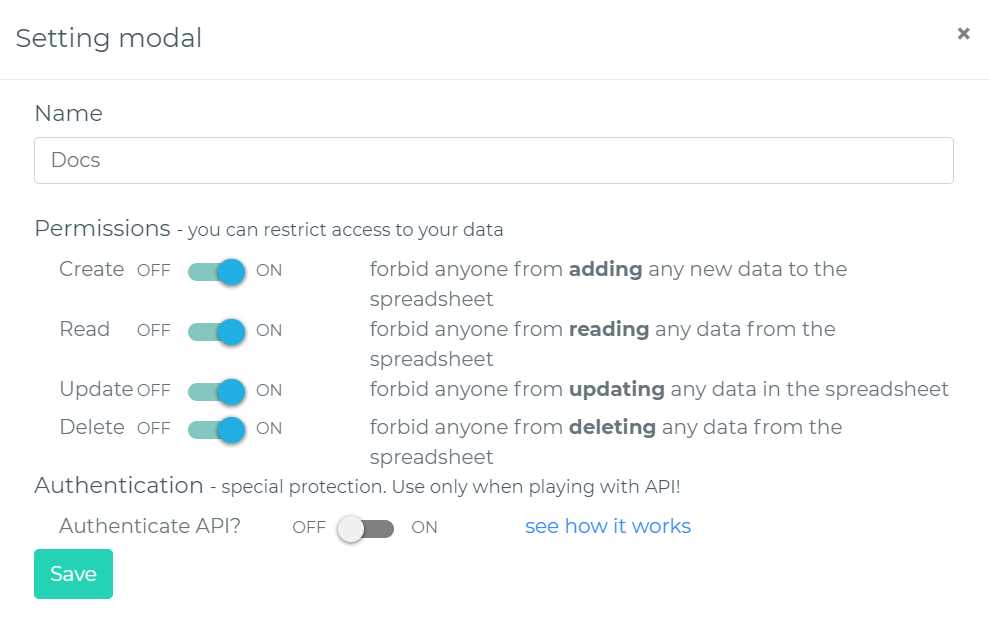
Figure 4-c: Sheetsu Default Table Settings
In my case, the only thing I have done is renamed the table from Example Table to Docs, by changing the value of the Name field.
Before we can start using Sheetsu within our code, we need to go to the root folder project and install Sheetsu from the command line as: npm install sheetsu-node --save.
Dynamic data loading
Now that we are set up and ready to work with Sheetsu, the next thing we need to do is to add it to App.vue, make some modifications to the existing code, and load the items array from the Docs table using Sheetsu.
Listing 4-a: Updated App.vue
<template> <div id="app"> <v-app> <Doc ref="modal" :item="newdoc" :items="items" /> <v-layout row> <v-flex xs12 sm6 offset-sm3> <v-card> <Docs :items="items"/> <v-card-text tyle="height: 100px; position: relative"> <v-btn @click="openModal" big color="pink" dark absolute bottom right fab > <v-icon>add</v-icon> </v-btn> </v-card-text> </v-card> </v-flex> </v-layout> </v-app> </div> </template> <script> import Docs from './components/Docs'; import Doc from './components/Doc'; import sheetsu from 'sheetsu-node'; let db = sheetsu({ address: "https://sheetsu.com/apis/v1.0su/..."}); // put your URL here export default { name: 'app', components: { Docs, Doc }, created () { this.getdocs(); }, methods: { openModal() { this.$refs.modal.show(); }, db.read().then((data) => { this.items = JSON.parse(data); }); } }, data: () => { return { newdoc: { id: -1, name: "New Document", exp: "", alert1year: true, alert6months: true, alert3months: true, alert1month: true }, items: [] } } } </script> <style> </style> |
I’ve highlighted the changes to App.vue in bold. The first change made to the code is to import a reference to the Sheetsu module, using an import sheetsu from 'sheetsu-node'; statement.
Next, we need to instantiate the Sheetsu object by passing the API address of the Google spreadsheet we created. You can do this from the Sheetsu dashboard by scrolling down to the bottom of the page and clicking Go to your API—as we can see in the following figure.
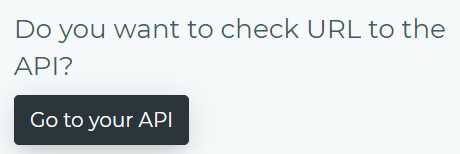
Figure 4-d: The “Go to your API” Button (Sheetsu Dashboard: bottom of the page)
When you click this button, you will be taken to a webpage that displays the JSON representation of data existing on the Google spreadsheet—which looks something like this.

Figure 4-e: The JSON Sheetsu (Google Spreadsheet) Results
The URL of this JSON result is used when creating the Sheetsu instance using the following line of code: let db = sheetsu({address: "https://sheetsu.com/apis/v1.0su/..."});.
Next, we can see that the list of documents gets loaded from the Google spreadsheet when the component’s created event is executed by calling the getdocs method—which happens when App.vue is rendered on the screen.
created () {
this.getdocs();
}
The getdocs method is responsible for executing the read method from the Sheetsu instance, retrieving those values and assigning them to the items array as JSON results—as seen in Figure 4-e.
getdocs() {
db.read().then((data) => {
this.items = JSON.parse(data);
});
}
The result needs to be converted from a string JSON representation to its JSON object equivalent—which is why JSON.parse is invoked.
For this to fully work, there’s one final change required: The default data that was assigned to the items array needs to be cleared, which is why it is initialized as items: [].
If you now run the application, you should see that the data is loaded dynamically.
Deleting documents
Now that we can load the documents dynamically from the Google spreadsheet table, the next thing we need to do is to be able to delete a document from the database when clicking the delete_forever icon. The following listing shows the updated Item.vue code that does this.
Listing 4-b: Updated Item.vue
<template> <div> <Doc ref="modal" :item="item" :items="items" /> <v-list-tile avatar ripple> <v-btn @click="removeItem" flat icon color="red lighten-2"> <v-icon>delete_forever</v-icon> </v-btn> <v-btn @click="openModal" flat icon color="green lighten-2"> <v-icon>edit</v-icon> </v-btn> <v-list-tile-content> <v-list-tile-title class="text--primary"> {{ item.name }} </v-list-tile-title> <v-list-tile-sub-title> {{ item.exp }} </v-list-tile-sub-title> <v-list-tile-sub-title> {{daysLeft(item.exp)}} </v-list-tile-sub-title> </v-list-tile-content> <v-list-tile-action> <v-list-tile-action-text> {{ item.id }} </v-list-tile-action-text> <v-icon v-if="!hasExpired(item.exp)" color="green lighten-1">done_outline</v-icon> <v-icon v-else color="red lighten-1">warning</v-icon> </v-list-tile-action> </v-list-tile> <v-divider v-if="item.id + 1 < lgth" :key="`divider-${item.id}`"></v-divider> </div> </template> <script> import Doc from './Doc'; import moment from 'moment'; import sheetsu from 'sheetsu-node'; let db = sheetsu({ address: "https://sheetsu.com/apis/v1.0su/..."}); // put your URL here export default { name: "Item", components: { Doc }, props: ["item", "lgth", "items"], methods: { openModal() { this.$refs.modal.show(); }, removeItem() { db.delete( "id", this.item.id ).then(() => { let idx = this.items.indexOf(this.item); if (idx > -1) { this.items.splice(idx, 1); } }); }, daysLeft(dt) { let ends = moment(dt); let starts = moment(Date.now()); let years = ends.diff(starts, "year"); starts.add(years, "years"); let months = ends.diff(starts, "months"); starts.add(months, "months"); let days = ends.diff(starts, "days"); let rs = years + " years " + months + " months " + days + " days"; return this.hasExpired(dt) ? "Expired " + rs.replace(/-/g, '') + " ago" : "Left: " + rs; }, hasExpired(dt) { return (Date.parse(dt) <= Date.now()) ? true : false; } } } </script> <style scoped> </style> |
There are only three changes to the code: the first is the import statement that imports the sheetsu module, the second is the creation of the sheetsu instance, and the third is the change to the removeItem method that performs the deletion operation.
The logic within the removeItem module is quite simple—it basically calls the delete method from the db instance that points to the Google spreadsheet table.
removeItem() {
db.delete(
"id",
this.item.id
).then(() => {
let idx = this.items.indexOf(this.item);
if (idx > -1) {
this.items.splice(idx, 1); // remove 1 item at [idx]
}
});
}
The way the delete method works, is that if we pass it the name of the column we want to focus on—the id and the value which we want to remove, in this case this.item.id—then the rows that match that search criteria will be deleted.
After the document is deleted, then item gets removed from the items array, which is what then(() => {} ... ); does.
Because we are using Sheetsu’s free plan, you will notice that when you click on the delete_forever icon, the document will not be deleted on the Google spreadsheet. This is because the free version doesn’t allow for items to be deleted. If you open your browser’s developer tools, you should see the following message.

Figure 4-f: Developer tools (DELETE message): Sheetsu
Notice that message returned by the Sheetsu API is quite clear—a 402 (Payment Required) response is returned. If you would like to use a paid Sheetsu plan, feel free to give it a try.
This validates that our code works, but the delete operation was not carried out on the Google spreadsheet due to the paywall option; however, you will notice that the document has been removed from the list of documents on the UI.
Saving new or existing documents
There’s one final thing to do before we have a finished application—we need to be able to save new or existing documents. To achieve this, we need to make some changes to Doc.vue as follows.
Listing 4-c: Updated Doc.vue
<template> <div> <v-dialog v-model="showModal" fullscreen hide-overlay transition="dialog-bottom-transition" scrollable > <v-card tile> <v-toolbar color="blue" dark> <v-btn icon dark @click="hide"> <v-icon>close</v-icon> </v-btn> <v-toolbar-title>{{item.name}}</v-toolbar-title> <v-spacer></v-spacer> <v-toolbar-items> <v-btn dark flat @click="save">Save</v-btn> </v-toolbar-items> </v-toolbar> <v-card-text> <v-list three-line subheader> <v-list-tile avatar> <v-list-tile-content> <v-list-tile-title> Document Name </v-list-tile-title> <v-list-tile-sub-title></v-list-tile-sub-title> <v-text-field ref="name" v-model="item.name" :rules="[ () => !!item.name || 'Required field']" required > </v-text-field> </v-list-tile-content> </v-list-tile> <v-list-tile avatar> <v-list-tile-content> <v-list-tile-title> Expiry Date </v-list-tile-title> <v-list-tile-sub-title></v-list-tile-sub-title> <v-menu ref="menu" v-model="menu" :close-on-content-click="false" :nudge-right="40" :return-value.sync="date" lazy transition="scale-transition" offset-y full-width min-width="290px" > <template v-slot:activator="{ on }"> <v-text-field v-model="date" prepend-icon="event" readonly v-on="on" ></v-text-field> </template> <v-date-picker v-model="date" :min=today max="2099-12-31" no-title scrollable> <v-spacer></v-spacer> <v-btn flat color="primary" @click="menu = false">Cancel</v-btn> <v-btn flat color="primary" @click="$refs.menu.save(date)">OK</v-btn> </v-date-picker> </v-menu> </v-list-tile-content> </v-list-tile> </v-list> <v-divider></v-divider> <v-list four-line subheader> <v-list-tile avatar> <v-list-tile-action> <v-switch v-model="item.alert1year" :label="`Alert @ 1.5 & 1 year(s)`" ></v-switch> </v-list-tile-action> </v-list-tile> <v-list-tile avatar> <v-list-tile-action> <v-switch v-model="item.alert6months" :label="`Alert @ 6 months`" ></v-switch> </v-list-tile-action> </v-list-tile> <v-list-tile avatar> <v-list-tile-action> <v-switch v-model="item.alert3months" :label="`Alert @ 3 months`" ></v-switch> </v-list-tile-action> </v-list-tile> <v-list-tile avatar> <v-list-tile-action> <v-switch v-model="item.alert1month" :label="`Alert @ 1 month or less`" ></v-switch> </v-list-tile-action> </v-list-tile> </v-list> </v-card-text>
<div style="flex: 1 1 auto;"></div> </v-card> </v-dialog> </div> </template> <script> import sheetsu from 'sheetsu-node'; let db = sheetsu({ address: "https://sheetsu.com/apis/v1.0su/..."}); export default { name: "Doc", props: ["item", "items"], data: () => { return { name: "", date: new Date().toISOString().substr(0, 10), today: new Date().toISOString().substr(0, 10), menu: false, showModal: false } }, methods: { show() { this.showModal = true; if (this.item.id > -1) { this.date = this.item.exp; } }, hide() { this.showModal = false; }, save() { if (this.item.id == -1) { this.adddoc(); } else { this.editdoc(); } this.showModal = false; }, adddoc() { let doc = { id: this.items.length + 1, name: this.item.name, exp: this.date, alert1year: this.item.alert1year, alert6months: this.item.alert6months, alert3months: this.item.alert3months, alert1month: this.item.alert1month }; db.create(doc).then(() => { this.items.push(doc); }); }, editdoc() { this.item.exp = this.date; let doc = { id: this.item.id, name: this.item.name, exp: this.date, alert1year: this.item.alert1year, alert6months: this.item.alert6months, alert3months: this.item.alert3months, alert1month: this.item.alert1month }; db.update( "id", this.item.id, doc).then(() => { let idx = this.items.findIndex ((itm => itm.id == this.item.id)); this.items[idx] = doc; }); } } } </script> <style scoped> </style> |
We can see that the first two changes highlighted in bold have to do with importing the Sheetsu module and instantiating it.
Next, within the Save method, we check if an item is new or if it is already existing. If it is a new item (this.item.id == -1), then the adddoc method is called. If it is an existing item, then the editdoc method is called.
Let’s now explore in detail the adddoc method.
adddoc() {
let doc = {
id: this.items.length + 1,
name: this.item.name,
exp: this.date,
alert1year: this.item.alert1year,
alert6months: this.item.alert6months,
alert3months: this.item.alert3months,
alert1month: this.item.alert1month
};
db.create(doc).then(() => {
this.items.push(doc);
});
}
We begin the adddoc method by creating a doc object to which we assign the values of each of the new document’s properties.
This doc object is then committed to the Google spreadsheet table (through Sheetsu) by calling the db.create method. The doc object is also added to the items array, which represents the list of documents.
Now, let’s explore the editdoc function.
editdoc() {
this.item.exp = this.date;
let doc = {
id: this.item.id,
name: this.item.name,
exp: this.date,
alert1year: this.item.alert1year,
alert6months: this.item.alert6months,
alert3months: this.item.alert3months,
alert1month: this.item.alert1month };
db.update("id", this.item.id, doc).then(() => {
let idx = this.items.findIndex
((itm => itm.id == this.item.id));
this.items[idx] = doc;
});
}
The first thing we do is assign the date value to item.exp. Then the doc object is created by assigning the values of the active document to their respective doc properties.
The update to the Google Spreadsheet is done by calling db.update, by looking for the id column that matches the value of the item.id.
The doc object is passed to db.update, which represents the document to be updated on the Google Spreadsheet.
Once the document has been updated, the document (item) is found within the list of documents (items array) using the findIndex method, and then the document is updated within the items array by calling this.items[idx] = doc;.
If you run the application and attempt to add, edit, or delete a document, you will notice that all these operations return a 402 (Payment Required) response from the Sheetsu service.
This means that all code for adding, editing, and deleting a document work. However, to enable that functionality on the Google spreadsheet table and reflect those changes, you’ll have to upgrade your Sheetsu plan.
Awesome—by using Google Sheets as a data source, we now have a small and fully working Vue application that works like the application we built in Flutter Succinctly.
Figure 4-g: The Finished Vue App
Project source code
You can download the complete source code files for the demo project built throughout this book from here.
Node modules and dependencies are not included as part of the code package, so you’ll need to run the npm install command from the project root folder (where package.json resides) to download and install all the modules and dependencies required.
Closing comments
We’ve covered quite a bit of ground. We’ve explored the essentials of Vue and how to quickly build an application with this amazing framework.
However, there’s quite a lot to learn about Vue. The goal of this book was to get you started and acquainted with the fundamentals and foundation of the framework, and help you build something relatively easily, without having to first become an expert on the framework.
Going forward, there are a few things to keep exploring about the framework, such as routing (using Vue Router), state management (using Vuex), and server-side rendering (using Nuxt.js).
Vue is more than a framework—it’s a mature and vibrant ecosystem that keeps growing and welcomes new adopters and fans every day.
I invite you to take this application a step further and add extra functionality, such as authentication and possibly transforming it into a single-page application. Go beyond the Sheetsu (Google Sheets) approach and replace it with a different backend, such as Firebase.
The possibilities with Vue are endless, and I’m excited to hear about what you build going forward. Thank you for reading, and goodbye until next time!
- 80+ high-performance, modular, and responsive Vue UI components.
- Popular components like Data Grid, Charts, and Diagram.
- Incredibly lightweight and user-friendly.