
Visual Studio 2017 Succinctly®

CHAPTER 5
Working with Solutions, Folders, and Languages
Visual Studio 2017 introduces updates to the solution model and to the way the IDE manages projects. This brings improved performance and reliability, especially with large solutions. Visual Studio 2017 also supports a larger number of languages and code files, regardless of the project system to which they belong. All these goodies are described thoroughly in this chapter.
Lightweight Solution Load
Often, enterprise applications consist of very large solutions, sometimes with dozens of projects. However, loading a very large solution can result in a negative impact on the overall performance of Visual Studio. For this reason, Visual Studio 2017 has introduced a new feature called Lightweight Solution Load. This feature optimizes the process of loading very large solutions, providing better responsiveness and performance. This feature is not enabled by default, so you can enable it manually by navigating to Tools > Options > Projects and Solutions, and then selecting Lightweight Solution load (see Figure 43).
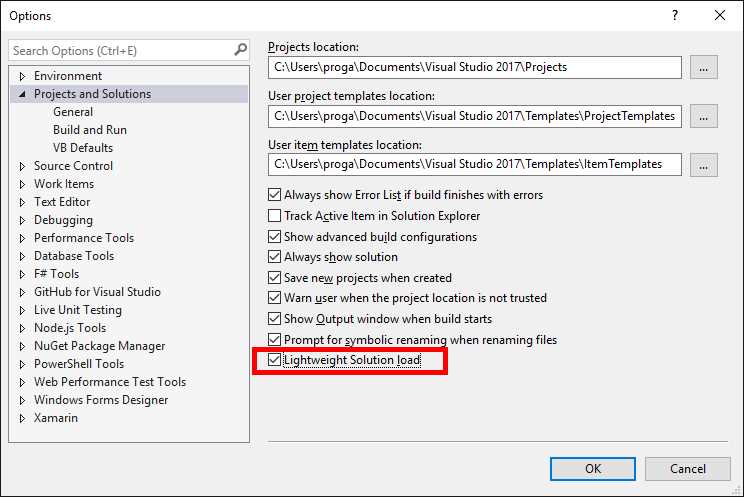
Figure 43: Enabling Lightweight Solution Load
You must understand the reasons why this feature is not enabled by default before you use it:
- You benefit from using this feature only with large solutions.
- It is optimized to work with solutions made of C#/VB projects or a mix of C# and C++ projects. Not all project types benefit from this feature.
- Visual Studio 2017 can automatically detect if loading a given solution might be optimized with this feature. In this case, it will prompt you with a message and ask your permission to enable the feature for you.
Behind the scenes, Lightweight Solution Load delays loading some projects until you actually need them. This implies that some features, such as code refactoring, code navigation, or inline renaming, might require some extra milliseconds the first time you invoke them. In conclusion, Lightweight Solution Load is a very useful addition, but only with large solutions made of C#/VB projects or with mixed C#/C++ solutions.
Extended language support
Out of the box, Visual Studio 2017 provides built-in support for a broader set of languages than past versions. This support consists of syntax colorization, code snippets, navigation, and code completion through the Visual Studio core editor, which means it is available even if no workloads are installed. If you install workloads that target specific languages (e.g., .NET desktop development that targets C# and VB), those languages will receive more extensive support, such as, but not limited to, IntelliSense, light bulbs and quick actions, debugging, and so on. The value of this feature will be demonstrated in the next section, “Open Folder: Working with any codebase.” In the meantime, take a look at Table 7, which summarizes the list of supported languages and features per language.
Table 7: Supported Languages and Features in Visual Studio 2017
Features | Languages |
Only syntax colorization and code completion | Batch, Clojure, CoffeeScript, CSS, Docker, F#, INI, Jade, JSON, LESS, Make, Markdown, Objective-C, PowerShell, Python, Rust, ShaderLab, SQL, YAML |
Code snippets, syntax colorization, and code completion | CMake, Groovy, HTML, Javadoc, Lua, Perl, R, Ruby, ShellScript, Swift, XML |
Go To, code snippets, syntax colorization, and code completion | C++, C#, Go, Java, JavaScript, PHP, TypeScript, Visual Basic |
By supporting these languages, you can work with source code for different platforms and take advantage of evolved editing features—even with no installed workloads. If you are impatient, you can try to open individual code files in any of the supported languages, but the biggest benefit is working with folders. The next section provides some practical examples.
Open Folder: Working with any codebase
Many development environments have their own project system, and Visual Studio is no exception. A project contains everything needed to build an application, including source code files, references to external libraries, assets, and metadata. Microsoft Visual Studio has always had its own proprietary project system based on solutions (.sln files) and projects with the .xxproj extension, where xx represents the targeted development platform, the utilized programming language, or both. A solution can be considered as a collection of projects, and in the .NET terminology it is often referred to as an MSBuild solution, because MSBuild.exe is the tool Visual Studio uses to produce an application that compiles all the projects in a solution in the proper order. Visual Studio 2017’s ambition is to be the development environment for any developer on any platform, so it takes an important step forward by supporting a large number of non-.NET languages (see Table 7). Visual Studio 2017 also supports working with folders; this means that you can open folders on disk containing multiple code and asset files and Visual Studio will organize them in the best way possible in that environment. This makes Visual Studio independent from any proprietary project system (except for solutions, of course). It loads all the code files in a folder as a loose assortment, providing a structured view by organizing files and subfolders into a root folder for easy navigation through Solution Explorer. The root folder is actually the name of the folder you opened. Let’s look at a couple of examples.
Setting up the demo
For the examples, I’ll be using a nice open source project called Haikunator, which provides functions that generate random subdomain names for the Heroku platform. This project is available in various programming languages and with no proprietary project system, so it is perfect for our needs. I’ll be using two versions: the version written in Go and the version written in Python. The first example will be used to showcase the capabilities of the Visual Studio core editor, and the second example will be used to demonstrate extensive language support with the debugger and IntelliSense. That said, follow these steps:
- Go to github.com/Atrox/haikunatorgo for the Go version.
- Click Clone or download, then Download ZIP.
- Extract the content of the downloaded .zip archive into a folder of your choice.
- Go to github.com/Atrox/haikunatorpy for the Python version, then repeat steps two and three.
Take note of the folders where you extracted both .zip archives because they will be used shortly.
Basic language support in Visual Studio 2017
Our first example is based on the version of the Haikunator project written with the Go programming language. In Visual Studio 2017, select File > Open > Folder. Browse the disk until you find the folder where you extracted the code, then click Select Folder. After a few seconds, Solution Explorer will show the root folder for navigation and files inside that folder (see Figure 44). If you double-click any of the files with the .go extension, you will see how Visual Studio 2017 offers syntax colorization for this supported language even if no workloads have been installed and even if the current language does not belong to the .NET family (see Figure 44).
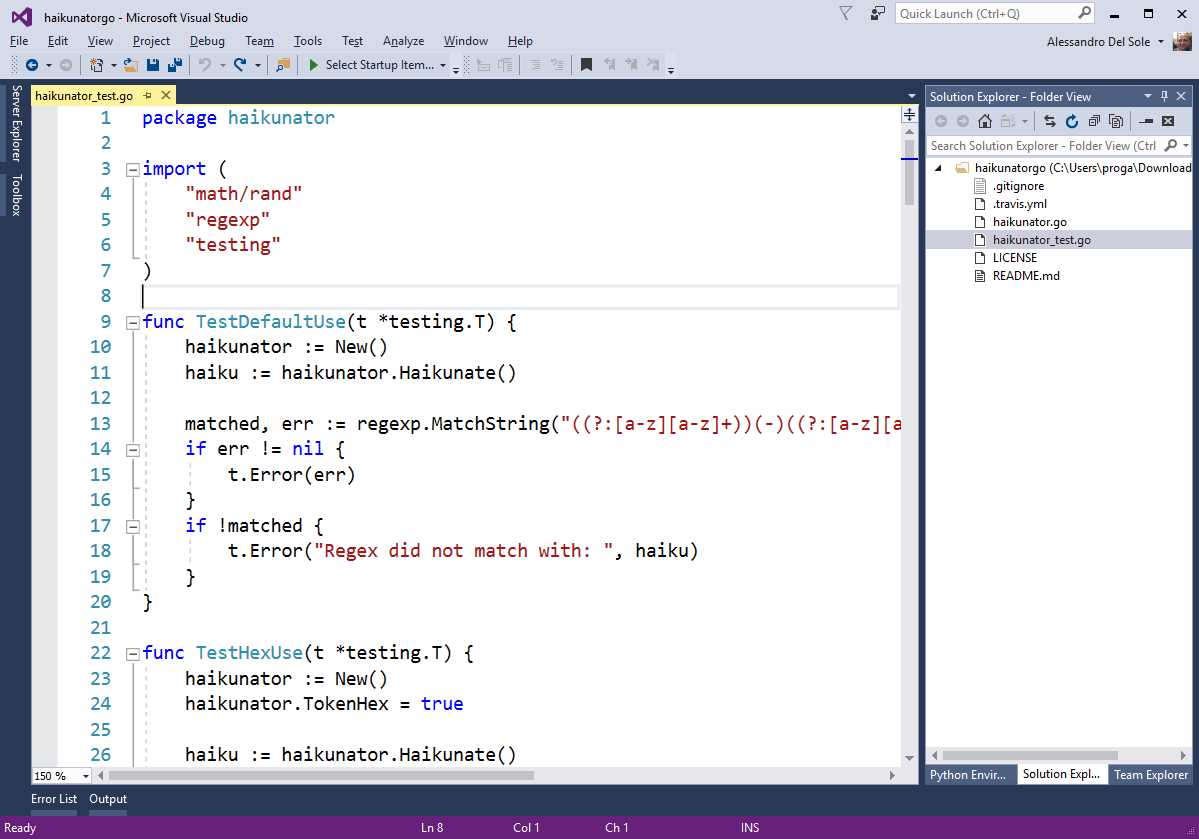
Figure 44: Opening a Folder and Editing Any Supported Code Files
Additionally, you get code navigation features such as Go To and structure guide lines as demonstrated in Figure 45, where you can see how the list of items can be filtered as you type.
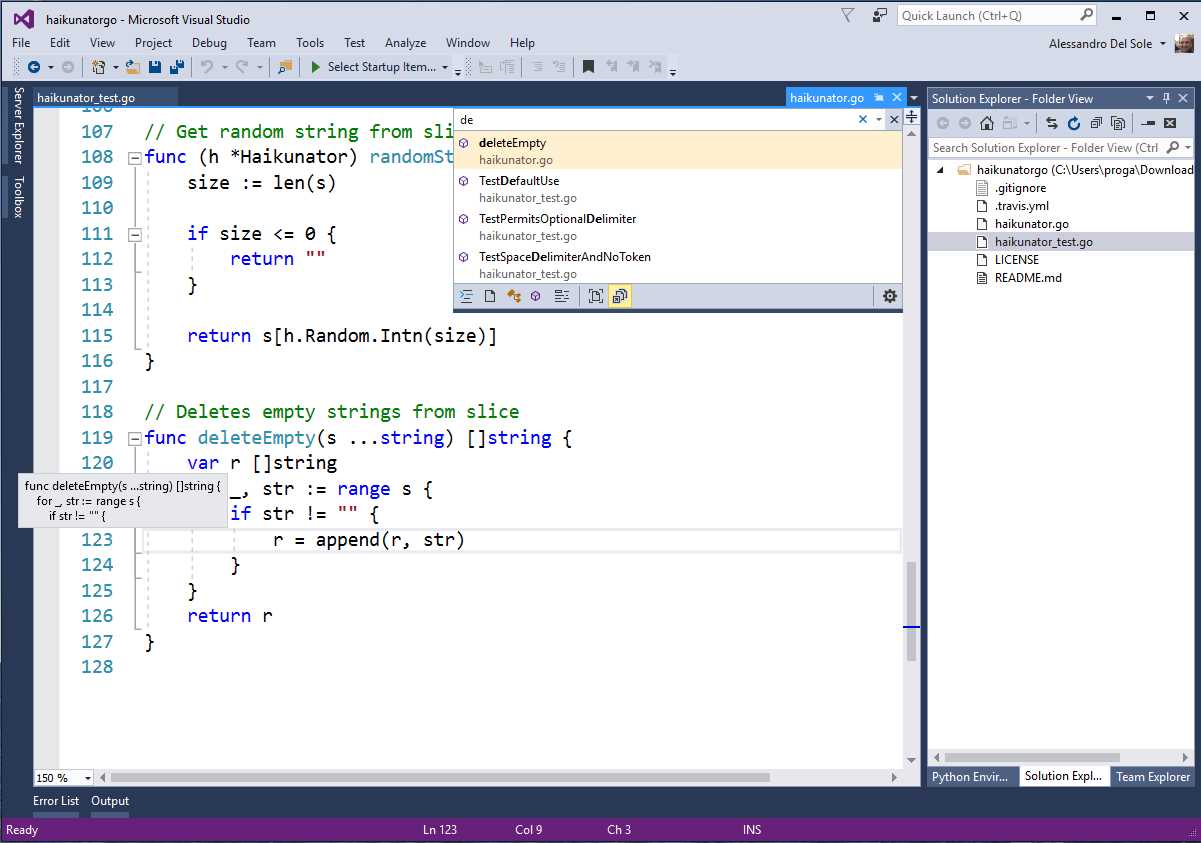
Figure 45: Code Navigation Features in Visual Studio’s Core Editor
For every supported language, you also get code completion, a feature that makes writing and editing code faster and easier. Figure 46 shows an example.
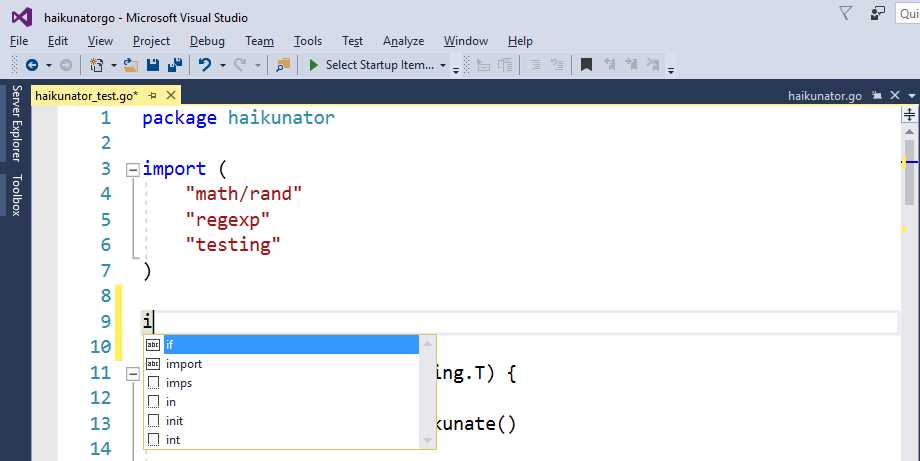
Figure 46: Code Completion Simplifies Writing Code
Some languages, including Go, also support TextMate code snippets, which are available through the code completion pop-up. Code snippets can be recognized through the icon of a blank sheet (see Figure 46). For example, if you select the init snippet and then press Tab, the code editor will insert a function stub called init, as shown in Figure 47.
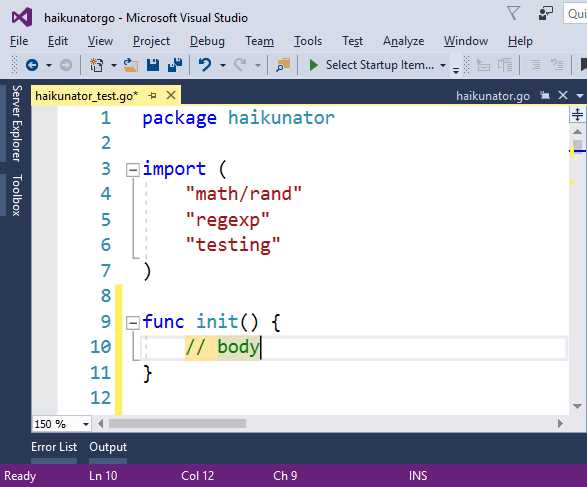
Figure 47: Inserting Code Snippets
Notice how the code editor highlights in yellow the code that should be replaced with your code. Remember that code snippets are not available to all languages, but you can refer to Table 7 as a quick reference for this feature’s availability. The important thing to emphasize here is that you have all you would expect from an evolved code editor regardless of the language, project systems, and installed workloads.
Note: Code completion is not IntelliSense. This is an important clarification. IntelliSense is an evolved tool, typically powered by a background compiler or by a completion database that allows an IDE to display and group items based on types, members, identifiers, and so on. Not surprisingly, IntelliSense in Visual Studio is available only to a restricted number of languages that have extensive support provided by specific workloads and tools. Code completion is more limited, often based on a small built-in list of keywords and on literals that the editor detects in the code, but it is in fact available to any language.
Extensive language support through workloads and tools
For some languages, Visual Studio 2017 allows for adding extensive support through specific installation workloads or third-party tools. Think of Python, which is a very popular programming language. The Visual Studio core editor provides basic support for it, including syntax colorization and code completion. However, Visual Studio 2017 allows executing external programs against your source code; this means that if you install the Python interpreter, you can execute your Python code from the development environment.
Tip: The last sentence applies to all the supported languages, not only Python.
In pre-releases of Visual Studio 2017, Microsoft also included a specific installation workload for Python development which included debugger integration and other enhanced tools to work with Python from the IDE. For RTM, the Python workload has been removed from the Visual Studio Installer. The Visual Studio Tools for Python for Visual Studio 2017 will be offered separately and is planned to be released a few days after Visual Studio 2017 reaches the RTM milestone. So, the next example based on the Python version of the Haikunator project is actually based on the pre-release of Visual Studio Tools for Python previously included with the Visual Studio Installer and will still be valid once the updated tools ship.
Note: The reason why I’m showing an example based on Python though it will only be available after RTM ships is that it’s the perfect demonstration of extensive language support with debugging features and code refactorings.
When you are done, open the folder containing the Python project with the Open Folder command. Then, open any .py code file to see how the code editor provides the expected syntax colorization. Figure 48 shows an example based on the tests.py file.
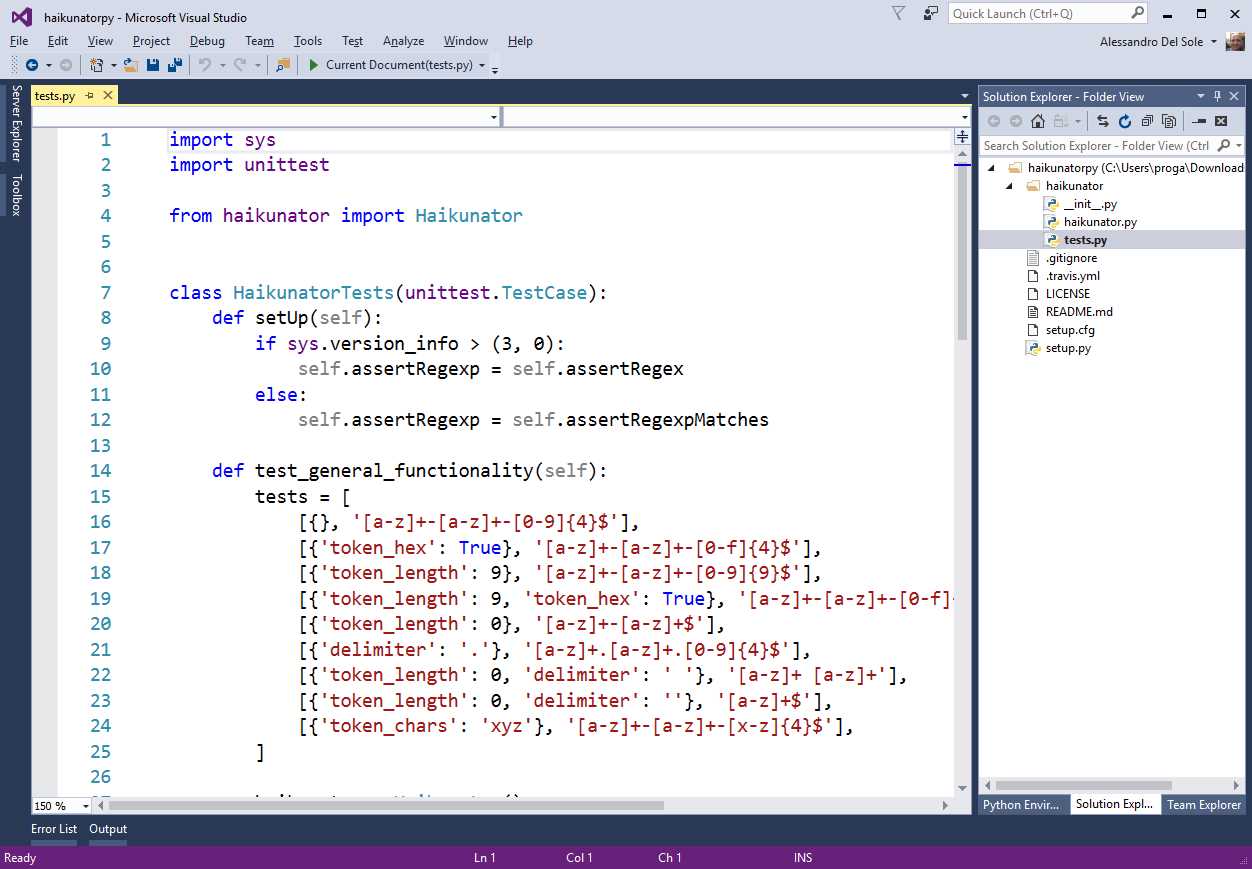
Figure 48: Syntax Colorization for Python
When you start typing, you will see IntelliSense in action, not just code completion. Figure 49 demonstrates how IntelliSense for Python shows items with icons that explain an item’s scope, such as keywords, functions, and types. Remember that IntelliSense is available for Python because of the specific installation workload, otherwise only code completion would be available.
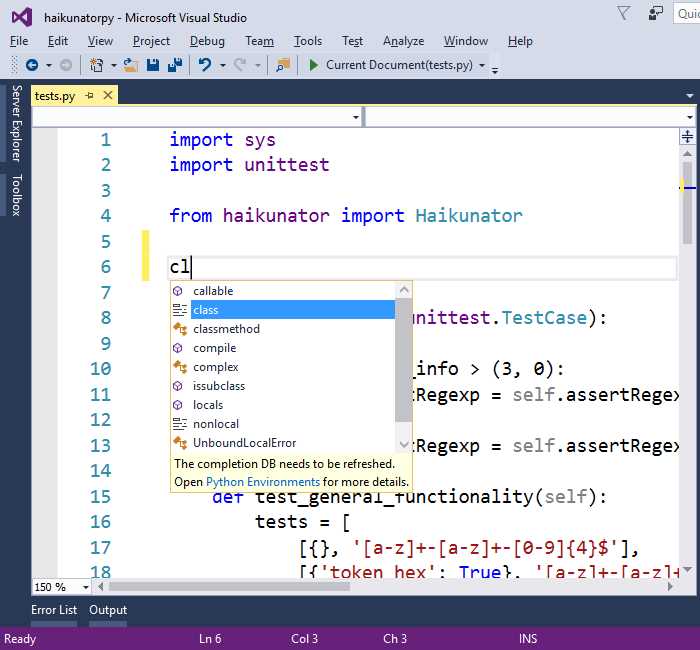
Figure 49: IntelliSense for Python
You might see a warning message that the completion DB needs to be refreshed. This happens because IntelliSense for Python is populated with an external database, which is different from what happens with C# and VB, in which the Roslyn APIs expose available members to Visual Studio. If you see the warning message, click the Python Environments hyperlink in the IntelliSense pop-up (see Figure 49). This action will open the Python Environments tool window, where you can see a list of available environments and interpreters (see Figure 50). The Python development workload installs the latest version of the interpreter from the official Python Software Foundation website—in this case version 3.5. Depending on your machine, the workload installs the 32-bit or 64-bit version. You will see a Refresh button near the Python environment—click it to start refreshing the completion database.
Figure 50 shows this operation in progress. Notice that not all of the available environments are also installed locally. For instance, in Figure 50 you can see how the Anaconda environment appears disabled, which means available but not installed. This is available as an individual component in the Visual Studio Installer or can be installed separately.
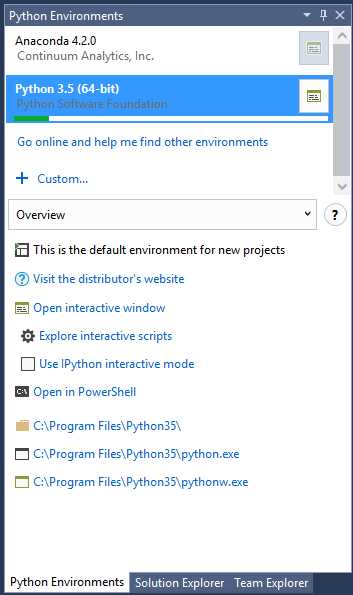
Figure 50: The Python Environments Tool Window
There are other shortcuts in this window, but they are strictly related to the Python tools for Visual Studio—addressing them is beyond the scope of this e-book. Now, it is time to discover some benefits of the Visual Studio editor by writing a bit of Python code.
Setting up a startup item
As we know, a great benefit that comes from installing tools that extend a language’s support is being able to run a program directly from within Visual Studio. This is true for the Python language, too. In order to run code, Visual Studio 2017 needs us to set up a startup item, which is the code file it will use to start a program. If your folder already contains a startup item, you are set. In this current example, the Haikunator project is a library that does not contain a startup item. To add one, right-click the root folder in Solution Explorer, then select Add > New File. You will see a new file in the folder. You can type any name you like, but for consistency in this chapter, enter Startup.py and press Enter. At this point, type the code shown in Code Listing 1. You will get IntelliSense as you type, and this will make your coding experience truly awesome.
Code Listing 1
from haikunator import Haikunator haikunator = Haikunator() name = haikunator.haikunate() print(name) |
The code is very simple—it imports the Haikunator type that is defined in the haikunator package and generates a random name invoking the haikunate method. Then it simply prints the name on screen. This is enough to demonstrate a number of features of the code editor. When you open the code editor on a specific file, either new or existing, this will automatically be set as the startup item. In this case, Startup.py is automatically set as the startup item for the program. If you wish to use a different startup file, simply open it or right-click its name in Solution Explorer, then select Set as Startup Item.
Running a program
As you would do with any other Visual Studio project, you can run a program by pressing F5 (debug mode), Ctrl+F5 (without debugging), or by clicking Start on the standard toolbar. When working with folders, the Start button shows the name of the startup item (see Figure 51).
Figure 51: Start Button Displays the Name of the Startup Item
Whatever start option you choose, your program will run as expected. In this particular case, you do not need to manually invoke the Python interpreter. Starting the sample program will produce the result shown in Figure 52 (the generated random name will vary on your machine).
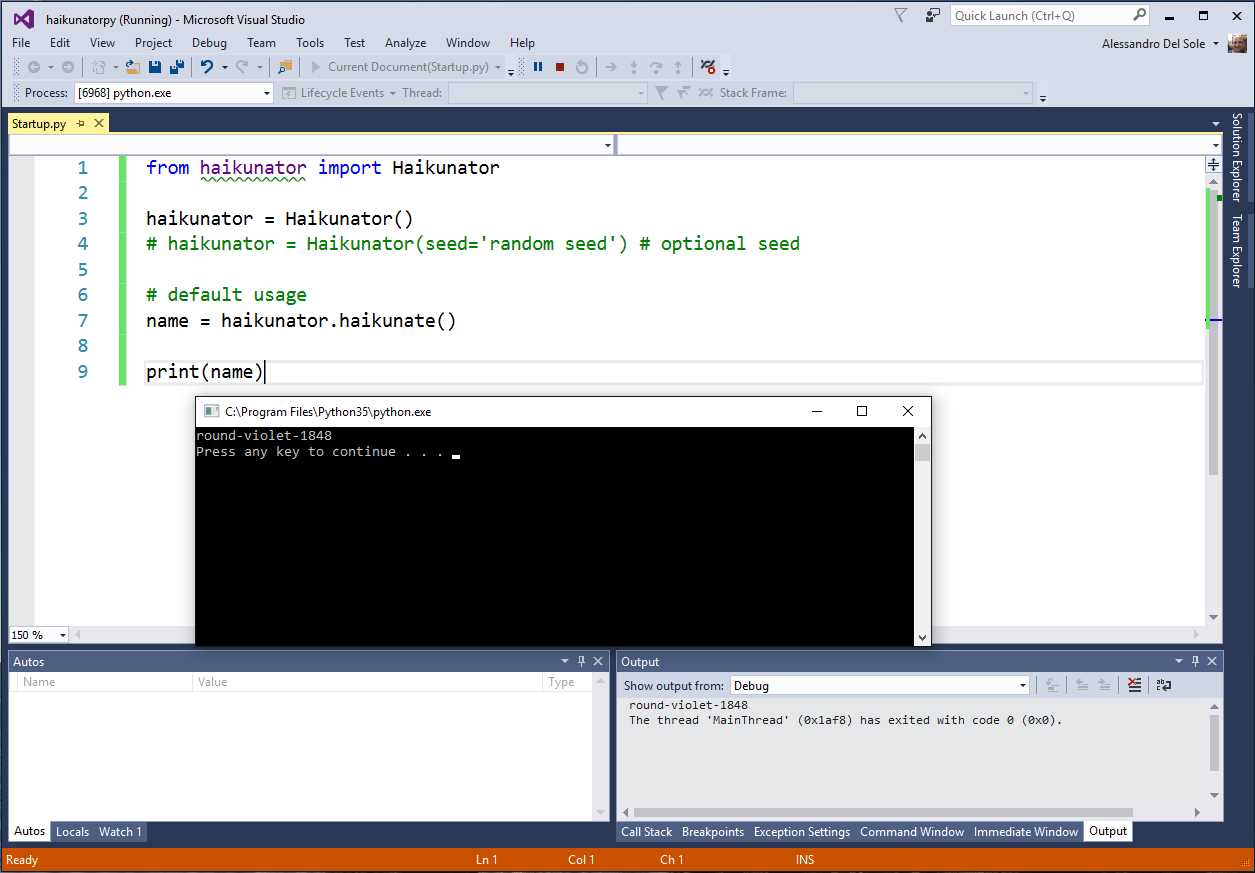
Figure 52: Running a Python Program from Visual Studio 2017
Notice that with specific regard to Python, the installation workload automatically configures Visual Studio 2017 to run the interpreter from within the IDE against the selected startup item. For other languages and with other tools, Visual Studio 2017 must be manually configured to run compilers or interpreters. We will look at those situations later in this chapter. For now, take a closer look at Figure 52—notice how the status bar of Visual Studio is orange, which means it is in debugging mode. This also implies that the new IDE can use external debugging tools.
Debugging
Visual Studio 2017 can extend the debugger to support additional languages. Specific workloads or third-party tools can install debugging components that the IDE can integrate into its powerful development experience. For a better understanding of this, open the haikunator.py file in the code editor. Move to the last line of code and place a breakpoint exactly as you would in C# or Visual Basic. Make sure you open the Startup.py file so that this is set again as the startup item, then run the program. After a few seconds, the debugger will break the application execution because of the breakpoint. At this point, you will be able to use powerful debugging features you already know, such as data tips, local variables, and other debugging windows. Figure 53 shows an example.
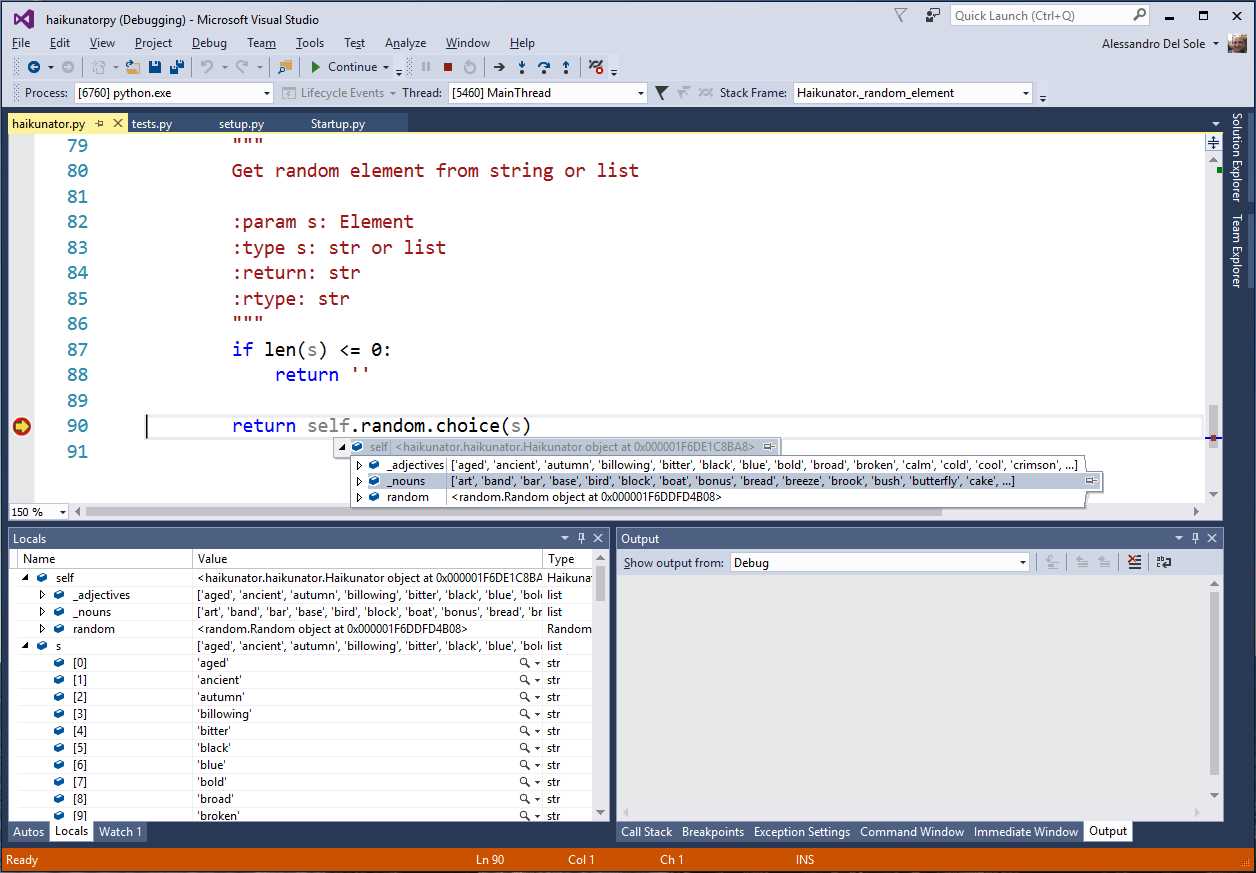
Figure 53: Debugger Support and Integration for Python
We need to remember that features such as debugging and IntelliSense are not available to all the supported languages, but rather they are available through specific workloads or third-party tools. However, Visual Studio 2017 offers its robust environment to non-.NET languages, and this is a tremendous added value for any developer.
Code refactoring
For specific languages, the Visual Studio 2017 code editor also offers light bulb and quick actions to provide an evolved code editing experience. For example, in Python you can select a code block and extract a method as you would with C# and Visual Basic refactorings. Figure 54 demonstrates this.
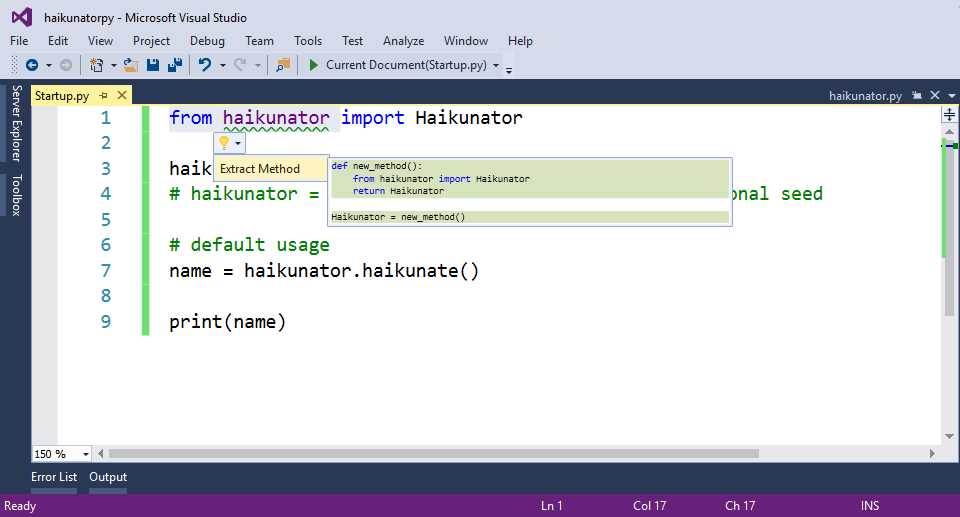
Figure 54: Code Refactoring for Python
With support for integrating features such as IntelliSense, refactorings, and debuggers, Visual Studio 2017 certainly lives up to its claim as the development tool for any developer on any platform.
Customizing tasks
Previously, we saw how easy it is to run a Python program by simply pressing F5. This is true because the Python tools for Visual Studio automatically configure the environment to run the interpreter against the selected source code file. Specific integrated tools do not exist for all languages, but for many we can still automate the execution of external programs, such as interpreters, compilers, or Windows commands by creating and customizing tasks.
Tip: If you are familiar with tasks in Visual Studio Code, you will notice a very close similarity with tasks in Visual Studio 2017. They have different locations and different syntax, but their purpose is exactly the same.
A task is an operation with a number of settings and is represented with JSON markup. Settings include the command to execute and its command-line arguments. An explanation will be provided shortly, but for now suppose you want to be able to compile or run a Go program. You first need a Go compiler and the proper settings. The Go Programming Language website has everything you need, including binaries and documentation. First, download and install the binaries for Windows. Second, create a folder in which you will write a simple Go program and configure the GOPATH environment variable as explained in the documentation, which also explains everything you need to know about writing, compiling, and running code with Go. The installer automatically configures the GOROOT environment variable so that you can run the Go.exe compiler from any location. In the current example, I’ll use a folder called C:\GoWork. Now, everything we need to compile and run a Go program is ready.
Note: Obviously, different programming languages work with different binaries and system configurations, which means that configuring tasks requires the same steps with any language but with different settings. In this e-book, I’m providing an example based on Go because installing its binaries is very easy, though configuring the system requires some manual steps.
In Visual Studio 2017, open the folder you created (such as my C:\GoWork). When ready, add a new file called HelloWorld.go. Next, enter the code shown in Code Listing 2.
Code Listing 2
package main import "fmt" func main() { fmt.Printf("hello world from Visual Studio 2017!\n") } |
I’m using a new “Hello World!” program instead of the Haikunator project because Go requires that we install and configure packages before we can use them. We should compile and install the Haikunator library, then provide the proper configuration (which requires us to be somewhat familiar with Go rules).
While providing these details is outside of the scope of this e-book, the Go documentation offers good explanations. Code Listing 2 simply defines a package called main and imports a base library called fmt, then prints a simple message on screen. Now, in Solution Explorer, right-click the Helloworld.go file and select Customize Task Settings. This action will create a new JSON file called tasks.vs.json, which is located in a hidden folder called .vs and that resides in your workspace. This JSON file contains the directives Visual Studio needs to know in order to execute a number of tasks, including launching the startup item. The following is a list of JSON properties common to every task:
- taskName: A name for the task that will be shown in the Solution Explorer context menu.
- appliesTo: Specifies the target of the current task, typically a specific file.
- type: Represents the type of task, typically command.
You must edit tasks.vs.json and specify that it must execute the Go.exe compiler against the current source code file. Code Listing 3 shows how to accomplish this by adding the command and args properties.
{ "version": "0.2.1", "tasks": [ { "taskName": "Run Hello World", "appliesTo": "Helloworld.go", "type": "command", "command": "Go.exe", "args": ["run", "Helloworld.go"] } ] } |
Notice how command specifies the name of the external program that must be executed. In this case, you specify the compiler file name with no path because an environment variable has been set by the installer. Instead, args specifies any command-line arguments for the command in the form of a JSON array. In this case, the first argument is an option called run that instructs the compiler to build and run a program, and the second argument is the name of the file to be compiled.
Note: Tasks.vs.json can contain many tasks, such as for building a whole folder or cleaning the build output. For additional configuration options, you can read this blog post from the Visual C++ Team in which they provide further explanations about multiple task configurations, supported constants, literals, and macros.
At this point, right-click the Helloworld.go file name in Solution Explorer, then select Run Hello World from the context menu (this is the taskName you supplied before). This action will launch the Go compiler and will make the program output visible in the Output window, as shown in Figure 55.
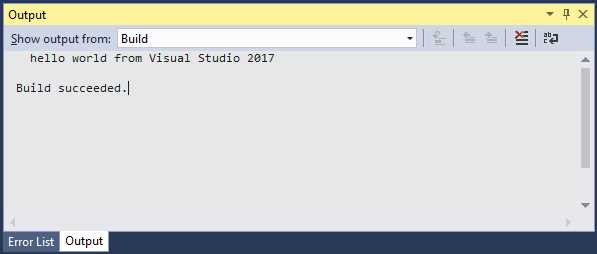
Figure 55: Running a Go Program with a Task
Though you don’t have debugging support or a console window for the execution, you have been able to run a Go program from within Visual Studio 2017. Many other possibilities for task automation are available to you that provide greater control over all supported languages.
What’s new for source control and team projects
Visual Studio 2017 also has something new for team collaboration. In fact, you can now use a new dialog to connect to Visual Studio Team Services and Team Foundation Server. For instance, in Team Explorer, click Manage Connections, then Connect to Team Project. At this point, you will see a new dialog called Connect to a Project, which shows all the Visual Studio Team Service accounts and TFS servers you are subscribed to (see Figure 56). By default, Visual Studio looks for repositories associated with the Microsoft account you used to log into the IDE, but you can add multiple accounts through the account drop-down. When you click Connect, Visual Studio will open Team Explorer showing a button labeled Map & Get, which provides a shortcut to map the remote repository to a local folder and get the latest version of the source code from the server.
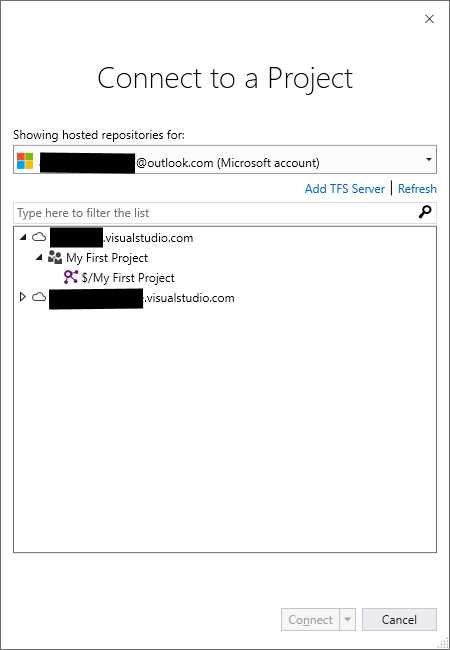
Figure 56: Connecting to Visual Studio Team Services Repositories
If you click Add TFS Server, you will be able to add and connect to on-premises TFS instances. Figure 57 shows an example based on fictitious information.
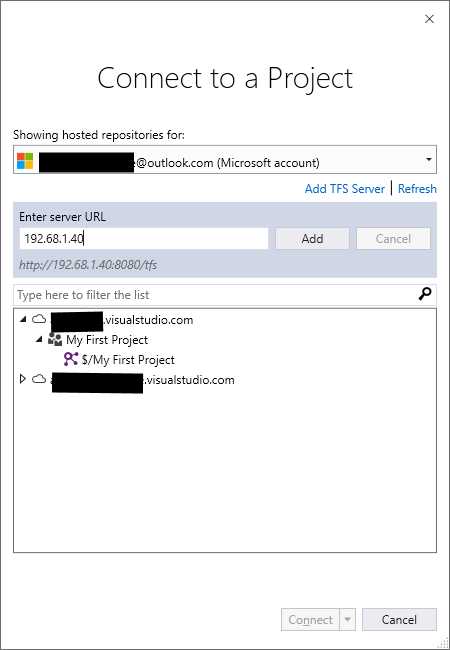
Figure 57: Adding an On-Premises TFS Instance
As with the Team Services tab, here you are still able to map the repository to a local folder and get the latest version of the source code. All the other features related to team collaboration, including Team Explorer, remain unchanged.
Tip: You can also enable the connection dialog through the Manage Connections command in the Team menu.
Note: Visual Studio 2015 Update 2 introduced more Git commands in Team Explorer and shortcuts for Git repositories at the bottom-right corner of the status bar. Visual Studio 2017 inherits these features, but it does not introduce anything new. If you want to learn more about these features, read the Visual Studio IDE and Team Explorer sections of the Visual Studio 2015 Update 2 release notes.
Chapter summary
Visual Studio 2017 introduces very important improvements and features for solutions, projects, and code files. With Lightweight Solution Load, large solutions can be loaded more efficiently and faster. The new IDE also supports a broader set of programming languages, even with no workloads installed, and the core editor can work with folders containing code files, providing not only a structured, organized representation, but also offering basic features such as syntax colorization and code completion, as well as evolved features like IntelliSense, debugging, and code snippets. In order to support these and other new or updated features, the architecture of Visual Studio 2017 is very different from previous editions, and this affects extensibility, as we’ll see in the next chapter.
- 1800+ high-performance UI components.
- Includes popular controls such as Grid, Chart, Scheduler, and more.
- 24x5 unlimited support by developers.