
Visual Studio 2017 Succinctly®

CHAPTER 9
Visual Studio 2017 for Cloud and Web Development
Cross-platform development is not only mobile development. Microsoft has been heavily investing in building tools that developers can leverage to write applications that run on Windows, Mac OS, Linux, and its most popular distributions. The result of such investments is .NET Core, the cross-platform framework that allows you to build applications that run on multiple systems using C#. Web apps you write on .NET Core need a robust infrastructure, and Microsoft Azure is the perfect companion on the cloud. When it comes to deploying .NET Core apps to Azure, many developers decide to adopt Docker containers. Visual Studio 2017 has integrated support for all of these technologies and, once again, proves to be the perfect environment to write applications that run on any platform and any device. This chapter provides a high-level overview of what’s new in the tooling for cloud and web development in Visual Studio 2017, and you’ll get links to the official documentation for further study.
Note: This chapter assumes you are familiar with basic Azure concepts and terminology. In fact, you will find mentions of resource groups, app service plans, Azure container registries, and other terms. If you are not familiar with Azure, or if something is not clear, the official documentation will help.
Building cross-platform apps with .NET Core 1.1
Note: This section requires installing the .NET Core cross-platform development workload.
The .NET Core is an open source, cross-platform, modular runtime that runs on Linux, Mac OS, and Windows. With .NET Core, you can write applications that run on multiple operating systems and platforms by using your existing C# skills. .NET Core ships with a command-line interface (CLI) and exposes a rich set of APIs that are shared across operating systems and, put succinctly, it allows you to deploy an application while including only the libraries the application effectively needs plus a component called Core CLR. The latter can be considered as a portable Common Language Runtime, and it allows an application to run. Discussing .NET Core in detail would require an entire book, so this chapter will focus on new tooling in Visual Studio 2017 that supports version 1.1 of the framework. Visual Studio 2017 provides a new node called .NET Core in the New Project dialog, under Visual C#, as shown in Figure 88.
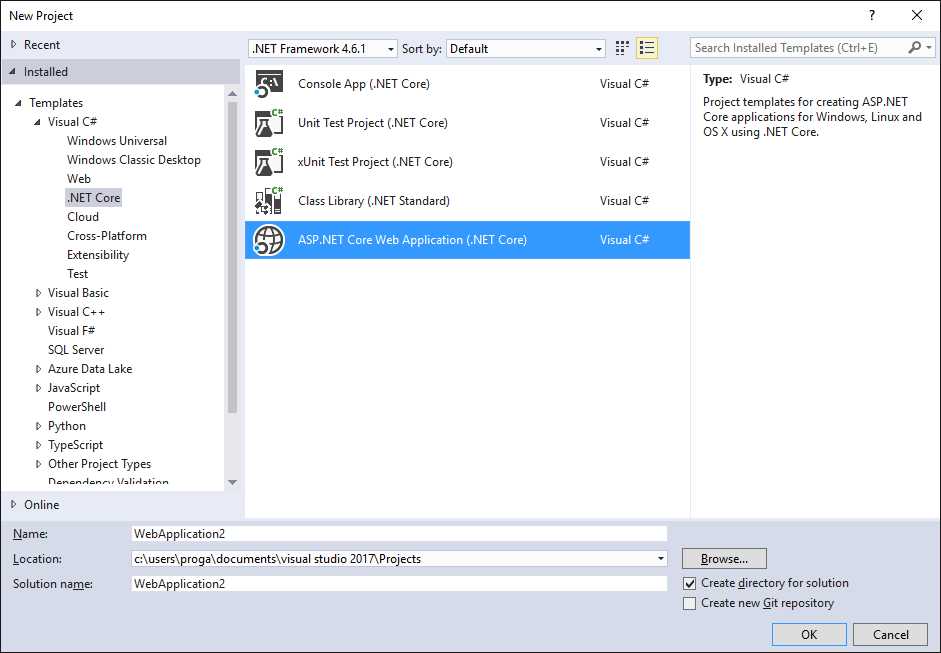
Figure 88: Available Project Templates for .NET Core
Two project templates (Unit Test Project and xUnit Test Project) are related to unit testing. With the Console App (.NET Core) template, you can write a console application that runs from the command line on Linux, Mac OS X, and Windows. With the ASP.NET Core Web Application (.NET Core) template, you can create a C# cross-platform web application based on the MVC pattern. The Class Library (.NET Standard) template allows you to create a library that is usable across all .NET runtimes, including .NET Core, Mono, and .NET Framework.
Tip: The .NET Standard Library specification, currently in version 1.6, is growing quickly, and it will be much more important in the next releases. If you author libraries, I strongly recommend that you consider .NET Standard libraries instead of Portable Class Libraries. Detailed information and explanations about .NET Standard can be found in the official documentation and in this blog post from the .NET Team at Microsoft.
For now, select the ASP.NET Core Web Application template, give a name to the project, then click OK. At this point, you will be able to specify which kind of application you want to create in the new ASP.NET Core Web Application (.NET Core) dialog, as represented in Figure 89.
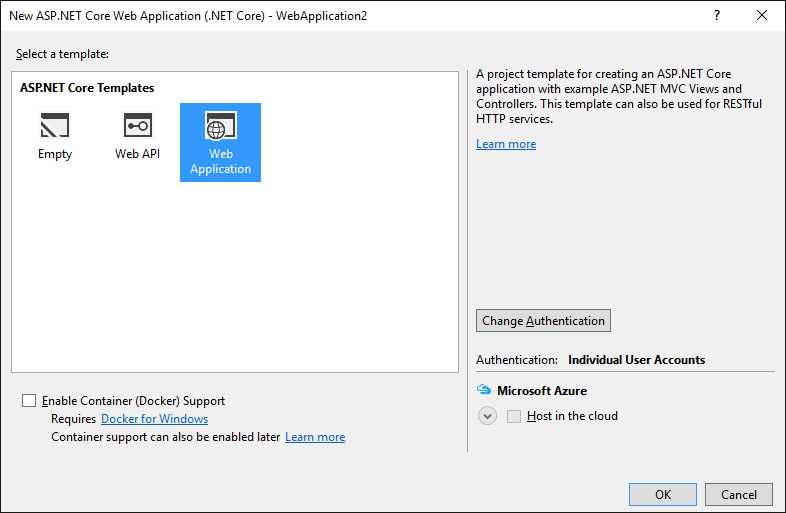
Figure 89: Creating a New ASP.NET Core Web Application
As you can see, you can decide to create an empty application, a cross-platform Web API service, or a cross-platform MVC web application. Select the Web Application for consistency with the next examples.
With both Web API and MVC web application, you also get a chance to supply which kind of authentication the application must offer. The default is no authentication, so click Change Authentication, then select Individual User Accounts. For now, disable the Enable Container (Docker) Support in the dialog, and, finally, click OK. Docker support will be discussed later in this chapter. As you would expect from an MVC application, in Solution Explorer you can see folders containing C# controllers, models, startup files, and services needed to manage registration and credentials (see Figure 90).
.NET Core applications can access SQL databases using a cross-platform version of the Entity Framework called Entity Framework Core. This is demonstrated by the availability of the Data\Migrations subfolder, which contains several of the so-called Code First Migrations.

Figure 90: The Structure of an ASP.NET Core Web Application
Note: There is an important breaking change between .NET Core 1.0 and 1.1. With 1.1, Microsoft introduces MSBuild support for .NET Core, which means you now have a solution .sln file and a project .csproj file. In the previous version, there was no solution file and project information was inside project.json. Visual Studio 2017, will help you migrate older projects to the latest version, however.
Behind the scenes, Visual Studio 2017 simply invokes the .NET Core command-line interface and launches the following command that scaffolds a new ASP.NET Core web application:
> dotnet new -t web
where -t means the type of application.
You can then add your own data model, controllers, and views exactly as you would do in an ASP.NET MVC application built on the full .NET Framework. To get a better idea of what Visual Studio 2017 generated with .NET Core, simply press F5. After a few seconds, you will see the web application running in the browser, as shown in Figure 91.
All the powerful debugging tools in Visual Studio 2017 that you already know will be at your disposal. The application has a built-in authentication service, which means users can quickly register and log in to access information secured within controllers. Most importantly, the web application you have can run on Mac OS X, Linux, and Windows.
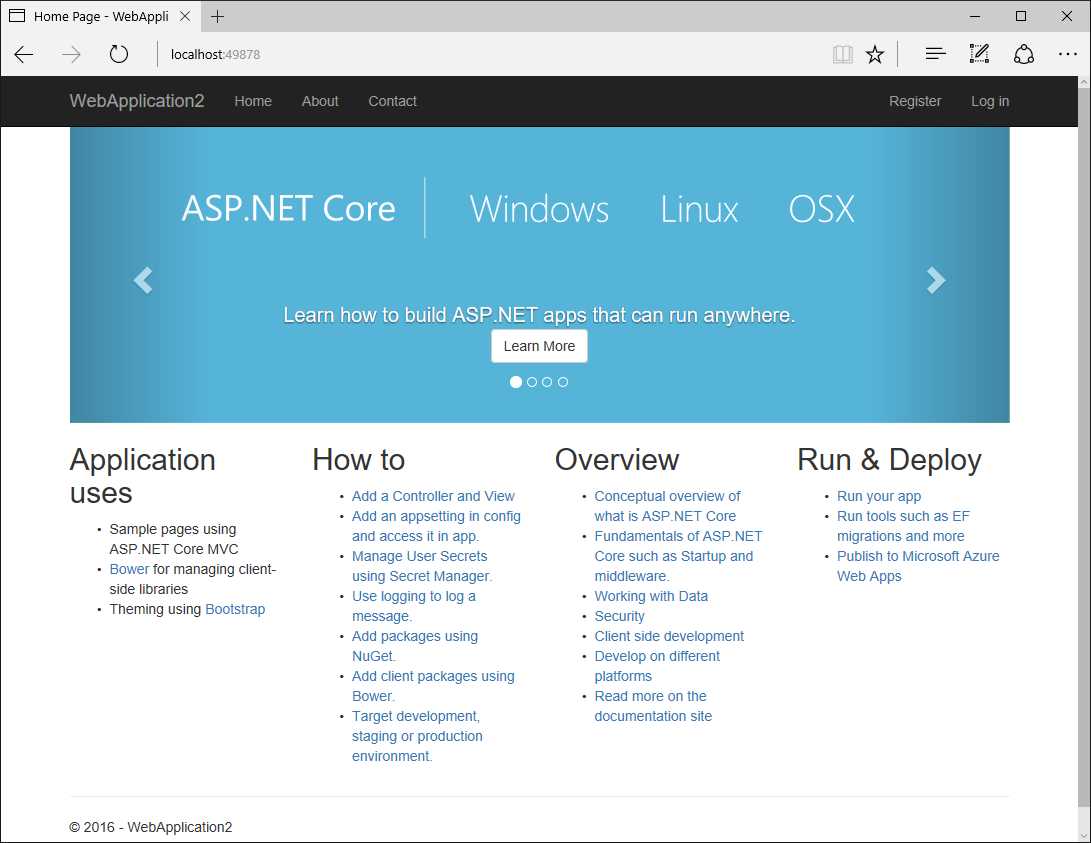
Figure 91: A Cross-Platform ASP.NET Core Web Application Running in the Browser
Do not close the solution, as it will be used in the next section with Docker. Here are a few more considerations about .NET Core 1.1 in Visual Studio 2017:
- NuGet package references are now included in the project .csproj file. This makes it easier to consolidate all packages in one file.
- The Web Publish tool has been moved from PowerShell to MSBuild.
- .NET Core 1.1 supports standard references, which means you can add references to non-.NET Core libraries. This makes it easier for .NET Core projects to interoperate with Xamarin projects.
- Visual Studio 2017 supports continuous delivery to Docker containers directly from within the IDE.
The following is a list of useful resources for further study:
- .NET Core home page.
- Tutorial: Getting started with ASP.NET Core MVC and Visual Studio.
- Entity Framework Core documentation.
- .NET Core command-line interface tools.
Visual Studio 2017 also allows you to quickly package an ASP.NET Core web application into a Docker container, as you will see in the next section.
Introducing tools for Docker containers
Note: This section requires installation of the .NET Core cross-platform development workload
Containers can be considered units of deployment, and they allow you to package an application, its dependencies, and its environment configuration into an image that is finally deployed to a host operating system—typically Linux or Windows. The biggest benefit of containers is that they isolate applications on a shared operating system (Linux or Windows) and are lighter than virtual machines, because a virtual machine has a host operating system, one or more guest operating systems, and, therefore, a much more complex infrastructure.
Instead, containers use essentially the same, shared operating system, but they isolate applications from one another. In the world of containers, Docker is the most popular platform to package, deploy, and host containerized applications, and it is quickly becoming the standard. Docker can work on the cloud and on-premises, and it has been adopted by many vendors, including Microsoft and the Azure platform. Because of the growing importance and power of Docker, Visual Studio 2017 has added support for containers with the Docker tools for Visual Studio, which easily allow developers to package and deploy containerized applications. This section cannot explain Docker in complete detail, but it will demonstrate how to leverage the Docker integrated tools for development and debugging. Before looking at how Visual Studio 2017 natively supports Docker, it is first necessary to set up your development environment.
Tip: Microsoft has recently released a free e-book called Containerized Docker Application Lifecycle with Microsoft Tools and Platform. This is a very good starting point if you are not familiar with Docker and you want to learn how to use it with Microsoft tools.
Setting up the development environment
This chapter will explain how to package a .NET Core application into a Docker container, and how to publish the container to Microsoft Azure. Before continuing, you need to set up both Docker and Azure.
Note: Publishing a Docker container to Azure is an optional step, so you can skip setting up an Azure workspace and the section titled “Running a Docker container on Azure” if you are not interested in Docker on Azure. However, if you are interested, you need an active Azure subscription. If you do not have one, you can request a free trial at azure.microsoft.com/en-us/free.
Installing and setting up Docker
The first order of business is downloading and installing Docker for Windows for local debugging. When the installation is complete, you will see the Docker icon in the Windows tray bar. Right-click the icon, then select Settings. Docker needs you to specify a drive that will provide the shared operating system for containers, so click Shared Drives and select the C drive. Figure 92 demonstrates this.
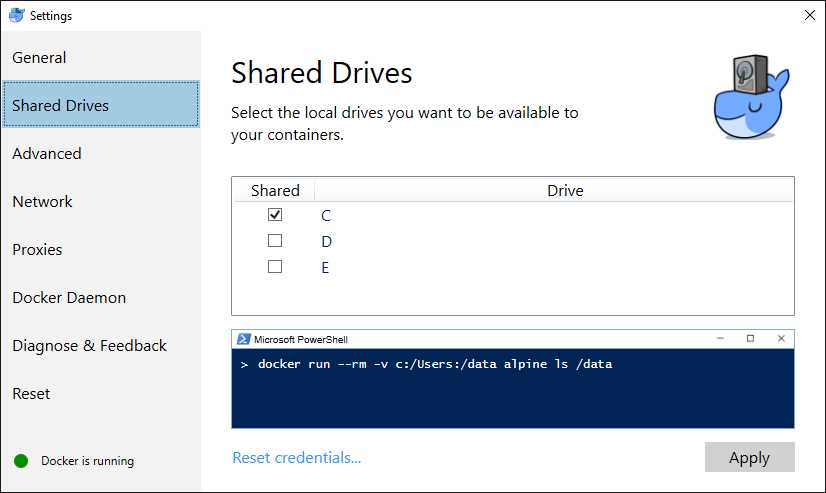
Figure 92: Configuring Shared Drives for Docker
When ready, click Apply and close the dialog.
Setting up Azure resources
As you will see shortly, Visual Studio 2017 allows you to quickly and easily publish a containerized application to a Linux system on Microsoft Azure. In order to accomplish this, the IDE needs you to supply the Azure subscription ID and some cloud service instances. You can see Figure 96 as a reference. More specifically, Visual Studio needs the following information:
- Web App Name: Represents the subdomain name in the application URL.
- Subscription: The target Azure subscription.
- Resource Group: A container that holds resources related to an Azure solution. This includes SQL servers, web applications, mobile services, and much more.
- App Service Plan: A collection of physical resources required to host an application.
- Container Registry: A new resource that allows for hosting and managing Docker containers.
The IDE allows you to select existing resources and create new ones. However, if you want to create new resources from Visual Studio, there is a problem—for new resource groups it does not allow for specifying the Azure region. Currently, Docker on Azure is a preview service and only the Western region of the U.S. supports hosting Docker containers on Linux. Also, publishing containers to Azure requires an app service plan and a container registry that must both be located in the Western U.S. and associated with a specific resource group. For these reasons, and until additional regions allow hosting Docker containers, I recommend that you set up the required resources in the Azure Portal rather than with Visual Studio. When you log into the Portal, enable services in the following order (hyperlinks point to the documentation):
- Create a resource group located in the Western U.S. Once created, it will be visible in the list of resource groups. Click it to view its details.
- While in the details of the new resource group, create a new App Service plan located in the Western U.S.
- Go back to the resource group details and add a new Linux-based container registry located in the Western U.S. A storage account located in the same region and associated with the container registry will be created automatically.
You now have everything needed to deploy your application packaged into a Docker container hosted on Azure.
Note: Make sure you delete all your Azure resources when you no longer need them—for instance, at the end of your experiments and tests. This avoids the risk of unexpected charges on your credit card.
Enabling Docker on .NET projects
At the time of writing, the Docker tools for Visual Studio support .NET Core applications (including console applications) and classic ASP.NET applications. To enable Docker support in a project, you have three options:
- In the case of new ASP.NET Core web applications, you can select the Enable Container (Docker) Support flag in the New ASP.NET Core Web Application dialog, as you can see in Figure 89.
- Select Project > Docker Solution Support (or Docker Project Support if you only need to enable Docker at the project level).
- Right-click the project name in Solution Explorer and select Add > Docker Solution Support (or Docker Project Support).
For instance, you can easily enable Docker support for the ASP.NET Core web application created in the previous section with Project > Docker Project Support. This will add a few files that Docker needs to configure a new container (and that you don’t really need to change):
- Dockerfile: This specifies the image and the application output. For ASP.NET Core, the image is called microsoft/aspnetcore and already includes all the native images of the necessary NuGet packages.
- docker-compose.yml: This file defines the collection of images to be built and run within the container.
- docker-compose.override.yml: This file defines the environment for the application (in this case ASPNETCORE_ENVIRONMENT) and the port (80) that is exposed and mapped to a dynamically assigned port for the development web server (localhost). The port number is determined by the Docker host and can be queried using Docker scripts.
- docker-compose.dev.debug.yml: This file contains additional settings when the build configuration is set to Debug. This is used by the Visual Studio development tools.
- docker-compose.dev.release.yml: This file contains settings to optimize the production image for Release configuration.
In the standard toolbar, you will notice the selected host for debugging is Docker, and a new button labeled Docker: Debug Solution is present (see Figure 93).
![]()
Figure 93: Buttons to Start an Application in a Docker Container
If you click this new button, Visual Studio 2017 will first package the application into a Docker container, invoke Docker to host the container, and then launch the application, offering the usual, powerful debugging support. Behind the scenes, Visual Studio 2017 invokes the Docker command-line interface to produce containers so that, while packaging, the Output window shows messages coming from command-line tools. When you switch to the Release configuration and build the solution, Visual Studio and the Docker tools generate an optimized image that is ready for production and for publishing.
Running a Docker container on Azure
Microsoft Azure can host Docker containers on Linux, and Visual Studio 2017 makes it extremely simple to publish a container to your Azure workspace. To accomplish this, right-click the project’s name in Solution Explorer, then select Publish. You will be asked to specify a publish profile (see Figure 94). Assuming no publish profiles have yet been created, click Create.
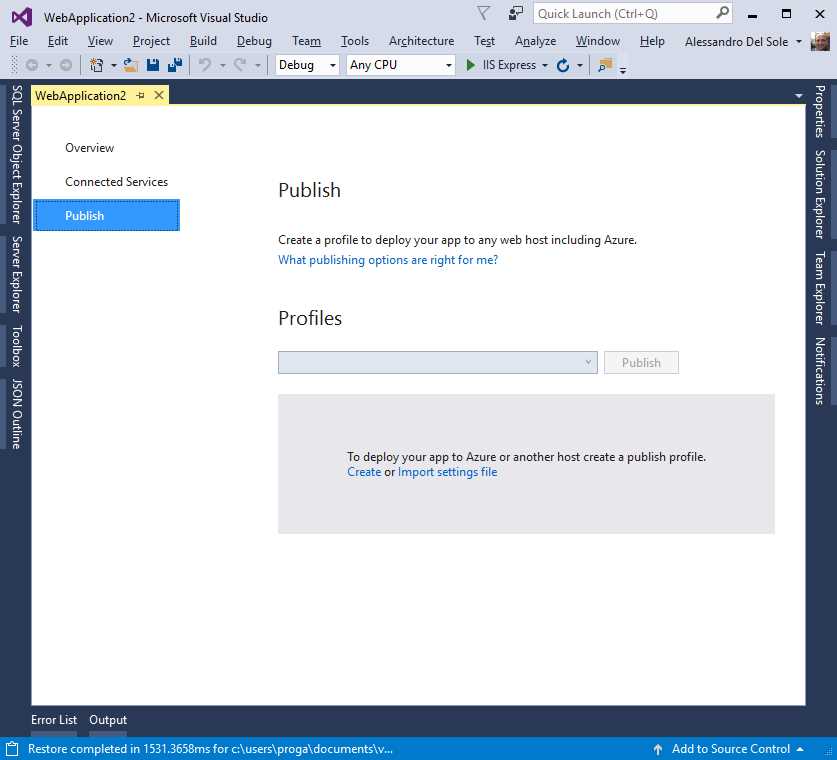
Figure 94: Specifying a Publish Profile
You will be asked to specify a publish target immediately. Select Azure App Service Linux (see Figure 95), then click OK.
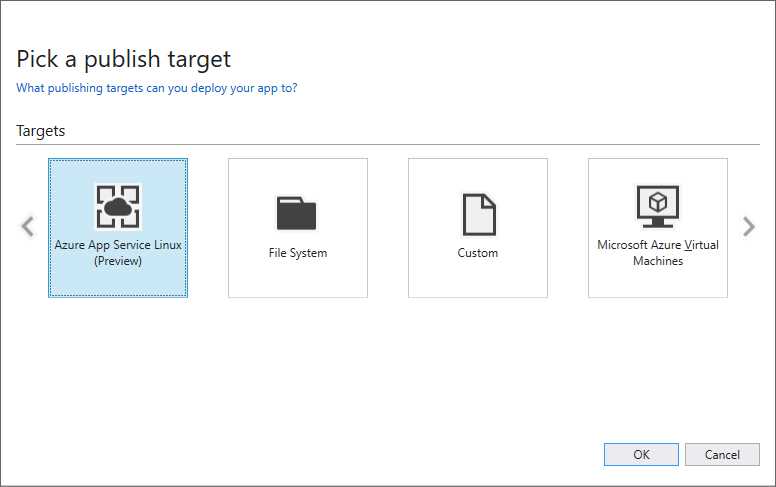
Figure 95: Selecting Linux on Azure as the Publish Target
At this point, the Create App Service dialog appears. Here you must supply some important information that Visual Studio 2017 needs in order to publish a Docker container to Azure, such as the web application name, the Azure subscription, a resource group, an App Service plan, and a container registry. Some fields will be automatically filled in, including the Azure subscription if Visual Studio detects one associated with the Microsoft account you used for login (see Figure 96).
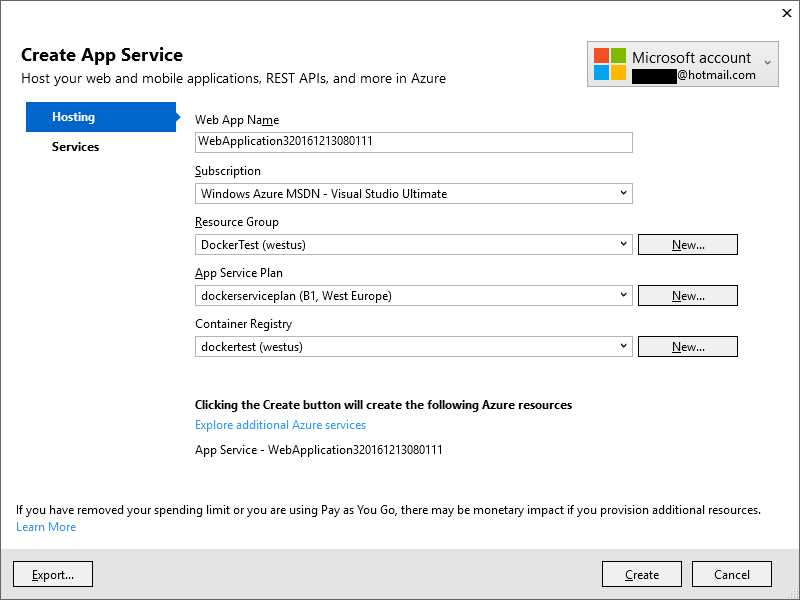
Figure 96: Providing Information Required to Publish a Docker Container to Azure
Select the resources you previously created in the Azure Portal, then click Create. At this point, Visual Studio 2017 will set up all the necessary services on Azure. When the setup completes, you will see a summary including the URL that you will use to launch the containerized application (see Figure 97). After reviewing the summary, simply click Publish. Visual Studio 2017 will package and deploy the Docker container with your application to your Azure subscription. The progress of publishing will be visible in the Web Publish tool window.
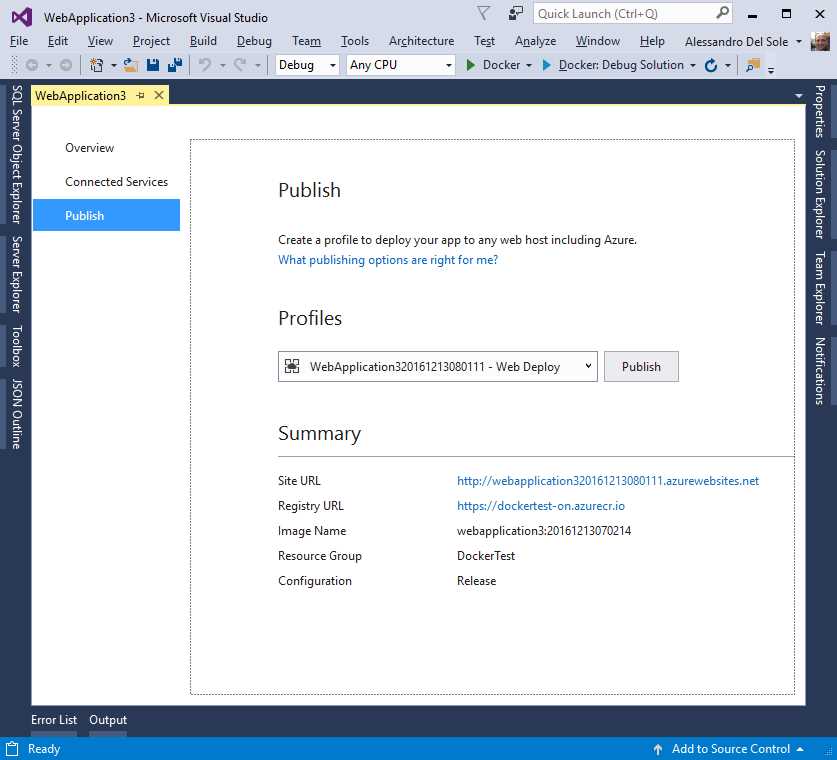
Figure 97: VS Summary Before Publishing the App to Docker
While publishing, Docker will open a console window that you must not close and that will shut down automatically. When Visual Studio 2017 ends publishing your web application, you will be able to launch it in your favorite browser using the URL you received in the summary. You’ll do this exactly as you would with any other website or application.
Introducing Service Capabilities
For web and mobile apps, Visual Studio 2017 has introduced a feature called Service Capabilities. This is a new way of connecting to a service, and it supplements the older Add Connected Service and Add Service Reference mechanisms. In Solution Explorer, you will see Service Capabilities under a project name. Right-click it, then select Add Service Capability (you can still use the sample ASP.NET Core web application created previously). The number of available services varies depending on your configuration, but Visual Studio 2017 shows a new tool window called Service Capabilities where you can find a list of available services (see Figure 98).
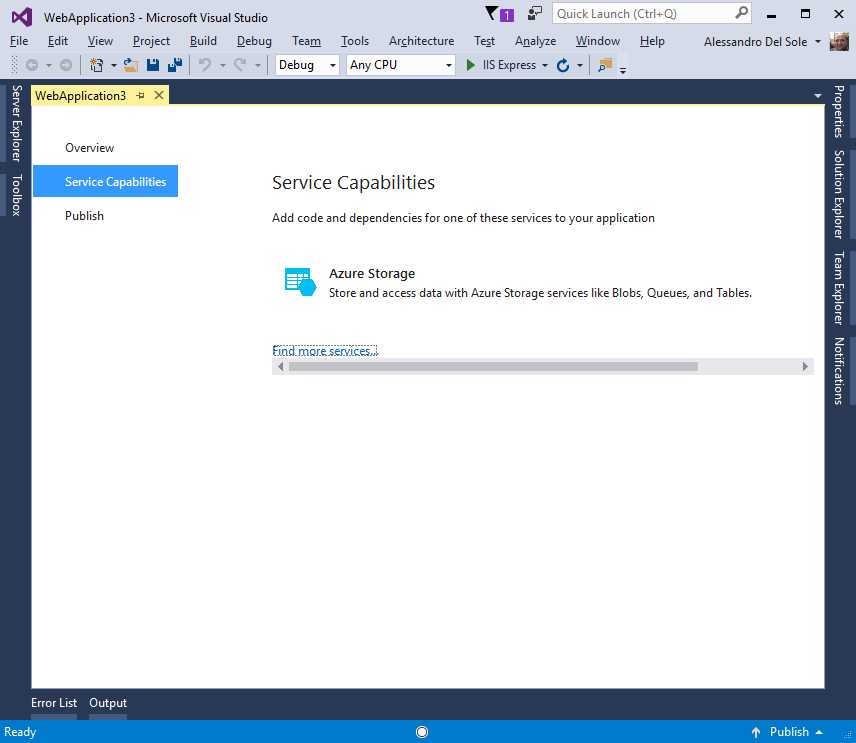
Figure 98: The List of Available Connected Services
If you click the Find more services hyperlink, Visual Studio shows the Extensions and Updates dialog—more specifically, it opens a new node called Connected Services and shows the list of additional connections you can download from either the Visual Studio Marketplace (formerly Visual Studio Gallery) or a vendor’s website (see Figure 99).
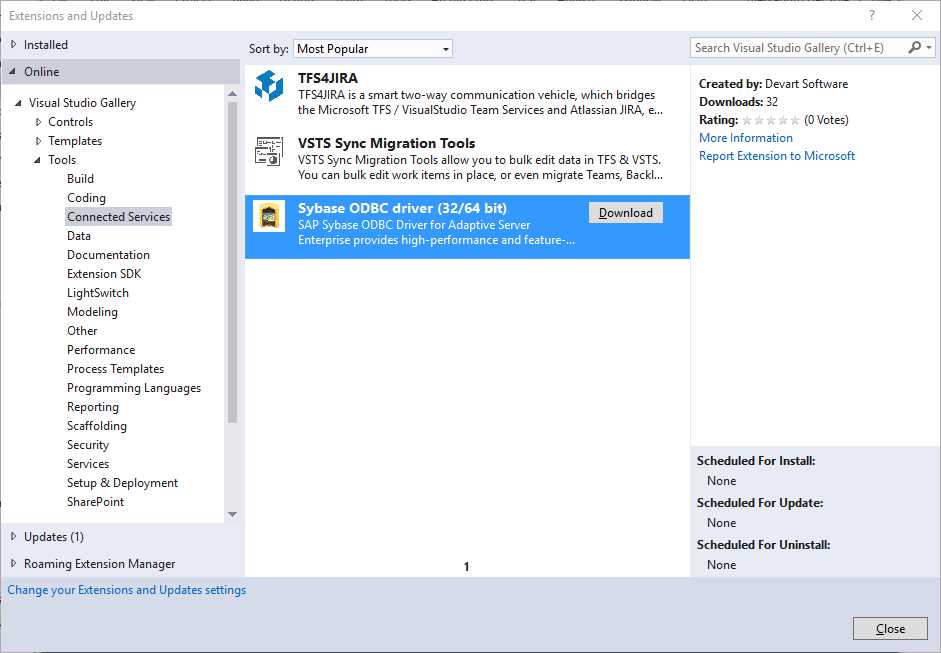
Figure 99: Additional Connected Services to Download as Extensions
You can download and install one or more additional services. Remember that the list shown in Figure 99 is only an example. Go back to the Service Capabilities window. In the next steps, I’ll show how the connection wizard works against an Azure storage account. This will require you to have an active Azure subscription (the free trial is fine). If you do not have that (or do not want to set one up), you can skip to the next section. Generally speaking, with Service Capabilities, Visual Studio 2017 simplifies establishing a connection to a service, and it takes care of downloading the NuGet packages that are required to work against the selected service. If you click Azure Storage, a wizard appears and requires you to specify whether you want to connect to an existing storage account or if you want to create a new one (see Figure 100).
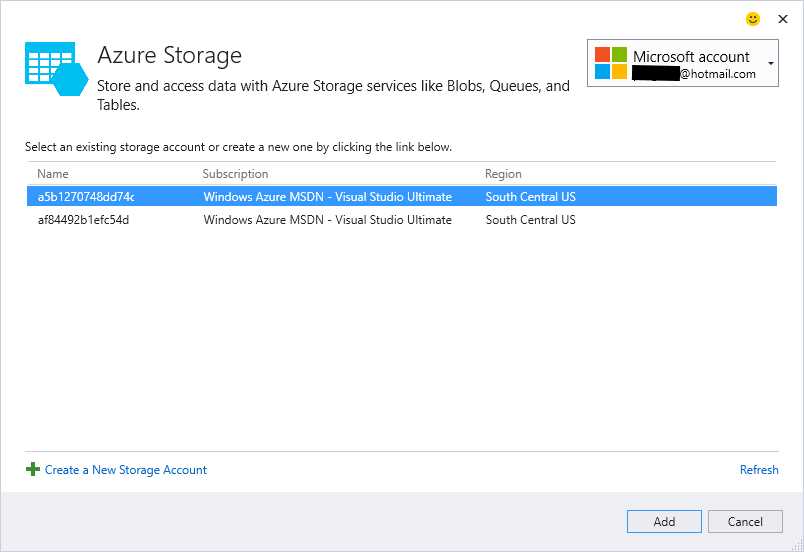
Figure 100: The Azure Storage Wizard
If you click Create a New Storage Account, the Create Storage Account dialog appears (see Figure 101). Here you will specify your Azure subscription, the storage account name, and required information such as the pricing tier, location, and resource group.
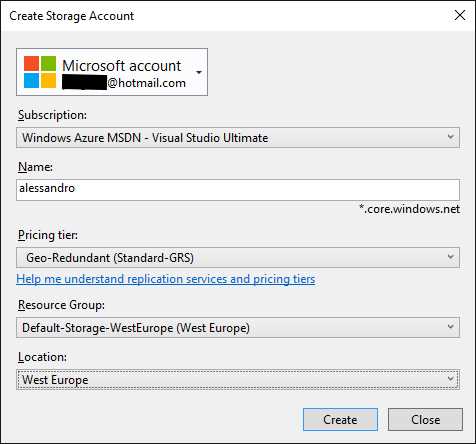
Figure 101: Creating a New Storage Account
When you click Create, or if you select Add in the Azure Storage dialog for an existing account, Visual Studio 2017 will connect to Azure, perform the necessary operations, and download and install the NuGet packages your application needs to interact with the selected service from C#. Figure 102 demonstrates this.
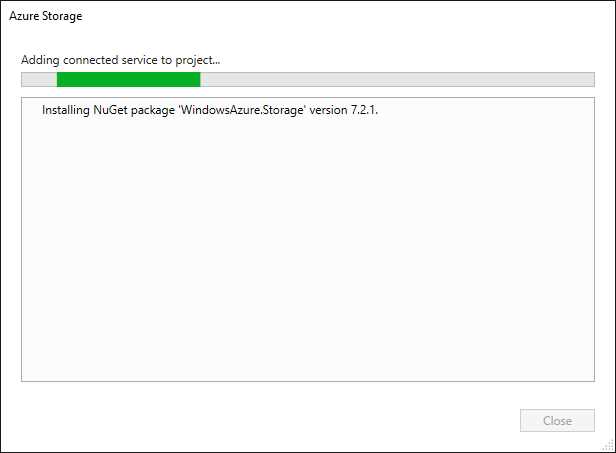
Figure 102: Downloading the Appropriate NuGet Packages
The referenced NuGet packages are also visible in Solution Explorer, as expected. Figure 103 shows how Solution Explorer displays the downloaded NuGet packages (in this case WindowsAzure.Storage) and a new folder, which has the name of your storage account plus the AzureStorage suffix. This folder contains a ConnectedService.json file, which holds dependency information, and a Getting Started information file that points to the appropriate documentation page for the selected service.
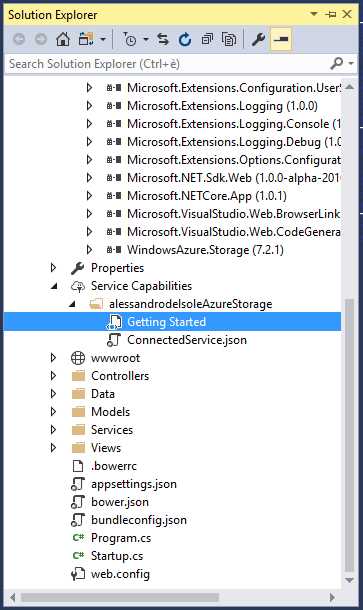
Figure 103: Solution Explorer Displays NuGet Package and a New Support Folder
In this particular case, if you double-click Getting Started, Visual Studio will open a page called Get started with Azure blob storage and Visual Studio Connected Services (ASP.NET). Here you will find code examples in C# that you can use to interact with the newly created storage account from within your applications. It is worth remembering that regardless of the connected service you choose, Visual Studio 2017 takes care of setting up a connection and downloading and installing the proper NuGet packages.
Building Node.js applications
Visual Studio 2017 has full support for building Node.js applications. Node.js is a very popular open source, cross-platform, and event-driven JavaScript runtime for developing a variety of applications. Visual Studio 2017 includes project templates you can use to quickly build a number of Node.js apps, including web apps, console apps, and Azure-enabled applications.
Note: Node.js support and integration is only available if you install the Node.js development workload.
Project templates for Node.js are available under the JavaScript node in the New Project dialog, as shown in Figure 104.
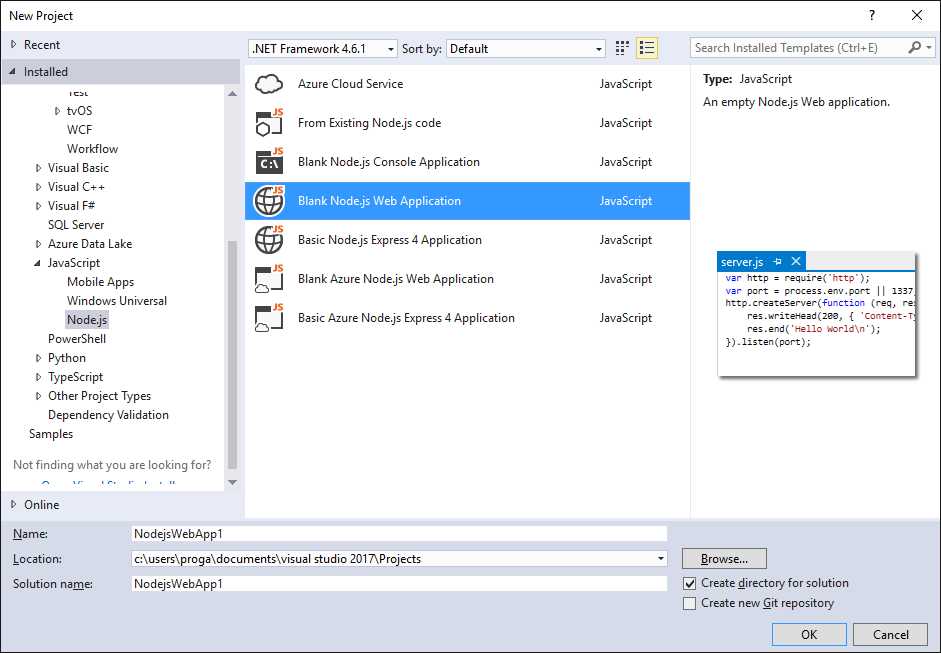
Figure 104: Project Templates for Node.js
The template names are fairly self-explanatory, and the New Project dialog provides a good description when you select one. Just a quick note on the template called From Existing Node.js code: this allows you to import existing code or assets from files on disk with different extensions. Figure 105 shows the import wizard with the list of supported files. You can include additional extensions in the text box at the bottom, and you can specify the startup item in the second page of the wizard. Finally, you import the specified folder.
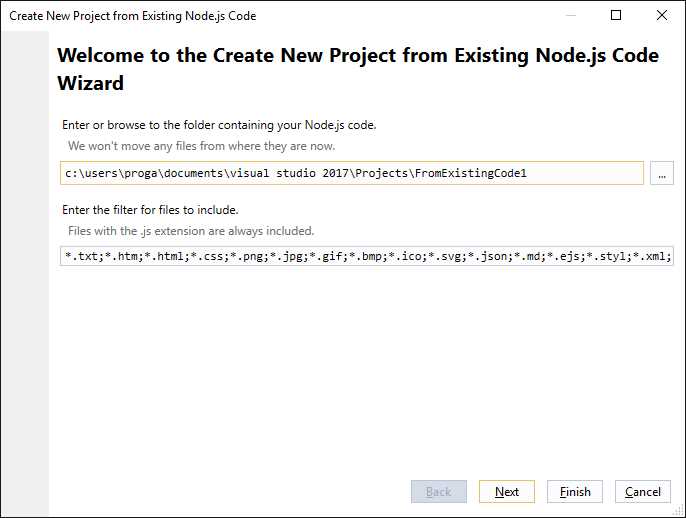
Figure 105: Dialog that Imports Existing Node.js Code
Note: Some project templates support Express 4. This is a Node.js framework for web applications that provides a set of features, utilities, and APIs for web and mobile apps. You can learn more about Express 4 at expressjs.com.
Whatever template you choose, Visual Studio 2017 generates a project that contains the following items visible in Solution Explorer:
- A JavaScript file (app.js for console apps or server.js for web apps) that contains minimal startup code.
- A package.json file that contains information about the application.
- An empty README.md file that you can use to write documentation using the Markdown markup language.
- The Node Package Manager (npm) node, which you can right-click to manage, download, and install npm packages for Node.js. The command you select is Install New npm Packages.
Tip: npm is the package manager for JavaScript applications. If you are new to JavaScript development, you can compare npm to NuGet in .NET development.
Figure 106 shows the Install New npm Packages dialog in action. Start typing package names in the search box and the dialog will list matching packages as you type.
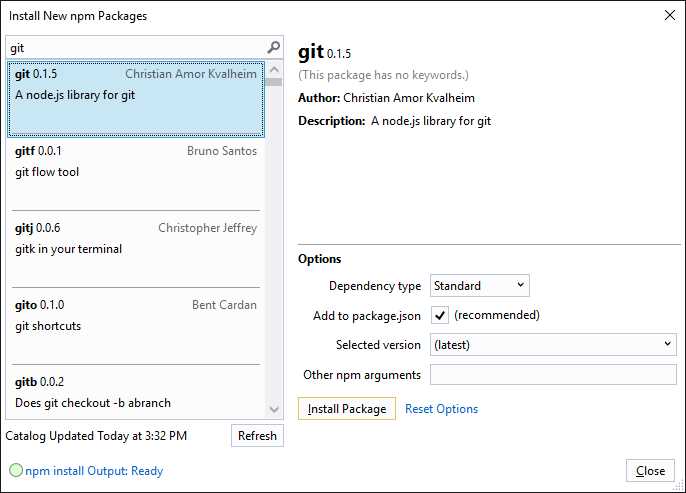
Figure 106: Managing npm Packages
With any template, you can write JavaScript code and take advantage of well-known and powerful integrated tools in Visual Studio such as:
- Full IntelliSense availability.
- Diagnostic and profiling tools.
- Unit testing.
- Source control based on Git.
- Integration with TypeScript.
- Debugging tools, including breakpoints and debugging windows.
As an example, Figure 107 shows the debugger in action over a blank web application in break mode after a breakpoint is hit.
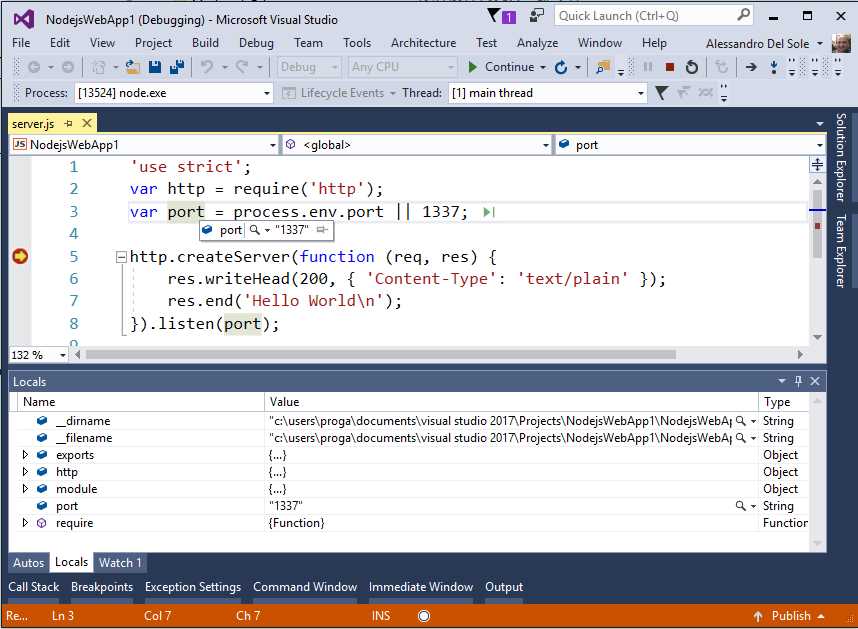
Figure 107: Full Debugging Support in Node.js Applications
As you can see, Node.js receives full debugging support with breakpoints, data tips, and debugging windows such as Locals. More about the Visual Studio 2017 tooling for Node.js can be found at www.visualstudio.com/vs/node-js.
Updated tools for Microsoft Azure
Azure is the cloud solution from Microsoft, and it’s growing fast with new and updated services. When you select the Azure development workload, the Visual Studio Installer downloads and installs the latest Azure SDK for .NET, which extends Visual Studio 2017 with integrated tools, windows, and project templates that allow developers to work against the majority of the Azure services from within the IDE without opening the Azure portal. Cloud Explorer is one of the integrated tools that the SDK brings to Visual Studio 2017. At the time of writing, the Azure SDK for .NET provides the same functionalities to Visual Studio 2015, Visual Studio 2013 Update 4, and Visual Studio 2012 Update 2. Because the number of Azure services that Visual Studio integrates with has grown so much, and because the Azure tools are not specific to Visual Studio 2017, this chapter only summarizes the tools you have with the Azure SDK for .NET. You can later learn more about Azure services and tools in the official documentation. Notice that the list of services and tools may vary in future releases of the Azure SDK and of Visual Studio.
Here’s a summary of what’s new:
- Support for Azure Data Lake, the new cloud service for big data from Microsoft. This is offered through the Azure Data Lake Tools for Visual Studio. In Visual Studio 2017, these are available when you install the data storage and processing workload. More specifically, the tools allow you to manage your Data Lake resources from Cloud Explorer and offer a number of templates, such as for U-SQL, HDInsight, and Apache Storm projects.
- Support for Azure Service Fabric, a platform that allows you to build, debug, test, and deploy microservice-based applications. In addition to the Azure SDK, you need to install the Azure Service Fabric SDK, which includes integrated tools for Visual Studio. The SDK can be downloaded from the Azure Downloads page and allows you to manage a Service Fabric account from Cloud Explorer.
- Support for the Azure Resource Manager, which is available with the Azure Resource Group project template that you can use to create, configure, and deploy resource groups to Azure. With the Visual Studio tools, you can now manage resource groups within the IDE with the help of the JSON Outline tool window. Regarding the Azure Resource Manager tools for Visual Studio, you can follow an official tutorial online.
The previous points highlight, once again, the importance of Cloud Explorer as the integrated tool you use to work with your Azure resources. The next section describes updates to Cloud Explorer in more detail.
Cloud Explorer updates
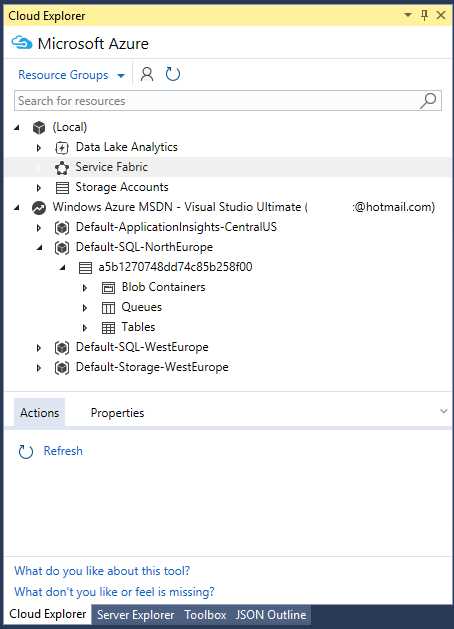
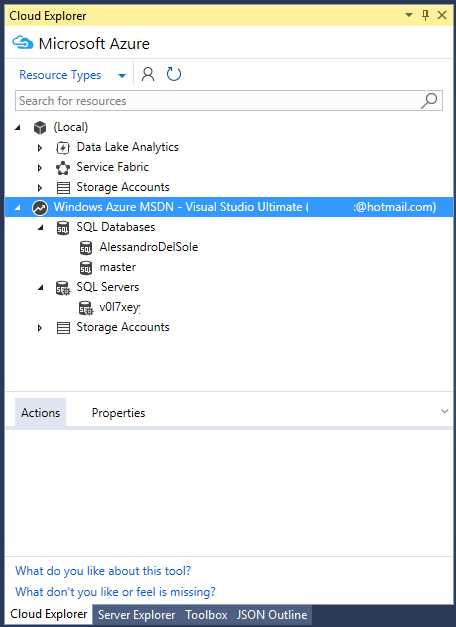
Cloud Explorer is a tool window that interacts with one or more Azure subscriptions from within Visual Studio. With Cloud Explorer, you can view and manage a number of resources without leaving the IDE. For instance, you can create new storage accounts, blobs, tables, queues, and you can even manage SQL databases with the integration of the SQL Server Object Explorer tool window. Starting with the Azure SDK for .NET v. 2.9.6, Cloud Explorer gets important updates. First, you can group the view by resource types or resource groups via the drop-down under the Microsoft Azure label. In Figure 108, you can see how the view appears with the Resource Groups option selected, while Figure 109 shows how the view appears with the Resource Types option selected. Notice that the number and type of items may vary on your machine, depending on which kinds of cloud services you have enabled in your subscription.
|
|
Figure 108: Resource Groups View in Cloud Explorer | Figure 109: Resource Types View in Cloud Explorer |
When you select a resource, the Actions tab at the bottom of the window will show a list of available actions against that resource. For instance, if you select a SQL database, available actions will open the database in the Azure portal, then open the database in Visual Studio via SQL Server Object Explorer, then refresh the view. Available actions vary depending on the selected resource. The Properties tab shows information about the selected resource (if available). If you have installed the data storage and processing workload and you have subscribed the Azure Data Lake service, you will see a node called Data Lake Analytics. This allows you to manage Data Lake resources easily, create databases, insert tables, and write scripts. Figure 110 provides a sample view of a database created within Cloud Explorer and a table currently in design mode with specific, integrated tools and editors.
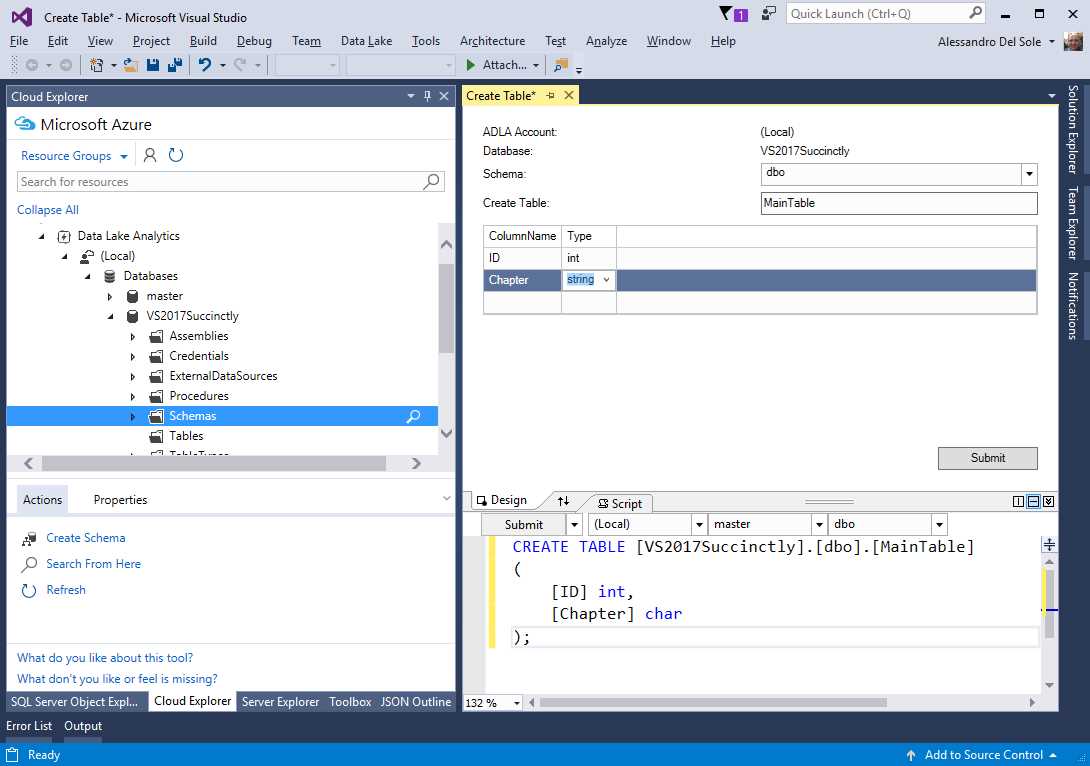
Figure 110: Managing Azure Data Lake Resources
Similarly, if you have installed the Azure Service Fabric SDK, you will be able to manage resources related to this service directly from within Cloud Explorer.
Chapter summary
Visual Studio 2017 introduces important tools for cross-platform development and the cloud—two things that often go hand in hand. Probably the most important addition is tooling for .NET Core, the modular, cross-platform, open source runtime that developers can use to build console and web apps for Linux, Mac, and Windows using C#. With the integrated tools, you can build .NET Core solutions the same way as with classic .NET development. Another fundamental addition is tools for Docker, a de facto standard in deploying applications to containers. Docker containers can be hosted on Linux in Azure, and Visual Studio 2017 does the entire job of packaging and deploying a container for you. In conjunction with its aim to be the development environment for any developer on any platform, Visual Studio 2017 has full support for Node.js, including advanced editing, debugging, and testing features. Finally, Visual Studio 2017 supports all the most recent Azure services, including Data Lake and Service Fabric, and it provides an option for interacting with more services from within the IDE through the Cloud Explorer tool window. This avoids the need for opening the Azure portal every time.
- 1800+ high-performance UI components.
- Includes popular controls such as Grid, Chart, Scheduler, and more.
- 24x5 unlimited support by developers.