
Visual Studio 2017 Succinctly®

CHAPTER 6
Extensions and Extensibility
Changes in the architecture of Visual Studio 2017 have an impact on the extensibility model. This chapter will describe the improvements in extensions and extension management, but it will also provide information for extension authors looking to upgrade their Visual Studio 2015 extensions to the Visual Studio 2017 extensibility model.
What’s new with extensions in Visual Studio 2017
In Chapter 1, I described the new installation model based on workloads and how we can now install multiple editions of Visual Studio 2017 on the same machine. For example, a developer might want to install an extension for the Enterprise edition but not for the Community edition, while another developer might have only the core editor installed and no workloads so that some extensions would not work. Consequently, extensions must be versatile enough to fit into these situations. In order to support these scenarios, Microsoft changed the extensibility model by introducing version 3 of the .vsix file format, which represents Visual Studio extension installers. This presents a number of breaking changes that will be described later in this chapter. For now, you must know that you will only be able to install extensions specifically written and compiled for Visual Studio 2017. An extension for Visual Studio 2015 cannot also target Visual Studio 2017, while an extension for Visual Studio 2017 can target past versions of Visual Studio, down to and including Visual Studio 2012. Let’s now focus on new features that save time when using third-party extensions.
Roaming Extension Manager
The first important new feature regarding extensions is the Roaming Extension Manager. This tool allows for synchronizing installed extensions on every Visual Studio installation you have on different machines. The Roaming Extension Manager is included in the Extensions and Updates dialog that you enable through Tools > Extensions and Updates. Figure 58 shows what the tool looks like.
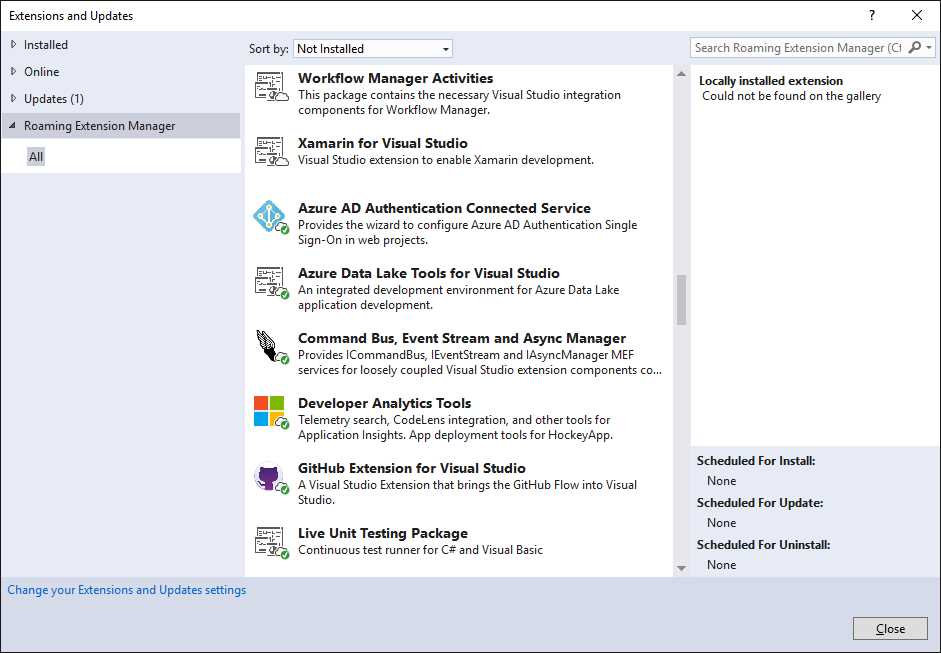
Figure 58: Activating the Roaming Extension Manager
The state of an extension is represented by one of the following three icons:
- A white cloud means the extension is subject to roaming but is not installed locally.
- A white cloud with a green check symbol means the extension is installed locally and roams.
- A green check symbol means the extension is installed locally but does not roam.
You can control extension roaming by selecting an extension and then clicking Stop Roaming (if it roams) or Start Roaming (if it’s only installed locally). In Visual Studio 2017, this is one of the synchronized settings you enable once you log in with your Microsoft account.
Scheduling operations over extensions
Visual Studio 2017 also introduces a new way of installing, updating, and uninstalling extensions. In fact, the IDE now allows you to schedule multiple extensions for installation, update, or removal. These operations will be executed in bulk when you close Visual Studio. In order to understand how this works, consider Figure 59, in which you can see the Extensions and Updates dialog. In the figure, you can see two extensions marked with a clock icon. This icon appears after you download an extension, and it means it will be installed after Visual Studio shuts down.

Figure 59: Scheduling Operations for Extensions
In the bottom-right corner, you can see the list of scheduled operations grouped by Scheduled For Install, Scheduled For Update, and Scheduled For Uninstall. For example, Figure 59 shows the number 1 next to the Updates node, which means there is one update available for an extension. When you click the Updates node and then click the Update button for each update available, the extension will be listed in the Scheduled For Update group. Figure 59 shows how, on my machine, an update is available for the GitHub Extension that will be installed when Visual Studio shuts down, along with the other extensions listed in the Scheduled For Install group.
This also applies to extensions you want to remove. You can exclude an extension from the schedule simply by clicking the X symbol next to its name. If you are familiar with Visual Studio 2015, you might remember how the Extensions and Updates dialog offers buttons to restart the IDE in order to complete the installation or update of one or more extensions. In Visual Studio 2017, you no longer have such buttons. Instead, you have only an option to close the dialog. All the operations will be executed in bulk when the IDE shuts down. This is a more convenient way of managing extensions that avoids moving your focus away from the development environment.
What’s new with extensibility
Note: This section is dedicated to extension authoring. If you are interested in this topic, make sure you have installed the Visual Studio extension development workload. I will assume that you are familiar with extension authoring in previous versions of Visual Studio, so some steps and concepts will not be addressed in detail.
Extension authoring for Visual Studio 2017 requires facing some changes that break with previous editions because of the new extensibility model and version 3.0 of the .vsix file format. Breaking changes are due mainly to the following scenarios that Visual Studio 2017 must support:
- Developers might install multiple editions on the same machine, so extensions can no longer be installed into a centralized location, but must be installed with each edition.
- Developers might install only the Visual Studio core editor with no workloads, or only a restricted number of workloads. That means extensions must be able to detect if the workloads and components they need to work are installed.
There is an important implication here: Visual Studio 2017 can only accept extensions specifically written for this version of the IDE and installed through version 3.0 of a .vsix package. An extension written for Visual Studio 2015 cannot simply be updated or recompiled to target Visual Studio 2017. However, an extension written for Visual Studio 2017 can target through Visual Studio 2012. As an extension author, you must be aware of these considerations if you have existing extensions that you want to port to Visual Studio 2017.
Creating a blank extension for demo purposes
In order to describe the new features in extension authoring, an extensibility project is required. You can now simply create a blank project, as the new features reside in the VSIX manifest. Follow these steps:
- Select File > New > Project.
- In the New Project dialog, expand the language of your choice (C# or VB), then select the Extensibility node.
- Select the VSIX Project template, supply a different project name if you want, and then click OK.
- Right-click the project name in Solution Explorer, then select Add New Item.
- In the Add New Item dialog, click the Extensibility node.
- Select one of the available item templates, then click OK. If you want to be consistent with this e-book, choose the Custom Tool Window template.
When everything is ready, double-click the source.extension.vsixmanifest file. This is the extension manifest that contains all the information and metadata required to build the .vsix package.
Specifying extension prerequisites
In the manifest designer, you will see a new item called Prerequisites (see Figure 60).
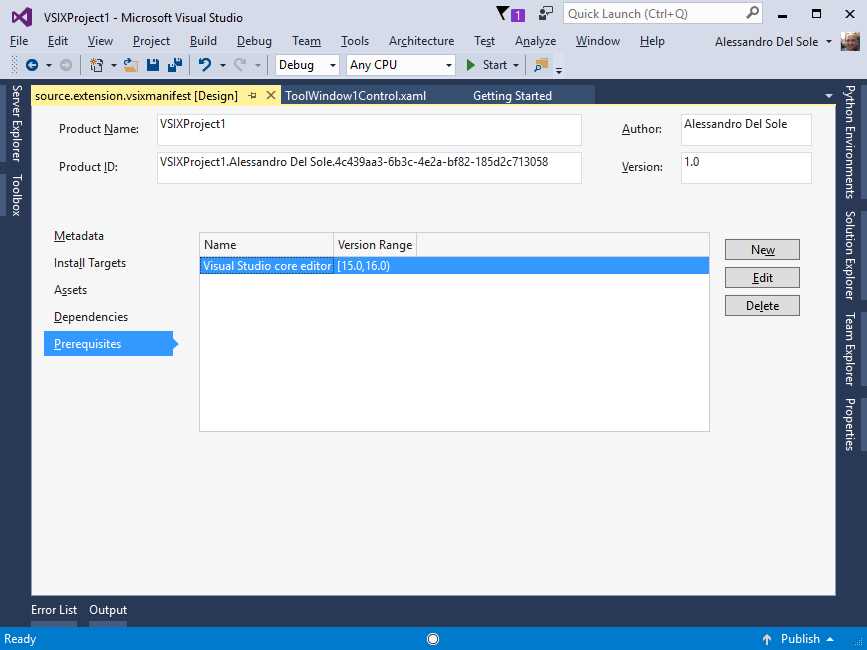
Figure 60: The New Prerequisites Item in the Manifest Designer
This new element is very important because it allows for specifying the workloads or individual components your extension requires in order to work inside Visual Studio 2017. As you can see, a prerequisite called Visual Studio core editor is available by default and targets the current and future versions of the IDE. Click New to add a new prerequisite. The Add New Prerequisite dialog will appear, and you can select a workload or component from the combo box, as shown in Figure 61.
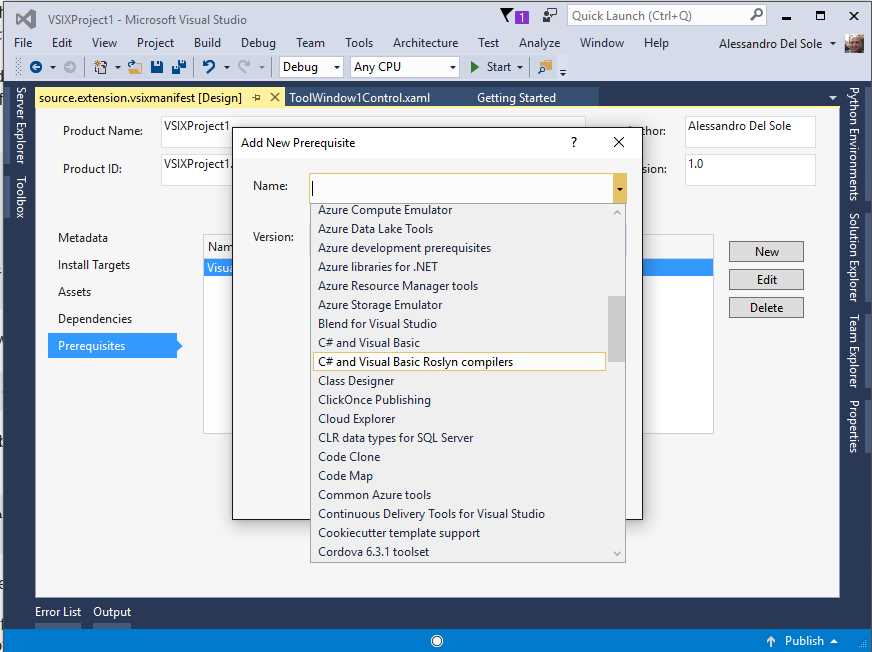
Figure 61: Selecting a Prerequisite
Once selected, you will be able to specify a version number for the prerequisite, as shown in Figure 62.
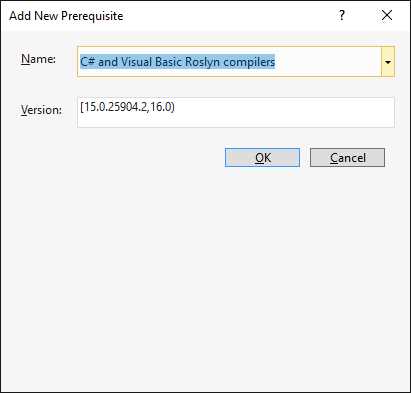
Figure 62: Specifying the Version Number for a Prerequisite
Specifying a version is optional because Visual Studio 2017 automatically selects the current IDE version detected on the development machine.
Note: This section has been written in conjunction with the Release Candidate of Visual Studio 2017, which means the default version number might be slightly different when Visual Studio reaches the RTM milestone.
After you specify the required prerequisites, you can build your .vsix package. When launched on the target machine, the VSIX installer will show the list of required prerequisites.
Ngen support and custom file installation
The new .vsix format supports the Native Image Generator tool Ngen, which allows creating native images of the extension assembly and the referenced assemblies. This can be set using the Properties window, as shown in Figure 63.
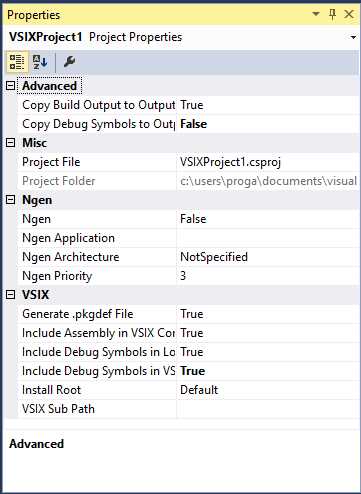
Figure 63: Ngen and File Destination Properties
The following Ngen options are available:
- Ngen: Sets whether to use Ngen. Options are True or False (default).
- Ngen Application: The application to pass into Ngen via the /ExeConfig switch.
- Ngen Architecture: Specifies the architecture among x86, x64, and All.
- Ngen Priority: Specifies the Ngen priority level.
In Figure 63, you can also see a group called VSIX, which allows you to control the behavior of some important assets, such as the .pkgdef file. Properties are self-explanatory, but it is worth emphasizing how you can specify a different installation target through the Install Root property. Here you can pick a destination folder from a predefined list, but unless you have very specific requirements, Default is a good option.
Chapter summary
Visual Studio 2017 introduces two new tools for consuming third-party extensions—the Roaming Extension Manager, which makes it easy to make the same extension available across machines, and support for scheduling operations over extension installation, update, and removal. This avoids the need to close and restart the IDE each time. For extension authors, Visual Studio 2017 introduces version 3.0 of the .vsix file format, which requires specifying extension prerequisites (workloads or components), and allows controlling the extension behavior by creating native images of the assemblies and by controlling the destination folder.
- 1800+ high-performance UI components.
- Includes popular controls such as Grid, Chart, Scheduler, and more.
- 24x5 unlimited support by developers.