
Visual Studio 2017 Succinctly®

CHAPTER 3
Code Editor Improvements
The code editor is the place where you spend most of your developer life, and Microsoft introduces productivity improvements at every major release of the IDE. Visual Studio 2017 is no exception—it introduces a number of excellent features to improve your coding experience.
Note: All the topics described in this chapter apply to both C# and Visual Basic, except where expressly specified. Also, remember that C#, Visual Basic, C++, and F# also provide a number of new language features that are not covered in this chapter, which instead focuses on the code editing experience. Visit the Visual Studio documentation for further information on what’s new with programming languages in Visual Studio 2017.
IntelliSense improvements
The IntelliSense tool has long been a best friend of every developer using Microsoft Visual Studio. In Visual Studio 2017, IntelliSense gets major improvements that will help you save time while coding. First, IntelliSense is now smarter with filtering. Instead of suggesting the top item in the list, it automatically shows the best matching result based on what you typed. And, not limited to this, it starts highlighting the words in bold as you type, as shown in Figure 8.
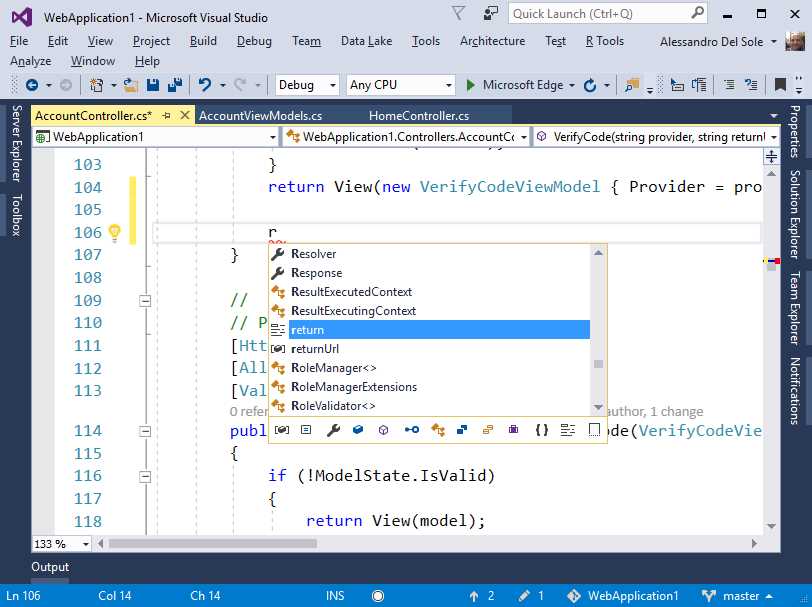
Figure 8: IntelliSense Suggestions and Filters
Filtering based on specific types or members is another important improvement in Visual Studio. As you can see in Figure 8, there is a new bar with many icons at the bottom of IntelliSense, each icon representing a particular kind of object or member such as local variables, constants, properties, fields, methods, interfaces, classes, value types, enumerations, delegates, namespaces, reserved words, and even code snippets. For instance, Figure 9 shows how to restrict IntelliSense’s members searches to methods, classes, and code snippets.

Figure 9: Filtering IntelliSense Search
Click an icon to add or remove the specified filter. This new option dramatically simplifies the way you can leverage word completion, especially when you know in advance what kind of objects you need to work with.
Code navigation made easier
Moving quickly between type definitions and member invocations or assignments is crucial for productivity, especially with dozens of code files. Visual Studio 2017 introduces a number of interesting improvements to code navigation, thereby enhancing your productivity.
Find All References
Find All References is a popular tool window you can use to see where and how an object or member has been used across your solution. It is still more useful for developers who cannot take advantage of the CodeLens tooling, which is only available in the Enterprise edition. With previous versions of Visual Studio, Find All References showed a list of lines of code where an object or member was used, including its definition, and provided an option to double-click a line in the list and be immediately redirected to the line of code in the editor. In Visual Studio 2017, Find All References groups object and member references by project and then by type, with syntax colorization and a more intuitive user interface. Figure 10 shows an example based on references to a class called Person, which is used in two different projects.
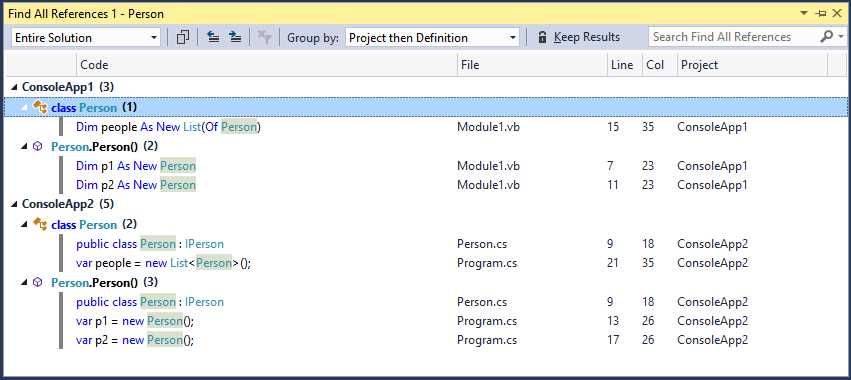
Figure 10: Find All References Groups References with Syntax Colorization
As you can see, the new view makes it easier to see where and how an object has been used. The tool window shows the number of references near the project name, its types, and their members. You can still double-click an item to open the code editor on the selected line. If you hover over a reference, a colorized tooltip shows a preview of the code block that references the object or member (see Figure 11).
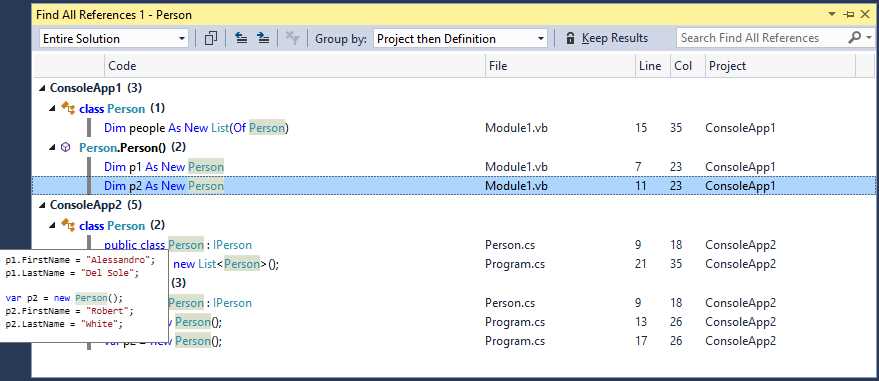
Figure 11: Colorized Tooltip Shows a Preview of the Code Block Referencing an Object
By default, Find All References shows references across the entire solution. You can filter the list through open documents, the current project, the current document, and documents with pending changes. Also, by default, Find All References groups items by project, then by object definition. Table 2 shows a list of available grouping objects you can find in the Group by combo box.
Table 2: Grouping Options for Find All References
Option | Description |
Project then Definition | Groups by project, then by object definition (default). |
Definition Only | Groups by object or member definition, without the project hierarchy. |
Definition then Project | Groups by object definition, then by project. |
Definition then Path | Groups by object definition, then by the path of the code file that contains the definition. |
Definition, Project then Path | Groups by object definition, then by project, and then by the path of the code file. |
You can also search among results with the Search Find All References text box and lock the current results by clicking Keep Results.
Navigating code with Go To
Visual Studio 2017 introduces a new navigation feature called Go To, which replaces and improves another popular tool known as Navigate To. To enable Go To, just press Ctrl+T. A navigation pop-up appears and automatically lists all the occurrences of the identifier where the cursor was when you pressed Ctrl+T. Figure 12 shows an example.
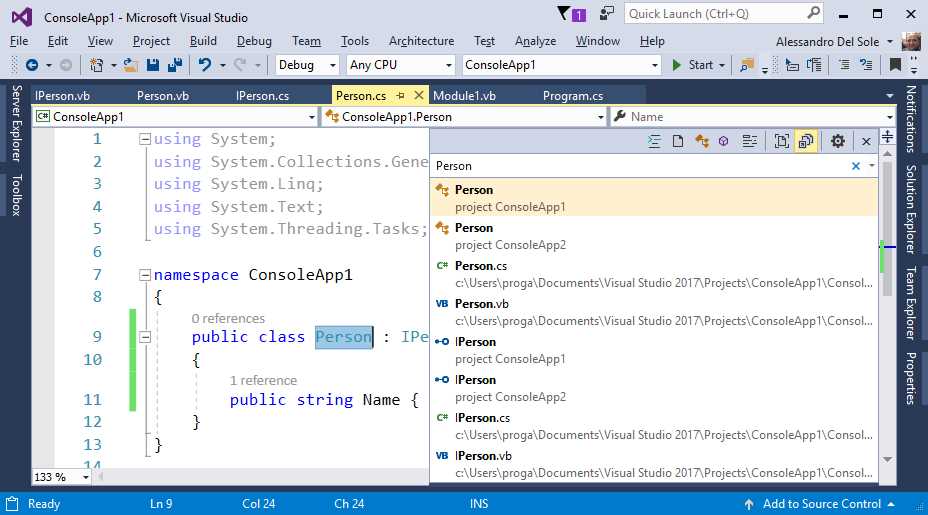
Figure 12: Go To Listing Occurrences of the Specified Identifier
You can refine your search by typing in the search bar. The list will be automatically updated with any words matching what you typed. Like IntelliSense, Go To has a new toolbar at the top that allows for easy filtering based on the object type. You can filter by code file, type, method, object members, and line of code. With Go To, you can only apply one filter at a time. Notice that when you click the filter buttons, the search box shows special characters before a word or identifier. For instance, the t character preceding any words in the search box will filter the list by type, while the # character will filter by method. Other supported characters are f (files), m (members), and : (line numbers). These are very useful. If you know in advance what kind of object or member you are searching for, they can speed up your search.
Go To has settings that can be customized. If you click the Show Settings button at the right corner of the tool bar, you will be able to decide whether to show a preview tab or enable a detailed view. Figure 13 shows a customized view that filters by type and shows details such as the project, code file, and line number containing the selected type.
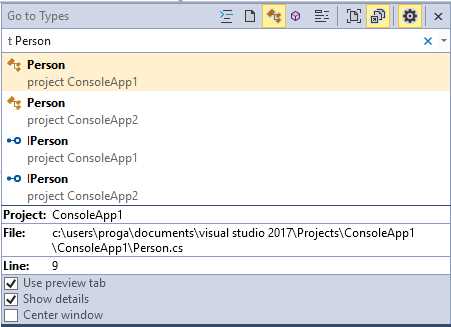
Figure 13: Customizing the Go To View
Actually, Ctrl+T is a shortcut for the Go To All command in the Edit menu. The Edit menu has additional Go To commands (e.g., Go To Type and Go To Member), each mapped to a filter in the Go To tool window. If you select one of these commands, Go To appears with the appropriate filter enabled. This can speed up your code navigation, especially if you use the provided keyboard shortcuts.
Structure guide lines
Visual Studio 2017’s code editor introduces a feature known as Structure Visualizer that was previously available in the Productivity Power Tools extension for Visual Studio 2015. With this feature enabled, the editor draws structure guide lines—small gray vertical lines near each code block that make it easier to view the structure of your code. If you hover over structured guide lines, the editor shows a tooltip with a preview of the parent code for the current block. This is demonstrated in Figure 14.
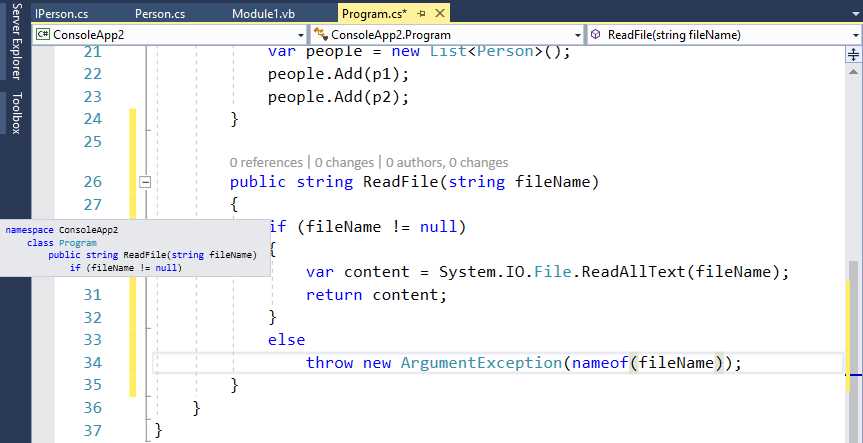
Figure 14: Visualizing Code Structure with Guide Lines
This feature is very useful with long code blocks, and it is enabled by default. If you want to disable it, go to Tools > Options > Text Editor, and clear the Show structure guide lines option.
Roslyn code analysis
Along with Visual Studio 2017, Microsoft is releasing C# 7.0 and Visual Basic 15 with an updated version of the .NET Compiler Platform, also known as Project Roslyn. The .NET Compiler Platform provides open source C# and Visual Basic compilers with rich code analysis APIs. With this platform, compilers are offered as a service and developers can take advantage of their APIs to perform a number of operations against source code. If you want to know more about Roslyn, you can read the e-book Roslyn Succinctly (also written by me). Starting with Visual Studio 2015, a huge number of tools, including the code editor, are no longer powered by the IDE itself; instead, they are powered by Roslyn. These tools include the live code analysis that detects issues while typing, and code refactoring. As described in Roslyn Succinctly and Visual Studio 2015 Succinctly, when the compiler detects code issues as you type, the editor offers the light bulb and quick actions to fix an issue or to refactor a code block. Visual Studio 2017 takes some steps forward, providing new refactoring tools and an enhanced coding experience based on Roslyn.
More Roslyn refactorings
The new release of Roslyn offers additional interesting code refactorings. The following is a detailed list of what’s new.
Simplify object initialization
The first new refactoring simplifies object initialization. It replaces an object initialization based on property assignments with another one based on object initializers. Figure 15 shows this refactoring in action. Notice that when the code editor detects a possible refactoring for an object initialization, it underlines the constructor invocation with three gray dots.
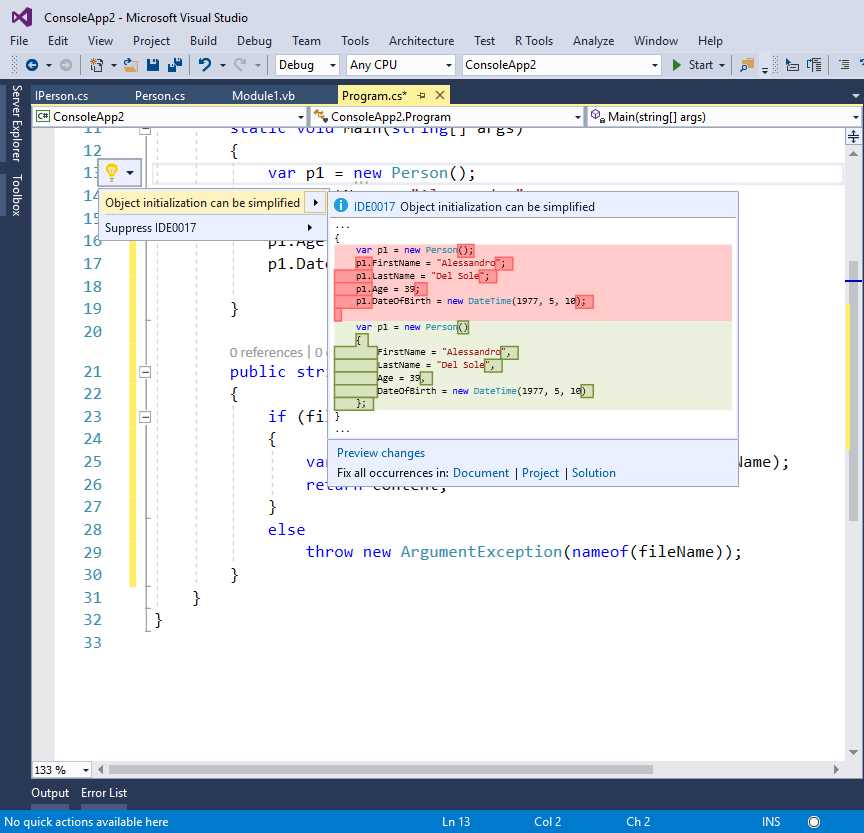
Figure 15: The Object Initialization Refactoring
This code refactoring also provides the proper indentation when applied.
Convert to interpolated string
Another very useful refactoring converts an invocation to string.Format to an interpolated string. This is shown in Figure 16.
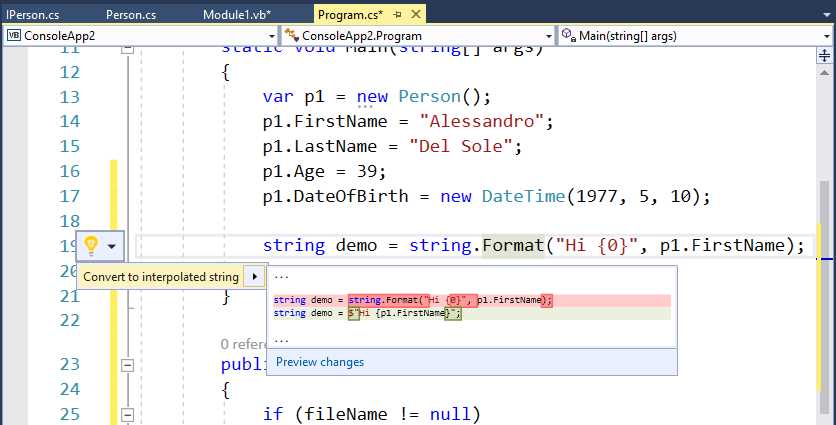
Figure 16: Converting string.Format to String Interpolation
You can enable this refactoring by right-clicking the string.Format invocation, not the assignment. If you want to know more about string interpolation, visit the documentation page on MSDN.
Move type to matching file
Suppose you have a class that is not defined within an individual file but rather is defined inside a code file that contains other type definitions or, more generally, other code. A new Roslyn refactoring allows you to quickly move the specified type into a new file that will have the same name as the type. For instance, Figure 17 shows a class called Person that is defined inside Program.cs. If you right-click Person, you will see a refactoring that offers to move the type into a new file called Person.cs.
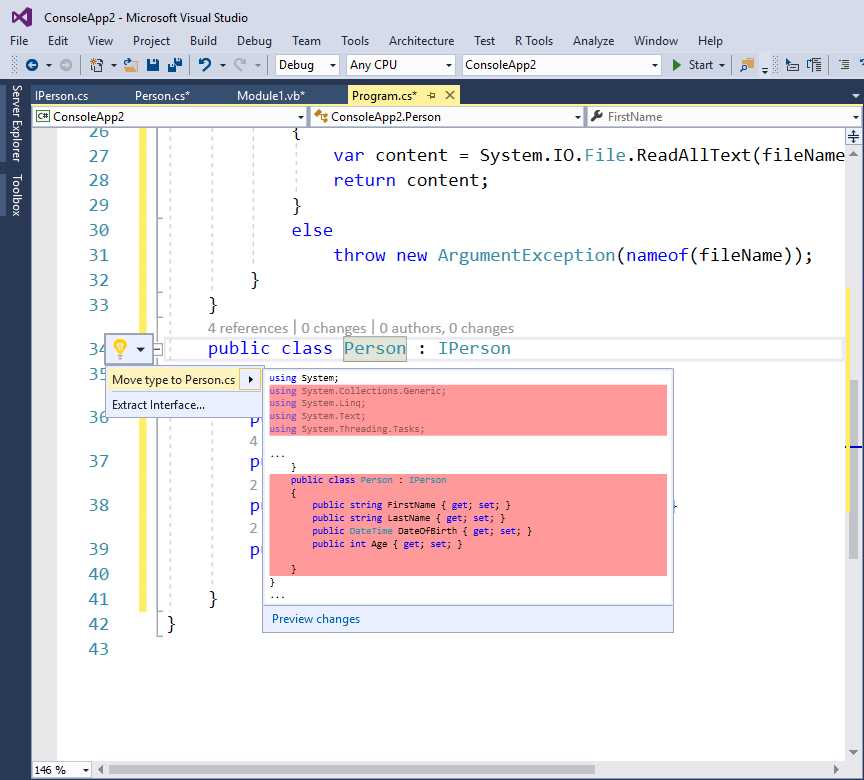
Figure 17: Moving a Type Definition into a Matching File
This feature is extremely useful if you use it to define multiple types in one code file. The only caveat is that, if the target file already exists, Visual Studio will generate a new file and will not use the existing one. In the current example, if Person.cs already exists, then Visual Studio will generate Person1.cs and place the type into the newly created file.
Synchronizing type name and file name
If you have a type definition inside a file whose name doesn’t match the type name, a new refactoring will simplify the work of keeping the type name and file name in sync. For instance, if you have a Person class defined inside a file called Human.cs, you can either rename the file or rename the type to make them match. Figure 18 shows this refactoring in action, which you enable by right-clicking a type name.
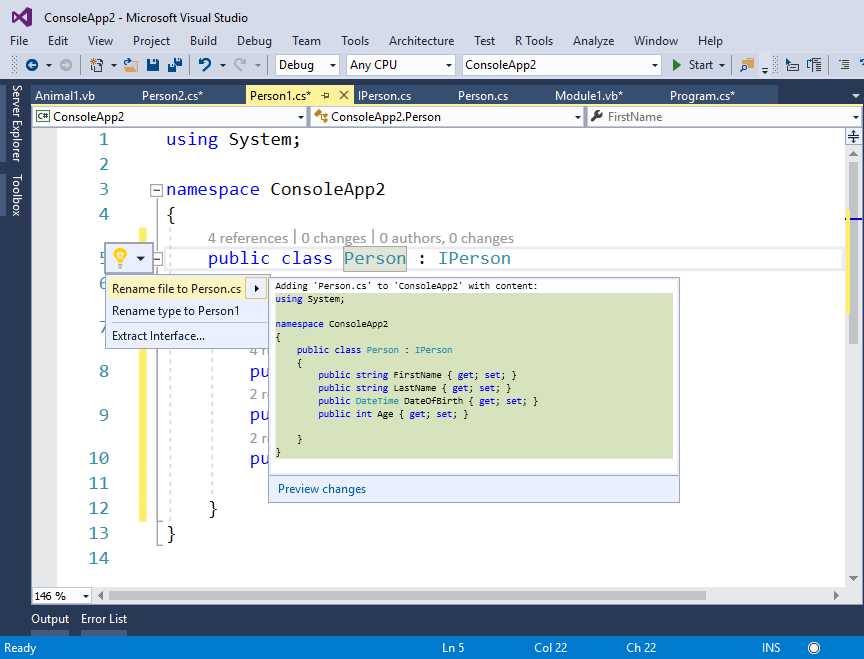
Figure 18: Keeping Type Name and File Name in Sync
The rename file refactoring offers to rename the file to match the type name. Alternatively, rename type offers to rename the type to match the file name.
Inline out variable declarations
Note: This refactoring is not available in Visual Basic 15.
C# 7.0 introduces a new feature known as out variables, which provide the ability to declare a variable right at the point where it is used as an out argument. Roslyn now offers a new refactoring to support this feature, as shown in Figure 19.
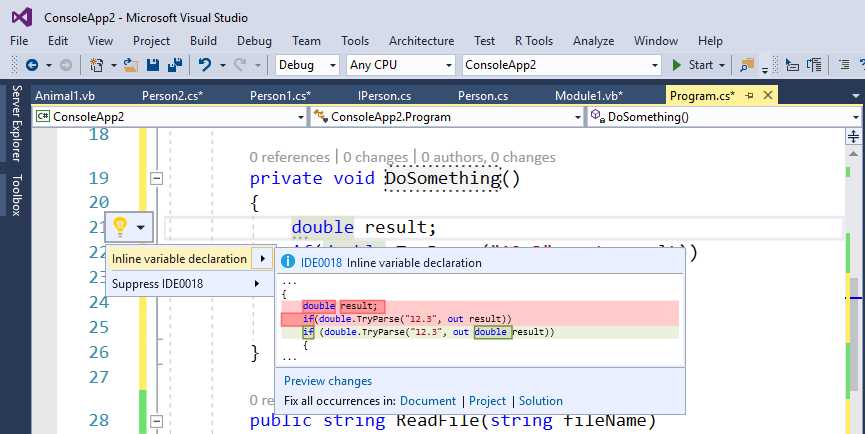
Figure 19: Introducing an Inline Out Variable
With the inline variable declaration refactoring, you can simplify code that uses out variables introducing an inline declaration.
Controlling live analysis with code style
With Roslyn, compilers can report code issues as you type, no matter what kind of Roslyn-based IDE is being used. With Visual Studio and before Roslyn, the code editor could only analyze code for rules designed at Microsoft. One of the biggest advantages of Roslyn is that it allows you to introduce your own analysis rules (with fixes and refactorings), and the compiler will report issues for code that does not adhere to those rules. While we certainly have full control over rules we write, before Visual Studio 2017 we had no control over rules coded at Microsoft, except for disabling warnings. For instance, in Visual Studio 2015 the background compiler always reports as redundant the usage of the this and Me keywords in C# and VB unless the keyword is used to reference a member that has the same name as the variable we are assigning (e.g., this.name = name).
As another example, in Visual Studio 2015 the compiler always suggests that we replace the Framework type names with the corresponding keywords; for instance, it suggests we use int (C#) or Integer (VB) instead of System.Int32. However, there are plenty of reasons why you might want to use those coding styles. In order to give developers the opportunity to decide which coding styles they want to use, with Visual Studio 2017, Microsoft has introduced a new tool called code style. This tool enables you to decide how the compiler should treat some of our coding preferences, including naming. You reach the code style settings by selecting Tools > Options > Text Editor, then C# or Visual Basic, and finally the Code Style node. I will provide a description based on C#, but the same applies to Visual Basic (I will later summarize the available preferences for both). In C#, code style has general, formatting (C# only), and naming options.
Tip: Behind the scenes, this feature is based on the EditorConfig file format. If you wish to further configure code styles, you can read this blog post from the .NET Team at Microsoft.
General code style
The general settings are probably the most interesting options for altering code style. They allow you to change preferences over some built-in coding rules. Each group of preferences allows you to specify the preference and the severity level. If your code does not match the preference, the compiler will report a suggestion, warning, or error, depending on the severity level you choose. The default severity is None, which means that the compiler will simply ignore the preference and report nothing.
Tip: Remember that the Error severity level will prevent you from building your project until the code issue is solved.
For instance, suppose you want to use the this keyword when referencing an object’s property and that the compiler should report a suggestion if your code does not use the keyword. Figure 20 shows how to accomplish this.
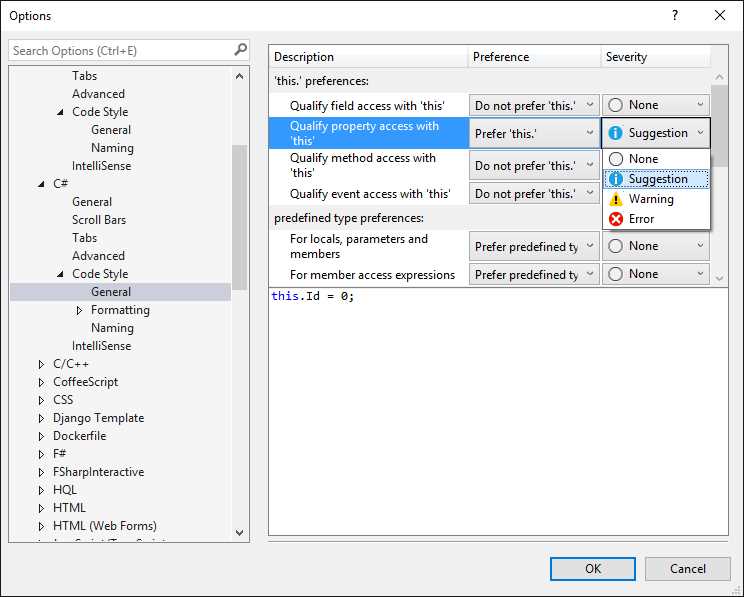
Figure 20: Changing Code Style Preferences
Notice how a preview of your code is shown at the bottom of the dialog in Figure 20, whereas Figure 21 shows the result of setting this preference—the compiler reports a suggestion over the property assignment without this, and the light bulb offers to fix the issue.
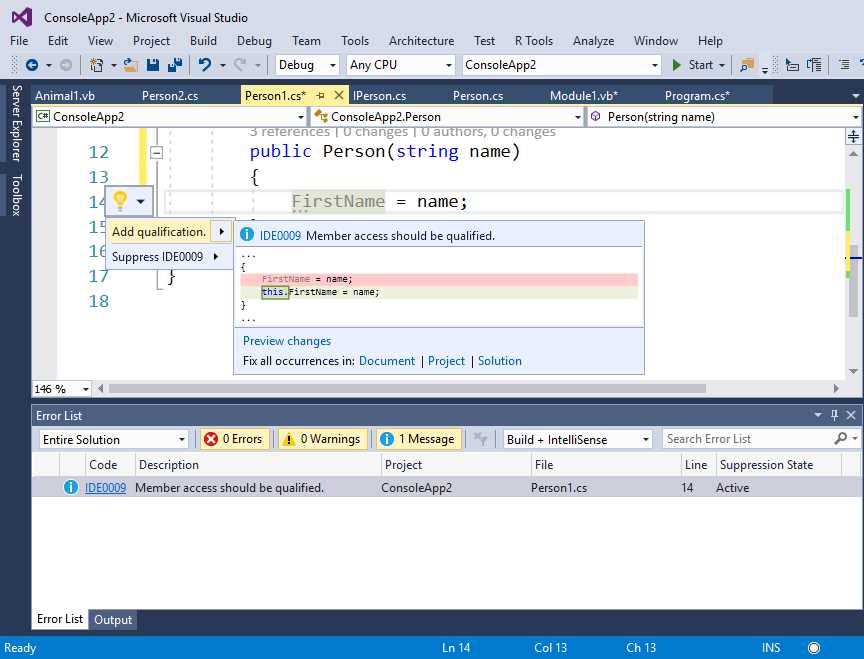
Figure 21: Changing the Code Style for the this Keyword
As another example, suppose you want to control the code style for the var keyword. More specifically, suppose you want to avoid using var with built-in types and you want to avoid var when the type is apparent from assignment expressions. Figure 22 shows how to accomplish this.

Figure 22: Changing the Code Style for the var Keyword
In the first case, the compiler will report a warning each time you use var instead of a built-in type, and it will offer the proper code fix, as shown in Figure 23.
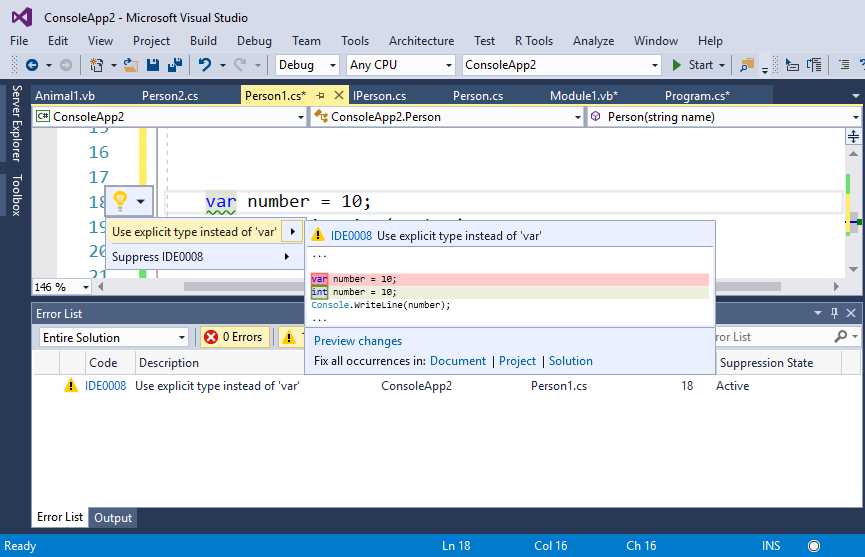
Figure 23: Compiler Detects and Fixes Improper var Usage
In the case of apparent assignments, Figure 24 shows how the compiler detects that assigning an instance of the Person type to a variable is an apparent assignment. The compiler therefore reports the suggestion to replace var with the explicit Person type, offering the proper fix through the light bulb.

Figure 24: Compiler Detects an Improper var Usage with an Apparent Assignment
Tables 3 and 4 summarize some of the available preferences for C# and Visual Basic, respectively. Remember that a code preview for each style is shown in the Options dialog.
Table 3: Code Style Preferences for C#
Preference | Description | |
|---|---|---|
‘this.’ preferences | Qualify field access with ‘this’ | Sets whether you should prefer the this keyword to qualify access to fields. |
‘this.’ preferences | Qualify property access with ‘this’ | Sets whether you should prefer the this keyword to qualify access to properties. |
‘this.’ preferences | Qualify method access with ‘this’ | Sets whether you should prefer the this keyword to qualify access to methods. |
‘this.’ preferences | Qualify event access with ‘this’ | Sets whether you should prefer the this keyword to qualify access to events. |
predefined type preferences | For locals, parameters, and members | Sets whether you should prefer the predefined type (e.g., int, double) over the Framework type (e.g., System.Int32, System.Double) with local variables, method parameters, and object members. |
predefined type preferences | For member access expressions | Sets whether you should prefer the predefined type over the Framework type when accessing type members. |
‘var’ preferences | For built-in types | Sets whether you should prefer an explicit type instead of the var keyword with built-in types such as int, string, double, etc. |
‘var’ preferences | When variable type is apparent | Sets whether you should prefer an explicit type instead of the var keyword when the type can be easily discovered by the assignment of an expression. |
‘var’ preferences | Elsewhere | Sets whether you should prefer an explicit type instead of the var keyword in all other cases. |
Code block preferences | Prefer braces, For methods, For constructors, For operators, For properties, For indexers, For accessors | Sets whether code blocks should be implemented using a block body or an expression body (that is, with lambda expressions). |
Expression preferences | Prefer object initializer | Sets whether you should prefer an object initializer when instantiating an object and populating its members. When reported, this invokes the simplify object initialization refactoring described in the previous section. |
Expression preferences | Prefer collection initializer | Sets whether you should prefer a collection initializer when instantiating a collection of objects. When reported, the editor offers the proper fix. |
Expression preferences | Prefer pattern matching over ‘is’ with ‘cast’ check | Sets whether code should enforce cast check with pattern matching. |
Expression preferences | Prefer pattern matching over ‘as’ with ‘null’ check | Sets whether code should use pattern matching instead of using the as conversion operator for null checks. |
Expression preferences | Prefer explicit tuple name | Tuples in C# 7.0 allow for implicit names. This option sets whether code should use explicit or implicit tuple names. |
Variable preferences | Prefer inline variable declaration | Sets whether you should prefer using inline variable declaration. When reported, this invokes the inline out variable declaration refactoring described in the previous section. |
‘null’ checking’ | Prefer throw expression | With null checks, sets whether you should prefer using the new throw expression feature in C# 7.0 with the null-coalescing operator (??) instead of comparing variables to null. |
‘null checking’ | Prefer conditional delegate call | With null checks, sets whether you should prefer the null-conditional operator (?.) and delegates’ Invoke method over evaluating an object with the != null expression. |
‘null checking’ | Prefer coalesce expression | With null checks, sets whether you should prefer the coalescing operator (??) instead of expressions based on the conditional operator (?.) |
‘null checking’ | Prefer null propagation | With null checks, sets whether you should prefer the null propagation (?.) instead of conditional comparisons based on the conditional operator ?:. |
Table 4: Code Style Preferences for Visual Basic
Preference Group | Preference | Description |
|---|---|---|
‘Me.’ preferences | Qualify field access with ‘Me’ | Sets whether you should prefer the Me keyword to qualify access to fields. |
‘Me.’ preferences | Qualify property access with ‘Me’ | Sets whether you should prefer the Me keyword to qualify access to properties. |
‘Me.’ preferences | Qualify method access with ‘Me’ | Sets whether you should prefer the Me keyword to qualify access to methods. |
‘Me.’ preferences | Qualify event access with ‘Me’ | Sets whether you should prefer the Me keyword to qualify access to events. |
Predefined type preferences | For locals, parameters, and members | Sets whether you should prefer the predefined type (e.g., Integer, Date) over the Framework type (e.g., System.Int32, System.DateTime) with local variables, method parameters, and object members. |
Predefined type preferences | For member access expressions | Sets whether you should prefer the predefined type over the Framework type when accessing type members. |
Expression preferences | Prefer object initializer | Sets whether you should prefer an object initializer when instantiating an object and populating its members. When reported, this invokes the simplify object initialization refactoring described in the previous section. |
Expression preferences | Prefer collection initializer | Sets whether you should prefer a collection initializer when instantiating a collection of objects. When reported, the editor offers the proper fix. |
Expression preferences | Prefer explicit tuple name | Tuples in Visual Basic 15 allow for implicit names. This option sets whether code should use explicit or implicit tuple names. |
‘nothing’ checking | Prefer coalesce expression | Sets whether you should prefer calling the If operator with short-circuit evaluation for null checks. |
‘nothing’ checking | Prefer null propagation | Sets whether you should prefer the null conditional operator ?. for null checks. |
This feature is extremely useful, especially if you find some of the default suggestions from the compiler to be annoying.
Formatting code style
Formatting code style is available only to C#. This makes sense because the primary goal of formatting is to control automatic formatting and indentation of curly braces and code that is or should be inside braces as you type. Formatting also allows you to control how some code blocks or statements should be added to specific constructs. All the available options have self-explanatory names and the Options dialog shows a preview of how the code will look with a particular option selected. As an example, Figure 25 shows how a property definition looks with the Leave block on single line option selected (under the Wrapping node), whereas Figure 26 shows how the same property definition will look with that option not selected.
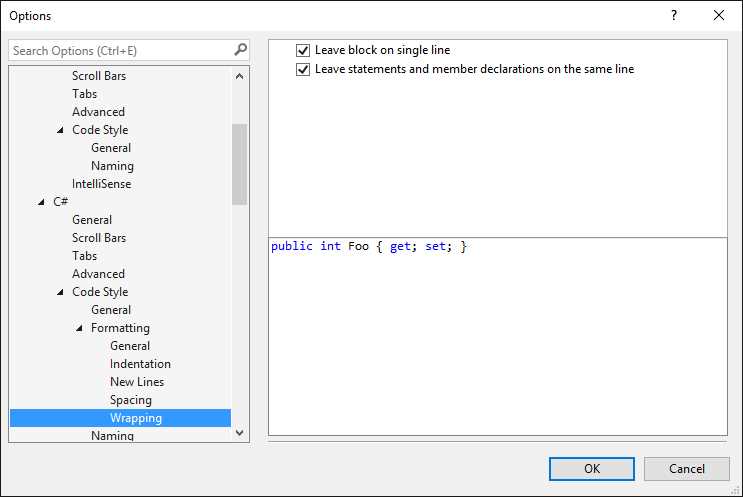
Figure 25: Code Blocks Should Be on a Single Line
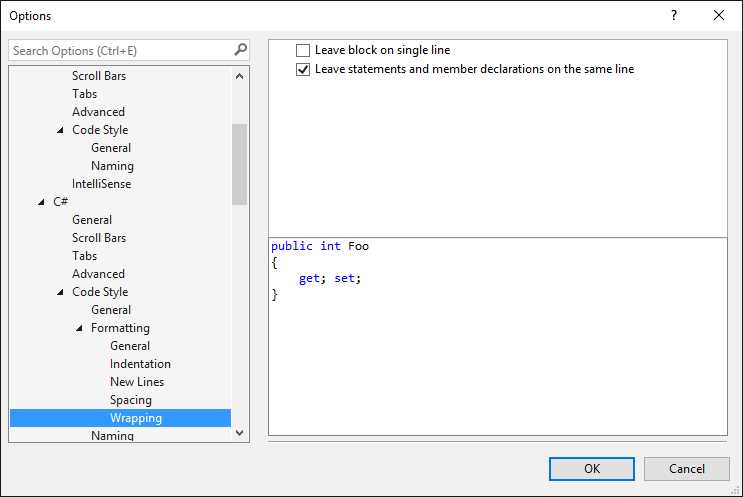
Figure 26: Code Blocks Should Be on Multiple Lines
Naming code style
The naming code style preferences address .NET naming conventions for types and members. With the naming specifications, you can control how the compiler should report issues about code that does not adhere to the specified naming conventions. For instance, if the name of an interface does not begin with I, the compiler will report a suggestion to fix its name. Each specification can have one style and severity level. The severity level can be None, Suggestion, Warning, or Error. There are three built-in styles and four built-in specifications—these are summarized in Tables 5 and 6, respectively. By default, all specifications have the Suggestion severity level.
Table 5: Built-In Naming Styles
Style name | Description |
|---|---|
Begins with I | The name of the type or member selected in the specification to which it is assigned should begin with I. |
Pascal Case | The name of the type or member selected in the specification to which it is assigned should follow the Pascal case naming convention. |
Table 6: Built-In Naming Specifications
Note: I strongly recommend that you not change these four specifications. They reflect some of the most important general naming conventions in .NET and should be left as they are.
Figure 27 shows the default settings for the Naming code style options.
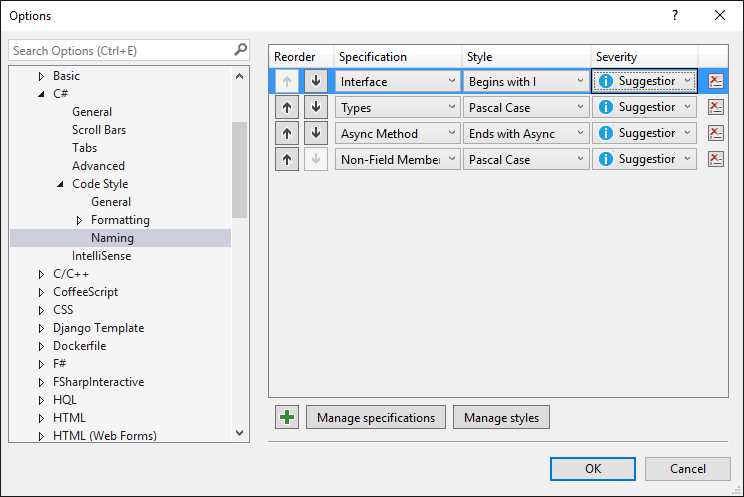
Figure 27: Default Settings for the Naming Code Style
You have significant control over naming settings. In fact, you can add your own specifications and styles, and you can combine multiple styles for the same specification. You can even edit existing specifications and styles by clicking Manage specifications and Manage styles. For instance, suppose you want to add a new naming convention for private enumerations and you want the style to be camel case. To accomplish this, click Manage specifications. This will show the full list of active specifications (see Figure 28).
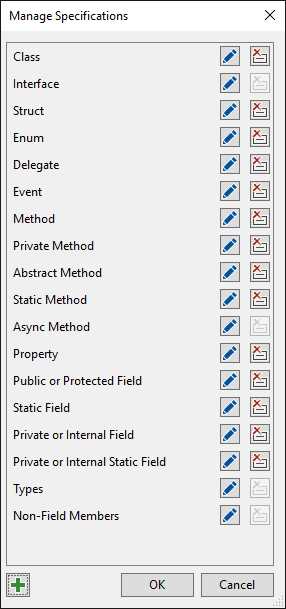
Figure 28: The List of Available Specifications
For each specification, you can click Edit (with the pencil icon) to change its properties or Delete to remove it (not recommended).
Tip: Editing an existing specification will open the same Symbol Specifications dialog described shortly (and visible in Figure 29).
As you can see, a specification for Enum types already exists, but let’s say you want to add one specifically for private enumerations. Click Add (the green + icon). In the Symbol Specification dialog that appears, you will see a list of available types, modifiers, and accessors. Make sure that only enum and private are selected, then assign the Private Enums title in the Symbol Specification Title text box (see Figure 29) and, finally, click OK.

Figure 29: Creating a Custom Specification
Click OK again to close the Manage Specifications dialog. At this point, the new specification will be listed in the Naming code style list. Now you need to create a new style, so click Manage styles. The Manage Naming Styles dialog will show the list of current styles, which contains the three styles described in Table 5. Click Add to add a new one. In the Naming Style dialog (see Figure 30), provide a title for the new style, such as Camel Case, then select the camel Case Name option from the Capitalization combo box. As you can see, you also have the option to specify a prefix, a suffix, and a word separator (not required in this case).
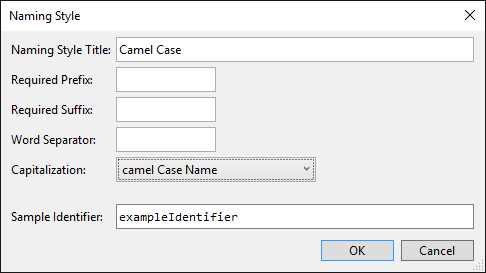
Figure 30: Creating a Custom Style
Click OK to close the Naming Style dialog, then click OK to close the Manage Naming Styles dialog. At this point, you will be able to assign the new style for the previously created specification, as shown in Figure 31 (notice that a severity level of Warning has been also assigned).
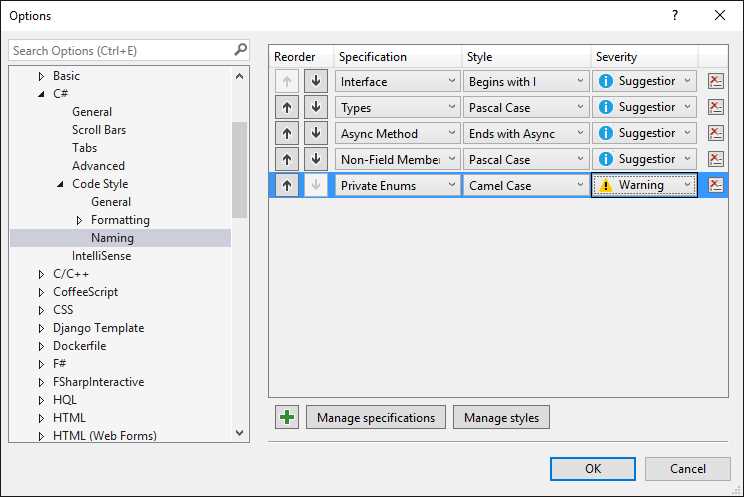
Figure 31: Assigning a Custom Style to a Custom Specification
If you want to see the result of your work in action, you must take an additional step. Because the Types specification includes all types with any visibility accessor, you should edit this specification and remove the private accessor from the list. You can use Figures 28 and 29 as a reference. Of course, we do this only for demonstration purposes, but the default specifications should not be changed. However, with these custom specifications and styles, the compiler now detects a violation of the naming rule for private enumerations, shows a warning message, and offers the appropriate fix, as shown in Figure 32.
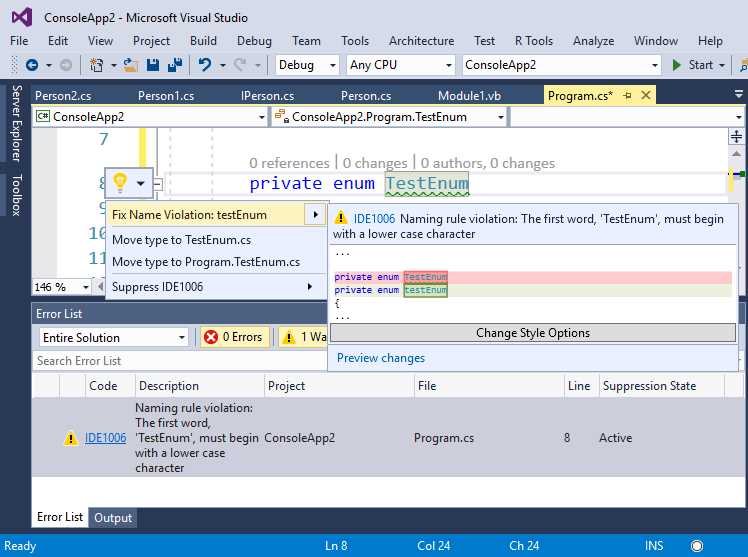
Figure 32: Detection of Custom Naming Rules Violations and a Code Fix
So, you are not limited to creating custom naming rules that will be checked by the live analysis engine, but you will also get code fixes for violations, which is really amazing.
Editing improvements for C++ and F#
Visual Studio 2017 introduces improvements to the code editing experience for C++ and F#, too. For C++, features such as IntelliSense, Go To Definition, and Find All References now rely on a SQLite database that stores the information the IDE needs in order to quickly move among lines of code, and that dramatically improves performance. Also, the code editor for C++ now provides two new refactorings: change signature and extract function. The first refactoring allows you to more quickly change the signature of a method, while the second one allows you to encapsulate a code block into a function. With F#, the code editor now offers improved IntelliSense with better completions and filters, along with type colorization. Also, the F# code editor is now built on Roslyn Workspaces, and many features are now powered by Roslyn, including Go To Definition, Peek Definition, brace matching, indentation, breakpoint resolution, and debugging data tips.
Chapter summary
Microsoft has increased the code editor’s productivity for C# and Visual Basic in Visual Studio 2017 by investing in IntelliSense, code navigation, and integrated Roslyn code analysis. IntelliSense has better performance and allows for type filtering, which makes it easier to use the objects and members you need. For code navigation, Find All References now presents grouped lists of objects with syntax colorization. Go To is an improved replacement of Navigate To, with type filtering and quick search among large codebases. Finally, structure guide lines help us understand to which code block a snippet belongs. With live code analysis powered by Roslyn, new refactorings are available to both C# and Visual Basic, and you can now control styles and naming rules coded at Microsoft with the new code style features. Code editor improvements are not limited to C# and Visual Basic—the XAML code editor has exciting new and updated features as well, which is discussed in the next chapter.
- 1800+ high-performance UI components.
- Includes popular controls such as Grid, Chart, Scheduler, and more.
- 24x5 unlimited support by developers.