
Visual Studio 2017 Succinctly®

CHAPTER 1
A New Installation Experience
Microsoft Visual Studio has always been an extremely powerful development environment. One of the reasons for its power is that it can target multiple development platforms and, with versions 2013 and 2015, it even added the option to target non-Microsoft technologies and operating systems. For example, think of Android and iOS development with both Xamarin and Apache Cordova. But great power also means a complex infrastructure, and in the past Visual Studio required many hours for installation and a huge amount of space on disk. In Visual Studio 2017, Microsoft brings a new installation experience that simplifies the process and saves both time and disk space. Installing Visual Studio 2017 will be your first experience with the new version, and it deserves a thorough discussion.
Solving the complexity of the Visual Studio installation
Keeping in mind the importance of the overall performance and efficiency of its premiere development tool, one of Microsoft’s goals for Visual Studio 2017 was to simplify the installation process to save developers time and disk space. With Visual Studio 2015, a full installation required many gigabytes on disk and several hours to complete. Solving this problem meant rethinking the entire IDE infrastructure and changing both the way Visual Studio consumes the components it relies on and the way it allows targeting different development platforms. Based on these changes, Visual Studio 2017 is now made of a core shell that includes the code editor and essential tools, referred to as Visual Studio core editor. This provides capabilities for writing code in a number of languages, including (but not limited to) Visual Basic, C#, C++, and Python, along with syntax colorization, IntelliSense, and debugging support, all in the familiar Visual Studio environment (see Chapter 5, "Working with solutions, folders, and languages").
Additionally, Visual Studio 2017 supports adding sets of components, each targeting a specific development scenario. Each set of components is referred to as a workload. Workloads make installation and maintenance easier and allow developers to install what they actually need without unnecessary components, SDKs, and tools. You could even decide to install only the Visual Studio core editor without any additional workloads in order to get the basic coding environment, which would reduce the space required by the Visual Studio installation to about 750 megabytes. You will probably need more than just syntax highlighting, which means you will want to select the proper workloads—this just gives you an idea of how Visual Studio’s infrastructure has been revisited. The next section will describe how to install Visual Studio 2017 and explain more about workloads and what you can do with each.
Installing Visual Studio 2017
Tip: Visual Studio 2017 can be installed side-by-side on a machine that has earlier versions of the IDE installed.
When you start the setup program, you are prompted with a completely new user interface that presents a list of workloads. This is represented in Figure 1.
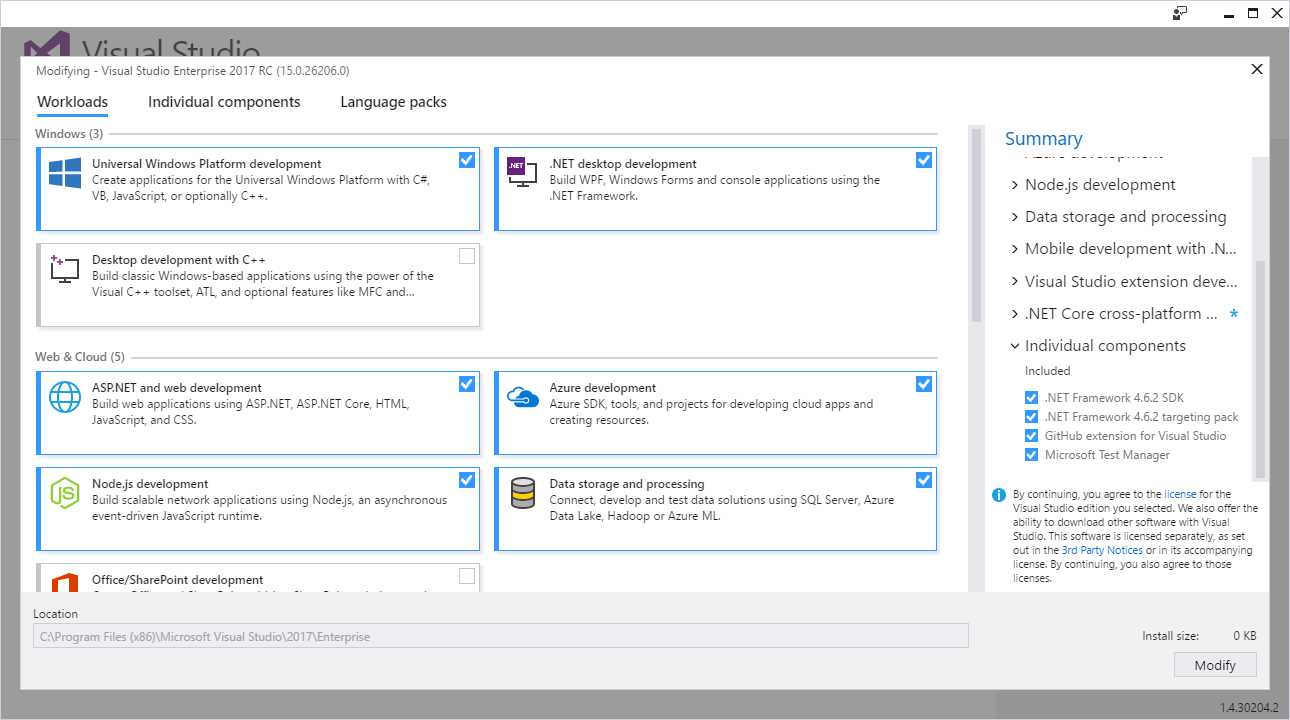
Figure 1: Starting the Installation of Visual Studio 2017
As you can see, workloads are grouped by the following categories:
- Windows
- Web & Cloud
- Mobile & Gaming
- Other Toolsets
All the available workloads can be discovered by scrolling through the list (see Figure 2).
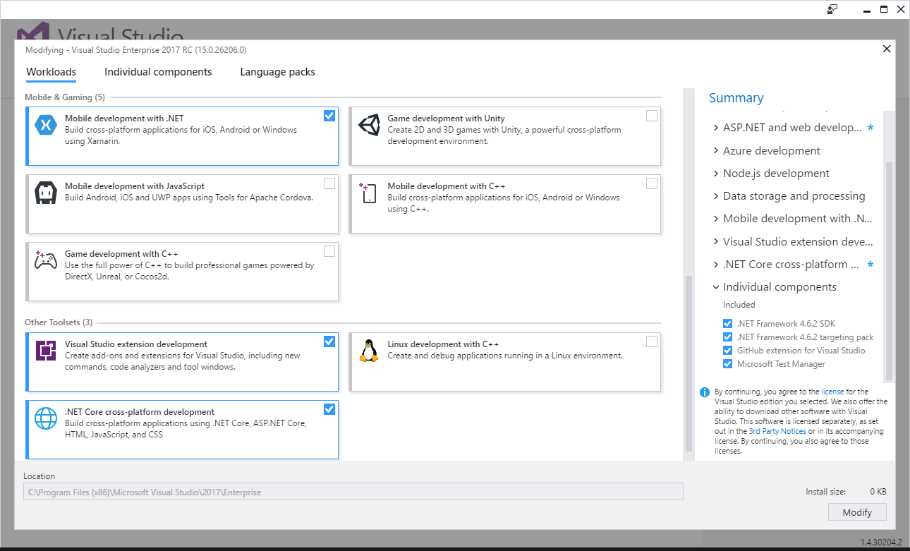
Figure 2: Additional Workloads
You can select all the workloads you’ll need for your daily work with Visual Studio 2017. If you select no workloads, only the Visual Studio core editor will be installed. On the right side of the dialog, you can expand the workload name and see which components it includes and a list of additional, individual components. Table 1 depicts available workloads in more detail.
Table 1: Available Workloads for Visual Studio 2017
Name | Description |
|---|---|
Universal Windows Platform development | Select this workload if you want to write universal applications for Windows 10, including PC, tablets, smartphones, HoloLens, Xbox, and IoT devices. |
.NET desktop development | Select this workload if you want to build classic Windows desktop applications with WPF, Windows Forms, and console apps using the .NET Framework. This provides shorter solution load time and improved IntelliSense, code navigation, and refactorings. It includes new features such as XAML Edit and Continue and Run to Click debugging, both of which are discussed in this e-book. |
Desktop development with C++ | Select this workload if you wish to create, build, and debug native, classic desktop applications that run on versions ranging from Windows XP to the latest Windows 10 release, using the C++ language and environment. |
ASP.NET and web development | Select this workload to develop web applications using ASP.NET and standards-based technologies such as HTML, JavaScript, CSS, and JSON. As with .NET desktop, this workload includes shorter solution load time, improved IntelliSense, code navigation, and more refactoring, and it enables you to quickly deploy your app to a web server or to Azure. |
Azure development | This workload installs the latest Azure SDK for .NET and tools for Visual Studio 2017. It allows you to view resources in Cloud Explorer, create resources using Azure Resource Manager tools, and build applications and services ready to be hosted in Azure. |
Node.js development | This workload adds everything you need to build apps for Node.js, including IntelliSense, local and remote debugging, profiling, npm integration, an interactive window, test runners, and Azure integration. |
Data storage and processing | This workload provides tools for accessing on-premises SQL Server databases as well as SQL databases on Azure and Azure Data Lakes resources. It also provides support for U-SQL, Hive, and Big Data on Azure. |
Office/SharePoint development | This workload provides the Office developer tools, which allow for creating Office and SharePoint add-ins and solutions. |
.NET Core cross-platform development | This workload installs all the tools you need to write cross-platform web applications with .NET Core, with support for deployment to Docker containers. |
Mobile development with .NET | This workload installs Xamarin, the technology that allows you to create native iOS, Android, and Universal Windows Platform apps using a shared C# codebase. |
Game development with Unity | Select this workload if you want to develop cross-platform 2D and 3D games using the Unity framework and integrated tools for Visual Studio 2017. |
Mobile development with JavaScript | This workload installs Apache Cordova for creating cross-platform mobile apps using HTML and JavaScript within Visual Studio. |
Mobile development with C++ | Select this workload if you want to create cross-platform mobile apps using C++. |
Game development with C++ | Select this workload if you want to create games using C++. |
Visual Studio extension development | This workload installs the Visual Studio SDK and allows you to write extensions such as new commands, tool windows, and templates. |
Linux development with C++ | This workload enables you to author C++ code for Linux servers, desktops, and devices from within Visual Studio 2017. |
For the instructional purposes of this e-book, I have installed all the available workloads. You are not required to do the same—feel free to select only those you need. You can later install additional workloads as required.
Customizing the installation with individual components
Although workloads help keep the installation simple, you might still need to install individual components. In Figure 2, you will see an item called Individual components. Click it to access the full list of individual components that can be installed regardless of selected workloads (see Figure 3).
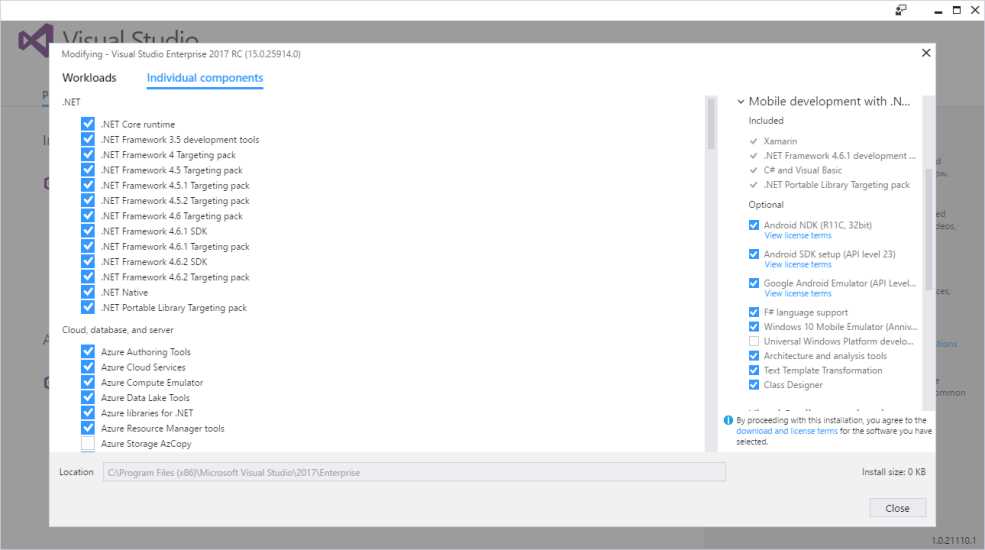
Figure 3: Selecting Individual Components
As an example, the GitHub extension for Visual Studio 2017 is not selected by default, which means you might want to select this component if you plan to work with Git repositories on that popular service. Once you have made your selection, click Close and select the edition of Visual Studio 2017 you want to install. A dialog will show the progress of the operation (see Figure 4).
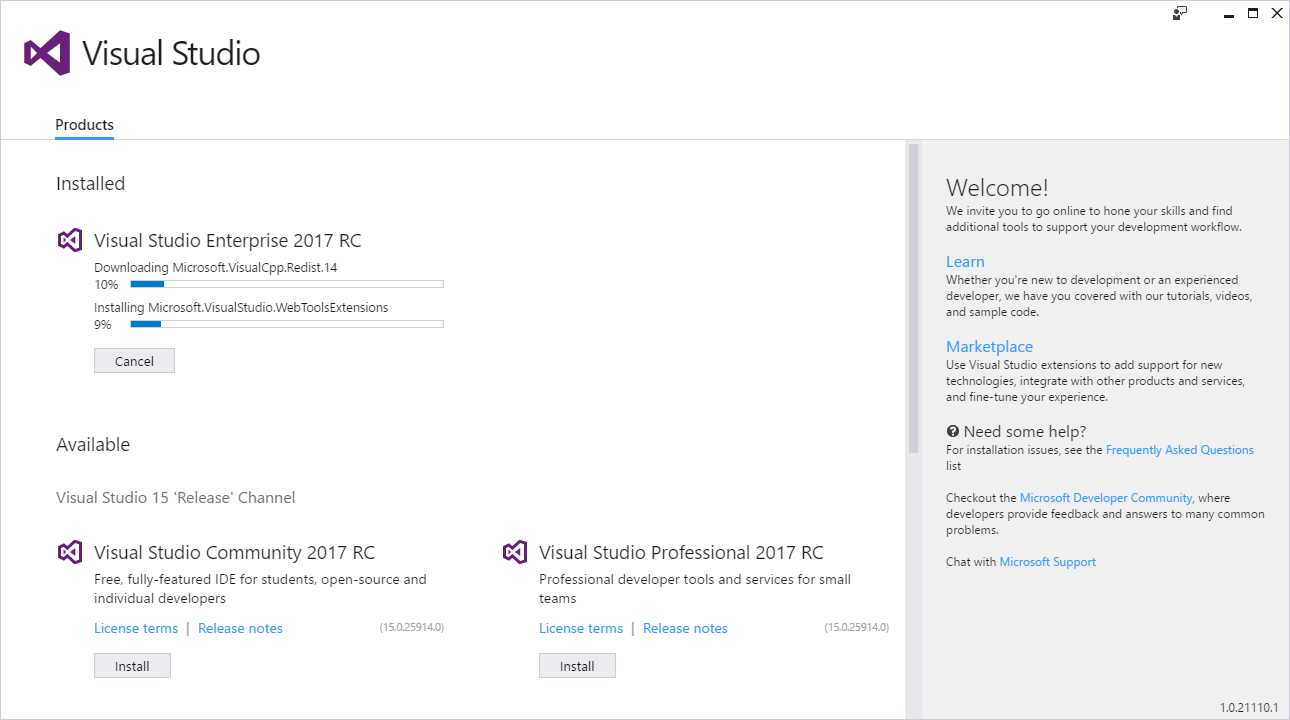
Figure 4: Installation Progress
The time needed for complete installation depends on the number of workloads and on your Internet connection. But even with many workloads selected, you will notice it goes much faster than previous Visual Studio installations.
Installing multiple editions
With Visual Studio 2017, you can finally install multiple editions on the same machine. This great feature means you can install the Community, Professional, and Enterprise editions on the same machine (or any two of them). This is now possible because each edition is installed into a specific subfolder on the system. Apart from running separate installers, you could launch a new installation directly from the current setup program. Figure 4 shows an Install button for both the Community and Professional editions while Enterprise is being installed.
Note: Visual Studio core assemblies are no longer installed to the Global Assembly Cache (GAC). In order to support the installation of multiple editions, most assemblies required by Visual Studio 2017 now reside in C:\Program Files (x86)\Microsoft Visual Studio\2017\%editionName%\Common7\IDE\PublicAssemblies, where %editionName% is the installed edition (such as Community, Professional, or Enterprise).
Modifying the Visual Studio 2017 installation
Visual Studio 2017 offers a new shortcut for modifying an existing installation. You simply go to the Windows > All Programs menu and select the Visual Studio Installer shortcut. This will start the setup program, and you will have an option to add or remove workloads or individual components.
Launching Visual Studio 2017
As with its predecessor, Visual Studio 2017 launches using the same-named shortcut in the All Programs menu. When it starts for the first time, Visual Studio will ask for your Microsoft account credentials to log in (optional). As you might know, entering a Microsoft account will allow for synchronizing settings across machines. This will also automatically restore customized settings you might have on an existing VS 2017 installation. When launching Visual Studio, you will immediately recognize better performance and faster startup than Visual Studio 2015. Other new features at startup are described in the next chapter.
Chapter summary
Visual Studio 2017 introduces a completely new installation experience based on the Visual Studio core editor and a number of workloads, each targeting specific development scenarios. This not only simplifies the setup process, but installing Visual Studio is now much faster and more efficient. You still maintain full control of the installed components, and you can even install multiple editions of Visual Studio 2017 on the same machine. Now that you have set up the environment, you will find some new features when launching Visual Studio 2017 for the first time.
- 1800+ high-performance UI components.
- Includes popular controls such as Grid, Chart, Scheduler, and more.
- 24x5 unlimited support by developers.